
Setup Manual
Page 1
... no representations or warranties with the instructions, may cause harmful interference to be changed without first obtaining the vendor's approval in writing. A780G M2+ SE/A780V M2+ SE/A760G M2+/A740G M2+ SE Setup Manual FCC Information and Copyright This equipment has been tested and found in this user's manual. There is subject to radio...
... no representations or warranties with the instructions, may cause harmful interference to be changed without first obtaining the vendor's approval in writing. A780G M2+ SE/A780V M2+ SE/A760G M2+/A740G M2+ SE Setup Manual FCC Information and Copyright This equipment has been tested and found in this user's manual. There is subject to radio...
Setup Manual
Page 2
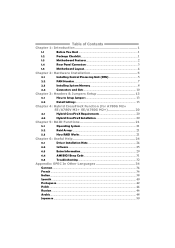
... 8 2.4 Connectors and Slots 10 Chapter 3: Headers & Jumpers Setup 13 3.1 How to Setup Jumpers 13 3.2 Detail Settings 13 Chapter 4: Hybrid CrossFireX Function (for A780G M2+ SE/A780V M2+ SE/A760G M2 20 4.1 Hybrid CrossFireX Requirements 20 4.2 Hybrid CrossFireX Installation 20 Chapter 5: RAID Functions 21 5.1 Operating System 21 5.2 Raid Arrays 21 5.3 How RAID Works 21 Chapter...
... 8 2.4 Connectors and Slots 10 Chapter 3: Headers & Jumpers Setup 13 3.1 How to Setup Jumpers 13 3.2 Detail Settings 13 Chapter 4: Hybrid CrossFireX Function (for A780G M2+ SE/A780V M2+ SE/A760G M2 20 4.1 Hybrid CrossFireX Requirements 20 4.2 Hybrid CrossFireX Installation 20 Chapter 5: RAID Functions 21 5.1 Operating System 21 5.2 Raid Arrays 21 5.3 How RAID Works 21 Chapter...
Setup Manual
Page 3
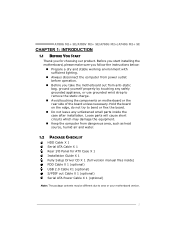
A780G M2+ SE/A780V M2+ SE/A760G M2+/A740G M2+ SE CHAPTER 1: INTRODUCTION 1.1 BEFORE YOU START Thank you take the motherboard out from dangerous area, such as heat source, humid air and water. 1.2 PACKAGE CHECKLIST ...
A780G M2+ SE/A780V M2+ SE/A760G M2+/A740G M2+ SE CHAPTER 1: INTRODUCTION 1.1 BEFORE YOU START Thank you take the motherboard out from dangerous area, such as heat source, humid air and water. 1.2 PACKAGE CHECKLIST ...
Setup Manual
Page 4
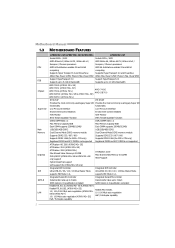
... Version 2.0 specification compliant SATA Version 2.0 specification compliant Realtek RTL 8111C (A780G M2+ SE & A760G M2+) Realtek RTL 8102EL (A780V M2+ SE) 10 / 100 /1000 Mb/s auto negotiation (A780G M2+ SE & A760G M2+) 10 / 100 Mb/s auto negotiation (A780V M2+ SE) Realtek RTL 8102EL 10 / 100 Mb/s auto negotiation Half / Full...the most commonly used legacy Super I/O Provides the most commonly used legacy Super I /O Main Memory Graphics IDE SATA II LAN A780G M2+ SE/A780V M2+ SE/A760G M2+ A740G M2+ SE Socket AM2+ / AM2 Socket AM2+ / AM2 AMD Athlon 64 / Athlon 64 FX / Athlon 64 x2 / AMD ...
... Version 2.0 specification compliant SATA Version 2.0 specification compliant Realtek RTL 8111C (A780G M2+ SE & A760G M2+) Realtek RTL 8102EL (A780V M2+ SE) 10 / 100 /1000 Mb/s auto negotiation (A780G M2+ SE & A760G M2+) 10 / 100 Mb/s auto negotiation (A780V M2+ SE) Realtek RTL 8102EL 10 / 100 Mb/s auto negotiation Half / Full...the most commonly used legacy Super I/O Provides the most commonly used legacy Super I /O Main Memory Graphics IDE SATA II LAN A780G M2+ SE/A780V M2+ SE/A760G M2+ A740G M2+ SE Socket AM2+ / AM2 Socket AM2+ / AM2 AMD Athlon 64 / Athlon 64 FX / Athlon 64 x2 / AMD ...
Setup Manual
Page 5
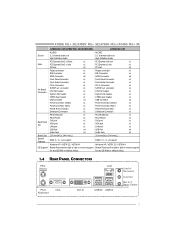
... 64 Biostar Reserves the right to add or remove support for any OS With or without notice. 1.4 REAR PANEL CONNECTORS PS/2 Mouse LA N PS/2 Keyboard VGA DVI-D USBX2 USBX2 Line In/ Su rr oun d Line Out Mic In 1/ Bass/ Center 3 A780G M2+ SE/A780V M2+ SE/A760G M2+/A740G M2+ SE A780G M2+ SE/A780V M2+ SE/A760G M2+ A740G M2... Audio Jack x3 Board Size 200 mm(W)x 244 mm(L) 200 mm(W)x 244 mm(L) Special Features OS Support RAID 0 / 1 / 1+0 support Windows XP / VISTA 32 / VISTA 64 Biostar Reserves the right to add or remove support for any OS With or without notice.
... 64 Biostar Reserves the right to add or remove support for any OS With or without notice. 1.4 REAR PANEL CONNECTORS PS/2 Mouse LA N PS/2 Keyboard VGA DVI-D USBX2 USBX2 Line In/ Su rr oun d Line Out Mic In 1/ Bass/ Center 3 A780G M2+ SE/A780V M2+ SE/A760G M2+/A740G M2+ SE A780G M2+ SE/A780V M2+ SE/A760G M2+ A740G M2... Audio Jack x3 Board Size 200 mm(W)x 244 mm(L) 200 mm(W)x 244 mm(L) Special Features OS Support RAID 0 / 1 / 1+0 support Windows XP / VISTA 32 / VISTA 64 Biostar Reserves the right to add or remove support for any OS With or without notice.

Setup Manual
Page 7
Step 2: Pull the lever toward direction A from the socket and then raise the lever up to a 90-degree angle. A780G M2+ SE/A780V M2+ SE/A760G M2+/A740G M2+ SE CHAPTER 2: HARDWARE INSTALLATION 2.1 INSTALLING CENTRAL PROCESSING UNIT (CPU) Step 1: Remove the socket protection cap. Step 3: Look for the white triangle on socket, and the gold triangle on CPU should point towards this white triangle. The CPU will fit only in the correct orientation. 5
Step 2: Pull the lever toward direction A from the socket and then raise the lever up to a 90-degree angle. A780G M2+ SE/A780V M2+ SE/A760G M2+/A740G M2+ SE CHAPTER 2: HARDWARE INSTALLATION 2.1 INSTALLING CENTRAL PROCESSING UNIT (CPU) Step 1: Remove the socket protection cap. Step 3: Look for the white triangle on socket, and the gold triangle on CPU should point towards this white triangle. The CPU will fit only in the correct orientation. 5
Setup Manual
Page 9
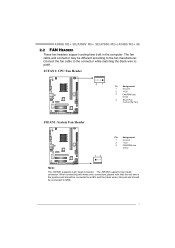
... red wire is the positive and should be connected to pin#2, and the black wire is Ground and should be different according to pin#1. A780G M2+ SE/A780V M2+ SE/A760G M2+/A740G M2+ SE 2.2 FAN HEADERS These fan headers support cooling-fans built in the computer.
... red wire is the positive and should be connected to pin#2, and the black wire is Ground and should be different according to pin#1. A780G M2+ SE/A780V M2+ SE/A760G M2+/A740G M2+ SE 2.2 FAN HEADERS These fan headers support cooling-fans built in the computer.

Setup Manual
Page 11
A780G M2+ SE/A780V M2+ SE/A760G M2+/A740G M2+ SE B. Dual Channel Memory installation To trigger the Dual Channel function of the motherboard, the memory module must meet the following requirements: Install memory module ...
A780G M2+ SE/A780V M2+ SE/A760G M2+/A740G M2+ SE B. Dual Channel Memory installation To trigger the Dual Channel function of the motherboard, the memory module must meet the following requirements: Install memory module ...
Setup Manual
Page 13
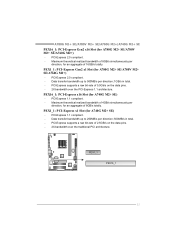
... 2.0 compliant. - Data transfer bandwidth up to 500MB/s per direction; 500MB/s in total. - A780G M2+ SE/A780V M2+ SE/A760G M2+/A740G M2+ SE PEX16_1: PCI-Express Gen2 x16 Slot (for A780G M2+ SE/A780V M2+ SE/A760G M2+) - PEX16_1: PCI-Express x16 Slot (for A740G M2+ SE) - Data transfer bandwidth up to 250MB/s per direction; 1GB/s in total. - Maximum theoretical...
... 2.0 compliant. - Data transfer bandwidth up to 500MB/s per direction; 500MB/s in total. - A780G M2+ SE/A780V M2+ SE/A760G M2+/A740G M2+ SE PEX16_1: PCI-Express Gen2 x16 Slot (for A780G M2+ SE/A780V M2+ SE/A760G M2+) - PEX16_1: PCI-Express x16 Slot (for A740G M2+ SE) - Data transfer bandwidth up to 250MB/s per direction; 1GB/s in total. - Maximum theoretical...

Setup Manual
Page 15
A780G M2+ SE/A780V M2+ SE/A760G M2+/A740G M2+ SE CHAPTER 3: HEADERS & JUMPERS SETUP 3.1 HOW TO SETUP JUMPERS The illustration shows how to connect the PC case's front panel switch functions. When the jumper ...
A780G M2+ SE/A780V M2+ SE/A760G M2+/A740G M2+ SE CHAPTER 3: HEADERS & JUMPERS SETUP 3.1 HOW TO SETUP JUMPERS The illustration shows how to connect the PC case's front panel switch functions. When the jumper ...

Setup Manual
Page 17
SATA6 SATA5 SATA4 SATA3 SATA2 SATA1 741 Pin Assignment 1 Ground 2 TX+ 3 TX4 Ground 5 RX6 RX+ 7 Ground 15 A780G M2+ SE/A780V M2+ SE/A760G M2+/A740G M2+ SE JUSB2/JUSB3/JUSB4: Headers for USB 2.0 Ports at Front Panel This header allows user to SATA Controller with 6 channels SATA interface, it satisfies the ...
SATA6 SATA5 SATA4 SATA3 SATA2 SATA1 741 Pin Assignment 1 Ground 2 TX+ 3 TX4 Ground 5 RX6 RX+ 7 Ground 15 A780G M2+ SE/A780V M2+ SE/A760G M2+/A740G M2+ SE JUSB2/JUSB3/JUSB4: Headers for USB 2.0 Ports at Front Panel This header allows user to SATA Controller with 6 channels SATA interface, it satisfies the ...
Setup Manual
Page 19
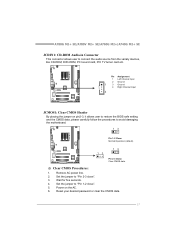
... etc. Pin Assignment 1 Left Channel Input 2 Ground 1 3 Ground 4 Right Channel Input 4 JCMOS1: Clear CMOS Header By placing the jumper on the AC. 6. A780G M2+ SE/A780V M2+ SE/A760G M2+/A740G M2+ SE JCDIN1: CD-ROM Audio-in Connector This connector allows user to avoid damaging the motherboard. 13 Pin 1-2 Close: Normal Operation (default). 13...
... etc. Pin Assignment 1 Left Channel Input 2 Ground 1 3 Ground 4 Right Channel Input 4 JCMOS1: Clear CMOS Header By placing the jumper on the AC. 6. A780G M2+ SE/A780V M2+ SE/A760G M2+/A740G M2+ SE JCDIN1: CD-ROM Audio-in Connector This connector allows user to avoid damaging the motherboard. 13 Pin 1-2 Close: Normal Operation (default). 13...

Setup Manual
Page 21
JUSBV1 3 1 JUSBV2 3 1 Pin 1-2 close 3 1 Pin 2-3 close JKBV1: Power Source Header for PS/2 Keyboard and Mouse 3 3 1 1 Pin 1-2 close +5V for PS/2 keyboard and mouse. 3 1 Pin 2-3 close +5V STB for USB ports at JUSB1/JUSBLAN1. A780G M2+ SE/A780V M2+ SE/A760G M2+/A740G M2+ SE JUSBV1/JUSBV2: Power Source Headers for USB Ports Pin 1-2 Close: JUSBV1: +5V for USB ports at front panel (JUSB2/JUSB3/JUSB4). JUSBV2: +5V for USB ports at front panel (JUSB2/JUSB3/JUSB4). Pin 2-3 Close: JUSBV1: +5V STB for USB ports at JUSB1/JUSBLAN1. JUSBV2: +5V STB for PS/2 keyboard and mouse. 19
JUSBV1 3 1 JUSBV2 3 1 Pin 1-2 close 3 1 Pin 2-3 close JKBV1: Power Source Header for PS/2 Keyboard and Mouse 3 3 1 1 Pin 1-2 close +5V for PS/2 keyboard and mouse. 3 1 Pin 2-3 close +5V STB for USB ports at JUSB1/JUSBLAN1. A780G M2+ SE/A780V M2+ SE/A760G M2+/A740G M2+ SE JUSBV1/JUSBV2: Power Source Headers for USB Ports Pin 1-2 Close: JUSBV1: +5V for USB ports at front panel (JUSB2/JUSB3/JUSB4). JUSBV2: +5V for USB ports at front panel (JUSB2/JUSB3/JUSB4). Pin 2-3 Close: JUSBV1: +5V STB for USB ports at JUSB1/JUSBLAN1. JUSBV2: +5V STB for PS/2 keyboard and mouse. 19
Setup Manual
Page 22
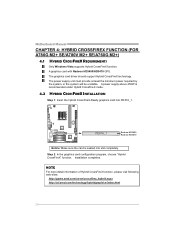
... Hybrid CrossFireX mode. 4.2 HYBRID CROSSFIREX INSTALLATION Step 1: Insert the Hybrid CrossFireX-Ready graphics card into slot completely. Motherboard Manual CHAPTER 4: HYBRID CROSSFIREX FUNCTION (FOR A780G M2+ SE/A780V M2+ SE/A760G M2+) 4.1 HYBRID CROSSFIREX REQUIREMENTS Only Windows Vista supports Hybrid CrossFireX function. A graphics card with Radeon HD3450/HD3470 GPU. Installation completes.
... Hybrid CrossFireX mode. 4.2 HYBRID CROSSFIREX INSTALLATION Step 1: Insert the Hybrid CrossFireX-Ready graphics card into slot completely. Motherboard Manual CHAPTER 4: HYBRID CROSSFIREX FUNCTION (FOR A780G M2+ SE/A780V M2+ SE/A760G M2+) 4.1 HYBRID CROSSFIREX REQUIREMENTS Only Windows Vista supports Hybrid CrossFireX function. A graphics card with Radeon HD3450/HD3470 GPU. Installation completes.
Setup Manual
Page 23
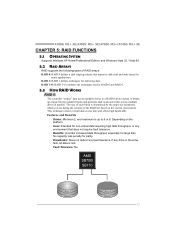
A780G M2+ SE/A780V M2+ SE/A760G M2+/A740G M2+ SE CHAPTER 5: RAID FUNCTIONS 5.1 OPERATING SYSTEM Supports Windows XP Home/Professional Edition, and Windows Vista 32 / Vista 64. 5.2 RAID ARRAYS RAID supports the following types ...
A780G M2+ SE/A780V M2+ SE/A760G M2+/A740G M2+ SE CHAPTER 5: RAID FUNCTIONS 5.1 OPERATING SYSTEM Supports Windows XP Home/Professional Edition, and Windows Vista 32 / Vista 64. 5.2 RAID ARRAYS RAID supports the following types ...
Setup Manual
Page 25
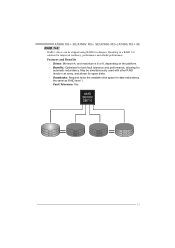
...: Optimizes for both fault tolerance and performance, allowing for data redundancy, the same as RAID level 1. - May be stripped using RAID 0 techniques. A780G M2+ SE/A780V M2+ SE/A760G M2+/A740G M2+ SE RAID 1+0: RAID 1 drives can be simultaneously used with other RAID levels in a RAID 1+0 solution for spare disks. - Block 1 Block 3 Block 5 Block 1 Block...
...: Optimizes for both fault tolerance and performance, allowing for data redundancy, the same as RAID level 1. - May be stripped using RAID 0 techniques. A780G M2+ SE/A780V M2+ SE/A760G M2+/A740G M2+ SE RAID 1+0: RAID 1 drives can be simultaneously used with other RAID levels in a RAID 1+0 solution for spare disks. - Block 1 Block 3 Block 5 Block 1 Block...
Setup Manual
Page 27
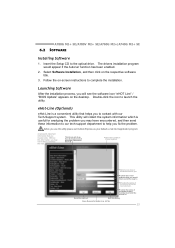
... Tech-Support system. This utility will see the software icon "eHOT Line" / "BIOS Update" appears on that helps you to help you must provide. A780G M2+ SE/A780V M2+ SE/A760G M2+/A740G M2+ SE 6.2 SOFTWARE Installing Software 1.
... Tech-Support system. This utility will see the software icon "eHOT Line" / "BIOS Update" appears on that helps you to help you must provide. A780G M2+ SE/A780V M2+ SE/A760G M2+/A740G M2+ SE 6.2 SOFTWARE Installing Software 1.

Setup Manual
Page 29
Click on this button, the saving dialog will show . A780G M2+ SE/A780V M2+ SE/A760G M2+/A740G M2+ SE BIOS Update BIOS Update is a convenient utility which allows you to complete the BIOS Backup procedure. 27 Choose the position to a .bin file Update ...
Click on this button, the saving dialog will show . A780G M2+ SE/A780V M2+ SE/A760G M2+/A740G M2+ SE BIOS Update BIOS Update is a convenient utility which allows you to complete the BIOS Backup procedure. 27 Choose the position to a .bin file Update ...

Setup Manual
Page 31
In this case, please double check: 1. Plug in the power cord and boot up the system. Wait for seconds. 3. A780G M2+ SE/A780V M2+ SE/A760G M2+/A740G M2+ SE 6.3 EXTRA INFORMATION CPU Overheated If the system shutdown automatically after power on again. When the CPU is fulfilling with the CPU surface. 2. CPU fan ...
In this case, please double check: 1. Plug in the power cord and boot up the system. Wait for seconds. 3. A780G M2+ SE/A780V M2+ SE/A760G M2+/A740G M2+ SE 6.3 EXTRA INFORMATION CPU Overheated If the system shutdown automatically after power on again. When the CPU is fulfilling with the CPU surface. 2. CPU fan ...

Setup Manual
Page 33
....ROM" file size error 13 BIOS ROM image mismatch (file layout does not match image present in cards is causing the malfunction. A780G M2+ SE/A780V M2+ SE/A760G M2+/A740G M2+ SE 6.4 AMI BIOS BEEP CODE Boot Block Beep Codes Number of Beeps Description 1 No media present. (Insert diskette in floppy drive A:) 2 "AMIBOOT.ROM...
....ROM" file size error 13 BIOS ROM image mismatch (file layout does not match image present in cards is causing the malfunction. A780G M2+ SE/A780V M2+ SE/A760G M2+/A740G M2+ SE 6.4 AMI BIOS BEEP CODE Boot Block Beep Codes Number of Beeps Description 1 No media present. (Insert diskette in floppy drive A:) 2 "AMIBOOT.ROM...

