
Instruction Manual
Page 18
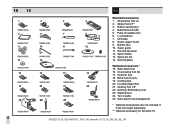
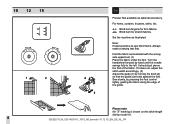
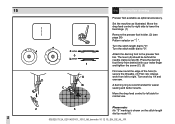
.... Bobbin winder 14. Handle 25. Presser foot lever 1 4 502020.75.24_021V4D0101_1010_IM_bernette 10 12 15_EN_DE_NL_FR Thread take-up lever 5. Thread cutter 8. Sewing table and accessory box 11. Bobbin stopper 15. Stitch display 18. Pattern selector dial 21. Presser foot pressure 3. Thread tension dial 6. Hole for second spool pin 13. Stitch length dial 16...
.... Bobbin winder 14. Handle 25. Presser foot lever 1 4 502020.75.24_021V4D0101_1010_IM_bernette 10 12 15_EN_DE_NL_FR Thread take-up lever 5. Thread cutter 8. Sewing table and accessory box 11. Bobbin stopper 15. Stitch display 18. Pattern selector dial 21. Presser foot pressure 3. Thread tension dial 6. Hole for second spool pin 13. Stitch length dial 16...
Instruction Manual
Page 20
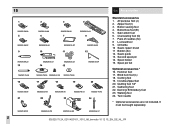
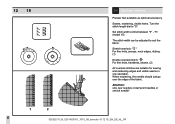
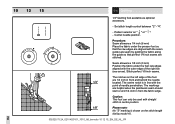
.../ Embroidery foot 23. Walking foot 24. Satin stitch foot (transparent) * Optional accessories are not included. It must be bought separately. ** Optional accessory for bernette 10. 502020.75.24_021V4D0101_1010_IM_bernette 10 12 15_EN_DE_NL_FR Spool pin felt 14. Overcasting foot (G)...Accessories Standard accessories 1. Pack of needles (3x) 6. Second spool pin 12. Satin stitch foot 16. Button sewing foot 4. Seam ripper/ brush 9. Seam guide 11. Quilting foot 1/4" 22. Zipper foot (I)** 3. Hemmer foot 18. Buttonhole foot (B) 5. Darning plate Optional accessories * 15...
.../ Embroidery foot 23. Walking foot 24. Satin stitch foot (transparent) * Optional accessories are not included. It must be bought separately. ** Optional accessory for bernette 10. 502020.75.24_021V4D0101_1010_IM_bernette 10 12 15_EN_DE_NL_FR Spool pin felt 14. Overcasting foot (G)...Accessories Standard accessories 1. Pack of needles (3x) 6. Second spool pin 12. Satin stitch foot 16. Button sewing foot 4. Seam ripper/ brush 9. Seam guide 11. Quilting foot 1/4" 22. Zipper foot (I)** 3. Hemmer foot 18. Buttonhole foot (B) 5. Darning plate Optional accessories * 15...
Instruction Manual
Page 22
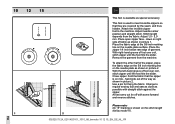
... foot 24. Satin stitch foot 6. Oil bottle 10 Seam ripper/ brush 11 Bobbin (3x) 12. Spool pin felt Optional accessories * 16. Overcasting foot (G) 7. Twin needle * Optional accessories are not included. Zipper foot (I) 3. Spool holder 15. Buttonhole foot (B) 5. Pack of needles (3x) 8 L-screwdriver 9. Quilting foot 1/4" 21. Hemmer foot 17. Second spool pin 14. All...
... foot 24. Satin stitch foot 6. Oil bottle 10 Seam ripper/ brush 11 Bobbin (3x) 12. Spool pin felt Optional accessories * 16. Overcasting foot (G) 7. Twin needle * Optional accessories are not included. Zipper foot (I) 3. Spool holder 15. Buttonhole foot (B) 5. Pack of needles (3x) 8 L-screwdriver 9. Quilting foot 1/4" 21. Hemmer foot 17. Second spool pin 14. All...
Instruction Manual
Page 24
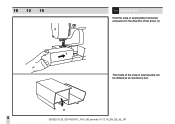
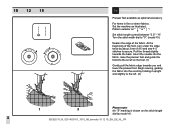
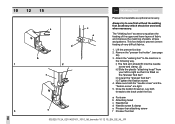
10 12 15 EN Sewing table Hold the snap-in sewing table horizontal, and push it in the direction of the arrow. (1) The inside of the snap-in sewing table can be utilized as an accessory box. 502020.75.24_021V4D0101_1010_IM_bernette 10 12 15_EN_DE_NL_FR 20
10 12 15 EN Sewing table Hold the snap-in sewing table horizontal, and push it in the direction of the arrow. (1) The inside of the snap-in sewing table can be utilized as an accessory box. 502020.75.24_021V4D0101_1010_IM_bernette 10 12 15_EN_DE_NL_FR 20
Instruction Manual
Page 72
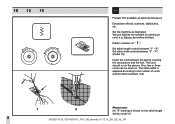
... edge of the fabric. Blind hem for firm fabrics. It should just pierce the fold of the guide. 10 12 15 EN Blind hem/lingerie stitch Presser foot available as optional accessory. Please note: No "S" marking is shown on the stitch length dial by hand until the needle swings fully to sew...
... edge of the fabric. Blind hem for firm fabrics. It should just pierce the fold of the guide. 10 12 15 EN Blind hem/lingerie stitch Presser foot available as optional accessory. Please note: No "S" marking is shown on the stitch length dial by hand until the needle swings fully to sew...
Instruction Manual
Page 74
... fine knits, handknits, seams. (2) All overlock stitches are suitable for sewing and neatening edges and visible seams in one operation. "5". (model 15) The stitch width can be adjusted to "S". When neatening, the needle should just go over the edge of the fabric. Attention: Use new... needles or ball point needles or stretch needle! 70 502020.75.24_021V4D0101_1010_IM_bernette 10 12 15_EN_DE_NL_FR 12 15 EN Overlock stitches Presser foot available as optional accessory. Seams, neatening, visible hems. Turn the stitch length dial to suit the fabric. Set stitch width control...
... fine knits, handknits, seams. (2) All overlock stitches are suitable for sewing and neatening edges and visible seams in one operation. "5". (model 15) The stitch width can be adjusted to "S". When neatening, the needle should just go over the edge of the fabric. Attention: Use new... needles or ball point needles or stretch needle! 70 502020.75.24_021V4D0101_1010_IM_bernette 10 12 15_EN_DE_NL_FR 12 15 EN Overlock stitches Presser foot available as optional accessory. Seams, neatening, visible hems. Turn the stitch length dial to suit the fabric. Set stitch width control...
Instruction Manual
Page 86
Set the machine as optional accessory. Set stitch length control between "2.5" - Pull the thread slightly towards you and... "S" marking is shown on the stitch length dial by about 3 mm (1/8") and sew 4-5 stitches to "0". (model 15) Neaten the edge of the hem, turn under the edge twice by model 10. 502020.75.24_021V4D0101_1010_IM_bernette 10 12 15_EN_DE_NL_FR... 82 At the beginning of the fabric. Turn the stitch width dial to secure. 10 12 15 EN Hemmer foot Presser foot available as illustrated. For hems in fine or sheer fabrics. Begin sewing, guiding ...
Set the machine as optional accessory. Set stitch length control between "2.5" - Pull the thread slightly towards you and... "S" marking is shown on the stitch length dial by about 3 mm (1/8") and sew 4-5 stitches to "0". (model 15) Neaten the edge of the hem, turn under the edge twice by model 10. 502020.75.24_021V4D0101_1010_IM_bernette 10 12 15_EN_DE_NL_FR... 82 At the beginning of the fabric. Turn the stitch width dial to secure. 10 12 15 EN Hemmer foot Presser foot available as illustrated. For hems in fine or sheer fabrics. Begin sewing, guiding ...
Instruction Manual
Page 94
Pattern selector on the stitch length dial by model 10. 502020.75.24_021V4D0101_1010_IM_bernette 10 12 15_EN_DE_NL_FR 90 "5". (model 15) Insert the cord between "1" - The cord should run in the groove. Set the machine as optional accessory. Set stitch length control between the spring covering the cord groove and the foot. Set stitch width... on " ". Decorative effects, cushions, tablecloths, etc. Various stitches are suitable for sewing on . One, two or three cords can be sewn on cord, e.g. 10 12 15 EN Cording foot Presser foot available as illustrated.
Pattern selector on the stitch length dial by model 10. 502020.75.24_021V4D0101_1010_IM_bernette 10 12 15_EN_DE_NL_FR 90 "5". (model 15) Insert the cord between "1" - The cord should run in the groove. Set the machine as optional accessory. Set stitch length control between the spring covering the cord groove and the foot. Set stitch width... on " ". Decorative effects, cushions, tablecloths, etc. Various stitches are suitable for sewing on . One, two or three cords can be sewn on cord, e.g. 10 12 15 EN Cording foot Presser foot available as illustrated.

Instruction Manual
Page 96
... from left to secure the threads). (4) First row: Always work by model 10. 502020.75.24_021V4D0101_1010_IM_bernette 10 12 15_EN_DE_NL_FR 92 Set the machine as optional accessory. Remove darning plate for easier sewing and better results. 10 12 EN Free motion darning Presser foot available as illustrated.
... from left to secure the threads). (4) First row: Always work by model 10. 502020.75.24_021V4D0101_1010_IM_bernette 10 12 15_EN_DE_NL_FR 92 Set the machine as optional accessory. Remove darning plate for easier sewing and better results. 10 12 EN Free motion darning Presser foot available as illustrated.
Instruction Manual
Page 98
...dial to "0". Turn the stitch width dial to "0". Turn work from left side for easier sewing and better results. Set the machine as optional accessory. A darning ring is shown on " ". Move the drop feed control to right side to the presser foot bar. Press the darning foot firmly... from behind the needle clamp screw (B). 15 EN Free motion darning Presser foot available as illustrated. Please note: No "S" marking is recommended for normal use. Move the drop feed control to...
...dial to "0". Turn the stitch width dial to "0". Turn work from left side for easier sewing and better results. Set the machine as optional accessory. A darning ring is shown on " ". Move the drop feed control to right side to the presser foot bar. Press the darning foot firmly... from behind the needle clamp screw (B). 15 EN Free motion darning Presser foot available as illustrated. Please note: No "S" marking is recommended for normal use. Move the drop feed control to...

Instruction Manual
Page 112
...lower thread through the fabric. Remove the presser foot and the presser foot holder. - Stretch the fabric between embroidery hoop as firmly as optional accessory. - Install the darning plate. (1) (model 10/12) - Adjust the stitch width according to "0". - Place the fabric under the needle.... the drop feed control to right side to sew. - Lower presser foot lever before starting point. - Preparation for normal use . (model 15) Please note: No "S" marking is down in its lowest position. - Remove darning plate for Monogramming and Embroidering - Set the machine as ...
...lower thread through the fabric. Remove the presser foot and the presser foot holder. - Stretch the fabric between embroidery hoop as firmly as optional accessory. - Install the darning plate. (1) (model 10/12) - Adjust the stitch width according to "0". - Place the fabric under the needle.... the drop feed control to right side to sew. - Lower presser foot lever before starting point. - Preparation for normal use . (model 15) Please note: No "S" marking is down in its lowest position. - Remove darning plate for Monogramming and Embroidering - Set the machine as ...
Instruction Manual
Page 116
... start or end 1/4 inch in front and behind the needle located. Stitch perfect 1/8 inch seams. The notches on " " or " ". - 10 12 15 EN Quilting 1/4" Quilting foot available as optional accessory. - Set stitch length control between "2" - Procedure: Seam allowance 1/4 inch (6 mm) Place the fabric under the foot raw edges aligned with the point...
... start or end 1/4 inch in front and behind the needle located. Stitch perfect 1/8 inch seams. The notches on " " or " ". - 10 12 15 EN Quilting 1/4" Quilting foot available as optional accessory. - Set stitch length control between "2" - Procedure: Seam allowance 1/4 inch (6 mm) Place the fabric under the foot raw edges aligned with the point...
Instruction Manual
Page 118
10 12 15 EN Invisible zipper foot This foot is on ride - Place open zipper face - Fold the fabric that they are covered by model 10. 114 502020.... the fabric. Remove the garment from the fabric. Adjust 1,0 - 3,0 mm. Attach the invisible zipper foot to regular sewing foot and saw as close as special accessory.
10 12 15 EN Invisible zipper foot This foot is on ride - Place open zipper face - Fold the fabric that they are covered by model 10. 114 502020.... the fabric. Remove the garment from the fabric. Adjust 1,0 - 3,0 mm. Attach the invisible zipper foot to regular sewing foot and saw as close as special accessory.

Instruction Manual
Page 120
... upper thread (to gather more gathering is shown on the stitch length dial by model 10. 502020.75.24_021V4D0101_1010_IM_bernette 10 12 15_EN_DE_NL_FR 116 10 12 15 EN Gathering Presser foot available as optional accessory. - Sew a single row or multiple rows of the material.
... upper thread (to gather more gathering is shown on the stitch length dial by model 10. 502020.75.24_021V4D0101_1010_IM_bernette 10 12 15_EN_DE_NL_FR 116 10 12 15 EN Gathering Presser foot available as optional accessory. - Sew a single row or multiple rows of the material.
Instruction Manual
Page 122
10 12 15 EN Walking foot Presser foot available as optional accessory. Attach the "walking foot" to right so that ... e Presser bar attaching screw f Presser foot bar 118 502020.75.24_021V4D0101_1010_IM_bernette 10 12 15_EN_DE_NL_FR The "Walking foot" accessory equalizes the feeding of the upper and lower layers of fabric and improves the matching of very difficult fabrics. 1.... This foot helps to sew first without the walking foot accessory which should fit into the needle screw and clamp. (2) ii) Slide the plastic "attaching head" ...
10 12 15 EN Walking foot Presser foot available as optional accessory. Attach the "walking foot" to right so that ... e Presser bar attaching screw f Presser foot bar 118 502020.75.24_021V4D0101_1010_IM_bernette 10 12 15_EN_DE_NL_FR The "Walking foot" accessory equalizes the feeding of the upper and lower layers of fabric and improves the matching of very difficult fabrics. 1.... This foot helps to sew first without the walking foot accessory which should fit into the needle screw and clamp. (2) ii) Slide the plastic "attaching head" ...
Instruction Manual
Page 132
DEEN Index A Accessories 16, 18 Adjusting the presser foot pressure 24 Adjust pattern balance 48 Applique 104 Attaching lace 102 Attaching the presser foot holder 26 B Blind hem/...
DEEN Index A Accessories 16, 18 Adjusting the presser foot pressure 24 Adjust pattern balance 48 Applique 104 Attaching lace 102 Attaching the presser foot holder 26 B Blind hem/...


