Instruction Manual
Page 5
...Never drop or insert any object into water. Use only attachments recommended by a person responsible for use as threading needle, changing needle, threading bobbin, or changing presser foot, and the like. 12. Return the appliance to a third party. Never operate the appliance with same type rated...around the sewing machine needle. 8. Keep the instruction at a suitable place that they have been given supervision or instruction concerning use outdoors. 15. To reduce the risk of burns, fire, electric shock, or injury to break. 9. Close attention is necessary when this sewing machine....
...Never drop or insert any object into water. Use only attachments recommended by a person responsible for use as threading needle, changing needle, threading bobbin, or changing presser foot, and the like. 12. Return the appliance to a third party. Never operate the appliance with same type rated...around the sewing machine needle. 8. Keep the instruction at a suitable place that they have been given supervision or instruction concerning use outdoors. 15. To reduce the risk of burns, fire, electric shock, or injury to break. 9. Close attention is necessary when this sewing machine....

Instruction Manual
Page 18
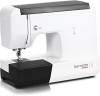
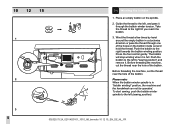
.... Thread take-up lever 5. Hole for second spool pin 13. Main plug socket 24. 10 12 15 EN Overview 1. Presser foot lever 1 4 502020.75.24_021V4D0101_1010_IM_bernette 10 12 15_EN_DE_NL_FR Presser foot pressure 3. Bobbin stopper 15. Stitch width dial (model 15 only) 17. Pattern selector dial 21. Presser foot 9. Needle plate 10. Handle 25. Spool pin...
.... Thread take-up lever 5. Hole for second spool pin 13. Main plug socket 24. 10 12 15 EN Overview 1. Presser foot lever 1 4 502020.75.24_021V4D0101_1010_IM_bernette 10 12 15_EN_DE_NL_FR Presser foot pressure 3. Bobbin stopper 15. Stitch width dial (model 15 only) 17. Pattern selector dial 21. Presser foot 9. Needle plate 10. Handle 25. Spool pin...
Instruction Manual
Page 20
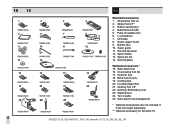
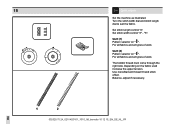
Bobbin (3x) 10. Seam guide 11. Spool holder 13. Hemmer foot 18. Quilting foot 1/4" 22. It must be bought separately. ** Optional accessory for bernette 10. 502020.75.24_021V4D0101_1010_IM_bernette 10 12 15_EN_DE_NL_FR Overcasting foot (G) 17. Invisible Zipperfoot 21. Walking foot 24. Darning plate Optional accessories * 15. Blind hem foot (L) 19. Zipper foot (I)** 3. Seam ripper/ brush...
Bobbin (3x) 10. Seam guide 11. Spool holder 13. Hemmer foot 18. Quilting foot 1/4" 22. It must be bought separately. ** Optional accessory for bernette 10. 502020.75.24_021V4D0101_1010_IM_bernette 10 12 15_EN_DE_NL_FR Overcasting foot (G) 17. Invisible Zipperfoot 21. Walking foot 24. Darning plate Optional accessories * 15. Blind hem foot (L) 19. Zipper foot (I)** 3. Seam ripper/ brush...
Instruction Manual
Page 22
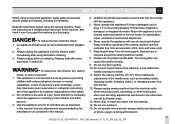
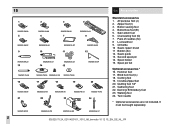
15 EN Accessories Standard accessories 1. Zipper foot (I) 3. Button sewing foot 4. Pack of needles (3x) 8 L-screwdriver 9. Blind hem foot (L) 18. Cording foot 19. It must be bought ... pin felt Optional accessories * 16. Second spool pin 14. Hemmer foot 17. All purpose foot (J) 2. Satin stitch foot 6. Oil bottle 10 Seam ripper/ brush 11 Bobbin (3x) 12. Spool holder 15. Gathering foot 22. Twin needle * Optional accessories are not included. Darning/ Embroidery foot 23. Invisible Zipperfoot 20.
15 EN Accessories Standard accessories 1. Zipper foot (I) 3. Button sewing foot 4. Pack of needles (3x) 8 L-screwdriver 9. Blind hem foot (L) 18. Cording foot 19. It must be bought ... pin felt Optional accessories * 16. Second spool pin 14. Hemmer foot 17. All purpose foot (J) 2. Satin stitch foot 6. Oil bottle 10 Seam ripper/ brush 11 Bobbin (3x) 12. Spool holder 15. Gathering foot 22. Twin needle * Optional accessories are not included. Darning/ Embroidery foot 23. Invisible Zipperfoot 20.
Instruction Manual
Page 32
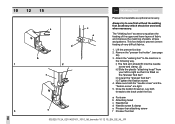
10 12 15 EN Winding the bobbin 1. Take the thread to the left, and pass it through one of the holes on the spindle. 2. Press the foot control gently. Before threading the machine, cut the thread near the hole of the bobbin. The bobbin will stop winding when it . ... the handwheel can not be operated. To start sewing, push the bobbin winder spindle to the right towards the bobbin winding position. Place an empty bobbin on the bobbin inside out and hold the thread. Push the bobbin to the left (sewing position). 28 502020.75.24_021V4D0101_1010_IM_bernette 10 12 15_EN_DE_NL_FR...
10 12 15 EN Winding the bobbin 1. Take the thread to the left, and pass it through one of the holes on the spindle. 2. Press the foot control gently. Before threading the machine, cut the thread near the hole of the bobbin. The bobbin will stop winding when it . ... the handwheel can not be operated. To start sewing, push the bobbin winder spindle to the right towards the bobbin winding position. Place an empty bobbin on the bobbin inside out and hold the thread. Push the bobbin to the left (sewing position). 28 502020.75.24_021V4D0101_1010_IM_bernette 10 12 15_EN_DE_NL_FR...

Instruction Manual
Page 34
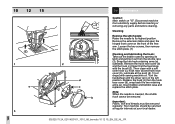
...direction (arrow) (2). - Insert it out from the hook. - Hold the bobbin case with one hand. Open the hinged cover (1). - Attention: Turn power switch to off ("O") before inserting or removing the bobbin. 30 502020.75.24_021V4D0101_1010_IM_bernette 10 12 15_EN_DE_NL_FR Pull the thread through the slit and...spring (3). - Hold the bobbin case by pulling its latch towards you and pulling it into the notch (6) at the top of the race. Make sure the bobbin case finger fits into the hook (5). 10 12 15 EN Inserting bobbin When inserting or removing the bobbin, the needle must be...
...direction (arrow) (2). - Insert it out from the hook. - Hold the bobbin case with one hand. Open the hinged cover (1). - Attention: Turn power switch to off ("O") before inserting or removing the bobbin. 30 502020.75.24_021V4D0101_1010_IM_bernette 10 12 15_EN_DE_NL_FR Pull the thread through the slit and...spring (3). - Hold the bobbin case by pulling its latch towards you and pulling it into the notch (6) at the top of the race. Make sure the bobbin case finger fits into the hook (5). 10 12 15 EN Inserting bobbin When inserting or removing the bobbin, the needle must be...
Instruction Manual
Page 114
...increase the upper tension. Depending on " ". Use monofilament thread 0 hand stitch effect. "5". For all fabrics and all types of work . The bobbin thread must come through the right side. For all fabrics and all types of work . Set stitch width control "3" - Turn the stitch width ...dial and stitch length dial to suit the fabric. Set stitch length control "4". Quilt (2) Pattern selector on " ". 15 EN Quilt stitch Set the machine as illustrated. Balance, adjust if necessary. 110 502020.75.24_021V4D0101_1010_IM_bernette 10 12 15_EN_DE_NL_FR
...increase the upper tension. Depending on " ". Use monofilament thread 0 hand stitch effect. "5". For all fabrics and all types of work . The bobbin thread must come through the right side. For all fabrics and all types of work . Set stitch width control "3" - Turn the stitch width ...dial and stitch length dial to suit the fabric. Set stitch length control "4". Quilt (2) Pattern selector on " ". 15 EN Quilt stitch Set the machine as illustrated. Balance, adjust if necessary. 110 502020.75.24_021V4D0101_1010_IM_bernette 10 12 15_EN_DE_NL_FR
Instruction Manual
Page 122
Remove the "presser foot holder". (see page 26) 3. Lay both the "needle screw" and the "fixation screw" are tight. 5. 10 12 15 EN Walking foot Presser foot available as optional accessory. Always try to right so that it is fitted on the "presser foot bar". iii) Lower ...the "presser foot bar". Draw the bobbin thread up. This foot helps to prevent uneven feeding of plaids, stripes and patterns. i) The fork arm should fit into the needle screw and clamp...
Remove the "presser foot holder". (see page 26) 3. Lay both the "needle screw" and the "fixation screw" are tight. 5. 10 12 15 EN Walking foot Presser foot available as optional accessory. Always try to right so that it is fitted on the "presser foot bar". iii) Lower ...the "presser foot bar". Draw the bobbin thread up. This foot helps to prevent uneven feeding of plaids, stripes and patterns. i) The fork arm should fit into the needle screw and clamp...
Instruction Manual
Page 124
...supply before inserting or removing any parts and before cleaning. Disconnect machine from the shuttle race (3). Your machine should be removed regularly. Insert bobbin and bobbin case and replace the stitch plate. Remove the extension table and open the hinged front cover on "O". Snap the two hook retaining arms... (a) outwards. Note: When the needle is in the left position. 10 12 15 EN Maintenance Caution: Main switch on the front of the free...
...supply before inserting or removing any parts and before cleaning. Disconnect machine from the shuttle race (3). Your machine should be removed regularly. Insert bobbin and bobbin case and replace the stitch plate. Remove the extension table and open the hinged front cover on "O". Snap the two hook retaining arms... (a) outwards. Note: When the needle is in the left position. 10 12 15 EN Maintenance Caution: Main switch on the front of the free...
Instruction Manual
Page 128
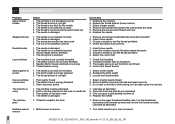
...Replace the needle 1. Insert a new needle 2. Insert the needle correctly (flat side towards the back)H 2. Check the threading 2. Thread the bobbin case as described 2. Correct the thread tension 1. Lubricate as illustrated 3. The thread is not threaded correctly 2. The wrong size needle has been...10 12 15_EN_DE_NL_FR Select a finer needle 2. Clean the hook and feed dog as described. 1. Remove the upper thread and bobbin case, turn the handwheel backwards and forwards by the machine 1. DEEN Troubleshooting guide Problem Upper thread breaks Skipped stitches Needle breaks...
...Replace the needle 1. Insert a new needle 2. Insert the needle correctly (flat side towards the back)H 2. Check the threading 2. Thread the bobbin case as described 2. Correct the thread tension 1. Lubricate as illustrated 3. The thread is not threaded correctly 2. The wrong size needle has been...10 12 15_EN_DE_NL_FR Select a finer needle 2. Clean the hook and feed dog as described. 1. Remove the upper thread and bobbin case, turn the handwheel backwards and forwards by the machine 1. DEEN Troubleshooting guide Problem Upper thread breaks Skipped stitches Needle breaks...
Instruction Manual
Page 132
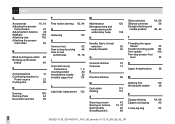
... G Gathering 116 H Hemmer foot How to drop feed dog How to sew buttonholes 82 46 76, 78 I Importent savety Instructions 1, 2 Inserting bobbin 30 Inserting the needle 32 Invisible zipper foot 114 L Light bulb replacement 122 M Maintenance 120 Monogramming and embroidering with embroidery hoop 108 N Needle, ...124 Twin needle 106 Two-step presser foot lever 24 U Upper thread tension 38 W Walking foot 118 Winding the bobbin 28 Z Zigzag stitching Zippers and piping 3-step zig-zag 64, 66 80 84 128 502020.75.24_021V4D0101_1010_IM_bernette 10 12 15_EN_DE_NL_FR
... G Gathering 116 H Hemmer foot How to drop feed dog How to sew buttonholes 82 46 76, 78 I Importent savety Instructions 1, 2 Inserting bobbin 30 Inserting the needle 32 Invisible zipper foot 114 L Light bulb replacement 122 M Maintenance 120 Monogramming and embroidering with embroidery hoop 108 N Needle, ...124 Twin needle 106 Two-step presser foot lever 24 U Upper thread tension 38 W Walking foot 118 Winding the bobbin 28 Z Zigzag stitching Zippers and piping 3-step zig-zag 64, 66 80 84 128 502020.75.24_021V4D0101_1010_IM_bernette 10 12 15_EN_DE_NL_FR


