Instruction Manual
Page 5
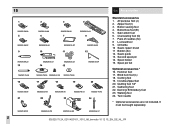
... followed, including the following: Read all moving parts. Keep the instruction at a suitable place that they have been given supervision or instruction concerning use outdoors. 15. To reduce the risk of burns, fire, electric shock, or injury to break. 9. Always unplug before using this appliance from accumulation of experience and knowledge...
... followed, including the following: Read all moving parts. Keep the instruction at a suitable place that they have been given supervision or instruction concerning use outdoors. 15. To reduce the risk of burns, fire, electric shock, or injury to break. 9. Always unplug before using this appliance from accumulation of experience and knowledge...
Instruction Manual
Page 6
... appliances as unsorted municipal waste, use only. SERVICING OF DOUBLE-INSULATED PRODUCTS In a double-insulated product, two systems of insulation are disposed of manufacturing. Environmentalprotection BERNINA is marked with double insulation (except U.S.A / Canada). EN 16. To disconnect, turn all controls to minimize the environmental impact of the environment. Do not unplug...
... appliances as unsorted municipal waste, use only. SERVICING OF DOUBLE-INSULATED PRODUCTS In a double-insulated product, two systems of insulation are disposed of manufacturing. Environmentalprotection BERNINA is marked with double insulation (except U.S.A / Canada). EN 16. To disconnect, turn all controls to minimize the environmental impact of the environment. Do not unplug...

Instruction Manual
Page 18
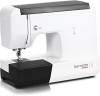
Reverse sewing lever 7. Stitch length dial 16. Power switch 23. 10 12 15 EN Overview 1. Spool pin 12. Hole for second spool pin 13. Bobbin winder 14. Pattern selector dial 21. Handle 25. Thread take-up lever 5. ...Thread cutter 8. Sewing table and accessory box 11. Stitch display 18. Handwheel 20. Pattern balance (model 15 only) 22. Presser foot lever 1 4 502020.75.24_021V4D0101_1010_IM_bernette 10 12 15_EN_DE_NL_FR Presser foot 9. Needle threader 19. Thread guide 2. Bobbin winder pre-tension 4. Needle plate ...
Reverse sewing lever 7. Stitch length dial 16. Power switch 23. 10 12 15 EN Overview 1. Spool pin 12. Hole for second spool pin 13. Bobbin winder 14. Pattern selector dial 21. Handle 25. Thread take-up lever 5. ...Thread cutter 8. Sewing table and accessory box 11. Stitch display 18. Handwheel 20. Pattern balance (model 15 only) 22. Presser foot lever 1 4 502020.75.24_021V4D0101_1010_IM_bernette 10 12 15_EN_DE_NL_FR Presser foot 9. Needle threader 19. Thread guide 2. Bobbin winder pre-tension 4. Needle plate ...
Instruction Manual
Page 20
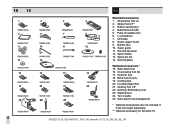
...2. Seam ripper/ brush 9. Spool holder 13. Satin stitch foot 16. It must be bought separately. ** Optional accessory for bernette 10. 502020.75.24_021V4D0101_1010_IM_bernette 10 12 15_EN_DE_NL_FR Zipper foot (I)** 3. Second spool pin 12. Overcasting foot (G) 17. Invisible Zipperfoot 21.... L-screwdriver 7. Twin needle 25. Pack of needles (3x) 6. Seam guide 11. Hemmer foot 18. Oil bottle 8. Darning plate Optional accessories * 15. Blind hem foot (L) 19. Quilting foot 1/4" 22. Bobbin (3x) 10. Walking foot 24. 1 6 10 12 EN Accessories Standard accessories 1. ...
...2. Seam ripper/ brush 9. Spool holder 13. Satin stitch foot 16. It must be bought separately. ** Optional accessory for bernette 10. 502020.75.24_021V4D0101_1010_IM_bernette 10 12 15_EN_DE_NL_FR Zipper foot (I)** 3. Second spool pin 12. Overcasting foot (G) 17. Invisible Zipperfoot 21.... L-screwdriver 7. Twin needle 25. Pack of needles (3x) 6. Seam guide 11. Hemmer foot 18. Oil bottle 8. Darning plate Optional accessories * 15. Blind hem foot (L) 19. Quilting foot 1/4" 22. Bobbin (3x) 10. Walking foot 24. 1 6 10 12 EN Accessories Standard accessories 1. ...
Instruction Manual
Page 22
Spool pin felt Optional accessories * 16. Invisible Zipperfoot 20. 15 EN Accessories Standard accessories 1. Buttonhole foot (B) 5. Oil bottle 10 Seam ripper/ brush 11 Bobbin (3x) 12. Quilting foot 1/4" 21. Gathering foot 22. ... foot 19. Walking foot 24. Hemmer foot 17. Blind hem foot (L) 18. Zipper foot (I) 3. Button sewing foot 4. Satin stitch foot 6. Spool holder 15. It must be bought separately. 18 502020.75.24_021V4D0101_1010_IM_bernette 10 12 15_EN_DE_NL_FR Overcasting foot (G) 7. Second spool pin 14. Twin needle * Optional accessories are not included...
Spool pin felt Optional accessories * 16. Invisible Zipperfoot 20. 15 EN Accessories Standard accessories 1. Buttonhole foot (B) 5. Oil bottle 10 Seam ripper/ brush 11 Bobbin (3x) 12. Quilting foot 1/4" 21. Gathering foot 22. ... foot 19. Walking foot 24. Hemmer foot 17. Blind hem foot (L) 18. Zipper foot (I) 3. Button sewing foot 4. Satin stitch foot 6. Spool holder 15. It must be bought separately. 18 502020.75.24_021V4D0101_1010_IM_bernette 10 12 15_EN_DE_NL_FR Overcasting foot (G) 7. Second spool pin 14. Twin needle * Optional accessories are not included...
Instruction Manual
Page 24
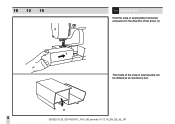
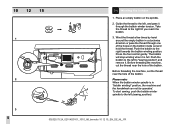
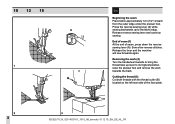
10 12 15 EN Sewing table Hold the snap-in sewing table horizontal, and push it in the direction of the arrow. (1) The inside of the snap-in sewing table can be utilized as an accessory box. 502020.75.24_021V4D0101_1010_IM_bernette 10 12 15_EN_DE_NL_FR 20
10 12 15 EN Sewing table Hold the snap-in sewing table horizontal, and push it in the direction of the arrow. (1) The inside of the snap-in sewing table can be utilized as an accessory box. 502020.75.24_021V4D0101_1010_IM_bernette 10 12 15_EN_DE_NL_FR 20
Instruction Manual
Page 26
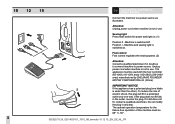
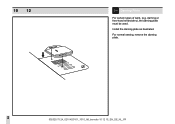
... wider than the other). To reduce the risk of this plug will fit in a polarized outlet only one blade is not in use . 10 12 15 EN Connecting machine to power source Connect the machine to a power source as to connect machine to power source.
... wider than the other). To reduce the risk of this plug will fit in a polarized outlet only one blade is not in use . 10 12 15 EN Connecting machine to power source Connect the machine to a power source as to connect machine to power source.
Instruction Manual
Page 28
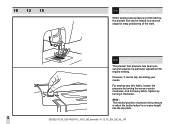
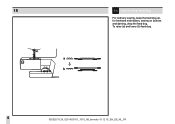
..., loosen the pressure by turning the screw counter clockwise, and for heavy fabric, tighten by turning it can be adj. However, it clockwise. 10 12 15 EN Two-step presser foot lever When sewing several layers or thick fabrics, the presser foot can be raised to a second stage for regular sewing...
..., loosen the pressure by turning the screw counter clockwise, and for heavy fabric, tighten by turning it can be adj. However, it clockwise. 10 12 15 EN Two-step presser foot lever When sewing several layers or thick fabrics, the presser foot can be raised to a second stage for regular sewing...
Instruction Manual
Page 30
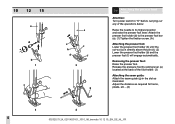
... foot holder (b) until the cut-out (c) is directly above the pin (d). (2) Lower the presser foot holder (b) and the presser foot (f) will engage automatically. 10 12 15 EN Attaching the presser foot holder Attention: Turn power switch to "O" before carrying out any of the foot holder. (3) Attaching the seam guide: Attach the...
... foot holder (b) until the cut-out (c) is directly above the pin (d). (2) Lower the presser foot holder (b) and the presser foot (f) will engage automatically. 10 12 15 EN Attaching the presser foot holder Attention: Turn power switch to "O" before carrying out any of the foot holder. (3) Attaching the seam guide: Attach the...
Instruction Manual
Page 32
... through the bobbin winder tension. Push the bobbin to the left to the left (sewing position). 28 502020.75.24_021V4D0101_1010_IM_bernette 10 12 15_EN_DE_NL_FR 10 12 15 EN Winding the bobbin 1.
... through the bobbin winder tension. Push the bobbin to the left to the left (sewing position). 28 502020.75.24_021V4D0101_1010_IM_bernette 10 12 15_EN_DE_NL_FR 10 12 15 EN Winding the bobbin 1.

Instruction Manual
Page 34
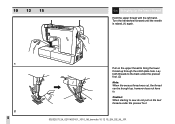
10 12 15 EN Inserting bobbin When inserting or removing the bobbin, the needle must be fully raised. - Hold the bobbin case by pulling its latch towards you ...
10 12 15 EN Inserting bobbin When inserting or removing the bobbin, the needle must be fully raised. - Hold the bobbin case by pulling its latch towards you ...

Instruction Manual
Page 36
10 12 15 EN Inserting the needle Attention: Turn power switch to "O" before inserting or removing the needle. The flat side of wear and causing problems. Insert the ...
10 12 15 EN Inserting the needle Attention: Turn power switch to "O" before inserting or removing the needle. The flat side of wear and causing problems. Insert the ...

Instruction Manual
Page 38
10 12 15 EN Threading the upper thread Caution: - To release the upper thread tension the presser foot lever has to be in the take -up to "O" before ...
10 12 15 EN Threading the upper thread Caution: - To release the upper thread tension the presser foot lever has to be in the take -up to "O" before ...

Instruction Manual
Page 40
Raise the needle to top. - Take the thread round the hook (C). - Pull the thread through the needle eye. Press lever (A) right down . - Release lever (A). - Take the thread in front of the needle so that the thread will insert into the hook (D) from bottom to its highest position. - 10 12 15 EN Needle threader - Attention: Turn power switch to the threading position (B). - The threader automatically swings to "O"! 36 502020.75.24_021V4D0101_1010_IM_bernette 10 12 15_EN_DE_NL_FR
Raise the needle to top. - Take the thread round the hook (C). - Pull the thread through the needle eye. Press lever (A) right down . - Release lever (A). - Take the thread in front of the needle so that the thread will insert into the hook (D) from bottom to its highest position. - 10 12 15 EN Needle threader - Attention: Turn power switch to the threading position (B). - The threader automatically swings to "O"! 36 502020.75.24_021V4D0101_1010_IM_bernette 10 12 15_EN_DE_NL_FR
Instruction Manual
Page 42
... number up. To increase the tension, turn the dial to suit the fabric and stitch type. 38 502020.75.24_021V4D0101_1010_IM_bernette 10 12 15_EN_DE_NL_FR A. 10 12 15 EN Upper thread tension Basic thread tension setting: "4".
... number up. To increase the tension, turn the dial to suit the fabric and stitch type. 38 502020.75.24_021V4D0101_1010_IM_bernette 10 12 15_EN_DE_NL_FR A. 10 12 15 EN Upper thread tension Basic thread tension setting: "4".
Instruction Manual
Page 44
10 12 15 EN Bringing up , however does not have to. Turn the handwheel forward until the needle is raised, (1) again. Lay both threads to bring the lower thread up through the stitch plate hole. Pull on the taut threads under the presser foot. (2) Note: When the excess thread was cut, the thread can be brought up the lower thread Hold the upper thread with the left hand. Caution: When starting to sew do not pull on the upper thread to the back under the presser foot. 502020.75.24_021V4D0101_1010_IM_bernette 10 12 15_EN_DE_NL_FR 40
10 12 15 EN Bringing up , however does not have to. Turn the handwheel forward until the needle is raised, (1) again. Lay both threads to bring the lower thread up through the stitch plate hole. Pull on the taut threads under the presser foot. (2) Note: When the excess thread was cut, the thread can be brought up the lower thread Hold the upper thread with the left hand. Caution: When starting to sew do not pull on the upper thread to the back under the presser foot. 502020.75.24_021V4D0101_1010_IM_bernette 10 12 15_EN_DE_NL_FR 40
Instruction Manual
Page 46
... the left rear side of seam, press down the reverse sewing lever (A). Release reverse sewing lever and continue sewing. Sew a few reverse stitches. 10 12 15 EN Beginning the seam Place fabric approximately 1cm (1/2") inward from the outer edge under the presser foot.
... the left rear side of seam, press down the reverse sewing lever (A). Release reverse sewing lever and continue sewing. Sew a few reverse stitches. 10 12 15 EN Beginning the seam Place fabric approximately 1cm (1/2") inward from the outer edge under the presser foot.
Instruction Manual
Page 48
Install the darning plate as illustrated. darning or free-hand embroidery), the darning plate must be used. 10 12 EN Darning Plate For certain types of work, (e.g. For normal sewing, remove the darning plate. 44 502020.75.24_021V4D0101_1010_IM_bernette 10 12 15_EN_DE_NL_FR
Install the darning plate as illustrated. darning or free-hand embroidery), the darning plate must be used. 10 12 EN Darning Plate For certain types of work, (e.g. For normal sewing, remove the darning plate. 44 502020.75.24_021V4D0101_1010_IM_bernette 10 12 15_EN_DE_NL_FR
Instruction Manual
Page 50
15 EN How to drop feed dog For ordinary sewing, keep the feed dog up, for freehand embroidery, sewing on buttons and darning, drop the feed dog. To raise (a) and lower (b) feed dog. 46 502020.75.24_021V4D0101_1010_IM_bernette 10 12 15_EN_DE_NL_FR
15 EN How to drop feed dog For ordinary sewing, keep the feed dog up, for freehand embroidery, sewing on buttons and darning, drop the feed dog. To raise (a) and lower (b) feed dog. 46 502020.75.24_021V4D0101_1010_IM_bernette 10 12 15_EN_DE_NL_FR
Instruction Manual
Page 52
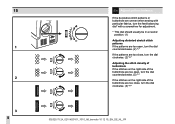
15 EN Adjust pattern balance If the decorative stitch patterns or buttonhole are uneven when sewing with particular fabrics, turn the feed balancing dial* with a screwdriver ...
15 EN Adjust pattern balance If the decorative stitch patterns or buttonhole are uneven when sewing with particular fabrics, turn the feed balancing dial* with a screwdriver ...