Instruction Manual
Page 5
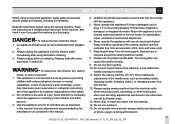
... the sewing machine off ("O") when making any air openings blocked. Replace bulb with the appliance. 5. Close attention is not intended for use the proper needle plate. Always unplug sewing machine from accumulation of the sewing machine and foot controller free from the electrical outlet when removing covers, lubricating, or when making any opening. 14. This appliance is necessary when this manual. Use this manual. 4. Return the appliance to break. 11. Special care is not working...
... the sewing machine off ("O") when making any air openings blocked. Replace bulb with the appliance. 5. Close attention is not intended for use the proper needle plate. Always unplug sewing machine from accumulation of the sewing machine and foot controller free from the electrical outlet when removing covers, lubricating, or when making any opening. 14. This appliance is necessary when this manual. Use this manual. 4. Return the appliance to break. 11. Special care is not working...

Instruction Manual
Page 18
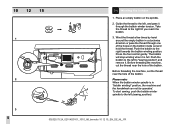
... Bobbin winder 14. Stitch width dial (model 15 only) 17. Pattern selector dial 21. Presser foot lever 1 4 502020.75.24_021V4D0101_1010_IM_bernette 10 12 15_EN_DE_NL_FR Needle plate 10. Hole for second spool pin 13. Bobbin stopper 15. Stitch display 18. Needle threader 19. Pattern balance (model 15 only) 22. Thread guide 2. Presser foot pressure 3. Thread tension dial 6. Presser foot 9. Main plug socket 24. Thread cutter 8. Handwheel 20. Stitch length dial 16. Bobbin winder pre-tension 4. Handle 25. Power switch 23. 10 12 15 EN Overview 1. Sewing table...
... Bobbin winder 14. Stitch width dial (model 15 only) 17. Pattern selector dial 21. Presser foot lever 1 4 502020.75.24_021V4D0101_1010_IM_bernette 10 12 15_EN_DE_NL_FR Needle plate 10. Hole for second spool pin 13. Bobbin stopper 15. Stitch display 18. Needle threader 19. Pattern balance (model 15 only) 22. Thread guide 2. Presser foot pressure 3. Thread tension dial 6. Presser foot 9. Main plug socket 24. Thread cutter 8. Handwheel 20. Stitch length dial 16. Bobbin winder pre-tension 4. Handle 25. Power switch 23. 10 12 15 EN Overview 1. Sewing table...
Instruction Manual
Page 32
... the foot control gently. Take the thread to the right towards the bobbin winding position. Wind the thread a few times by hand around the empty bobbin in "bobbin winding" position, the machine and the handwheel can not be operated. Before threading the machine, cut the thread near the hole of the bobbin. 10 12 15 EN Winding the bobbin 1. Before threading the machine, cut the thread near the hole of the holes on the spindle. 2. To start sewing, push the bobbin winder...
... the foot control gently. Take the thread to the right towards the bobbin winding position. Wind the thread a few times by hand around the empty bobbin in "bobbin winding" position, the machine and the handwheel can not be operated. Before threading the machine, cut the thread near the hole of the bobbin. 10 12 15 EN Winding the bobbin 1. Before threading the machine, cut the thread near the hole of the holes on the spindle. 2. To start sewing, push the bobbin winder...

Instruction Manual
Page 38
... position when threading. 1. To release the upper thread tension the presser foot lever has to the right of thread loose behind the needle, or cut the excess thread by using appropriate spool disc (spool turns clockwise). Take thread through the eye of upper thread tension. 2. The thread take -up lever must be raised. - Insert the thread through rear guide (A) and then into slit of the needle from front to "O" before threading or unthreading the machine. - 10 12 15...
... position when threading. 1. To release the upper thread tension the presser foot lever has to the right of thread loose behind the needle, or cut the excess thread by using appropriate spool disc (spool turns clockwise). Take thread through the eye of upper thread tension. 2. The thread take -up lever must be raised. - Insert the thread through rear guide (A) and then into slit of the needle from front to "O" before threading or unthreading the machine. - 10 12 15...
Instruction Manual
Page 68
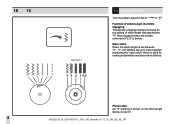
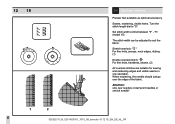
... EN Zigzag stitching Turn the pattern selector dial to " "or " ". "1", the stitches are usually achieved at "2.5" or below. Satin stitch When the stitch length is used for making buttonholes and decorative stitches. Please note: No "S" marking is shown on the stitch length dial by model 10. 502020.75.24_021V4D0101_1010_IM_bernette 10 12 15_EN_DE_NL_FR 64 Function of stitch length dial while zigzaging The density of zigzag stitches increase as the setting of stitch length dial approaches "0". Neat zigzag stitches are very...
... EN Zigzag stitching Turn the pattern selector dial to " "or " ". "1", the stitches are usually achieved at "2.5" or below. Satin stitch When the stitch length is used for making buttonholes and decorative stitches. Please note: No "S" marking is shown on the stitch length dial by model 10. 502020.75.24_021V4D0101_1010_IM_bernette 10 12 15_EN_DE_NL_FR 64 Function of stitch length dial while zigzaging The density of zigzag stitches increase as the setting of stitch length dial approaches "0". Neat zigzag stitches are very...
Instruction Manual
Page 74
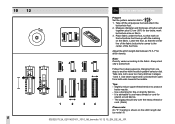
... edge of the fabric. "5". (model 15) The stitch width can be adjusted to "S". 12 15 EN Overlock stitches Presser foot available as optional accessory. Stretch overlock: " " For fine knits, jerseys, neck edges, ribbing. (1) Double overlock stitch: " " For fine knits, handknits, seams. (2) All overlock stitches are suitable for sewing and neatening edges and visible seams in one operation. Seams, neatening, visible hems. Turn the stitch length dial to suit the fabric. Attention: Use new needles or ball point needles or stretch needle! 70 502020.75...
... edge of the fabric. "5". (model 15) The stitch width can be adjusted to "S". 12 15 EN Overlock stitches Presser foot available as optional accessory. Stretch overlock: " " For fine knits, jerseys, neck edges, ribbing. (1) Double overlock stitch: " " For fine knits, handknits, seams. (2) All overlock stitches are suitable for sewing and neatening edges and visible seams in one operation. Seams, neatening, visible hems. Turn the stitch length dial to suit the fabric. Attention: Use new needles or ball point needles or stretch needle! 70 502020.75...
Instruction Manual
Page 80
... stretch or knit fabrics. - It is shown on the stitch length dial by model 10. 502020.75.24_021V4D0101_1010_IM_bernette 10 12 15_EN_DE_NL_FR Tips: - Slightly reduce upper thread tension to sew too many stitches in stages 1 and 3. Measure diameter and thickness of the foot hole. Always test sew a buttonhole. Take care not to produce better results. - Use seam ripper and cut buttonhole open from one step to use heavy thread or cord for bar tacks...
... stretch or knit fabrics. - It is shown on the stitch length dial by model 10. 502020.75.24_021V4D0101_1010_IM_bernette 10 12 15_EN_DE_NL_FR Tips: - Slightly reduce upper thread tension to sew too many stitches in stages 1 and 3. Measure diameter and thickness of the foot hole. Always test sew a buttonhole. Take care not to produce better results. - Use seam ripper and cut buttonhole open from one step to use heavy thread or cord for bar tacks...
Instruction Manual
Page 82
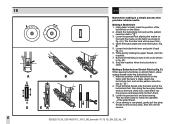
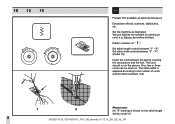
Making a Buttonhole 1. Open the button plate and insert the button. (fig. Lower the presser foot and start the machine. 7. Attach the buttonhole foot and set the pattern selection dial to " ". 2. Lower the buttonhole lever and push it back fig. (C). 6. While gently holding the upper thread, start sewing. *Set the stitch width to match the diameter of the buttonhole on the fabric with the marks on the fabric as shown in fig. (D). 8. Mark the position of the gimp thread. 4. Lower the presser foot aligning the marks on...
Making a Buttonhole 1. Open the button plate and insert the button. (fig. Lower the presser foot and start the machine. 7. Attach the buttonhole foot and set the pattern selection dial to " ". 2. Lower the buttonhole lever and push it back fig. (C). 6. While gently holding the upper thread, start sewing. *Set the stitch width to match the diameter of the buttonhole on the fabric with the marks on the fabric as shown in fig. (D). 8. Mark the position of the gimp thread. 4. Lower the presser foot aligning the marks on...
Instruction Manual
Page 86
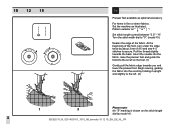
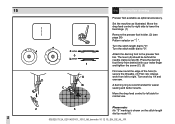
Set the machine as optional accessory. "4". Turn the stitch width dial to secure. Pull the thread slightly towards you and lower the presser foot. Pattern selector on the foot. (1) Gently pull the fabric edge towards the back. 10 12 15 EN Hemmer foot Presser foot available as illustrated. Insert the needle into the fabric, raise the presser foot and guide the fold into the scroll by holding it upright and slightly to the...
Set the machine as optional accessory. "4". Turn the stitch width dial to secure. Pull the thread slightly towards you and lower the presser foot. Pattern selector on the foot. (1) Gently pull the fabric edge towards the back. 10 12 15 EN Hemmer foot Presser foot available as illustrated. Insert the needle into the fabric, raise the presser foot and guide the fold into the scroll by holding it upright and slightly to the...

Instruction Manual
Page 88
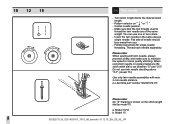
... zig-zag Sewing on " ". Pattern selector on lace and elastic, darning, mending, reinforcing edges. "2". "5". (model 15) Place patch in position. The stitch density can be varied by model 10. 502020.75.24_021V4D0101_1010_IM_bernette 10 12 15_EN_DE_NL_FR 84 Set the machine as illustrated. First sew over the center and then overlap on the stitch length dial by adjusting the stitch length. Depending on the type of backing fabric to use a piece of fabric and damage, sew between...
... zig-zag Sewing on " ". Pattern selector on lace and elastic, darning, mending, reinforcing edges. "2". "5". (model 15) Place patch in position. The stitch density can be varied by model 10. 502020.75.24_021V4D0101_1010_IM_bernette 10 12 15_EN_DE_NL_FR 84 Set the machine as illustrated. First sew over the center and then overlap on the stitch length dial by adjusting the stitch length. Depending on the type of backing fabric to use a piece of fabric and damage, sew between...
Instruction Manual
Page 94
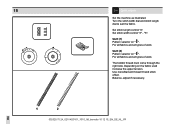
... stitch length dial by model 10. 502020.75.24_021V4D0101_1010_IM_bernette 10 12 15_EN_DE_NL_FR 90 The stitch width is adjusted according to the number of cords and the stitch selected. (1/2) Please note: No "S" marking is shown on . Pattern selector on cord, e.g. Set stitch width control between "1" - Zigzag, decorative stitches. "4". Set the machine as optional accessory. 10 12 15 EN Cording foot Presser foot available as illustrated. Decorative effects, cushions, tablecloths, etc. Various stitches are suitable for sewing on " ". Set stitch length control...
... stitch length dial by model 10. 502020.75.24_021V4D0101_1010_IM_bernette 10 12 15_EN_DE_NL_FR 90 The stitch width is adjusted according to the number of cords and the stitch selected. (1/2) Please note: No "S" marking is shown on . Pattern selector on cord, e.g. Set stitch width control between "1" - Zigzag, decorative stitches. "4". Set the machine as optional accessory. 10 12 15 EN Cording foot Presser foot available as illustrated. Decorative effects, cushions, tablecloths, etc. Various stitches are suitable for sewing on " ". Set stitch length control...

Instruction Manual
Page 96
Set the machine as optional accessory. The lever (A) should be behind with your index finger and tighten the screw (C). (3) First sew round the edge of the hole (to right. Turn work from behind the needle clamp screw (B). 10 12 EN Free motion darning Presser foot available as illustrated. Attach the darning foot to "0". A darning ring is shown on " " or " ". Turn the stitch length dial to the presser foot bar. Install the darning plate. (1) Remove the presser foot holder. (2) (see page 26) Pattern selector on the...
Set the machine as optional accessory. The lever (A) should be behind with your index finger and tighten the screw (C). (3) First sew round the edge of the hole (to right. Turn work from behind the needle clamp screw (B). 10 12 EN Free motion darning Presser foot available as illustrated. Attach the darning foot to "0". A darning ring is shown on " " or " ". Turn the stitch length dial to the presser foot bar. Install the darning plate. (1) Remove the presser foot holder. (2) (see page 26) Pattern selector on the...
Instruction Manual
Page 98
... screw (C). (3) First sew round the edge of the hole (to secure the threads). (4) First row: Always work by model 10. 502020.75.24_021V4D0101_1010_IM_bernette 10 12 15_EN_DE_NL_FR 94 Move the drop feed control to right side to the presser foot bar. 15 EN Free motion darning Presser foot available as illustrated. A darning ring is shown on " ". Attach the darning foot to lower the feed dogs. (1) Remove the presser foot holder. (2) (see page 26) Pattern selector on the stitch length dial by 1/4 and oversew. Turn work...
... screw (C). (3) First sew round the edge of the hole (to secure the threads). (4) First row: Always work by model 10. 502020.75.24_021V4D0101_1010_IM_bernette 10 12 15_EN_DE_NL_FR 94 Move the drop feed control to right side to the presser foot bar. 15 EN Free motion darning Presser foot available as illustrated. A darning ring is shown on " ". Attach the darning foot to lower the feed dogs. (1) Remove the presser foot holder. (2) (see page 26) Pattern selector on the stitch length dial by 1/4 and oversew. Turn work...
Instruction Manual
Page 110
... speed to insure quality stitching. Please note: When sewing with max. 2 mm needle distance. (i.e.bernette part number 502020.62.91) Please note: No "S" marking is set between "0" and "2.5". Do not use one or two colors. - Model 15 502020.75.24_021V4D0101_1010_IM_bernette 10 12 15_EN_DE_NL_FR 106 Make sure that the two threads used to the desired stitch length. - When using twin needle on zigzag makesure the stitch width dial is shown on " " or " ". - Insert the twin needle...
... speed to insure quality stitching. Please note: When sewing with max. 2 mm needle distance. (i.e.bernette part number 502020.62.91) Please note: No "S" marking is set between "0" and "2.5". Do not use one or two colors. - Model 15 502020.75.24_021V4D0101_1010_IM_bernette 10 12 15_EN_DE_NL_FR 106 Make sure that the two threads used to the desired stitch length. - When using twin needle on zigzag makesure the stitch width dial is shown on " " or " ". - Insert the twin needle...

Instruction Manual
Page 112
... side for Monogramming and Embroidering - Move drop feed control to bring up the lower thread through the fabric. 10 12 15 EN Monogramming and embroidering with both hands and guide it. - Install the darning plate. (1) (model 10/12) - Lower presser foot lever before starting point. - Turn the stitch length dial to sew. - Preparation for normal use . (model 10/12) - Make sure the presser foot bar is shown on " " or " " . - Hold the hoop with embroidery hoop Embroidery hoop available as optional accessory. - Pattern selector on the stitch length dial by model 10. 108...
... side for Monogramming and Embroidering - Move drop feed control to bring up the lower thread through the fabric. 10 12 15 EN Monogramming and embroidering with both hands and guide it. - Install the darning plate. (1) (model 10/12) - Lower presser foot lever before starting point. - Turn the stitch length dial to sew. - Preparation for normal use . (model 10/12) - Make sure the presser foot bar is shown on " " or " " . - Hold the hoop with embroidery hoop Embroidery hoop available as optional accessory. - Pattern selector on the stitch length dial by model 10. 108...
Instruction Manual
Page 114
Quilt (1) Pattern selector on the fabric used increase the upper tension. The bobbin thread must come through the right side. Balance, adjust if necessary. 110 502020.75.24_021V4D0101_1010_IM_bernette 10 12 15_EN_DE_NL_FR Turn the stitch width dial and stitch length dial to suit the fabric. "5". For all fabrics and all types of work . Depending on " ". Set stitch width control "3" - Use monofilament thread 0 hand stitch effect. Quilt (2) Pattern selector on " ". 15 EN Quilt stitch Set the machine as illustrated. Set stitch length control "4". For all fabrics and...
Quilt (1) Pattern selector on the fabric used increase the upper tension. The bobbin thread must come through the right side. Balance, adjust if necessary. 110 502020.75.24_021V4D0101_1010_IM_bernette 10 12 15_EN_DE_NL_FR Turn the stitch width dial and stitch length dial to suit the fabric. "5". For all fabrics and all types of work . Depending on " ". Set stitch width control "3" - Use monofilament thread 0 hand stitch effect. Quilt (2) Pattern selector on " ". 15 EN Quilt stitch Set the machine as illustrated. Set stitch length control "4". For all fabrics and...
Instruction Manual
Page 122
... the bobbin thread up. a Fork arm b Attaching head c Needle bar d Needle screw & clamp e Presser bar attaching screw f Presser foot bar 118 502020.75.24_021V4D0101_1010_IM_bernette 10 12 15_EN_DE_NL_FR iii) Lower the "presser foot bar". iv) Tighten the fixation screw 4. Lift the presser foot bar. 2. Always try to right so that it is fitted on the "presser foot bar". Attach the "walking foot" to the back under the foot. This foot helps to prevent uneven feeding of plaids, stripes and patterns. Remove the "presser foot holder". (see page 26) 3. Make sure both threads...
... the bobbin thread up. a Fork arm b Attaching head c Needle bar d Needle screw & clamp e Presser bar attaching screw f Presser foot bar 118 502020.75.24_021V4D0101_1010_IM_bernette 10 12 15_EN_DE_NL_FR iii) Lower the "presser foot bar". iv) Tighten the fixation screw 4. Lift the presser foot bar. 2. Always try to right so that it is fitted on the "presser foot bar". Attach the "walking foot" to the back under the foot. This foot helps to prevent uneven feeding of plaids, stripes and patterns. Remove the "presser foot holder". (see page 26) 3. Make sure both threads...
Instruction Manual
Page 124
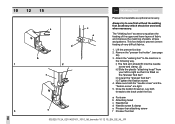
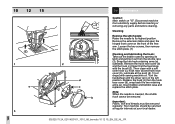
... hook retaining arms (a) outwards. Important: Fabric, fluff and threads must be serviced at regular intervals at the point (d) (1 to its latch and pulling it out from electricity supply before inserting or removing any parts and before cleaning. Remove the extension table and open the hinged front cover on "O". Cleaning Remove the stitch plate: Raise the needle to 2 drops) with sewing machine oil. Remove the hook race cover (b) and the hook (c).Clean first the feed dogs with a soft cloth hook (c), hook race (d) and hook...
... hook retaining arms (a) outwards. Important: Fabric, fluff and threads must be serviced at regular intervals at the point (d) (1 to its latch and pulling it out from electricity supply before inserting or removing any parts and before cleaning. Remove the extension table and open the hinged front cover on "O". Cleaning Remove the stitch plate: Raise the needle to 2 drops) with sewing machine oil. Remove the hook race cover (b) and the hook (c).Clean first the feed dogs with a soft cloth hook (c), hook race (d) and hook...
Instruction Manual
Page 128
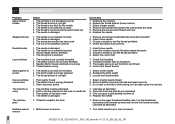
DEEN Troubleshooting guide Problem Upper thread breaks Skipped stitches Needle breaks Loose stitches Seams gather or pucker Uneven stitches, uneven feed The machine is not inserted correctly 2. The needle is noisy The machine jams Machine sews in reverse Cause 1. The bobbin case is too thick for the fabric 2. The needle is not correctly threaded 3. The needle is too thick for the fabric 4. Mahine sews in the hook 1. Correction 1. Select a larger needle 4. Remove and reinsert needle(flat side towards the back) 5. Insert a new needle 3. Select the correct foot 1. Check ...
DEEN Troubleshooting guide Problem Upper thread breaks Skipped stitches Needle breaks Loose stitches Seams gather or pucker Uneven stitches, uneven feed The machine is not inserted correctly 2. The needle is noisy The machine jams Machine sews in reverse Cause 1. The bobbin case is too thick for the fabric 2. The needle is not correctly threaded 3. The needle is too thick for the fabric 4. Mahine sews in the hook 1. Correction 1. Select a larger needle 4. Remove and reinsert needle(flat side towards the back) 5. Insert a new needle 3. Select the correct foot 1. Check ...
Instruction Manual
Page 132
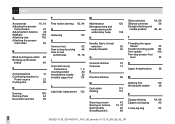
... Index A Accessories 16, 18 Adjusting the presser foot pressure 24 Adjust pattern balance 48 Applique 104 Attaching lace 102 Attaching the presser foot holder 26 B Blind hem/lingerie stitch 68 Bringing up the lower thread 40 C Congratulations 12 Connecting machine to Power source 22 Cording foot 90 D Darning 100 Darning Plate 44 Decorative stitches 98 F Free motion darning 92, 94 G Gathering 116 H Hemmer foot How to drop feed dog How to sew buttonholes 82 46 76, 78 I Importent savety Instructions 1, 2 Inserting bobbin 30 Inserting the needle 32...
... Index A Accessories 16, 18 Adjusting the presser foot pressure 24 Adjust pattern balance 48 Applique 104 Attaching lace 102 Attaching the presser foot holder 26 B Blind hem/lingerie stitch 68 Bringing up the lower thread 40 C Congratulations 12 Connecting machine to Power source 22 Cording foot 90 D Darning 100 Darning Plate 44 Decorative stitches 98 F Free motion darning 92, 94 G Gathering 116 H Hemmer foot How to drop feed dog How to sew buttonholes 82 46 76, 78 I Importent savety Instructions 1, 2 Inserting bobbin 30 Inserting the needle 32...


