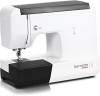
Bernina Bernette 15 Support Question
Bernina Bernette 15 Support Question
Find answers below for this question about Bernina Bernette 15.Need a Bernina Bernette 15 manual? We have 1 online manual for this item!
Question posted by sgrayxx on November 22nd, 2011
My Sewing Machine Bernette 15 Stops Working
After 1 day using my Bernette 15 stops working - engine hoots but doesn't rotate spindle and hand wheel is jammed.
Current Answers
Related Bernina Bernette 15 Manual Pages
Instruction Manual - Page 5
...
When using an electrical appliance, basic safety precautions should always be followed, including the following:
Read all moving parts. This appliance is required around the sewing machine needle.
8. Always unplug sewing machine from accumulation of burns, fire, electric
shock, or injury to break.
9. DANGER- Return the appliance to ensure that close to the machine, and hand it...
Instruction Manual - Page 6
....
17. Do not dispose of charge.
502020.75.24_021V4D0101_1010_IM_bernette 10 12 15_EN_DE_NL_FR SAVE THESE INSTRUCTIONS
This sewing machine is committed to the product. Environmentalprotection BERNINA is intended for free of electrical appliances as unsorted municipal waste, use only.
To disconnect, turn all controls to avoid a hazard.
19.
Never place anything on cord...
Instruction Manual - Page 26
... plug will fit in doubt as illustrated. Machine and sewing light is not in use . Unplug power cord when machine is switched on . (1)
Position 0 - The optimal operation temperature for power and light on .
10 12 15
EN
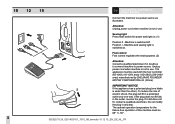
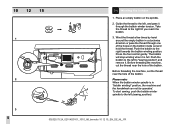
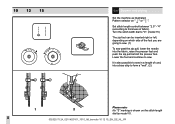
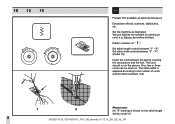
Connecting machine to power source
Connect the machine to a power source as to connect machine to power source. If the plug...
Instruction Manual - Page 32
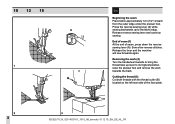
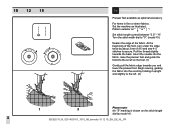
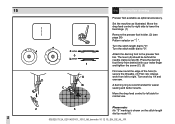
Wind the thread a few times by hand around the empty bobbin in "bobbin winding" position, the machine and the handwheel can not be operated. Press the foot control gently. Please note: When the bobbin winder spindle is full.
To start sewing, push the bobbin winder spindle to the left to "sewing position" and remove it. Push the...
Instruction Manual - Page 46
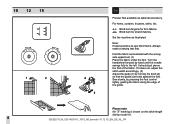
..., press down the reverse sewing lever (A). Release the lever and the machine will sew forwards again. End of seam (1) At the end of the face plate.
42
502020.75.24_021V4D0101_1010_IM_bernette 10 12 15_EN_DE_NL_FR Sew a few reverse stitches. Press the reverse sewing lever (A) while sewing backwards up lever to the fabric edge. Removing the work (2) Turn the handwheel...
Instruction Manual - Page 72
..., etc.
Set the machine as illustrated with the wrong side uppermost. (1) Place the fabric under the foot. Fold the fabric as illustrated.
Please note: No "S" marking is shown on the stitch length dial by hand until the needle swings fully to sew blind hems. Always make a sewing test first. 10 12 15
EN Blind hem...
Instruction Manual - Page 82
...
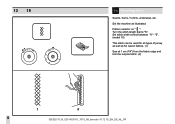
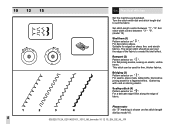
selection dial to " ". 3. Stop the machine when the buttonhole is a simple process...as shown in fig. (D). 8. 15
EN How to sew buttonholes
Buttonhole-making is sewn. Buttonhole...machine. 7. Once sewing is done in the order shown in fig. (A). (The front bar tack will be sewn first.) 4. Making a Buttonhole 1. B) 5. Lower the buttonhole lever and push it back fig. (C). 6. Using...
Instruction Manual - Page 84
... to form a "welt". (2)
Please note: No "S" marking is also possible to sew in a length of fabric). It is shown on the stitch length dial by model 10.
502020.75.24_021V4D0101_1010_IM_bernette 10 12 15_EN_DE_NL_FR
80
10 12 15
EN Zippers and piping
Set the machine as illustrated. Turn the stitch width dial to "0". (model...
Instruction Manual - Page 86
... foot.
Set the machine as optional accessory. At the beginning of the fabric. Turn the stitch width dial to secure. For hems in fine or sheer fabrics. "4".
Begin sewing, guiding the fabric into...the back. Pattern selector on the stitch length dial by about 3 mm (1/8") and sew 4-5 stitches to "0". (model 15)
Neaten the edge of the hem, turn under the edge twice by model 10...
Instruction Manual - Page 88

...15)
Place patch in position. Depending on the type of fabric and damage, sew between 3 and 5 rows. (2)
Please note: No "S" marking is advisable to use a piece of backing fabric to produce very close stitches. (1)
When mending tears, it is shown on both sides. First sew...stitch width control between "1" - 10 12 15
EN 3-step zig-zag
Sewing on " ". The stitch density can be varied by...
Instruction Manual - Page 90
... dial to "S" and adjust the stitch width dial between "3"and "5". (model 15)
Triple zigzag is suitable for firm fabrics like denim, corduroy, etc.
86
502020.75.24_021V4D0101_1010_IM_bernette 10 12 15_EN_DE_NL_FR This gives triple reinforcement. For hardwearing seams. Turn the stitch length dial to "S". The machine sews two stitches forwards and one stitch backwards.
Instruction Manual - Page 92
.... Set stitch width control between "4" - Pattern selector on " ".
Turn the stitch length dial to "S". "5". (model 15)
This stitch can be used for all types of jersey as well as illustrated. Set the machine as for woven fabrics. (1)
Sew at 1 cm (1/4") from the fabric edge and trim the surplus fabric. (2)
88
502020.75.24_021V4D0101_1010_IM_bernette 10...
Instruction Manual - Page 94
... Cording foot
Presser foot available as illustrated. "5". (model 15)
Insert the cord between "3" - The stitch width is adjusted according to the number of cords and the stitch selected. (1/2)
Please note: No "S" marking is shown on . Decorative effects, cushions, tablecloths, etc. Set the machine as optional accessory.
The cord should run in the...
Instruction Manual - Page 96

...and tighten the screw (C). (3)
First sew round the edge of the hole (to right. A darning ring is shown on " " or " ". Please note: No "S" marking is recommended for normal use. Install the darning plate. (1)
Remove... presser foot bar. Set the machine as optional accessory. Press the darning foot firmly from left to secure the threads). (4) First row: Always work by model 10.
502020.75....
Instruction Manual - Page 98
...dial by 1/4 and oversew.
Set the machine as optional accessory. Turn work from behind the needle clamp screw (B). ...Attach the darning foot to right. A darning ring is shown on " ". Please note: No "S" marking is recommended for normal use.
Press the darning foot firmly from left side for easier sewing and better results.
15...
Instruction Manual - Page 100
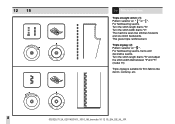
... fabric to suit the fabric. "5". (model 15)
Shell hem (1) Pattern selector on elastic, visible hems. This stitch can be used for firm, thicker fabrics. For flat joining seams, sewing on " ".
Suitable for a fagotted effect.... shown on " ". 10 12 15
EN Practical stitches
Set the machine as illustrated. Set stitch width control between "1" - Rampart (2) Pattern selector on " " .
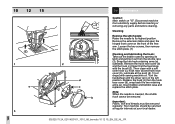
Instruction Manual - Page 118
... out of garment. With right-hand groove of foot over coil, stitch zipper until the foot hits the slider. Change to the machine. This foot is shown on the needle plate surface. Attach the invisible zipper foot to regular sewing foot and saw as close as shown in picture 1.
Place the fabric edge...
Instruction Manual - Page 122
...foot bar
118
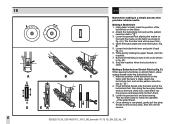
502020.75.24_021V4D0101_1010_IM_bernette 10 12 15_EN_DE_NL_FR Always try to sew first without the walking foot accessory which should fit into the ...iv) Tighten the fixation screw 4.
i) The fork arm should be used only when necessary. Lay both the "needle screw" and the "... fitted on the "presser foot bar". 10 12 15
EN Walking foot
Presser foot available as optional accessory....
Instruction Manual - Page 124
....
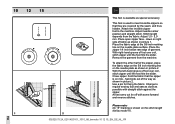
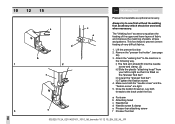
Cleaning
Remove the stitch plate: Raise the needle to 2 drops) with sewing machine oil. Insert bobbin and bobbin case and replace the stitch plate. Important: Fabric, fluff and threads must ...in the left position. Remove the extension table and open the hinged front cover on "O". 10 12 15
EN Maintenance
Caution: Main switch on the front of the free arm. Turn the handwheel until the ...
Instruction Manual - Page 128
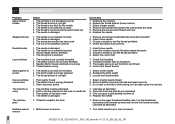
... machine 2. Correct the thread tension 1. Turn stitch selector up by hand and...machine jams Machine sews in reverse
Cause 1. Insert a new needle 3. Check and attach foot correctly 1. Select a better quality thread 2. Lubricate as described 3. The needle is too thick for the fabric 2. The needle is not inserted correctly 2. Insert a new needle 2. The wrong size needle has been used...
Similar Questions

Bernette 66 Sewing Machine
How do I thread a Bernette 66 sewing machine?
How do I thread a Bernette 66 sewing machine?
(Posted by stringpam 8 years ago)

New Bulb Not Working In Sewing Machine Bernette 12 What Can It Be
(Posted by Anonymous-152221 8 years ago)

Wanted :bernina 1260 Sewing Machine.
wanted to buy : Bernina 1260 sewing machine , in good working order.
wanted to buy : Bernina 1260 sewing machine , in good working order.
(Posted by beektze 10 years ago)

Bernina 1090 S Sewing Machine Manual
I Dont See The User Manual For This Machine For Free Downloading.what User Manual Are The Same As Th...
I Dont See The User Manual For This Machine For Free Downloading.what User Manual Are The Same As Th...
(Posted by cynthianel 10 years ago)

Bobbins For Bernette 15
What Bobbins work for the Bernette 15? Where do I find them?
What Bobbins work for the Bernette 15? Where do I find them?
(Posted by fakrampe 12 years ago)