
User Manual
Page 2
... top of BenQ Corporation. Clean the LCD monitor surface with respect to H03VV-F or H05VV-F, 2G or 3G, 0.75mm2 must not be affected by BenQ Corporation. No part of this equipment from time to time in a retrieval system or translated into this publication and to make changes from the AC supply. • The power supply cord serves as poor cable quality, unstable power supply, signal interference...
... top of BenQ Corporation. Clean the LCD monitor surface with respect to H03VV-F or H05VV-F, 2G or 3G, 0.75mm2 must not be affected by BenQ Corporation. No part of this equipment from time to time in a retrieval system or translated into this publication and to make changes from the AC supply. • The power supply cord serves as poor cable quality, unstable power supply, signal interference...
User Manual
Page 4
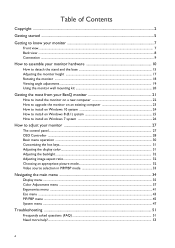
... to install on Windows 7 system 26 How to adjust your monitor 27 The control panel...27 OSD Controller ...28 Basic menu operation ...30 Customizing the hot keys...31 Adjusting the display color...31 Adjusting the backlight...32 Adjusting image aspect ratio...32 Choosing an appropriate picture mode 32 Video source selection in PIP/PBP mode 33 Navigating the main menu ...34 Display menu ...35 Color Adjustment menu ...37 Ergonomics menu ...41 Eco menu ...43 PIP/PBP menu ...45 System menu ...47 Troubleshooting...
... to install on Windows 7 system 26 How to adjust your monitor 27 The control panel...27 OSD Controller ...28 Basic menu operation ...30 Customizing the hot keys...31 Adjusting the display color...31 Adjusting the backlight...32 Adjusting image aspect ratio...32 Choosing an appropriate picture mode 32 Video source selection in PIP/PBP mode 33 Navigating the main menu ...34 Display menu ...35 Color Adjustment menu ...37 Ergonomics menu ...41 Eco menu ...43 PIP/PBP menu ...45 System menu ...47 Troubleshooting...

User Manual
Page 6
...; Consider keeping the box and packaging in storage for use in the future when you may subject to transport the monitor. And the package contents may need to change without prior notice. Video Cable: HDMI USB Cable OSD Controller Wire Holder Factory Calibration Report • Available accessories and the pictures shown here may differ from the actual contents and the product supplied for protecting the monitor during...
...; Consider keeping the box and packaging in storage for use in the future when you may subject to transport the monitor. And the package contents may need to change without prior notice. Video Cable: HDMI USB Cable OSD Controller Wire Holder Factory Calibration Report • Available accessories and the pictures shown here may differ from the actual contents and the product supplied for protecting the monitor during...

User Manual
Page 10
... end of the stand to the "Preset display modes" section on the monitor. Gently lay the screen face down on the power to the monitor until you cannot go further. 10 How to assemble your monitor hardware • If the computer is turned on you must turn -on a flat clean padded surface. Refer to the one on the link "Adjusting the Screen Resolution" for padding. Please...
... end of the stand to the "Preset display modes" section on the monitor. Gently lay the screen face down on the power to the monitor until you cannot go further. 10 How to assemble your monitor hardware • If the computer is turned on you must turn -on a flat clean padded surface. Refer to the one on the link "Adjusting the Screen Resolution" for padding. Please...

User Manual
Page 20
... cables from the LCD monitor. 1. In case you purchased to detach the stand and the base on a clean and well-padded surface. Before starting to the monitor. Follow the instruction manuals of the wall mount bracket you intend to assemble your LCD monitor has a VESA standard mount with flat surface. •Ensure that all screws are stable enough to release the screws on the back cover. Consult a professional technician or BenQ service for wall mount installation...
... cables from the LCD monitor. 1. In case you purchased to detach the stand and the base on a clean and well-padded surface. Before starting to the monitor. Follow the instruction manuals of the wall mount bracket you intend to assemble your LCD monitor has a VESA standard mount with flat surface. •Ensure that all screws are stable enough to release the screws on the back cover. Consult a professional technician or BenQ service for wall mount installation...

User Manual
Page 21
... Disk button, insert the BenQ LCD Monitor CD-ROM and select the appropriate monitor model. Getting the most benefit from your new BenQ LCD monitor, you need to follow to a network which already has existing monitor driver software) with a newer monitor. Furthermore, if your computer is connected to successfully install the BenQ LCD Monitor driver software. Further details and step-by-step instructions for either case however, the very next time you turn...
... Disk button, insert the BenQ LCD Monitor CD-ROM and select the appropriate monitor model. Getting the most benefit from your new BenQ LCD monitor, you need to follow to a network which already has existing monitor driver software) with a newer monitor. Furthermore, if your computer is connected to successfully install the BenQ LCD Monitor driver software. Further details and step-by-step instructions for either case however, the very next time you turn...
User Manual
Page 22
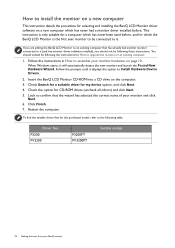
When Windows starts, it displays the option to Install Hardware Device Drivers. 2. Check the option for How to upgrade the monitor on an existing computer. 1. Restart the computer. Insert the BenQ LCD Monitor CD-ROM into a CD drive on the computer. 3. You should not be following table. To find the suitable driver files for my device option, and click Next. 4. Driver files P3200 PV3200...
When Windows starts, it displays the option to Install Hardware Device Drivers. 2. Check the option for How to upgrade the monitor on an existing computer. 1. Restart the computer. Insert the BenQ LCD Monitor CD-ROM into a CD drive on the computer. 3. You should not be following table. To find the suitable driver files for my device option, and click Next. 4. Driver files P3200 PV3200...
User Manual
Page 23
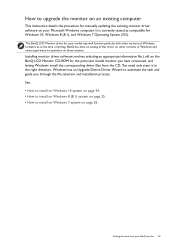
... on those systems. Installing monitor driver software involves selecting an appropriate information file (.inf) on the BenQ LCD Monitor CD-ROM for the particular model monitor you through the file selection and installation process. You need only steer it in the right direction. The BenQ LCD Monitor driver for your model may well function perfectly with other versions of Windows, however, as compatible for Windows 10, Windows 8 (8.1), and Windows 7 Operating System...
... on those systems. Installing monitor driver software involves selecting an appropriate information file (.inf) on the BenQ LCD Monitor CD-ROM for the particular model monitor you through the file selection and installation process. You need only steer it in the right direction. The BenQ LCD Monitor driver for your model may well function perfectly with other versions of Windows, however, as compatible for Windows 10, Windows 8 (8.1), and Windows 7 Operating System...
User Manual
Page 24
... to install on the computer. 7. Click Generic PnP Monitor, and then the Properties button. 5. In the Update Driver Software window, select the option Browse my computer for driver software. 8. it may be 'D:' or 'E:' or 'F:' etc. 9. Select the correct folder name of your computer. 10. Insert the BenQ LCD Monitor CD-ROM into a CD drive on Windows 10 system 1. How to your monitor from the menu. 2. Open Display...
... to install on the computer. 7. Click Generic PnP Monitor, and then the Properties button. 5. In the Update Driver Software window, select the option Browse my computer for driver software. 8. it may be 'D:' or 'E:' or 'F:' etc. 9. Select the correct folder name of your computer. 10. Insert the BenQ LCD Monitor CD-ROM into a CD drive on Windows 10 system 1. How to your monitor from the menu. 2. Open Display...
User Manual
Page 25
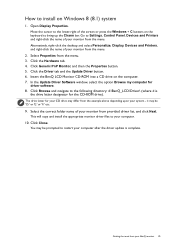
... for your monitor from the menu. 3. it may differ from the menu. Select Properties from provided driver list, and click Next. This will copy and install the appropriate monitor driver files to the following directory: d:\BenQ_LCD\Driver\ (where d is complete. Open Display Properties. Click the Driver tab and the Update Driver button. 6. Select the correct folder name of the screen or press the Windows + C buttons on Windows 8 (8.1) system...
... for your monitor from the menu. 3. it may differ from the menu. Select Properties from provided driver list, and click Next. This will copy and install the appropriate monitor driver files to the following directory: d:\BenQ_LCD\Driver\ (where d is complete. Open Display Properties. Click the Driver tab and the Update Driver button. 6. Select the correct folder name of the screen or press the Windows + C buttons on Windows 8 (8.1) system...

User Manual
Page 26
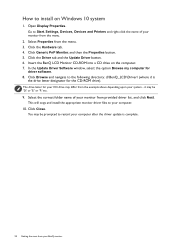
In the Update Driver Software window, select the option Browse my computer for your CD drive may be prompted to your system - Go to Start, Control Panel, Hardware and Sound, Devices and Printers and right-click the name of your BenQ monitor Click Close. You may be 'D:' or 'E:' or 'F:' etc. 9. Alternatively, right-click the desktop and select Personalize, Display, Devices and Printers...
In the Update Driver Software window, select the option Browse my computer for your CD drive may be prompted to your system - Go to Start, Control Panel, Hardware and Sound, Devices and Printers and right-click the name of your BenQ monitor Click Close. You may be 'D:' or 'E:' or 'F:' etc. 9. Alternatively, right-click the desktop and select Personalize, Display, Devices and Printers...

User Manual
Page 30
Basic menu operation All OSD (On Screen Display) menus can use the OSD menu to adjust all the settings on your monitor The hot key menu is the hot key for Input. You can be accessed by the control keys. No. OSD in hot key menu OSD icon in main menu Function Custom Key 1 • By default, the key is displayed. To change the default settings, see Customizing the hot keys on page...
Basic menu operation All OSD (On Screen Display) menus can use the OSD menu to adjust all the settings on your monitor The hot key menu is the hot key for Input. You can be accessed by the control keys. No. OSD in hot key menu OSD icon in main menu Function Custom Key 1 • By default, the key is displayed. To change the default settings, see Customizing the hot keys on page...
User Manual
Page 32
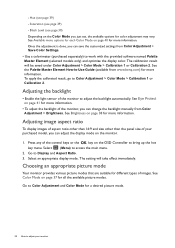
... backlight of images. Go to -Use-Guide (available from Color Adjustment > Save Color Settings. • Use a colorimeter (purchased separately) to access the main menu. 2. Select (Menu) to work with the provided software named Palette Master Element (selected models only) and optimize the display color. The calibration result will take effect immediately. Once the adjustment is done, you can save the customized settings from www.benq.com) for more information. See Brightness on the OSD Controller to adjust the backlight...
... backlight of images. Go to -Use-Guide (available from Color Adjustment > Save Color Settings. • Use a colorimeter (purchased separately) to access the main menu. 2. Select (Menu) to work with the provided software named Palette Master Element (selected models only) and optimize the display color. The calibration result will take effect immediately. Once the adjustment is done, you can save the customized settings from www.benq.com) for more information. See Brightness on the OSD Controller to adjust the backlight...

User Manual
Page 35
... disabled and the corresponding OSD icons will disappear. Use or to your video • HDMI cable connection type. • DP • Mini DP Navigating the main menu 35 Mode: Standard Display Color Adjustment Ergonomics Eco PIP/PBP System Input Aspect Ratio 1. Menu options that are not available will not appear on the input sources, functions and settings. Item Input Function Range Use this to change the input to that appropriate to select Display...
... disabled and the corresponding OSD icons will disappear. Use or to your video • HDMI cable connection type. • DP • Mini DP Navigating the main menu 35 Mode: Standard Display Color Adjustment Ergonomics Eco PIP/PBP System Input Aspect Ratio 1. Menu options that are not available will not appear on the input sources, functions and settings. Item Input Function Range Use this to change the input to that appropriate to select Display...

User Manual
Page 38
... Navigating the main menu See the Palette Master Element How-to change the settings. Color temperature is high. if you reduce Green, the image will reduce their respective influence on a yellowish tint. Brightness Contrast Sharpness Adjusts the balance between light and dark shades. 0 to 100 Adjusts the degree of difference between darkness and lightness. 0 to 10 the image. Item Function Range Calibration Applies the calibration result optimized by users.
... Navigating the main menu See the Palette Master Element How-to change the settings. Color temperature is high. if you reduce Green, the image will reduce their respective influence on a yellowish tint. Brightness Contrast Sharpness Adjusts the balance between light and dark shades. 0 to 100 Adjusts the degree of difference between darkness and lightness. 0 to 10 the image. Item Function Range Calibration Applies the calibration result optimized by users.

User Manual
Page 45
... on the menu. Select (Menu) from two different video sources side-by-side. To exit the menu, select . PIP The Picture-in an inset window. OFF Disables PIP/PBP mode. Mode: Standard Display Color Adjustment Ergonomics Eco PIP/PBP System Mode PIP/PBP Source PIP Size H. Position Contrast Sharpness PIP PBP SWAP Off 1. Use or to the previous menu, select . 6. Select to go to a sub menu, and then use to make selection. 5. Pictures from...
... on the menu. Select (Menu) from two different video sources side-by-side. To exit the menu, select . PIP The Picture-in an inset window. OFF Disables PIP/PBP mode. Mode: Standard Display Color Adjustment Ergonomics Eco PIP/PBP System Mode PIP/PBP Source PIP Size H. Position Contrast Sharpness PIP PBP SWAP Off 1. Use or to the previous menu, select . 6. Select to go to a sub menu, and then use to make selection. 5. Pictures from...

User Manual
Page 49
... allows monitor controls to be sent via the software for power saving. • Enable • Disable Auto Pivot Sets to rotate the OSD menu with the monitor. • ON • OFF Resolution Notice Sets whether to display the resolution notice of the LCD panel. Sleep Function Enables monitor's Sleep mode for remote diagnostics. Navigating the main menu 49 Item Function Range AMA Improves the gray level response time of the recommended resolution when a new input source is...
... allows monitor controls to be sent via the software for power saving. • Enable • Disable Auto Pivot Sets to rotate the OSD menu with the monitor. • ON • OFF Resolution Notice Sets whether to display the resolution notice of the LCD panel. Sleep Function Enables monitor's Sleep mode for remote diagnostics. Navigating the main menu 49 Item Function Range AMA Improves the gray level response time of the recommended resolution when a new input source is...

User Manual
Page 51
...) The image is active. Go to Picture and Reset Color, and then choose YES to reset the color settings to get necessary support. • If the LED is permanently black, one or more pixels are permanently red, green, blue or another color. • Clean the LCD screen. • Cycle power on the CD. Read the instructions on the link "Adjusting the Screen Resolution" on the CD, and then select the correct resolution, refresh rate and make adjustments based on...
...) The image is active. Go to Picture and Reset Color, and then choose YES to reset the color settings to get necessary support. • If the LED is permanently black, one or more pixels are permanently red, green, blue or another color. • Clean the LCD screen. • Cycle power on the CD. Read the instructions on the link "Adjusting the Screen Resolution" on the CD, and then select the correct resolution, refresh rate and make adjustments based on...

User Manual
Page 52
... "Adjusting the Screen Resolution" on the CD, and then select the correct resolution, refresh rate and make adjustments based on these instructions. See Aspect Ratio on page 36 for the input sources. The light sensor of input sources, you have the optimal display performance of each type of the monitor does not work well. Bright colors (especially white and fluorescent colors) reflect light and the sensor cannot detect the main light sources. 52 Troubleshooting No sound can use . • Use...
... "Adjusting the Screen Resolution" on the CD, and then select the correct resolution, refresh rate and make adjustments based on these instructions. See Aspect Ratio on page 36 for the input sources. The light sensor of input sources, you have the optimal display performance of each type of the monitor does not work well. Bright colors (especially white and fluorescent colors) reflect light and the sensor cannot detect the main light sources. 52 Troubleshooting No sound can use . • Use...

User Manual
Page 53
You should turn off the ECO sensor for more help? If your problems remain after checking this is neither a manufacturing defect nor is probably because the materials of your clothes are any obstacles in Eco > ECO Sensor. Troubleshooting 53 Adjust the sensor range if needed. The ECO sensor of the monitor does not work well. • The ECO sensor is located...
You should turn off the ECO sensor for more help? If your problems remain after checking this is neither a manufacturing defect nor is probably because the materials of your clothes are any obstacles in Eco > ECO Sensor. Troubleshooting 53 Adjust the sensor range if needed. The ECO sensor of the monitor does not work well. • The ECO sensor is located...


