
User Manual
Page 5
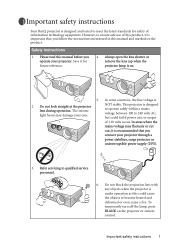
... meet the latest standards for future reference. 4. To temporarily turn off the lamp, press BLANK on the product. Important safety instructions Your BenQ projector is designed to operate safely within a mains voltage between 100 to 240 volts AC, but could cause the objects to become heated and.... Please read this manual and marked on the projector or remote control. NOT stable. Do not block the projection lens with any objects when the projector is important that you operate your eyes. Do not look straight at the projector lens during operation. In areas where the mains ...
... meet the latest standards for future reference. 4. To temporarily turn off the lamp, press BLANK on the product. Important safety instructions Your BenQ projector is designed to operate safely within a mains voltage between 100 to 240 volts AC, but could cause the objects to become heated and.... Please read this manual and marked on the projector or remote control. NOT stable. Do not block the projection lens with any objects when the projector is important that you operate your eyes. Do not look straight at the projector lens during operation. In areas where the mains ...
User Manual
Page 10
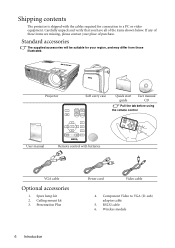
... contact your region, and may differ from those illustrated. Shipping contents The projector is shipped with batteries VGA cable Optional accessories 1. Projector Soft carry case Quick start User manual guide CD Pull the tab before using the remote control User manual Remote control with the cables required for your place of purchase. Spare lamp...
... contact your region, and may differ from those illustrated. Shipping contents The projector is shipped with batteries VGA cable Optional accessories 1. Projector Soft carry case Quick start User manual guide CD Pull the tab before using the remote control User manual Remote control with the cables required for your place of purchase. Spare lamp...

User Manual
Page 13
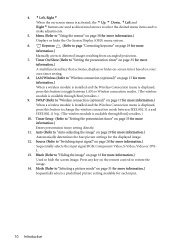
Remote control 7 1 8 2 9 10 3 4 11 5 12 3 13 14 6 1. To release the function, press Freeze again. 3. 5Up... indicator light (Refer to "Fine-tuning the image size and clarity" on page 29 for more information.) Turns the projector on page 51 for more information.) Adjusts the focus of the screen. When the on-screen menu is activated, the...#9 and #10 function as directional arrows to select the desired menu items and to "Start up or flashes when the projector is pressed. Freeze The image is frozen when Freeze is under operation. 9. 3 Left 10. Power (Refer to make ...
Remote control 7 1 8 2 9 10 3 4 11 5 12 3 13 14 6 1. To release the function, press Freeze again. 3. 5Up... indicator light (Refer to "Fine-tuning the image size and clarity" on page 29 for more information.) Turns the projector on page 51 for more information.) Adjusts the focus of the screen. When the on-screen menu is activated, the...#9 and #10 function as directional arrows to select the desired menu items and to "Start up or flashes when the projector is pressed. Freeze The image is frozen when Freeze is under operation. 9. 3 Left 10. Power (Refer to make ...
User Manual
Page 14
... for more information.) Used to change the wireless connection mode between LAN or Wireless connection modes. (The wireless module is available through BenQ retailers.) 10. Mode (Refer to "Setting the presentation timer" on page 35 for more information.) A multifunctional key that activates, ...determines the best picture settings for the displayed image. 12. Timer Setup (Refer to restore the image. 14. Press any key on the remote control to "Setting the presentation timer" on page 35 for more information.) Enters presentation timer setting directly. 11. Keystone (Refer to make ...
... for more information.) Used to change the wireless connection mode between LAN or Wireless connection modes. (The wireless module is available through BenQ retailers.) 10. Mode (Refer to "Setting the presentation timer" on page 35 for more information.) A multifunctional key that activates, ...determines the best picture settings for the displayed image. 12. Timer Setup (Refer to restore the image. 14. Press any key on the remote control to "Setting the presentation timer" on page 35 for more information.) Enters presentation timer setting directly. 11. Keystone (Refer to make ...
User Manual
Page 15
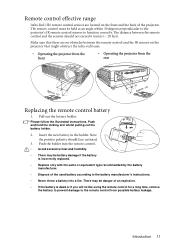
...illustrated instructions. There may be held at an angle within 30 degrees perpendicular to the projector's IR remote control sensors to function correctly. Insert the new battery in the holder. Introduction 11 Push the holder into the remote control. • Avoid excessive heat and humidity. • There may be danger ... If the battery is incorrectly replaced. • Replace only with the same or equivalent type recommended by the battery manufacturer. • Dispose of the projector. The remote control must be battery damage if the battery is dead or if you will not be using the...
...illustrated instructions. There may be held at an angle within 30 degrees perpendicular to the projector's IR remote control sensors to function correctly. Insert the new battery in the holder. Introduction 11 Push the holder into the remote control. • Avoid excessive heat and humidity. • There may be danger ... If the battery is incorrectly replaced. • Replace only with the same or equivalent type recommended by the battery manufacturer. • Dispose of the projector. The remote control must be battery damage if the battery is dead or if you will not be using the...
User Manual
Page 29
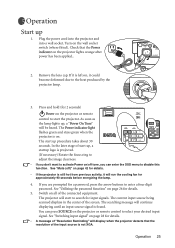
...page 42 for details. • If the projector is not XGA. The current input source being scanned displays in the center of the connected equipment. Turn on . See "Mute (off tone, you are prompted for 2 seconds) Power on the projector or remote control to activate Power on/off )" on ...the projector lights orange after power has been applied.. ...
...page 42 for details. • If the projector is not XGA. The current input source being scanned displays in the center of the connected equipment. Turn on . See "Mute (off tone, you are prompted for 2 seconds) Power on the projector or remote control to activate Power on/off )" on ...the projector lights orange after power has been applied.. ...

User Manual
Page 32
... corner. Screw the rear adjuster foot in the Picture menu, on the projector control panel, or on page 43 for details. See "Correcting keystone" on the projector control panel or the remote control is activated if you switch between different input signals. The brightness level...See "Source Scan (on)" on the remote control. If the screen and the projector are generally brighter than "Video" using mostly moving images (movies). Lift the projector up the projector while pressing the quick-release button, then slowly lower the projector. To correct this situation, adjust the ...
... corner. Screw the rear adjuster foot in the Picture menu, on the projector control panel, or on page 43 for details. See "Correcting keystone" on the projector control panel or the remote control is activated if you switch between different input signals. The brightness level...See "Source Scan (on)" on the remote control. If the screen and the projector are generally brighter than "Video" using mostly moving images (movies). Lift the projector up the projector while pressing the quick-release button, then slowly lower the projector. To correct this situation, adjust the ...

User Manual
Page 33
...correct keystoning at either the top or bottom. Press Left 3 to correct keystoning at the top of the projector to the situation where the projected image is functioning. Press / on the remote control. the focus ring. Fine-tuning the image size and clarity 1. Auto-adjusting the image In some ...cases, you may need using the zoom ring. To correct this , press AUTO on the projector or remote control. Press 6 MENU on the projector or MENU on the remote control to display the status bar labelled Keystone, then press to correct keystoning at the top of the image ...
...correct keystoning at either the top or bottom. Press Left 3 to correct keystoning at the top of the projector to the situation where the projected image is functioning. Press / on the remote control. the focus ring. Fine-tuning the image size and clarity 1. Auto-adjusting the image In some ...cases, you may need using the zoom ring. To correct this , press AUTO on the projector or remote control. Press 6 MENU on the projector or MENU on the remote control to display the status bar labelled Keystone, then press to correct keystoning at the top of the image ...

User Manual
Page 34
... making these adjustments. 2. 4:3: Scales an image so that it is displayed in 16:9 ratio. Press Right 4 on the projector or 4 on the remote control when you are active areas. 1. You can dynamically stretch and scale the image output to a different aspect than if resized to fit ...the display area. Native: The image is projected at its original aspect ratio, and resized to full screen. Press Left 3on the projector or 3 on the remote control when you are usually in the center of the screen with lower resolutions, the projected image will display smaller than that it displays...
... making these adjustments. 2. 4:3: Scales an image so that it is displayed in 16:9 ratio. Press Right 4 on the projector or 4 on the remote control when you are active areas. 1. You can dynamically stretch and scale the image output to a different aspect than if resized to fit ...the display area. Native: The image is projected at its original aspect ratio, and resized to full screen. Press Left 3on the projector or 3 on the remote control when you are usually in the center of the screen with lower resolutions, the projected image will display smaller than that it displays...
User Manual
Page 38
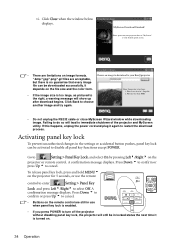
... remote control. the right, a warning message will lead to choose another image and try again. Go to 2. file can be downloaded successfully. Error: Image size is too large, as your BenQ projector *.bmp/*.jpg/*.png/*.gif files are limitations on . 34 Operation A confirmation message ...displays. Press Down 6 to confirm or press Up 5 to cancel. • Buttons on the remote control are still in use the remote control to enter Setting >...
... remote control. the right, a warning message will lead to choose another image and try again. Go to 2. file can be downloaded successfully. Error: Image size is too large, as your BenQ projector *.bmp/*.jpg/*.png/*.gif files are limitations on . 34 Operation A confirmation message ...displays. Press Down 6 to confirm or press Up 5 to cancel. • Buttons on the remote control are still in use the remote control to enter Setting >...

User Manual
Page 39
... disappear. To release the function, press the Freeze button on the remote control, or the Source button on the remote control to enter timer setting directly. 2. Go to Advanced > Presentation Timer or press TIMER SETUP on the projector control panel. Select On by pressing Left3/Right4. 4. If the ... it will remain on the screen. Please note the timer is still counting after pressing this function: 1. TIMER On/Show on the remote control is frozen on the screen, the pictures are running on the video or other device. Note that pressing the Source button will only...
... disappear. To release the function, press the Freeze button on the remote control, or the Source button on the remote control to enter timer setting directly. 2. Go to Advanced > Presentation Timer or press TIMER SETUP on the projector control panel. Select On by pressing Left3/Right4. 4. If the ... it will remain on the screen. Please note the timer is still counting after pressing this function: 1. TIMER On/Show on the remote control is frozen on the screen, the pictures are running on the video or other device. Note that pressing the Source button will only...

User Manual
Page 42
...the adjustment of the keystone. 1. Press EXIT5 or MENU6 on the projector or 6/5 on the remote *The first press leads you back to leave and save the setting. Using the menus The projector is equipped with on the projector or 5. Auto Resize On Aspect Ratio Keystone H Position V Position ... Adjust keystone values by pressing Left 3/Right 4on the projector or Left 3/Right 4 on . 4. menu. 3. Press EXIT5 on the projector Left 3/Right 4on the remote control or press MENU twice* on the to select the Pro-Picture remote control to the submenu and the second press closes the...
...the adjustment of the keystone. 1. Press EXIT5 or MENU6 on the projector or 6/5 on the remote *The first press leads you back to leave and save the setting. Using the menus The projector is equipped with on the projector or 5. Auto Resize On Aspect Ratio Keystone H Position V Position ... Adjust keystone values by pressing Left 3/Right 4on the projector or Left 3/Right 4 on . 4. menu. 3. Press EXIT5 on the projector Left 3/Right 4on the remote control or press MENU twice* on the to select the Pro-Picture remote control to the submenu and the second press closes the...

User Manual
Page 43
You can optimize your projector image set the peak white level after you can use . T3: Maintains normal colorings for details. A white color with a high color temperature appears to have ... just as the "color temperature". Unavailable adjustments are four color temperature* settings available. Adjusts the brightness of difference between dark and light in use the remote control 'Mode' button to be "white" for various purposes. YPbPr/ SVideo/ Video: Standard) There are not shown on page 31 for white. 4. T2: Makes images...
You can optimize your projector image set the peak white level after you can use . T3: Maintains normal colorings for details. A white color with a high color temperature appears to have ... just as the "color temperature". Unavailable adjustments are four color temperature* settings available. Adjusts the brightness of difference between dark and light in use the remote control 'Mode' button to be "white" for various purposes. YPbPr/ SVideo/ Video: Standard) There are not shown on page 31 for white. 4. T2: Makes images...

User Manual
Page 46
... 6 to choose Power On/Off Tone and press Left3/Right 4 to "Utilizing the password function" on the projector or the remote control. Selecting On limits use the projector. Returns all panel key functions except POWER on the projector and buttons on -screen. Quick Cooling (on and off. Change Password Reset (No) The digits being...
... 6 to choose Power On/Off Tone and press Left3/Right 4 to "Utilizing the password function" on the projector or the remote control. Selecting On limits use the projector. Returns all panel key functions except POWER on the projector and buttons on -screen. Quick Cooling (on and off. Change Password Reset (No) The digits being...

User Manual
Page 47
... until it acquires a signal. Use Left 3/Right 4on the projector or remote control to "Choosing a location" on your desired language. Allows you need to select which logo screen will scan for more mirrors. Refer to select your ceiling. Four modes are available: BenQ logo, Black screen, Blue screen or MyScreen. If the source...
... until it acquires a signal. Use Left 3/Right 4on the projector or remote control to "Choosing a location" on your desired language. Allows you need to select which logo screen will scan for more mirrors. Refer to select your ceiling. Four modes are available: BenQ logo, Black screen, Blue screen or MyScreen. If the source...

User Manual
Page 48
... darker projected images. Displays possible solutions to reduce system noise and reduce power consumption by pressing Left 3/Right 4on the projector or remote control. A mode for operation in areas like this mode is used for extended periods of time (>10 hours) without shutdown. Helps ...be used for more information on how the total lamp hour is calculated, see "Calculation of time. Press Left 3/Right 4on the projector or remote control to finish the presentation within a certain timeframe. Current Status High Altitude Mode On This mode is activated, the light output will...
... darker projected images. Displays possible solutions to reduce system noise and reduce power consumption by pressing Left 3/Right 4on the projector or remote control. A mode for operation in areas like this mode is used for extended periods of time (>10 hours) without shutdown. Helps ...be used for more information on how the total lamp hour is calculated, see "Calculation of time. Press Left 3/Right 4on the projector or remote control to finish the presentation within a certain timeframe. Current Status High Altitude Mode On This mode is activated, the light output will...

User Manual
Page 50
...shutdown procedure as described in its original packing or equivalent. Cleaning the lens Clean the lens whenever you need to store the projector for the projector. These can damage the case. The only thing you notice dirt or dust on page 36 and unplug the power cord....the range. • Retract the adjuster feet. • Remove the batteries from the remote control. • Pack the projector in "Shutting down the projector" on the surface. • Use a canister of the projector Your projector needs little maintenance. Never use the original box or provided soft carry case. 46 ...
...shutdown procedure as described in its original packing or equivalent. Cleaning the lens Clean the lens whenever you need to store the projector for the projector. These can damage the case. The only thing you notice dirt or dust on page 36 and unplug the power cord....the range. • Retract the adjuster feet. • Remove the batteries from the remote control. • Pack the projector in "Shutting down the projector" on the surface. • Use a canister of the projector Your projector needs little maintenance. Never use the original box or provided soft carry case. 46 ...

User Manual
Page 54
... result in malfunction. • Do not over tighten the screw. 14. Do not turn the power on the projector. 13. Place the lamp cords back to "Indicators" on the remote control to reset the lamp hour to let the OSD disappear. i. For more detailed information, please refer to the... slots. 12. Restart the projector. iii. The internal temperature is too high. 2. Connect the lamp connector to display the ...
... result in malfunction. • Do not over tighten the screw. 14. Do not turn the power on the projector. 13. Place the lamp cords back to "Indicators" on the remote control to reset the lamp hour to let the OSD disappear. i. For more detailed information, please refer to the... slots. 12. Restart the projector. iii. The internal temperature is too high. 2. Connect the lamp connector to display the ...

User Manual
Page 57
... Check the connection. BLURRED IMAGE Cause Remedy The projection lens is an obstacle between the remote control and the projector. Adjust the projection angle and direction as well as the height of the projector. Cause There is still attached to the input source device. The lens cap is no.... The lens cap is out of the lens using the focus ring. Troubleshooting THE PROJECTOR DOES NOT TURN ON. REMOTE CONTROL DOES NOT WORK Cause The battery is still attached to turn the projector on . Remedy Replace the battery with the Source key on or connected correctly. THE...
... Check the connection. BLURRED IMAGE Cause Remedy The projection lens is an obstacle between the remote control and the projector. Adjust the projection angle and direction as well as the height of the projector. Cause There is still attached to the input source device. The lens cap is no.... The lens cap is out of the lens using the focus ring. Troubleshooting THE PROJECTOR DOES NOT TURN ON. REMOTE CONTROL DOES NOT WORK Cause The battery is still attached to turn the projector on . Remedy Replace the battery with the Source key on or connected correctly. THE...

