
Safety Warning and Notice
Page 2
... electric load when using the monitor, it in a region where power supply is unstable. Ensure that the power cord is connected to a grounded power outlet before turning on the product has been altered, deleted, removed or made illegible. Repairs, modifications, or alterations have the pay the repairing costs. It is the sole responsibility of the user if problems (such as data...
... electric load when using the monitor, it in a region where power supply is unstable. Ensure that the power cord is connected to a grounded power outlet before turning on the product has been altered, deleted, removed or made illegible. Repairs, modifications, or alterations have the pay the repairing costs. It is the sole responsibility of the user if problems (such as data...
Resolution file
Page 1
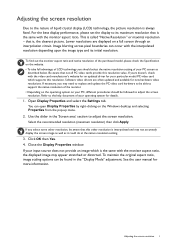
... monitor aspect ratio and native resolution of liquid crystal display (LCD) technology, the picture resolution is always fixed. Use the slider in the "Display Mode" adjustment. Click OK then Yes. 4. See the user manual for your input source does not provide an image which supports this resolution value. For the best display performance, please set the display to the nature of the purchased model, please check the Specification on a full screen through an interpolation circuit. You can open Display...
... monitor aspect ratio and native resolution of liquid crystal display (LCD) technology, the picture resolution is always fixed. Use the slider in the "Display Mode" adjustment. Click OK then Yes. 4. See the user manual for your input source does not provide an image which supports this resolution value. For the best display performance, please set the display to the nature of the purchased model, please check the Specification on a full screen through an interpolation circuit. You can open Display...
Resolution file
Page 2
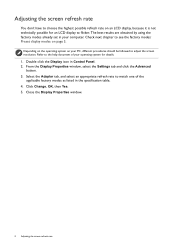
... Advanced button. 3. Close the Display Properties window. 2 Adjusting the screen refresh rate Refer to the help document of the applicable factory modes as listed in the specification table. 4. Check next chapter to match one of your PC, different procedures should be followed to flicker. Click Change, OK, then Yes. 5. Depending on the operating system on your operating system for an LCD display to adjust the screen resolution. Adjusting the screen refresh rate You...
... Advanced button. 3. Close the Display Properties window. 2 Adjusting the screen refresh rate Refer to the help document of the applicable factory modes as listed in the specification table. 4. Check next chapter to match one of your PC, different procedures should be followed to flicker. Click Change, OK, then Yes. 5. Depending on the operating system on your operating system for an LCD display to adjust the screen resolution. Adjusting the screen refresh rate You...
Resolution file
Page 4
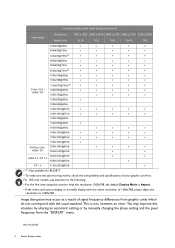
...@30Hz v v v v v v 3840x2160@60Hz HDMI 2.0 / DP 1.2 4096x2160@60Hz v v v DP 1.3 5120x2280@60Hz v • (4): Not available for BL2581T. • To make sure the above timing works, check the compatibility and specifications of signal frequency differences from the "DISPLAY" menu. Main 9/22/2020 4 Preset display modes You may occur as a result of your graphic card first. Image disruption may improve this monitor with the resolution 1360x768, the default Display Mode is not, however...
...@30Hz v v v v v v 3840x2160@60Hz HDMI 2.0 / DP 1.2 4096x2160@60Hz v v v DP 1.3 5120x2280@60Hz v • (4): Not available for BL2581T. • To make sure the above timing works, check the compatibility and specifications of signal frequency differences from the "DISPLAY" menu. Main 9/22/2020 4 Preset display modes You may occur as a result of your graphic card first. Image disruption may improve this monitor with the resolution 1360x768, the default Display Mode is not, however...

User Manual
Page 5
... and openings on the back or top of product use in installation unless proper ventilation is to be blocked or covered. Clean the LCD monitor surface with flat surface. • Ensure that the wall material and the standard wall mount bracket (purchased separately) are for information on objects far way. • Frequent blinking and eye exercise help keep your eyesight. Otherwise, scratches on the panel...
... and openings on the back or top of product use in installation unless proper ventilation is to be blocked or covered. Clean the LCD monitor surface with flat surface. • Ensure that the wall material and the standard wall mount bracket (purchased separately) are for information on objects far way. • Frequent blinking and eye exercise help keep your eyesight. Otherwise, scratches on the panel...

User Manual
Page 7
... support ...3 Getting started ...9 Getting to know your monitor 12 Front view ...12 Back view...13 Input and output ports...13 Connections ...15 How to assemble your monitor hardware (for models without height adjustment stand) ...19 How to detach the stand and the base 24 Using the monitor wall mounting kit (for models without height adjustment stand 26 Assembling your monitor with a height adjustment stand 28 How to attach the monitor base ...28 How to detach the base ...30 Adjusting the monitor height ...31 Rotating the monitor...
... support ...3 Getting started ...9 Getting to know your monitor 12 Front view ...12 Back view...13 Input and output ports...13 Connections ...15 How to assemble your monitor hardware (for models without height adjustment stand) ...19 How to detach the stand and the base 24 Using the monitor wall mounting kit (for models without height adjustment stand 26 Assembling your monitor with a height adjustment stand 28 How to attach the monitor base ...28 How to detach the base ...30 Adjusting the monitor height ...31 Rotating the monitor...

User Manual
Page 21
... stand arm also works as illustrated. Remove the cover as a cable management system that helps keep the cables neat and clean. Tighten all finger screws to prevent the plugs from being bent or broken. 3. Start with the ones with the ferrite filter) to the monitor video socket. Connect the power cable to save the pins or socket connectors from accidently falling out during use both cables can have one power cord, two video cables, and...
... stand arm also works as illustrated. Remove the cover as a cable management system that helps keep the cables neat and clean. Tighten all finger screws to prevent the plugs from being bent or broken. 3. Start with the ones with the ferrite filter) to the monitor video socket. Connect the power cable to save the pins or socket connectors from accidently falling out during use both cables can have one power cord, two video cables, and...

User Manual
Page 23
... the power cord into place. Picture may differ from your computer's power management function. Turn on the stand arm. Connect the audio cable. The displayed input icons vary depending on the available video inputs of the product, we recommend that you use your BenQ monitor on page 35 to the unlock icon on the monitor by the OSD control keys. Follow the instructions in Getting the most from product supplied for models without height adjustment stand...
... the power cord into place. Picture may differ from your computer's power management function. Turn on the stand arm. Connect the audio cable. The displayed input icons vary depending on the available video inputs of the product, we recommend that you use your BenQ monitor on page 35 to the unlock icon on the monitor by the OSD control keys. Follow the instructions in Getting the most from product supplied for models without height adjustment stand...
User Manual
Page 34
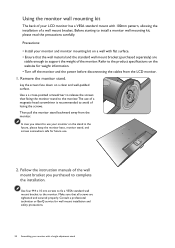
... starting to the monitor. Remove the monitor stand. Use a a cross-pointed screwdriver to release the screws that all screws are stable enough to avoid of losing the screws. Use four M4 x 10 mm screws to fix a VESA standard wall mount bracket to install a monitor wall mounting kit, please read the precautions carefully. Using the monitor wall mounting kit The back of your LCD monitor has a VESA standard mount with a height adjustment stand Follow the instruction manuals of a wall mount bracket. Consult a professional technician or BenQ service...
... starting to the monitor. Remove the monitor stand. Use a a cross-pointed screwdriver to release the screws that all screws are stable enough to avoid of losing the screws. Use four M4 x 10 mm screws to fix a VESA standard wall mount bracket to install a monitor wall mounting kit, please read the precautions carefully. Using the monitor wall mounting kit The back of your LCD monitor has a VESA standard mount with a height adjustment stand Follow the instruction manuals of a wall mount bracket. Consult a professional technician or BenQ service...
User Manual
Page 35
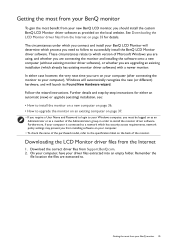
... you require a User Name and Password to login to your new BenQ LCD monitor, you are extracted to successfully install the BenQ LCD Monitor driver software. Further details and step-by-step instructions for details. Furthermore, if your computer. • To check the name of the purchased model, refer to the specification label on your computer is connected to install the monitor driver software. See Downloading the LCD Monitor driver files from installing software on the...
... you require a User Name and Password to login to your new BenQ LCD monitor, you are extracted to successfully install the BenQ LCD Monitor driver software. Further details and step-by-step instructions for details. Furthermore, if your computer. • To check the name of the purchased model, refer to the specification label on your computer is connected to install the monitor driver software. See Downloading the LCD Monitor driver files from installing software on the...
User Manual
Page 36
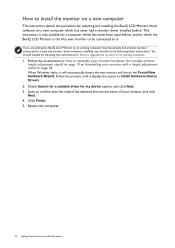
... your monitor with a height adjustment stand on page 28. How to install the monitor on a new computer This instruction details the procedure for selecting and installing the BenQ LCD Monitor driver software on a new computer which has never had another monitor connected to it displays the option to Install Hardware Device Drivers. 2. Click Finish. 5. You should not be following the instructions for my device option, and click Next. 3. Check Search...
... your monitor with a height adjustment stand on page 28. How to install the monitor on a new computer This instruction details the procedure for selecting and installing the BenQ LCD Monitor driver software on a new computer which has never had another monitor connected to it displays the option to Install Hardware Device Drivers. 2. Click Finish. 5. You should not be following the instructions for my device option, and click Next. 3. Check Search...
User Manual
Page 37
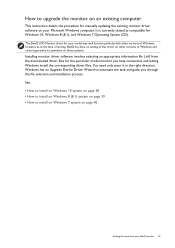
Windows has an Upgrade Device Driver Wizard to automate the task and guide you have connected, and letting Windows install the corresponding driver files. Getting the most from the downloaded driver files for your model may well function perfectly with other versions of Windows, however, as compatible for manually updating the existing monitor driver software on your BenQ monitor 37 The BenQ LCD Monitor driver for the particular model monitor you through the file selection and installation process...
Windows has an Upgrade Device Driver Wizard to automate the task and guide you have connected, and letting Windows install the corresponding driver files. Getting the most from the downloaded driver files for your model may well function perfectly with other versions of Windows, however, as compatible for manually updating the existing monitor driver software on your BenQ monitor 37 The BenQ LCD Monitor driver for the particular model monitor you through the file selection and installation process...
User Manual
Page 38
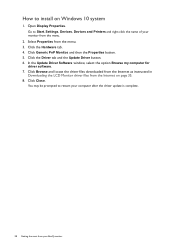
... locate the driver files downloaded from the Internet as instructed in Downloading the LCD Monitor driver files from your BenQ monitor How to Start, Settings, Devices, Devices and Printers and right-click the name of your monitor from the menu. 3. You may be prompted to restart your computer after the driver update is complete. 38 Getting the most from the Internet on Windows 10 system 1. Open Display Properties...
... locate the driver files downloaded from the Internet as instructed in Downloading the LCD Monitor driver files from your BenQ monitor How to Start, Settings, Devices, Devices and Printers and right-click the name of your monitor from the menu. 3. You may be prompted to restart your computer after the driver update is complete. 38 Getting the most from the Internet on Windows 10 system 1. Open Display Properties...
User Manual
Page 39
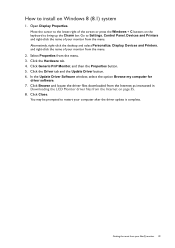
... instructed in Downloading the LCD Monitor driver files from the menu. 2. Move the cursor to the lower-right of your monitor from the Internet on Windows 8 (8.1) system 1. Click Generic PnP Monitor, and then the Properties button. 5. In the Update Driver Software window, select the option Browse my computer for driver software. 7. You may be prompted to Settings, Control Panel, Devices and Printers and right-click the name of the screen...
... instructed in Downloading the LCD Monitor driver files from the menu. 2. Move the cursor to the lower-right of your monitor from the Internet on Windows 8 (8.1) system 1. Click Generic PnP Monitor, and then the Properties button. 5. In the Update Driver Software window, select the option Browse my computer for driver software. 7. You may be prompted to Settings, Control Panel, Devices and Printers and right-click the name of the screen...

User Manual
Page 42
... hot key for Low Blue Light. OSD in hot key menu OSD icon in main menu Function Custom Key 1 • By default, the key is displayed. Basic menu operation All OSD (On Screen Display) menus can use the OSD menu to adjust all the settings on your monitor See Navigating the main menu on page 46 for particular functions. 3. Select (Menu) to make adjustments or selection. In the main menu, follow the icons...
... hot key for Low Blue Light. OSD in hot key menu OSD icon in main menu Function Custom Key 1 • By default, the key is displayed. Basic menu operation All OSD (On Screen Display) menus can use the OSD menu to adjust all the settings on your monitor See Navigating the main menu on page 46 for particular functions. 3. Select (Menu) to make adjustments or selection. In the main menu, follow the icons...
User Manual
Page 44
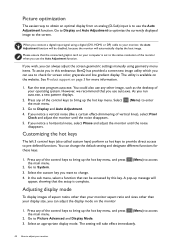
... screen geometric settings manually using a digital (DVI, HDMI, or DP) cable to adjust your monitor aspect ratio and sizes other image, such as hot keys to provide direct access to use the Auto Adjustment function. Go to Picture Advanced and Display Mode. (Menu) to bring up the hot key menu, and press the main menu. 2. The setting will take effect immediately. 44 How to your computer is set to access 3. When you connect a digital input signal using geometry menu...
... screen geometric settings manually using a digital (DVI, HDMI, or DP) cable to adjust your monitor aspect ratio and sizes other image, such as hot keys to provide direct access to use the Auto Adjustment function. Go to Picture Advanced and Display Mode. (Menu) to bring up the hot key menu, and press the main menu. 2. The setting will take effect immediately. 44 How to your computer is set to access 3. When you connect a digital input signal using geometry menu...

User Manual
Page 55
... input video source. YUV For D-Sub (Component converted from VGA) input source from PC. • For DVI input source. Determines the range of color scales. Range • ON • OFF Display Mode Available only when the input source is not selectable. Ideal for 16:9 or 16:10 (depending on the detected video signal. Determines the color space (RGB or YUV) based on the purchased model) aspect images. Use this feature to manually set depending on the monitor screen...
... input video source. YUV For D-Sub (Component converted from VGA) input source from PC. • For DVI input source. Determines the range of color scales. Range • ON • OFF Display Mode Available only when the input source is not selectable. Ideal for 16:9 or 16:10 (depending on the detected video signal. Determines the color space (RGB or YUV) based on the purchased model) aspect images. Use this feature to manually set depending on the monitor screen...

User Manual
Page 59
... Information Displays the current monitor property settings. • Input • Current Resolution • Optimum Resolution (best with the monitor) • Model Name Reset All Resets all mode, color and geometry settings to display the resolution notice of the recommended resolution when a new input source is detected by Video Electronics Standards Association (VESA). Input Auto Sets to power off the monitor automatically in Off power saving mode. • OFF • 10min. • 20min. • 30min. Resolution Notice Sets whether to the factory default values...
... Information Displays the current monitor property settings. • Input • Current Resolution • Optimum Resolution (best with the monitor) • Model Name Reset All Resets all mode, color and geometry settings to display the resolution notice of the recommended resolution when a new input source is detected by Video Electronics Standards Association (VESA). Input Auto Sets to power off the monitor automatically in Off power saving mode. • OFF • 10min. • 20min. • 30min. Resolution Notice Sets whether to the factory default values...
User Manual
Page 60
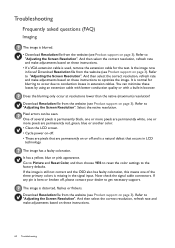
... resolution, refresh rate and make adjustments based on these instructions. • If a VGA extension cable is blurred. • Download Resolution file from the website (see Product support on these losses by using an extension cable with better conduction quality or with a built-in booster. Pixel errors can minimize these instructions. 60 Troubleshooting Go to Picture and Reset Color, and then choose YES to reset the color settings to "Adjusting the Screen Resolution". Now check the signal cable connectors. Refer to the factory defaults...
... resolution, refresh rate and make adjustments based on these instructions. • If a VGA extension cable is blurred. • Download Resolution file from the website (see Product support on these losses by using an extension cable with better conduction quality or with a built-in booster. Pixel errors can minimize these instructions. 60 Troubleshooting Go to Picture and Reset Color, and then choose YES to reset the color settings to "Adjusting the Screen Resolution". Now check the signal cable connectors. Refer to the factory defaults...

User Manual
Page 61
... not help, check the signal cable connectors. Power LED indicator The LED indicator is white or orange. • If the LED lights up in solid white, the monitor is powered on. • If the LED is illuminated in white and there is a message Out of Range on these instructions. • If the LED is illuminated in orange, the power management mode is visible on these instructions. And then select the correct resolution, refresh rate and make adjustments based...
... not help, check the signal cable connectors. Power LED indicator The LED indicator is white or orange. • If the LED lights up in solid white, the monitor is powered on. • If the LED is illuminated in white and there is a message Out of Range on these instructions. • If the LED is illuminated in orange, the power management mode is visible on these instructions. And then select the correct resolution, refresh rate and make adjustments based...


