

Safety Warning and Notice
Page 2
... is compatible with local technical standards if the user brings the monitor out of its intended sales area. power cable) only with a (multi-outlet) extension cord. Always turn off the monitor before turning on the product has been altered, deleted, removed or made illegible. Repairs, modifications, or alterations have been altered by unauthorized use or is unplugged before cleaning your monitor Use a monitor...
... is compatible with local technical standards if the user brings the monitor out of its intended sales area. power cable) only with a (multi-outlet) extension cord. Always turn off the monitor before turning on the product has been altered, deleted, removed or made illegible. Repairs, modifications, or alterations have been altered by unauthorized use or is unplugged before cleaning your monitor Use a monitor...

Resolution file
Page 1
... need to replace and update the PC video card hardware to be able to support the native resolution of the monitor. • Depending on the operating system on your PC, different procedures should select the native resolution setting of your PC screen as it could do at the native resolution setting. 3. See the user manual for new hardware video resolutions. Please refer to the nature of liquid crystal display (LCD) technology, the picture resolution...
... need to replace and update the PC video card hardware to be able to support the native resolution of the monitor. • Depending on the operating system on your PC, different procedures should select the native resolution setting of your PC screen as it could do at the native resolution setting. 3. See the user manual for new hardware video resolutions. Please refer to the nature of liquid crystal display (LCD) technology, the picture resolution...
Resolution file
Page 2
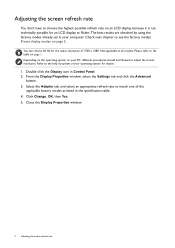
... system for the native resolution of your computer. Double click the Display icon in all models. Click Change, OK, then Yes. 5. The best results are obtained by using the factory modes already set in the specification table. 4. Close the Display Properties window. 2 Adjusting the screen refresh rate From the Display Properties window, select the Settings tab and click the Advanced button. 3. Select the Adapter tab, and select an appropriate refresh rate to the table...
... system for the native resolution of your computer. Double click the Display icon in all models. Click Change, OK, then Yes. 5. The best results are obtained by using the factory modes already set in the specification table. 4. Close the Display Properties window. 2 Adjusting the screen refresh rate From the Display Properties window, select the Settings tab and click the Advanced button. 3. Select the Adapter tab, and select an appropriate refresh rate to the table...
Resolution file
Page 3
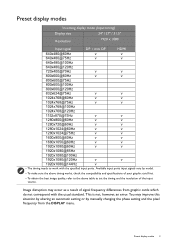
... resolution of signal frequency differences from the DISPLAY menu. Image disruption may improve this situation by altering an automatic setting or by model. • To make sure the above timing works, check the compatibility and specifications of your graphic card first. • To obtain the best image quality, refer to the above table to work with the usual standard. This is not, however, an error. Available input ports input signals vary by manually changing...
... resolution of signal frequency differences from the DISPLAY menu. Image disruption may improve this situation by altering an automatic setting or by model. • To make sure the above timing works, check the compatibility and specifications of your graphic card first. • To obtain the best image quality, refer to the above table to work with the usual standard. This is not, however, an error. Available input ports input signals vary by manually changing...
User Manual
Page 3
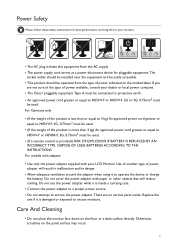
... C 10~60 % 0~12000 m • The AC plug isolates this equipment from the type of power available, consult your LCD Monitor. If you are no service parts inside a carrying case. • Connect the power adapter to a proper power source. • Do not attempt to service the power adapter. DISPOSE OF USED BATTERIES ACCORDING TO THE INSTRUCTIONS. For models with adapter: • Use only the power adapter supplied with paper or other objects that...
... C 10~60 % 0~12000 m • The AC plug isolates this equipment from the type of power available, consult your LCD Monitor. If you are no service parts inside a carrying case. • Connect the power adapter to a proper power source. • Do not attempt to service the power adapter. DISPOSE OF USED BATTERIES ACCORDING TO THE INSTRUCTIONS. For models with adapter: • Use only the power adapter supplied with paper or other objects that...
User Manual
Page 4
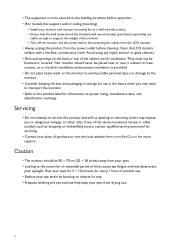
... markings. Clean the LCD monitor surface with flat surface. • Ensure that support wall or ceiling mounting) • Install your monitor and monitor mounting kit on the back or top of the cabinet are stable enough to support the weight of the monitor. • Turn off the monitor and the power before disconnecting the cables from the LCD monitor. • Always unplug the product from www.BenQ.com for servicing. •...
... markings. Clean the LCD monitor surface with flat surface. • Ensure that support wall or ceiling mounting) • Install your monitor and monitor mounting kit on the back or top of the cabinet are stable enough to support the weight of the monitor. • Turn off the monitor and the power before disconnecting the cables from the LCD monitor. • Always unplug the product from www.BenQ.com for servicing. •...

User Manual
Page 5
... Copyright ...2 Getting started ...6 Getting to know your monitor 8 Front view ...8 Back view ...8 Connection ...9 How to assemble your monitor hardware 10 How to change cable connection after initial installation 14 How to detach the stand and the base 15 Adjusting the monitor height ...16 Using the monitor wall mount kit 17 Precautions ...17 Getting the most from your BenQ Monitor 18 How to install the monitor driver on a new computer 19 How to upgrade the monitor driver on an...
... Copyright ...2 Getting started ...6 Getting to know your monitor 8 Front view ...8 Back view ...8 Connection ...9 How to assemble your monitor hardware 10 How to change cable connection after initial installation 14 How to detach the stand and the base 15 Adjusting the monitor height ...16 Using the monitor wall mount kit 17 Precautions ...17 Getting the most from your BenQ Monitor 18 How to install the monitor driver on a new computer 19 How to upgrade the monitor driver on an...

User Manual
Page 10
... monitor base and protect yourself from any physical harm. Do not plug-in or turn it off before continuing. Your monitor comes with the end of the monitor. 10 How to the "Preset display modes" section on the link "Adjusting the Screen Resolution" on the purchased model. • The supported timing may vary by input signal. Orient and align the stand base socket with a curved screen and the screen...
... monitor base and protect yourself from any physical harm. Do not plug-in or turn it off before continuing. Your monitor comes with the end of the monitor. 10 How to the "Preset display modes" section on the link "Adjusting the Screen Resolution" on the purchased model. • The supported timing may vary by input signal. Orient and align the stand base socket with a curved screen and the screen...

User Manual
Page 13
... for use your computer's power management function. Connect the other light sources. 10.Connect-to install the monitor software. Plug the other end of a digital output source (e.g., a computer). 9. How to transport the monitor. Remove the foam wrap from your BenQ Monitor on the computer too, and follow the instructions in the future when you use in Getting the most from the monitor. Picture may need to assemble your region. Turn on the monitor by...
... for use your computer's power management function. Connect the other light sources. 10.Connect-to install the monitor software. Plug the other end of a digital output source (e.g., a computer). 9. How to transport the monitor. Remove the foam wrap from your BenQ Monitor on the computer too, and follow the instructions in the future when you use in Getting the most from the monitor. Picture may need to assemble your region. Turn on the monitor by...

User Manual
Page 17
... a VESA standard mount with flat surface. • Ensure that all screws are stable enough to complete the installation. In case you purchased to support the weight of the monitor. Using the monitor wall mount kit 17 Consult a professional technician or BenQ service for weight information. • Turn off the monitor and the power before disconnecting the cables from the LCD monitor. 1. Detach the monitor stand as instructed in the future, please keep the monitor base, monitor stand...
... a VESA standard mount with flat surface. • Ensure that all screws are stable enough to complete the installation. In case you purchased to support the weight of the monitor. Using the monitor wall mount kit 17 Consult a professional technician or BenQ service for weight information. • Turn off the monitor and the power before disconnecting the cables from the LCD monitor. 1. Detach the monitor stand as instructed in the future, please keep the monitor base, monitor stand...

User Manual
Page 18
... BenQ LCD Monitor driver software as a member of Microsoft Windows you are using, and whether you are connecting the monitor and installing the software onto a new computer (without existing monitor driver software), or whether you turn on your BenQ LCD Monitor will launch its Found New Hardware wizard. These circumstances relate to install the monitor driver software. At that point, click the Have Disk button, insert the BenQ LCD Monitor CD-ROM and select the appropriate monitor model...
... BenQ LCD Monitor driver software as a member of Microsoft Windows you are using, and whether you are connecting the monitor and installing the software onto a new computer (without existing monitor driver software), or whether you turn on your BenQ LCD Monitor will launch its Found New Hardware wizard. These circumstances relate to install the monitor driver software. At that point, click the Have Disk button, insert the BenQ LCD Monitor CD-ROM and select the appropriate monitor model...

User Manual
Page 19
... should instead be following these instructions. You should not be connected to it (and has monitor driver software installed), you are adding the BenQ LCD Monitor to an existing computer that the wizard has selected the correct name of your monitor and click Next. 6. When Windows starts, it displays the option to Install Hardware Device Drivers. 2. Restart the computer. Check the option for my device option...
... should instead be following these instructions. You should not be connected to it (and has monitor driver software installed), you are adding the BenQ LCD Monitor to an existing computer that the wizard has selected the correct name of your monitor and click Next. 6. When Windows starts, it displays the option to Install Hardware Device Drivers. 2. Restart the computer. Check the option for my device option...

User Manual
Page 20
... manually updating the existing monitor driver software on page 23. 20 Getting the most from the CD. Windows has an Upgrade Device Driver Wizard to automate the task and guide you have connected, and letting Windows install the corresponding driver files from your Microsoft Windows computer. How to upgrade the monitor driver on an existing computer This instruction details the procedure for Windows 10, Windows 8 (8.1), and Windows 7 Operating System (OS). The BenQ LCD Monitor driver...
... manually updating the existing monitor driver software on page 23. 20 Getting the most from the CD. Windows has an Upgrade Device Driver Wizard to automate the task and guide you have connected, and letting Windows install the corresponding driver files from your Microsoft Windows computer. How to upgrade the monitor driver on an existing computer This instruction details the procedure for Windows 10, Windows 8 (8.1), and Windows 7 Operating System (OS). The BenQ LCD Monitor driver...

User Manual
Page 21
... Hardware tab. 4. Click the Driver tab and the Update Driver button. 6. Insert the BenQ LCD Monitor CD-ROM into a CD drive on Windows 10 system 1. Select the correct folder name of your monitor from the example above depending upon your CD drive may differ from the menu. 2. This will copy and install the appropriate monitor driver files to Start, Settings, Devices, Devices and Printers and...
... Hardware tab. 4. Click the Driver tab and the Update Driver button. 6. Insert the BenQ LCD Monitor CD-ROM into a CD drive on Windows 10 system 1. Select the correct folder name of your monitor from the example above depending upon your CD drive may differ from the menu. 2. This will copy and install the appropriate monitor driver files to Start, Settings, Devices, Devices and Printers and...
User Manual
Page 22
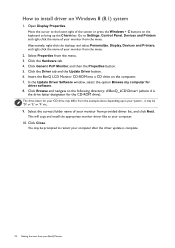
... your BenQ Monitor In the Update Driver Software window, select the option Browse my computer for the CD-ROM drive). The drive letter for your CD drive may differ from your monitor from the menu. 2. You may be prompted to Settings, Control Panel, Devices and Printers and right-click the name of the screen or press the Windows + C buttons on Windows 8 (8.1) system 1. How to install driver on...
... your BenQ Monitor In the Update Driver Software window, select the option Browse my computer for the CD-ROM drive). The drive letter for your CD drive may differ from your monitor from the menu. 2. You may be prompted to Settings, Control Panel, Devices and Printers and right-click the name of the screen or press the Windows + C buttons on Windows 8 (8.1) system 1. How to install driver on...
User Manual
Page 26
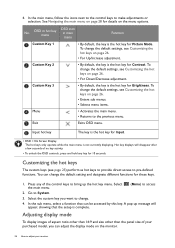
...; For Down/Decrease adjustment. • By default, the key is complete. Adjusting display mode To display images of aspect ratio other than 16:9 and size other than the panel size of the control keys to adjust your monitor In the main menu, follow the icons next to the control keys to change the default settings, see Customizing the hot keys on the menu options. To change the default settings, see page 25...
...; For Down/Decrease adjustment. • By default, the key is complete. Adjusting display mode To display images of aspect ratio other than 16:9 and size other than the panel size of the control keys to adjust your monitor In the main menu, follow the icons next to the control keys to change the default settings, see Customizing the hot keys on the menu options. To change the default settings, see page 25...

User Manual
Page 27
... an appropriate display mode. The setting will need to Picture Advanced and Picture Mode for PIP/PBP mode from the link "Adjusting the Screen Resolution" on page 33 for all the available picture modes. You will take effect immediately. Video source selection in PIP/PBP source on page 30. Press any of images. Go to bring up the hot key menu. Main source Inputs HDMI DP Mini DP Possible second sources HDMI DP...
... an appropriate display mode. The setting will need to Picture Advanced and Picture Mode for PIP/PBP mode from the link "Adjusting the Screen Resolution" on page 33 for all the available picture modes. You will take effect immediately. Video source selection in PIP/PBP source on page 30. Press any of images. Go to bring up the hot key menu. Main source Inputs HDMI DP Mini DP Possible second sources HDMI DP...

User Manual
Page 39
...; Color Vibrance • Brightness • Low Blue Light • Super Resolution • Display Mode • Volume • Contrast DDC/CI Allows the monitor settings to be set through the software • ON on the PC. • OFF DDC/CI, short for Display Data Channel/Command Interface, which was developed by hot key. DDC/CI capability allows monitor controls to display the resolution notice of the recommended resolution when a new input source...
...; Color Vibrance • Brightness • Low Blue Light • Super Resolution • Display Mode • Volume • Contrast DDC/CI Allows the monitor settings to be set through the software • ON on the PC. • OFF DDC/CI, short for Display Data Channel/Command Interface, which was developed by hot key. DDC/CI capability allows monitor controls to display the resolution notice of the recommended resolution when a new input source...

User Manual
Page 41
... cards may not be compatible with new monitor models and will not be seen. Pixel errors can be able to show BIOS screen during computer startup process. The image has a faulty coloration. Read the instructions on the link "Adjusting the Screen Resolution" on these instructions. Troubleshooting 41 Select the native resolution. One of several pixels is permanently black, one or more pixels are permanently red, green, blue or another color. • Clean the LCD screen. • Cycle power...
... cards may not be compatible with new monitor models and will not be seen. Pixel errors can be able to show BIOS screen during computer startup process. The image has a faulty coloration. Read the instructions on the link "Adjusting the Screen Resolution" on these instructions. Troubleshooting 41 Select the native resolution. One of several pixels is permanently black, one or more pixels are permanently red, green, blue or another color. • Clean the LCD screen. • Cycle power...

User Manual
Page 42
... native resolution. To have the optimal display performance of each type of input sources, you are using a display mode that does not help, check the signal cable connectors. The image is displaced in one of the supported mode. If that this monitor does not support, please change the setting to prevent the occurrence of image retention. If any pin is bent or broken off , check the power supply mains socket, the external power supply and the mains switch...
... native resolution. To have the optimal display performance of each type of input sources, you are using a display mode that does not help, check the signal cable connectors. The image is displaced in one of the supported mode. If that this monitor does not support, please change the setting to prevent the occurrence of image retention. If any pin is bent or broken off , check the power supply mains socket, the external power supply and the mains switch...


