User Guide
Page 2
..., except documentation kept by downloading it from http://support.asus.com/download or (2) for the cost of reproduction and shipment, which is dependent on the preferred carrier and the location where you give us a notification to the email address gpl@asus.com, stating the product and describing the problem (please DO NOT send large attachments such as required under the...
..., except documentation kept by downloading it from http://support.asus.com/download or (2) for the cost of reproduction and shipment, which is dependent on the preferred carrier and the location where you give us a notification to the email address gpl@asus.com, stating the product and describing the problem (please DO NOT send large attachments such as required under the...
User Guide
Page 5
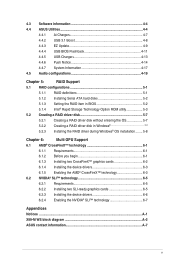
4.3 Software information 4-4 4.4 ASUS Utilities 4-4 4.4.1 Ai Charger 4-7 4.4.2 USB 3.1 Boost 4-8 4.4.3 EZ Update 4-9 4.4.4 USB BIOS Flashback 4-11 4.4.5 USB Charger 4-13 4.4.6 Push Notice 4-14 4.4.7 System Information 4-17 4.5 Audio configurations 4-19 Chapter 5: RAID Support 5.1 RAID configurations 5-1 5.1.1 RAID definitions 5-1 5.1.2 Installing Serial ATA hard disks 5-2 5.1.3 Setting the RAID item in BIOS 5-2 5.1.4 Intel® Rapid Storage Technology Option ROM utility 5-3 5.2 Creating a RAID driver disk 5-7 5.2.1 Creating a RAID driver disk without entering the OS...
4.3 Software information 4-4 4.4 ASUS Utilities 4-4 4.4.1 Ai Charger 4-7 4.4.2 USB 3.1 Boost 4-8 4.4.3 EZ Update 4-9 4.4.4 USB BIOS Flashback 4-11 4.4.5 USB Charger 4-13 4.4.6 Push Notice 4-14 4.4.7 System Information 4-17 4.5 Audio configurations 4-19 Chapter 5: RAID Support 5.1 RAID configurations 5-1 5.1.1 RAID definitions 5-1 5.1.2 Installing Serial ATA hard disks 5-2 5.1.3 Setting the RAID item in BIOS 5-2 5.1.4 Intel® Rapid Storage Technology Option ROM utility 5-3 5.2 Creating a RAID driver disk 5-7 5.2.1 Creating a RAID driver disk without entering the OS...

User Guide
Page 6
... encounter technical problems with the package. • Before using the product, ensure all cables are correctly connected and the power cables are not damaged. Contact a qualified service technician or your dealer immediately. • To avoid short circuits, keep paper clips, screws, and staples away from connectors, slots, sockets and circuitry. • Avoid dust, humidity, and temperature extremes. Operation safety • Before installing the motherboard...
... encounter technical problems with the package. • Before using the product, ensure all cables are correctly connected and the power cables are not damaged. Contact a qualified service technician or your dealer immediately. • To avoid short circuits, keep paper clips, screws, and staples away from connectors, slots, sockets and circuitry. • Avoid dust, humidity, and temperature extremes. Operation safety • Before installing the motherboard...
User Guide
Page 15
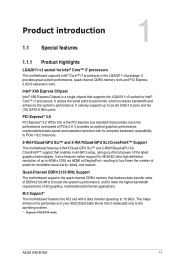
... (6) USB 3.0 ports and ten (10) SATA 6 Gb/s ports. M.2 Support* This motherboard features the M.2 slot with its complete backward compatibility to meet the higher bandwidth requirements of PCIe 2.0. It also features native support for 4K/UHD (ultra high definition) resolution of up to 4096 x 2160 via HDMI or DisplayPort, resulting to -point links, which increases bandwidth and enhances the system's performance. Chapter 1 ASUS X99-M WS...
... (6) USB 3.0 ports and ten (10) SATA 6 Gb/s ports. M.2 Support* This motherboard features the M.2 slot with its complete backward compatibility to meet the higher bandwidth requirements of PCIe 2.0. It also features native support for 4K/UHD (ultra high definition) resolution of up to 4096 x 2160 via HDMI or DisplayPort, resulting to -point links, which increases bandwidth and enhances the system's performance. Chapter 1 ASUS X99-M WS...
User Guide
Page 22
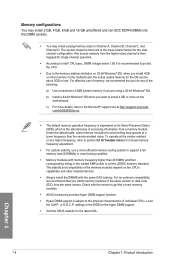
... motherboard, the actual usable memory for manual memory frequency adjustment. • For system stability, use of individual CPUs. Any excess memory from the higher-sized channel is then mapped for single-channel operation. • According to Intel® CPU spec, DIMM voltage below 1.65 V is recommended to protect the CPU. • Due to the memory address limitation on the CPU's capabilities and other installed devices. • Always install...
... motherboard, the actual usable memory for manual memory frequency adjustment. • For system stability, use of individual CPUs. Any excess memory from the higher-sized channel is then mapped for single-channel operation. • According to Intel® CPU spec, DIMM voltage below 1.65 V is recommended to protect the CPU. • Due to the memory address limitation on the CPU's capabilities and other installed devices. • Always install...

User Guide
Page 27
... tests failsafe memory settings. ASUS X99-M WS 1-13 Chapter 1 3. A message will appear during the tuning process, the system continues memory tuning after using the MemOK! MemOK! button Installing DIMMs that you turn off the computer and unplug the power cord for about 30 seconds for successful boot. • Refer to the latest BIOS version from www.asus.com after turning on the computer. Replace the DIMMs with the motherboard may cause system boot failure...
... tests failsafe memory settings. ASUS X99-M WS 1-13 Chapter 1 3. A message will appear during the tuning process, the system continues memory tuning after using the MemOK! MemOK! button Installing DIMMs that you turn off the computer and unplug the power cord for about 30 seconds for successful boot. • Refer to the latest BIOS version from www.asus.com after turning on the computer. Replace the DIMMs with the motherboard may cause system boot failure...

User Guide
Page 36
... module specific) ACPI module initialization CSM initialization Reserved for future AMI DXE codes Boot Device Selection (BDS) phase is started Driver connecting is started PCI Bus initialization is started PCI Bus Hot Plug Controller Initialization PCI Bus Enumeration PCI Bus Request Resources PCI Bus Assign Resources Console Output devices connect Console input devices connect Super IO Initialization USB initialization is started USB Reset USB Detect USB Enable Reserved for future AMI codes IDE initialization is started IDE Reset IDE Detect IDE Enable SCSI initialization is started SCSI Reset...
... module specific) ACPI module initialization CSM initialization Reserved for future AMI DXE codes Boot Device Selection (BDS) phase is started Driver connecting is started PCI Bus initialization is started PCI Bus Hot Plug Controller Initialization PCI Bus Enumeration PCI Bus Request Resources PCI Bus Assign Resources Console Output devices connect Console input devices connect Super IO Initialization USB initialization is started USB Reset USB Detect USB Enable Reserved for future AMI codes IDE initialization is started IDE Reset IDE Detect IDE Enable SCSI initialization is started SCSI Reset...
User Guide
Page 37
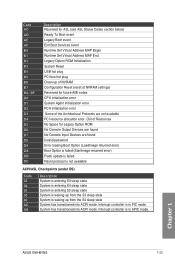
... DB DC Description Reserved for ASL (see ASL Status Codes section below) Ready To Boot event Legacy Boot event Exit Boot Services event Runtime Set Virtual Address MAP Begin Runtime Set Virtual Address MAP End Legacy Option ROM Initialization System Reset USB hot plug PCI bus hot plug Clean-up of NVRAM Configuration Reset (reset of the Architectural Protocols are found No Console Input Devices are not available PCI resource allocation error. Code AC AD AE AF B0 B1 B2 B3...
... DB DC Description Reserved for ASL (see ASL Status Codes section below) Ready To Boot event Legacy Boot event Exit Boot Services event Runtime Set Virtual Address MAP Begin Runtime Set Virtual Address MAP End Legacy Option ROM Initialization System Reset USB hot plug PCI bus hot plug Clean-up of NVRAM Configuration Reset (reset of the Architectural Protocols are found No Console Input Devices are not available PCI resource allocation error. Code AC AD AE AF B0 B1 B2 B3...
User Guide
Page 41
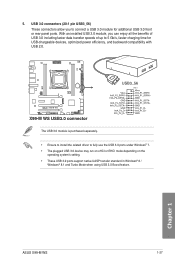
... 1 ASUS X99-M WS 1-27 USB 3.0 connectors (20-1 pin USB3_56) These connectors allow you can enjoy all the benefits of USB 3.0 including faster data transfer speeds of up to fully use the USB 3.0 ports under Windows® 7. • The plugged USB 3.0 device may run on xHCI or EHCI mode depending on the operating system's setting. • These USB 3.0 ports support native UASP transfer standard in Windows® 8 / Windows® 8.1 and Turbo Mode when using USB 3.0 Boost feature. The USB 3.0 module...
... 1 ASUS X99-M WS 1-27 USB 3.0 connectors (20-1 pin USB3_56) These connectors allow you can enjoy all the benefits of USB 3.0 including faster data transfer speeds of up to fully use the USB 3.0 ports under Windows® 7. • The plugged USB 3.0 device may run on xHCI or EHCI mode depending on the operating system's setting. • These USB 3.0 ports support native UASP transfer standard in Windows® 8 / Windows® 8.1 and Turbo Mode when using USB 3.0 Boost feature. The USB 3.0 module...

User Guide
Page 60
... USB port hole marked in Chapter 3. • Do not unplug portable disk, power system, or press the CLR_CMOS button while BIOS update is ongoing, otherwise update will be caused by improper installation of the USB storage device and filename/file format error. Insert the USB storage device to boot up, please contact your computer. 4. Shut down your local ASUS Service Center. 2-12 Chapter 2: Basic installation 2.2 BIOS update utility USB BIOS Flashback USB BIOS Flashback allows you to use USB BIOS...
... USB port hole marked in Chapter 3. • Do not unplug portable disk, power system, or press the CLR_CMOS button while BIOS update is ongoing, otherwise update will be caused by improper installation of the USB storage device and filename/file format error. Insert the USB storage device to boot up, please contact your computer. 4. Shut down your local ASUS Service Center. 2-12 Chapter 2: Basic installation 2.2 BIOS update utility USB BIOS Flashback USB BIOS Flashback allows you to use USB BIOS...
User Guide
Page 62
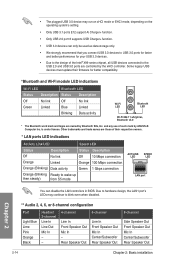
... Due to hardware design, the LAN1 port's LEDs may run on xHCI mode or EHCI mode, depending on the operating system's setting. • Only USB 3.1 ports E12 support Ai Charger+ function. • Only USB 2.0 port 8 supports USB Charger+ function. • USB 3.0 devices can disable the LAN controllers in BIOS. Some legacy USB devices must update their respective owners. * LAN ports LED indications Activity Link LED Speed LED Status Description Status Description Off No link Off 10 Mbps connection Orange Linked Orange 100 Mbps connection Orange (Blinking) Data activity Green...
... Due to hardware design, the LAN1 port's LEDs may run on xHCI mode or EHCI mode, depending on the operating system's setting. • Only USB 3.1 ports E12 support Ai Charger+ function. • Only USB 2.0 port 8 supports USB Charger+ function. • USB 3.0 devices can disable the LAN controllers in BIOS. Some legacy USB devices must update their respective owners. * LAN ports LED indications Activity Link LED Speed LED Status Description Status Description Off No link Off 10 Mbps connection Orange Linked Orange 100 Mbps connection Orange (Blinking) Data activity Green...
User Guide
Page 67
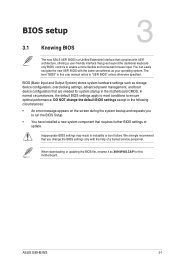
... default BIOS settings apply to most conditions to instability or boot failure. When downloading or updating the BIOS file, rename it as storage device configuration, overclocking settings, advanced power management, and boot device configuration that are needed for this user manual refers to enable a more flexible and convenient mouse input. The term "BIOS" in the following circumstances: • An error message appears on the screen during the system bootup and requests you change the default BIOS settings...
... default BIOS settings apply to most conditions to instability or boot failure. When downloading or updating the BIOS file, rename it as storage device configuration, overclocking settings, advanced power management, and boot device configuration that are needed for this user manual refers to enable a more flexible and convenient mouse input. The term "BIOS" in the following circumstances: • An error message appears on the screen during the system bootup and requests you change the default BIOS settings...

User Guide
Page 103
... devices. [AHCI Mode] Set to [AHCI Mode] when you want the SATA hard disk drives to use the AHCI (Advanced Host Controller Interface). SATA6G_1-4 (Gray) These items display all connected devices to SATA6G ports. SATA6G_7-10 (Black) These items display all connected devices to SATA6G ports. Configuration options: [Disabled] [Enabled] ASUS X99-M WS 3-37 The AHCI allows the onboard storage driver to enable advanced Serial ATA features that increases storage performance on random workloads by allowing the drive to [IDE]. Support Aggressive Link Power Management [Disabled...
... devices. [AHCI Mode] Set to [AHCI Mode] when you want the SATA hard disk drives to use the AHCI (Advanced Host Controller Interface). SATA6G_1-4 (Gray) These items display all connected devices to SATA6G ports. SATA6G_7-10 (Black) These items display all connected devices to SATA6G ports. Configuration options: [Disabled] [Enabled] ASUS X99-M WS 3-37 The AHCI allows the onboard storage driver to enable advanced Serial ATA features that increases storage performance on random workloads by allowing the drive to [IDE]. Support Aggressive Link Power Management [Disabled...
User Guide
Page 127
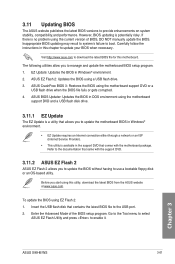
... start using the motherboard support DVD and a USB flash disk drive. 3.11.1 EZ Update The EZ Update is a utility that allows you to update the BIOS without having to the USB port. 2. To update the BIOS using the motherboard support DVD or a USB flash drive when the BIOS file fails or gets corrupted. 4. Chapter 3 ASUS X99-M WS 3-61 Refer to the documentation that came with the motherboard package. Enter the Advanced Mode of BIOS, DO NOT manually update the BIOS. Carefully follow the instructions in Windows® environment. 2. EZ Update: Updates...
... start using the motherboard support DVD and a USB flash disk drive. 3.11.1 EZ Update The EZ Update is a utility that allows you to update the BIOS without having to the USB port. 2. To update the BIOS using the motherboard support DVD or a USB flash drive when the BIOS file fails or gets corrupted. 4. Chapter 3 ASUS X99-M WS 3-61 Refer to the documentation that came with the motherboard package. Enter the Advanced Mode of BIOS, DO NOT manually update the BIOS. Carefully follow the instructions in Windows® environment. 2. EZ Update: Updates...
User Guide
Page 134
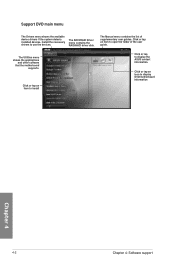
... an item to install Click or tap to use the devices. Support DVD main menu The Drivers menu shows the available device drivers if the system detects installed devices. Install the necessary drivers to display the ASUS contact information. Click or tap an icon to open the folder of supplementary user guides. The Utilities menu shows the applications and other software that the motherboard supports. The Manual menu contains the list of the user guide. The AHCI/RAID Driver menu contains the RAID/AHCI driver disk.
... an item to install Click or tap to use the devices. Support DVD main menu The Drivers menu shows the available device drivers if the system detects installed devices. Install the necessary drivers to display the ASUS contact information. Click or tap an icon to open the folder of supplementary user guides. The Utilities menu shows the applications and other software that the motherboard supports. The Manual menu contains the list of the user guide. The AHCI/RAID Driver menu contains the RAID/AHCI driver disk.

User Guide
Page 145
... the settings Ensure to connect your user guide for more details. • The USB Charger+ does not support USB hubs and USB extension cables, and generic USB cables. • The USB Charger+ may not recognize some ASUS devices due to a special design. Before using USB Charger+, ensure to disable the ErP Ready item from the Advanced > APM > ErP Ready in the Advanced mode of your USB device into the USB port that...
... the settings Ensure to connect your user guide for more details. • The USB Charger+ does not support USB hubs and USB extension cables, and generic USB cables. • The USB Charger+ may not recognize some ASUS devices due to a special design. Before using USB Charger+, ensure to disable the ErP Ready item from the Advanced > APM > ErP Ready in the Advanced mode of your USB device into the USB port that...

User Guide
Page 153
... written. Use four new hard disk drives or use an existing drive and a new drive for this setup. RAID 1 (Data mirroring) copies and maintains an identical image of data from one drive fails, the disk array management software directs all the benefits of the data in a RAID set, you want to install a Windows® operating system to a second drive. RAID 5 stripes both RAID 0 and RAID 1 configurations. The RAID 5 configuration is best suited for this setup. Chapter 5 ASUS X99-M WS 5-1 If one drive to a hard disk drive included in...
... written. Use four new hard disk drives or use an existing drive and a new drive for this setup. RAID 1 (Data mirroring) copies and maintains an identical image of data from one drive fails, the disk array management software directs all the benefits of the data in a RAID set, you want to install a Windows® operating system to a second drive. RAID 5 stripes both RAID 0 and RAID 1 configurations. The RAID 5 configuration is best suited for this setup. Chapter 5 ASUS X99-M WS 5-1 If one drive to a hard disk drive included in...
User Guide
Page 154
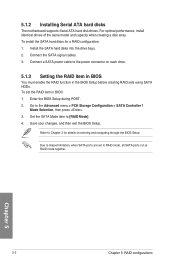
... drive bays. 2. Connect the SATA signal cables. 3. Chapter 5 5-2 Chapter 5: RAID configurations Set the SATA Mode item to the Advanced menu > PCH Storage Configuration > SATA Controller 1 Mode Selection, then press . 3. Connect a SATA power cable to Chapter 3 for a RAID configuration: 1. Enter the BIOS Setup during POST. 2. Refer to the power connector on entering and navigating through the BIOS Setup Due to RAID mode, all SATA ports run at RAID mode together. Go to [RAID Mode]. 4. 5.1.2 Installing Serial ATA hard disks The motherboard supports Serial ATA hard disk drives...
... drive bays. 2. Connect the SATA signal cables. 3. Chapter 5 5-2 Chapter 5: RAID configurations Set the SATA Mode item to the Advanced menu > PCH Storage Configuration > SATA Controller 1 Mode Selection, then press . 3. Connect a SATA power cable to Chapter 3 for a RAID configuration: 1. Enter the BIOS Setup during POST. 2. Refer to the power connector on entering and navigating through the BIOS Setup Due to RAID mode, all SATA ports run at RAID mode together. Go to [RAID Mode]. 4. 5.1.2 Installing Serial ATA hard disks The motherboard supports Serial ATA hard disk drives...

User Guide
Page 155
... of the screen allow you to display the utility main menu. Chapter 5 ASUS X99-M WS 5-3 During POST, press + to move through the menus and select the menu options. RAID Volumes: None defined. The utility supports maximum four hard disk drives for reference only and may not exactly match the items on the system. 2. Turn on your screen. The RAID BIOS setup screens shown in this section are for RAID configuration.
... of the screen allow you to display the utility main menu. Chapter 5 ASUS X99-M WS 5-3 During POST, press + to move through the menus and select the menu options. RAID Volumes: None defined. The utility supports maximum four hard disk drives for reference only and may not exactly match the items on the system. 2. Turn on your screen. The RAID BIOS setup screens shown in this section are for RAID configuration.
User Guide
Page 160
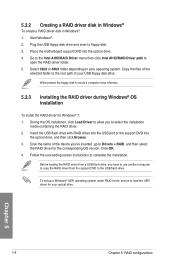
... AHCI/RAID Driver menu then click Intel AHCI/RAID Driver path to Drivers > RAID, and then select the RAID driver for the corresponding OS version. Chapter 5 5-8 Chapter 5: RAID configurations Insert the USB flash drive with RAID driver into the USB port or the support DVD into the optical drive. 4. Start Windows®. 2. Plug the USB floppy disk drive and insert a floppy disk. 3. Click the name of your USB floppy disk drive. To set up a Windows® UEFI operating system under RAID mode, ensure to complete the installation. Click...
... AHCI/RAID Driver menu then click Intel AHCI/RAID Driver path to Drivers > RAID, and then select the RAID driver for the corresponding OS version. Chapter 5 5-8 Chapter 5: RAID configurations Insert the USB flash drive with RAID driver into the USB port or the support DVD into the optical drive. 4. Start Windows®. 2. Plug the USB floppy disk drive and insert a floppy disk. 3. Click the name of your USB floppy disk drive. To set up a Windows® UEFI operating system under RAID mode, ensure to complete the installation. Click...


