
User Guide
Page 2
... service will be extended if: (1) the product is eager to duly provide complete source code as source code archives, etc. SPECIFICATIONS AND INFORMATION CONTAINED IN THIS MANUAL ARE FURNISHED FOR INFORMATIONAL USE ONLY, AND ARE SUBJECT TO CHANGE AT ANY TIME WITHOUT NOTICE, AND SHOULD NOT BE CONSTRUED AS A COMMITMENT BY ASUS. Offer to Provide Source Code of Certain Software...
... service will be extended if: (1) the product is eager to duly provide complete source code as source code archives, etc. SPECIFICATIONS AND INFORMATION CONTAINED IN THIS MANUAL ARE FURNISHED FOR INFORMATIONAL USE ONLY, AND ARE SUBJECT TO CHANGE AT ANY TIME WITHOUT NOTICE, AND SHOULD NOT BE CONSTRUED AS A COMMITMENT BY ASUS. Offer to Provide Source Code of Certain Software...
User Guide
Page 5
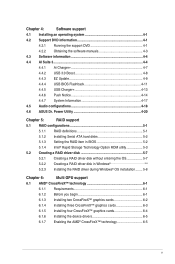
... software manuals 4-3 4.3 Software information 4-4 4.4 AI Suite 3...4-4 4.4.1 Ai Charger 4-7 4.4.2 USB 3.0 Boost 4-8 4.4.3 EZ Update 4-9 4.4.4 USB BIOS Flashback 4-11 4.4.5 USB Charger 4-13 4.4.6 Push Notice 4-14 4.4.7 System Information 4-17 4.5 Audio configurations 4-18 4.6 ASUS Dr. Power Utility 4-20 Chapter 5: RAID support 5.1 RAID configurations 5-1 5.1.1 RAID definitions 5-1 5.1.2 Installing Serial ATA hard disks 5-2 5.1.3 Setting the RAID item in BIOS 5-2 5.1.4 Intel® Rapid Storage Technology Option ROM utility 5-3 5.2 Creating a RAID driver disk...
... software manuals 4-3 4.3 Software information 4-4 4.4 AI Suite 3...4-4 4.4.1 Ai Charger 4-7 4.4.2 USB 3.0 Boost 4-8 4.4.3 EZ Update 4-9 4.4.4 USB BIOS Flashback 4-11 4.4.5 USB Charger 4-13 4.4.6 Push Notice 4-14 4.4.7 System Information 4-17 4.5 Audio configurations 4-18 4.6 ASUS Dr. Power Utility 4-20 Chapter 5: RAID support 5.1 RAID configurations 5-1 5.1.1 RAID definitions 5-1 5.1.2 Installing Serial ATA hard disks 5-2 5.1.3 Setting the RAID item in BIOS 5-2 5.1.4 Intel® Rapid Storage Technology Option ROM utility 5-3 5.2 Creating a RAID driver disk...

User Guide
Page 7
... avoid short circuits, keep paper clips, screws, and staples away from the motherboard, ensure that your power supply is broken, do not try to the correct voltage in any damage, contact your retailer. If possible, disconnect all power cables are connected. If you add a device. • Before connecting or removing signal cables from connectors, slots, sockets and circuitry. • Avoid dust, humidity, and temperature extremes.
... avoid short circuits, keep paper clips, screws, and staples away from the motherboard, ensure that your power supply is broken, do not try to the correct voltage in any damage, contact your retailer. If possible, disconnect all power cables are connected. If you add a device. • Before connecting or removing signal cables from connectors, slots, sockets and circuitry. • Avoid dust, humidity, and temperature extremes.

User Guide
Page 12
... Gb/s data transfer speeds for SATA Express Interactive HomeCloud ASUS HomeCloud Server Media Streamer - with smart devices in real time USB BIOS Flashback - Most advanced options with different usage scenarios Steam support - The ultra-fast transfer technology with up to a smart TV, your PC status with USB BIOS Flashback Wizard for M.2 - Feel the sound power with fast response time M.2 and SATA Express onboard - X99-E WS specifications summary ASUS Exclusive Features...
... Gb/s data transfer speeds for SATA Express Interactive HomeCloud ASUS HomeCloud Server Media Streamer - with smart devices in real time USB BIOS Flashback - Most advanced options with different usage scenarios Steam support - The ultra-fast transfer technology with up to a smart TV, your PC status with USB BIOS Flashback Wizard for M.2 - Feel the sound power with fast response time M.2 and SATA Express onboard - X99-E WS specifications summary ASUS Exclusive Features...

User Guide
Page 17
.... It utilizes the serial point-to six (6) USB 3.0 ports and ten (10) SATA 6 Gb/s ports. M.2 Support* This motherboard features the M.2 slot, which increases bandwidth and enhances the system's performance. It also features backward compatibility with its complete backward compatibility to the operating system. * Supports PCIe mode only. It natively supports up to meet the higher bandwidth requirements of the same speed. Chapter 1 ASUS X99-E WS 1-1 Intel® X99 Express Chipset...
.... It utilizes the serial point-to six (6) USB 3.0 ports and ten (10) SATA 6 Gb/s ports. M.2 Support* This motherboard features the M.2 slot, which increases bandwidth and enhances the system's performance. It also features backward compatibility with its complete backward compatibility to the operating system. * Supports PCIe mode only. It natively supports up to meet the higher bandwidth requirements of the same speed. Chapter 1 ASUS X99-E WS 1-1 Intel® X99 Express Chipset...
User Guide
Page 24
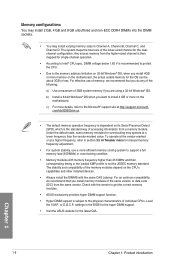
..., refer to the memory address limitation on its Serial Presence Detect (SPD), which is recommended to protect the CPU. • Due to section 3.5 Ai Tweaker menu for the latest QVL. The system maps the total size of the same version or data code (D/C) from the same vendor. Under the default state, some memory modules for the dualchannel configuration. Memory configurations You may install 2 GB, 4 GB and...
..., refer to the memory address limitation on its Serial Presence Detect (SPD), which is recommended to protect the CPU. • Due to section 3.5 Ai Tweaker menu for the latest QVL. The system maps the total size of the same version or data code (D/C) from the same vendor. Under the default state, some memory modules for the dualchannel configuration. Memory configurations You may install 2 GB, 4 GB and...

User Guide
Page 40
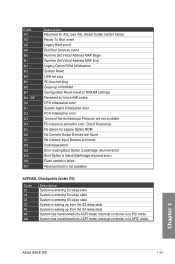
... module specific) ACPI module initialization CSM initialization Reserved for future AMI DXE codes Boot Device Selection (BDS) phase is started Driver connecting is started PCI Bus initialization is started PCI Bus Hot Plug Controller Initialization PCI Bus Enumeration PCI Bus Request Resources PCI Bus Assign Resources Console Output devices connect Console input devices connect Super IO Initialization USB initialization is started USB Reset USB Detect USB Enable Reserved for future AMI codes IDE initialization is started IDE Reset IDE Detect IDE Enable SCSI initialization is started SCSI Reset...
... module specific) ACPI module initialization CSM initialization Reserved for future AMI DXE codes Boot Device Selection (BDS) phase is started Driver connecting is started PCI Bus initialization is started PCI Bus Hot Plug Controller Initialization PCI Bus Enumeration PCI Bus Request Resources PCI Bus Assign Resources Console Output devices connect Console input devices connect Super IO Initialization USB initialization is started USB Reset USB Detect USB Enable Reserved for future AMI codes IDE initialization is started IDE Reset IDE Detect IDE Enable SCSI initialization is started SCSI Reset...
User Guide
Page 41
... for ASL (see ASL Status Codes section below) Ready To Boot event Legacy Boot event Exit Boot Services event Runtime Set Virtual Address MAP Begin Runtime Set Virtual Address MAP End Legacy Option ROM Initialization System Reset USB hot plug PCI bus hot plug Clean-up from the S3 sleep state System is waking up of NVRAM Configuration Reset (reset of NVRAM settings) Reserved for Legacy Option ROM No Console Output Devices are found No Console Input Devices are not available PCI resource allocation error.
... for ASL (see ASL Status Codes section below) Ready To Boot event Legacy Boot event Exit Boot Services event Runtime Set Virtual Address MAP Begin Runtime Set Virtual Address MAP End Legacy Option ROM Initialization System Reset USB hot plug PCI bus hot plug Clean-up from the S3 sleep state System is waking up of NVRAM Configuration Reset (reset of NVRAM settings) Reserved for Legacy Option ROM No Console Output Devices are found No Console Input Devices are not available PCI resource allocation error.
User Guide
Page 45
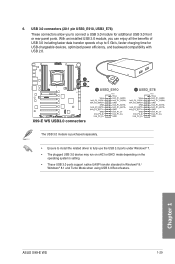
... of USB 3.0 including faster data transfer speeds of up to 5 Gb/s, faster charging time for additional USB 3.0 front or rear panel ports. With an installed USB 3.0 module, you to fully use the USB 3.0 ports under Windows® 7. • The plugged USB 3.0 device may run on xHCI or EHCI mode depending on the operating system's setting. • These USB 3.0 ports support native UASP transfer standard in Windows® 8 / Windows® 8.1 and Turbo Mode when using USB 3.0 Boost feature. Chapter 1 ASUS X99-E WS...
... of USB 3.0 including faster data transfer speeds of up to 5 Gb/s, faster charging time for additional USB 3.0 front or rear panel ports. With an installed USB 3.0 module, you to fully use the USB 3.0 ports under Windows® 7. • The plugged USB 3.0 device may run on xHCI or EHCI mode depending on the operating system's setting. • These USB 3.0 ports support native UASP transfer standard in Windows® 8 / Windows® 8.1 and Turbo Mode when using USB 3.0 Boost feature. Chapter 1 ASUS X99-E WS...

User Guide
Page 65
... BIOS. ASUS X99-E WS 2-11 Place the bundled support DVD to automatically download the latest BIOS version. 4. Chapter 2 BIOS Flashback button USB BIOS Flashback port 6. Wait until the Flashback LED blinks three times, indicating that supports USB BIOS Flashback. 3. Insert the USB storage device to the USB Flashback port. • We recommend you to easily update the BIOS without entering the existing BIOS or operating system. This may have risks. Launch the USB BIOS Flashback Wizard to the optical drive and install...
... BIOS. ASUS X99-E WS 2-11 Place the bundled support DVD to automatically download the latest BIOS version. 4. Chapter 2 BIOS Flashback button USB BIOS Flashback port 6. Wait until the Flashback LED blinks three times, indicating that supports USB BIOS Flashback. 3. Insert the USB storage device to the USB Flashback port. • We recommend you to easily update the BIOS without entering the existing BIOS or operating system. This may have risks. Launch the USB BIOS Flashback Wizard to the optical drive and install...

User Guide
Page 68
.... * LAN ports LED indications Activity Link LED Speed LED Status Description Status Description Off No link Off 10 Mbps connection Orange Linked Orange 100 Mbps connection Orange (Blinking) Data activity Green 1 Gbps connection Orange (Blinking Ready to wake up then steady) from S5 mode ACT/LINK SPEED LED LED LAN port You can disable the LAN controllers in BIOS. Some legacy USB devices must update their firmware for your USB 3.0 devices. • Due to the design of the Intel® X99 series chipset, all USB devices connected to blink...
.... * LAN ports LED indications Activity Link LED Speed LED Status Description Status Description Off No link Off 10 Mbps connection Orange Linked Orange 100 Mbps connection Orange (Blinking) Data activity Green 1 Gbps connection Orange (Blinking Ready to wake up then steady) from S5 mode ACT/LINK SPEED LED LED LAN port You can disable the LAN controllers in BIOS. Some legacy USB devices must update their firmware for your USB 3.0 devices. • Due to the design of the Intel® X99 series chipset, all USB devices connected to blink...

User Guide
Page 73
... UEFI architecture, offering a user-friendly interface that goes beyond the traditional keyboardonly BIOS controls to instability or boot failure. BIOS (Basic Input and Output System) stores system hardware settings such as your operating system. Inappropriate BIOS settings may result to enable a more flexible and convenient mouse input. We strongly recommend that requires further BIOS settings or update. Chapter 3 ASUS X99-E WS 3-1 In normal circumstances, the default BIOS settings apply to most conditions to run the BIOS Setup...
... UEFI architecture, offering a user-friendly interface that goes beyond the traditional keyboardonly BIOS controls to instability or boot failure. BIOS (Basic Input and Output System) stores system hardware settings such as your operating system. Inappropriate BIOS settings may result to enable a more flexible and convenient mouse input. We strongly recommend that requires further BIOS settings or update. Chapter 3 ASUS X99-E WS 3-1 In normal circumstances, the default BIOS settings apply to most conditions to run the BIOS Setup...

User Guide
Page 90
... is set lower CPU VCCIN and Vcore voltages and achieve the best energy saving condition. Configuration options: [Disabled] [Enabled] DRAM Timing Control The subitems in this item to set to 100:133. To restore the default setting, type [auto] using the keyboard and press the key. The configurable options vary with the BCLK (base clock) frequency setting. Chapter 3 3-18 Chapter 3: BIOS setup Use the or keys to become unstable! Changing...
... is set lower CPU VCCIN and Vcore voltages and achieve the best energy saving condition. Configuration options: [Disabled] [Enabled] DRAM Timing Control The subitems in this item to set to 100:133. To restore the default setting, type [auto] using the keyboard and press the key. The configurable options vary with the BCLK (base clock) frequency setting. Chapter 3 3-18 Chapter 3: BIOS setup Use the or keys to become unstable! Changing...

User Guide
Page 109
...set the SATA configuration. [Disabled] Disables the SATA function. [IDE Mode] Set to [IDE Mode] when you want to use the Serial ATA hard disk drives as Parallel ATA physical storage devices. [AHCI Mode] Set to [AHCI Mode] when you to enable/disable SATA Hot Plug Support. Configuration options: [Disabled] [Enabled] ASUS X99-E WS 3-37 If some ports are not used , these items show [Not Installed]. If some ports are disabled. SATA6G_1-6 (Gray) These items display all connected devices to SATA6G ports. SATA6G_7-10 (Black) These items display all connected devices...
...set the SATA configuration. [Disabled] Disables the SATA function. [IDE Mode] Set to [IDE Mode] when you want to use the Serial ATA hard disk drives as Parallel ATA physical storage devices. [AHCI Mode] Set to [AHCI Mode] when you to enable/disable SATA Hot Plug Support. Configuration options: [Disabled] [Enabled] ASUS X99-E WS 3-37 If some ports are not used , these items show [Not Installed]. If some ports are disabled. SATA6G_1-6 (Gray) These items display all connected devices to SATA6G ports. SATA6G_7-10 (Black) These items display all connected devices...
User Guide
Page 136
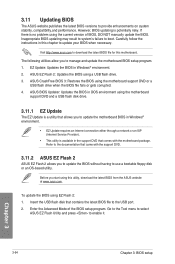
...utilities allow you start using the current version of the BIOS setup program. ASUS BIOS Updater: Updates the BIOS in Windows® environment. • EZ Update requires an Internet connection either through a network or an ISP (Internet Service Provider). • This utility is no problem using this motherboard. If there is available in the support DVD that allows you to update the motherboard BIOS in DOS environment using EZ Flash 2: 1. Chapter 3 3-64 Chapter 3: BIOS setup ASUS CrashFree BIOS 3: Restores the BIOS using a USB flash drive. 3. To update the BIOS using...
...utilities allow you start using the current version of the BIOS setup program. ASUS BIOS Updater: Updates the BIOS in Windows® environment. • EZ Update requires an Internet connection either through a network or an ISP (Internet Service Provider). • This utility is no problem using this motherboard. If there is available in the support DVD that allows you to update the motherboard BIOS in DOS environment using EZ Flash 2: 1. Chapter 3 3-64 Chapter 3: BIOS setup ASUS CrashFree BIOS 3: Restores the BIOS using a USB flash drive. 3. To update the BIOS using...
User Guide
Page 142
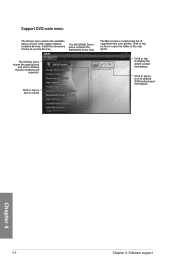
... detects installed devices. Click or tap an icon to open the folder of supplementary user guides. The AHCI/RAID Driver menu contains the RAID/AHCI driver disk. Click or tap an item to display DVD/motherboard information Chapter 4 4-2 Chapter 4: Software support Install the necessary drivers to display the ASUS contact information. Click or tap an item to install Click or tap to use the devices. The Utilities menu shows the applications and other software that the motherboard supports. The Manual menu...
... detects installed devices. Click or tap an icon to open the folder of supplementary user guides. The AHCI/RAID Driver menu contains the RAID/AHCI driver disk. Click or tap an item to display DVD/motherboard information Chapter 4 4-2 Chapter 4: Software support Install the necessary drivers to display the ASUS contact information. Click or tap an item to install Click or tap to use the devices. The Utilities menu shows the applications and other software that the motherboard supports. The Manual menu...

User Guide
Page 163
... identical hard disk drives for this setup. The RAID 5 configuration is required for this setup. With the RAID 10 configuration you have to read and write data in parallel, interleaved stacks. Chapter 5 X99-E WS 5-1 Chapter 5: RAID support RAID support 5 5.1 RAID configurations The motherboard supports Intel® Rapid Storage Technology with RAID 0, RAID 1, RAID 10, and RAID 5 solution. If you want to install a Windows® operating system to a hard disk drive included in the other drive. If one drive to the surviving drive as a single drive but...
... identical hard disk drives for this setup. The RAID 5 configuration is required for this setup. With the RAID 10 configuration you have to read and write data in parallel, interleaved stacks. Chapter 5 X99-E WS 5-1 Chapter 5: RAID support RAID support 5 5.1 RAID configurations The motherboard supports Intel® Rapid Storage Technology with RAID 0, RAID 1, RAID 10, and RAID 5 solution. If you want to install a Windows® operating system to a hard disk drive included in the other drive. If one drive to the surviving drive as a single drive but...
User Guide
Page 164
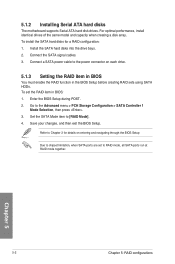
5.1.2 Installing Serial ATA hard disks The motherboard supports Serial ATA hard disk drives. To install the SATA hard disks for details on each drive. 5.1.3 Setting the RAID item in BIOS You must enable the RAID function in BIOS: 1. Connect a SATA power cable to the power connector on entering and navigating through the BIOS Setup Due to chipset limitation, when SATA ports are set the RAID item in the BIOS Setup before creating RAID sets using SATA HDDs. Go to [RAID Mode]. 4. Save your changes, and then exit the BIOS Setup. Chapter 5 5-2 Chapter 5: RAID configurations For ...
5.1.2 Installing Serial ATA hard disks The motherboard supports Serial ATA hard disk drives. To install the SATA hard disks for details on each drive. 5.1.3 Setting the RAID item in BIOS You must enable the RAID function in BIOS: 1. Connect a SATA power cable to the power connector on entering and navigating through the BIOS Setup Due to chipset limitation, when SATA ports are set the RAID item in the BIOS Setup before creating RAID sets using SATA HDDs. Go to [RAID Mode]. 4. Save your changes, and then exit the BIOS Setup. Chapter 5 5-2 Chapter 5: RAID configurations For ...

User Guide
Page 165
... you to display the utility main menu. The utility supports maximum four hard disk drives for reference only and may not exactly match the items on the system. 2. During POST, press + to move through the menus and select the menu options. RAID Volumes: None defined. The RAID BIOS setup screens shown in this section are for RAID configuration. Chapter 5 X99-E WS 5-3 5.1.4 Intel® Rapid Storage Technology Option ROM utility To enter...
... you to display the utility main menu. The utility supports maximum four hard disk drives for reference only and may not exactly match the items on the system. 2. During POST, press + to move through the menus and select the menu options. RAID Volumes: None defined. The RAID BIOS setup screens shown in this section are for RAID configuration. Chapter 5 X99-E WS 5-3 5.1.4 Intel® Rapid Storage Technology Option ROM utility To enter...
User Guide
Page 170
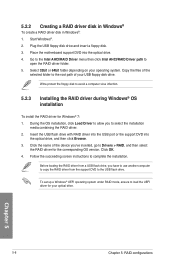
... RAID driver from a USB flash drive, you to the USB flash drive. Go to the Intel AHCI/RAID Driver menu then click Intel AHCI/RAID Driver path to complete the installation. Place the motherboard support DVD into the optical drive, and then click Browse. 3. Before loading the RAID driver from the support DVD to select the installation media containing the RAID driver. 2. 5.2.2 Creating a RAID driver disk in Windows® To create a RAID driver disk in Windows®: 1. Start Windows®. 2. To set up a Windows® UEFI operating system under RAID mode...
... RAID driver from a USB flash drive, you to the USB flash drive. Go to the Intel AHCI/RAID Driver menu then click Intel AHCI/RAID Driver path to complete the installation. Place the motherboard support DVD into the optical drive, and then click Browse. 3. Before loading the RAID driver from the support DVD to select the installation media containing the RAID driver. 2. 5.2.2 Creating a RAID driver disk in Windows® To create a RAID driver disk in Windows®: 1. Start Windows®. 2. To set up a Windows® UEFI operating system under RAID mode...


