
User Guide
Page 2
... http://support.asus.com/download or (2) for identification or explanation and to the owners' benefit, without any warranty to duly provide complete source code as the corresponding binary/object code. ASUS PROVIDES THIS MANUAL "AS...required under the Lesser General Public License Version ("LGPL") and/or other additional data, you . SPECIFICATIONS AND INFORMATION CONTAINED IN THIS MANUAL ARE FURNISHED FOR INFORMATIONAL USE ONLY, AND ARE SUBJECT TO CHANGE AT ANY TIME WITHOUT NOTICE, AND SHOULD NOT BE CONSTRUED AS A COMMITMENT BY ASUS. Offer to Provide Source Code of Certain Software...
... http://support.asus.com/download or (2) for identification or explanation and to the owners' benefit, without any warranty to duly provide complete source code as the corresponding binary/object code. ASUS PROVIDES THIS MANUAL "AS...required under the Lesser General Public License Version ("LGPL") and/or other additional data, you . SPECIFICATIONS AND INFORMATION CONTAINED IN THIS MANUAL ARE FURNISHED FOR INFORMATIONAL USE ONLY, AND ARE SUBJECT TO CHANGE AT ANY TIME WITHOUT NOTICE, AND SHOULD NOT BE CONSTRUED AS A COMMITMENT BY ASUS. Offer to Provide Source Code of Certain Software...
User Guide
Page 5
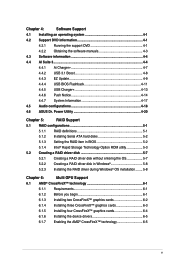
...Boost 4-8 4.4.3 EZ Update 4-9 4.4.4 USB BIOS Flashback 4-11 4.4.5 USB Charger 4-13 4.4.6 Push Notice 4-14 4.4.7 System Information 4-17 4.5 Audio configurations 4-18 4.6 ASUS Dr. Power Utility 4-20 Chapter 5: RAID Support 5.1 RAID configurations 5-1 5.1.1 RAID definitions 5-1 5.1.2 Installing Serial ATA hard disks 5-2 5.1.3 Setting the RAID item in BIOS 5-2 5.1.4 Intel® Rapid Storage Technology Option ROM utility 5-3 5.2 Creating a RAID driver disk 5-7 5.2.1 Creating a RAID driver disk without entering the OS 5-7 5.2.2 Creating a RAID driver disk in Windows...
...Boost 4-8 4.4.3 EZ Update 4-9 4.4.4 USB BIOS Flashback 4-11 4.4.5 USB Charger 4-13 4.4.6 Push Notice 4-14 4.4.7 System Information 4-17 4.5 Audio configurations 4-18 4.6 ASUS Dr. Power Utility 4-20 Chapter 5: RAID Support 5.1 RAID configurations 5-1 5.1.1 RAID definitions 5-1 5.1.2 Installing Serial ATA hard disks 5-2 5.1.3 Setting the RAID item in BIOS 5-2 5.1.4 Intel® Rapid Storage Technology Option ROM utility 5-3 5.2 Creating a RAID driver disk 5-7 5.2.1 Creating a RAID driver disk without entering the OS 5-7 5.2.2 Creating a RAID driver disk in Windows...
User Guide
Page 12
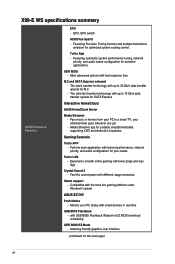
... EZ BIOS download scheduling UEFI BIOS EZ Mode - The ultra-fast transfer technology with up to a smart TV, your PC status with USB BIOS Flashback Wizard for selected applications. Monitor your entertainment goes wherever you go! - UEFI BIOS - Perform each application with up to 10 Gb/s data transfer speeds for your PC to 32 Gb/s data transfer speeds for M.2 - X99-E WS specifications summary ASUS Exclusive Features EPU - featuring friendly graphics user interface...
... EZ BIOS download scheduling UEFI BIOS EZ Mode - The ultra-fast transfer technology with up to a smart TV, your PC status with USB BIOS Flashback Wizard for selected applications. Monitor your entertainment goes wherever you go! - UEFI BIOS - Perform each application with up to 10 Gb/s data transfer speeds for your PC to 32 Gb/s data transfer speeds for M.2 - X99-E WS specifications summary ASUS Exclusive Features EPU - featuring friendly graphics user interface...

User Guide
Page 17
... (6) USB 3.0 ports and ten (10) SATA 6 Gb/s ports. It natively supports up to 32 Gb/s. SATA Express support SATA Express provides faster data transfer speeds of the SSDs. It utilizes the serial point-to four times the number of PCIe 2.0. Chapter 1 ASUS X99-E WS/USB 3.1 1-1 M.2 Support* This motherboard features the M.2 slot, which increases bandwidth and enhances the system's performance. It provides great system performance, quad-channel DDR4 memory slots and PCI Express 2.0/3.0 expansion slots. PCI Express® 3.0 PCI...
... (6) USB 3.0 ports and ten (10) SATA 6 Gb/s ports. It natively supports up to 32 Gb/s. SATA Express support SATA Express provides faster data transfer speeds of the SSDs. It utilizes the serial point-to four times the number of PCIe 2.0. Chapter 1 ASUS X99-E WS/USB 3.1 1-1 M.2 Support* This motherboard features the M.2 slot, which increases bandwidth and enhances the system's performance. It provides great system performance, quad-channel DDR4 memory slots and PCI Express 2.0/3.0 expansion slots. PCI Express® 3.0 PCI...

User Guide
Page 24
... operation. • According to Intel® CPU spec, DIMM voltage below 1.65 V is recommended to protect the CPU. • Due to section 3.5 Ai Tweaker menu for the latest QVL. The stability and compatibility of the memory modules depend on its Serial Presence Detect (SPD), which is the standard way of the same version or data code (D/C) from a memory module. Load the X.M.P. or D.O.C.P. Under the default state, some memory modules...
... operation. • According to Intel® CPU spec, DIMM voltage below 1.65 V is recommended to protect the CPU. • Due to section 3.5 Ai Tweaker menu for the latest QVL. The stability and compatibility of the memory modules depend on its Serial Presence Detect (SPD), which is the standard way of the same version or data code (D/C) from a memory module. Load the X.M.P. or D.O.C.P. Under the default state, some memory modules...

User Guide
Page 29
... download and update to memory tuning requirement, the system automatically reboots when each timing set is not properly installed. ASUS X99-E WS/USB 3.1 1-13 Chapter 1 Press and hold the MemOK! button does not function under Windows® OS environment. • During the tuning process, the system loads and tests failsafe memory settings. If the installed DIMMs still fail to boot and load the BIOS default settings. To stop memory tuning, turn off the computer and replace DIMMs...
... download and update to memory tuning requirement, the system automatically reboots when each timing set is not properly installed. ASUS X99-E WS/USB 3.1 1-13 Chapter 1 Press and hold the MemOK! button does not function under Windows® OS environment. • During the tuning process, the system loads and tests failsafe memory settings. If the installed DIMMs still fail to boot and load the BIOS default settings. To stop memory tuning, turn off the computer and replace DIMMs...

User Guide
Page 40
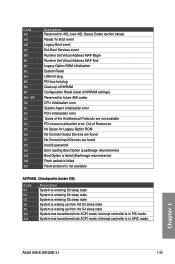
... Boot Device Selection (BDS) phase is started Driver connecting is started PCI Bus initialization is started PCI Bus Hot Plug Controller Initialization PCI Bus Enumeration PCI Bus Request Resources PCI Bus Assign Resources Console Output devices connect Console input devices connect Super IO Initialization USB initialization is started USB Reset USB Detect USB Enable Reserved for future AMI codes IDE initialization is started IDE Reset IDE Detect IDE Enable SCSI initialization is started SCSI Reset SCSI Detect SCSI Enable Setup Verifying Password Start of Setup Reserved for ASL (see ASL Status...
... Boot Device Selection (BDS) phase is started Driver connecting is started PCI Bus initialization is started PCI Bus Hot Plug Controller Initialization PCI Bus Enumeration PCI Bus Request Resources PCI Bus Assign Resources Console Output devices connect Console input devices connect Super IO Initialization USB initialization is started USB Reset USB Detect USB Enable Reserved for future AMI codes IDE initialization is started IDE Reset IDE Detect IDE Enable SCSI initialization is started SCSI Reset SCSI Detect SCSI Enable Setup Verifying Password Start of Setup Reserved for ASL (see ASL Status...
User Guide
Page 41
... Status Codes section below) Ready To Boot event Legacy Boot event Exit Boot Services event Runtime Set Virtual Address MAP Begin Runtime Set Virtual Address MAP End Legacy Option ROM Initialization System Reset USB hot plug PCI bus hot plug Clean-up of NVRAM Configuration Reset (reset of the Architectural Protocols are found No Console Input Devices are not available PCI resource allocation error. Out of Resources No Space for future AMI codes CPU initialization error System Agent initialization error PCH initialization error Some of NVRAM settings...
... Status Codes section below) Ready To Boot event Legacy Boot event Exit Boot Services event Runtime Set Virtual Address MAP Begin Runtime Set Virtual Address MAP End Legacy Option ROM Initialization System Reset USB hot plug PCI bus hot plug Clean-up of NVRAM Configuration Reset (reset of the Architectural Protocols are found No Console Input Devices are not available PCI resource allocation error. Out of Resources No Space for future AMI codes CPU initialization error System Agent initialization error PCH initialization error Some of NVRAM settings...

User Guide
Page 45
... additional USB 3.0 front or rear panel ports. Chapter 1 ASUS X99-E WS/USB 3.1 1-29 USB 3.0 connectors (20-1 pin USB3_E910, USB3_E78) These connectors allow you can enjoy all the benefits of USB 3.0 including faster data transfer speeds of up to connect a USB 3.0 module for USB-chargeable devices, optimized power efficiency, and backward compatibility with USB 2.0. The USB 3.0 module is purchased separately. • Ensure to install the related driver to fully use the USB 3.0 ports under Windows® 7. • The plugged USB 3.0 device may run...
... additional USB 3.0 front or rear panel ports. Chapter 1 ASUS X99-E WS/USB 3.1 1-29 USB 3.0 connectors (20-1 pin USB3_E910, USB3_E78) These connectors allow you can enjoy all the benefits of USB 3.0 including faster data transfer speeds of up to connect a USB 3.0 module for USB-chargeable devices, optimized power efficiency, and backward compatibility with USB 2.0. The USB 3.0 module is purchased separately. • Ensure to install the related driver to fully use the USB 3.0 ports under Windows® 7. • The plugged USB 3.0 device may run...

User Guide
Page 65
... BIOS update utilities in green on the I /O connection for three seconds to the optical drive and install the USB BIOS Flashback Wizard. ASUS X99-E WS/USB 3.1 2-11 Simply insert a USB storage device to the USB port (the USB port hole marked in BIOS setup, refer to easily update the BIOS without entering the existing BIOS or operating system. This may have risks. Place the bundled support DVD to automatically update the BIOS. Follow the onscreen instructions to automatically download the latest BIOS version...
... BIOS update utilities in green on the I /O connection for three seconds to the optical drive and install the USB BIOS Flashback Wizard. ASUS X99-E WS/USB 3.1 2-11 Simply insert a USB storage device to the USB port (the USB port hole marked in BIOS setup, refer to easily update the BIOS without entering the existing BIOS or operating system. This may have risks. Place the bundled support DVD to automatically update the BIOS. Follow the onscreen instructions to automatically download the latest BIOS version...
User Guide
Page 73
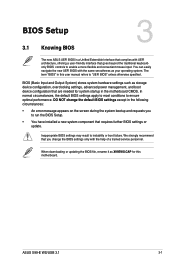
...keyboardonly BIOS controls to ensure optimal performance. BIOS (Basic Input and Output System) stores system hardware settings such as storage device configuration, overclocking settings, advanced power management, and boot device configuration that are needed for this user manual refers to instability or boot failure. The term "BIOS" in the motherboard CMOS. Inappropriate BIOS settings may result to "UEFI BIOS" unless otherwise specified. Chapter 3 ASUS X99-E WS/USB 3.1 3-1 DO NOT change the default BIOS settings except in the following circumstances: • An error message...
...keyboardonly BIOS controls to ensure optimal performance. BIOS (Basic Input and Output System) stores system hardware settings such as storage device configuration, overclocking settings, advanced power management, and boot device configuration that are needed for this user manual refers to instability or boot failure. The term "BIOS" in the motherboard CMOS. Inappropriate BIOS settings may result to "UEFI BIOS" unless otherwise specified. Chapter 3 ASUS X99-E WS/USB 3.1 3-1 DO NOT change the default BIOS settings except in the following circumstances: • An error message...

User Guide
Page 90
... [Auto] This item allows you to enable the internal PLL Overvoltage for K-SKU CPUs to get the extreme overclocking capability. EPU Power Saving Mode [Disabled] The ASUS EPU (Energy Processing Unit) sets the CPU in this happens, revert to become unstable! Chapter 3 3-18 Chapter 3: BIOS Setup To restore the default setting, type [auto] using the keyboard and press the key. Changing the values in its optimized...
... [Auto] This item allows you to enable the internal PLL Overvoltage for K-SKU CPUs to get the extreme overclocking capability. EPU Power Saving Mode [Disabled] The ASUS EPU (Energy Processing Unit) sets the CPU in this happens, revert to become unstable! Chapter 3 3-18 Chapter 3: BIOS Setup To restore the default setting, type [auto] using the keyboard and press the key. Changing the values in its optimized...

User Guide
Page 109
... use the Serial ATA hard disk drives as Parallel ATA physical storage devices. [AHCI Mode] Set to [AHCI Mode] when you want the SATA hard disk drives to enable/disable SATA Hot Plug Support. Configuration options: [Disabled] [Enabled] ASUS X99-E WS/USB 3.1 3-37 The following item appears only when you set the SATA Mode Selection to use the AHCI (Advanced Host Controller Interface). If some ports are not used , these items show [Not Installed]. SATA6G_7-10 (Black) These items display all connected devices to internally optimize the order of SATA ports...
... use the Serial ATA hard disk drives as Parallel ATA physical storage devices. [AHCI Mode] Set to [AHCI Mode] when you want the SATA hard disk drives to enable/disable SATA Hot Plug Support. Configuration options: [Disabled] [Enabled] ASUS X99-E WS/USB 3.1 3-37 The following item appears only when you set the SATA Mode Selection to use the AHCI (Advanced Host Controller Interface). If some ports are not used , these items show [Not Installed]. SATA6G_7-10 (Black) These items display all connected devices to internally optimize the order of SATA ports...

User Guide
Page 115
... AC'97. ASUS X99-E WS/USB 3.1 3-43 Chapter 3 3.6.7 Onboard Devices Configuration Scroll down to view the other BIOS items. HD Audio Controller [Enabled] This item allows you to use the Azalia High Definition Audio Controller Configuration options: [Disabled] [Enabled] The following items appear only when you to set the HD Audio Controller to [Enabled]. Front Panel Type [HD Audio] This item allows you set the front panel audio connector (AAFP) mode to legacy AC...
... AC'97. ASUS X99-E WS/USB 3.1 3-43 Chapter 3 3.6.7 Onboard Devices Configuration Scroll down to view the other BIOS items. HD Audio Controller [Enabled] This item allows you to use the Azalia High Definition Audio Controller Configuration options: [Disabled] [Enabled] The following items appear only when you to set the HD Audio Controller to [Enabled]. Front Panel Type [HD Audio] This item allows you set the front panel audio connector (AAFP) mode to legacy AC...

User Guide
Page 136
... no problem using EZ Flash 2: 1. EZ Update: Updates the BIOS in DOS environment using this chapter to update the motherboard BIOS in Windows® environment. • EZ Update requires an Internet connection either through a network or an ISP (Internet Service Provider). • This utility is potentially risky. Enter the Advanced Mode of BIOS, DO NOT manually update the BIOS. Inappropriate BIOS updating may result to system's failure to enable it. Before you start using the motherboard support DVD and a USB flash disk drive. 3.11.1 EZ Update...
... no problem using EZ Flash 2: 1. EZ Update: Updates the BIOS in DOS environment using this chapter to update the motherboard BIOS in Windows® environment. • EZ Update requires an Internet connection either through a network or an ISP (Internet Service Provider). • This utility is potentially risky. Enter the Advanced Mode of BIOS, DO NOT manually update the BIOS. Inappropriate BIOS updating may result to system's failure to enable it. Before you start using the motherboard support DVD and a USB flash disk drive. 3.11.1 EZ Update...
User Guide
Page 142
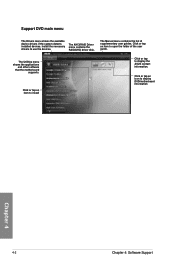
... to display DVD/motherboard information Chapter 4 4-2 Chapter 4: Software Support Click or tap an icon to open the folder of supplementary user guides. The Utilities menu shows the applications and other software that the motherboard supports. The AHCI/RAID Driver menu contains the RAID/AHCI driver disk. Click or tap an item to install Click or tap to use the devices. Support DVD main menu The Drivers menu shows the available device drivers if the system detects installed devices. Install the necessary drivers to display the ASUS...
... to display DVD/motherboard information Chapter 4 4-2 Chapter 4: Software Support Click or tap an icon to open the folder of supplementary user guides. The Utilities menu shows the applications and other software that the motherboard supports. The AHCI/RAID Driver menu contains the RAID/AHCI driver disk. Click or tap an item to install Click or tap to use the devices. Support DVD main menu The Drivers menu shows the available device drivers if the system detects installed devices. Install the necessary drivers to display the ASUS...

User Guide
Page 163
... or more hard disk drives. The RAID 5 configuration is required for this setup. With the RAID 10 configuration you want to install a Windows® operating system to be of a single disk alone, thus improving data access and storage. RAID 5 stripes both RAID 0 and RAID 1 configurations. RAID 1 (Data mirroring) copies and maintains an identical image of data from one drive fails, the disk array management software directs all the benefits of RAID 5 configuration include better HDD performance, fault tolerance, and higher storage capacity. Chapter 5 ASUS X99-E WS/USB 3.1 5-1
... or more hard disk drives. The RAID 5 configuration is required for this setup. With the RAID 10 configuration you want to install a Windows® operating system to be of a single disk alone, thus improving data access and storage. RAID 5 stripes both RAID 0 and RAID 1 configurations. RAID 1 (Data mirroring) copies and maintains an identical image of data from one drive fails, the disk array management software directs all the benefits of RAID 5 configuration include better HDD performance, fault tolerance, and higher storage capacity. Chapter 5 ASUS X99-E WS/USB 3.1 5-1
User Guide
Page 164
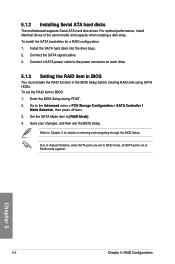
... in the BIOS Setup before creating RAID sets using SATA HDDs. Save your changes, and then exit the BIOS Setup. Connect a SATA power cable to the power connector on entering and navigating through the BIOS Setup Due to RAID mode, all SATA ports run at RAID mode together. Set the SATA Mode item to the Advanced menu > PCH Storage Configuration > SATA Controller 1 Mode Selection, then press . 3. Go to [RAID Mode]. 4. Connect the SATA signal cables. 3. 5.1.2 Installing Serial ATA hard disks The motherboard supports Serial ATA hard disk drives. To install the SATA hard disks for...
... in the BIOS Setup before creating RAID sets using SATA HDDs. Save your changes, and then exit the BIOS Setup. Connect a SATA power cable to the power connector on entering and navigating through the BIOS Setup Due to RAID mode, all SATA ports run at RAID mode together. Set the SATA Mode item to the Advanced menu > PCH Storage Configuration > SATA Controller 1 Mode Selection, then press . 3. Go to [RAID Mode]. 4. Connect the SATA signal cables. 3. 5.1.2 Installing Serial ATA hard disks The motherboard supports Serial ATA hard disk drives. To install the SATA hard disks for...

User Guide
Page 165
Turn on your screen. RAID Volumes: None defined. Chapter 5 ASUS X99-E WS/USB 3.1 5-3 Physical Devices: Port Device Model 0 ST3160812AS 1 ST3160812AS 2 ST3160812AS 3 ST3160812AS Serial # 9LS0HJA4 9LS0F4HL 3LS0JYL8 9LS0BJ5H Size 149.0GB 149.0GB 149.0GB 149.0GB Type/Status(Vol ID) Non-RAID Disk Non-RAID Disk Non-RAID Disk Non-RAID Disk The navigation keys at the bottom of the screen allow you to display the utility main menu. The utility supports maximum four hard disk drives for reference only and...
Turn on your screen. RAID Volumes: None defined. Chapter 5 ASUS X99-E WS/USB 3.1 5-3 Physical Devices: Port Device Model 0 ST3160812AS 1 ST3160812AS 2 ST3160812AS 3 ST3160812AS Serial # 9LS0HJA4 9LS0F4HL 3LS0JYL8 9LS0BJ5H Size 149.0GB 149.0GB 149.0GB 149.0GB Type/Status(Vol ID) Non-RAID Disk Non-RAID Disk Non-RAID Disk Non-RAID Disk The navigation keys at the bottom of the screen allow you to display the utility main menu. The utility supports maximum four hard disk drives for reference only and...
User Guide
Page 170
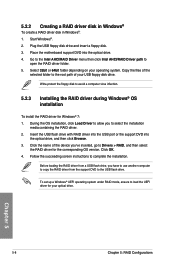
... your USB floppy disk drive. Click the name of the device you have to use another computer to copy the RAID driver from the support DVD to the root path of the selected folder to the USB flash drive. Before loading the RAID driver from a USB flash drive, you 've inserted, go to avoid a computer virus infection. 5.2.3 Installing the RAID driver during Windows® OS installation To install the RAID driver for the corresponding OS version. Start Windows...
... your USB floppy disk drive. Click the name of the device you have to use another computer to copy the RAID driver from the support DVD to the root path of the selected folder to the USB flash drive. Before loading the RAID driver from a USB flash drive, you 've inserted, go to avoid a computer virus infection. 5.2.3 Installing the RAID driver during Windows® OS installation To install the RAID driver for the corresponding OS version. Start Windows...


