User's Manual for English Edition
Page 20
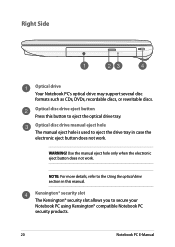
...® security slot allows you to eject the drive tray in this manual. Right Side Optical drive Your Notebook PC's optical drive may support several disc formats such as CDs, DVDs, recordable discs, or rewritable discs. WARNING! NOTE: For more details, refer to eject the optical drive tray. Optical disc drive eject button Press this button to the Using...
...® security slot allows you to eject the drive tray in this manual. Right Side Optical drive Your Notebook PC's optical drive may support several disc formats such as CDs, DVDs, recordable discs, or rewritable discs. WARNING! NOTE: For more details, refer to eject the optical drive tray. Optical disc drive eject button Press this button to the Using...
User's Manual for English Edition
Page 40
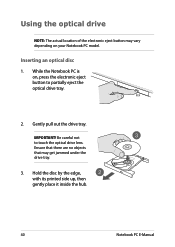
Using the optical drive NOTE: The actual location of the electronic eject button may get jammed under the drive tray. 3. Ensure that there are no objects that may vary depending on , press the electronic eject button to touch the optical drive lens. Hold the disc by the edge, with its printed side up, then gently place it inside the hub. 40 Notebook PC E-Manual Inserting an optical disc 1. Be careful not to partially eject the optical drive tray. 2. Gently pull out the drive tray. While the Notebook PC is on your Notebook PC model. IMPORTANT!
Using the optical drive NOTE: The actual location of the electronic eject button may get jammed under the drive tray. 3. Ensure that there are no objects that may vary depending on , press the electronic eject button to touch the optical drive lens. Hold the disc by the edge, with its printed side up, then gently place it inside the hub. 40 Notebook PC E-Manual Inserting an optical disc 1. Be careful not to partially eject the optical drive tray. 2. Gently pull out the drive tray. While the Notebook PC is on your Notebook PC model. IMPORTANT!
User's Manual for English Edition
Page 41
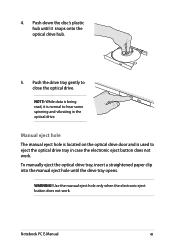
...button does not work . To manually eject the optical drive tray, insert a straightened paper clip into the manual eject hole until it is used to eject the optical drive tray in the optical drive. Push down the disc's plastic hub until the drive tray opens. Manual eject hole The manual eject hole ...is located on the optical drive door and is normal to close the optical...
...button does not work . To manually eject the optical drive tray, insert a straightened paper clip into the manual eject hole until it is used to eject the optical drive tray in the optical drive. Push down the disc's plastic hub until the drive tray opens. Manual eject hole The manual eject hole ...is located on the optical drive door and is normal to close the optical...

User's Manual for English Edition
Page 94
..., Taiwan), and CTR21. NOTE: Refer to the public switched telephone network (PSTN). However due to view high definition (HD) videos and other disc file formats such as DVDs and CDs. Australia and New Zealand. Region B European, African, and South West Asian countries and their territories; China.... Taiwan, Hong Kong, Macao, Japan, Korea (South and North), South East Asian countries and their territories; Blu-ray ROM Drive Information (on selected models) The Blu-ray ROM Drive allows you should contact your equipment supplier in the first instance. 94 Notebook PC E-Manual
..., Taiwan), and CTR21. NOTE: Refer to the public switched telephone network (PSTN). However due to view high definition (HD) videos and other disc file formats such as DVDs and CDs. Australia and New Zealand. Region B European, African, and South West Asian countries and their territories; China.... Taiwan, Hong Kong, Macao, Japan, Korea (South and North), South East Asian countries and their territories; Blu-ray ROM Drive Information (on selected models) The Blu-ray ROM Drive allows you should contact your equipment supplier in the first instance. 94 Notebook PC E-Manual


