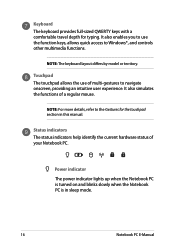
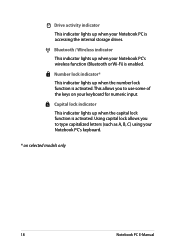
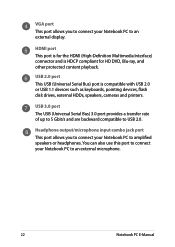
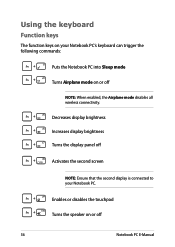
User's Manual for English Edition
Page 3
... Notebook PC 26 Lift to open the display panel 28 Press the power button 28 Gestures for the touchpad 29 Using the keyboard 36 Function keys...36 Function keys for ASUS Apps 37 Windows®8 keys...38 Multimedia control keys 38 Numeric keypad*...39 Using the optical drive 40 Notebook PC E-Manual...
User's Manual for English Edition
Page 4
... Windows® apps 49 Launching apps...49 Customizing apps...49 Closing apps...50 Accessing the Apps screen 51 Charms bar...53 Snap feature...55 Other keyboard shortcuts 57 Connecting to wireless networks 59 Wi-Fi...59 Bluetooth ...61 Airplane mode...63 Connecting to wired networks 64 Configuring a dynamic IP/PPPoE ...network connection 64 Configuring a static IP network connection 66 Turning your Notebook PC off 67 Putting your Notebook PC to sleep 67 Chapter 4: ASUS apps Featured ASUS Apps 70 LifeFrame...70 Power4Gear Hybrid...72 Instant On...74 Notebook PC E-Manual
User's Manual for English Edition
Page 8
... or procedures on your Notebook PC's data and components. Italic = This indicates sections that can refer to your Notebook PC. = Use the touchpad. = Use the keyboard. Icons The icons below indicate the devices you can help complete tasks.
User's Manual for English Edition
Page 14
Getting to know your Notebook PC Top View NOTE: The keyboard's layout may also vary in appearance depending on the Notebook PC model. 14 Notebook PC E-Manual The top view may vary per region or country.
User's Manual for English Edition
Page 16
NOTE: For more details, refer to the Gestures for typing. Keyboard The keyboard provides full-sized QWERTY keys with a comfortable travel depth for the touchpad section in sleep mode. 16 Notebook PC E-Manual It also simulates the functions ... other multimedia functions. Touchpad The touchpad allows the use the function keys, allows quick access to navigate onscreen, providing an intuitive user experience. NOTE: The keyboard layout differs by model or territory.
User's Manual for English Edition
Page 18
... the capital lock function is accessing the internal storage drives. Using capital lock allows you to type capitalized letters (such as A, B, C) using your Notebook PC's keyboard. * on your keyboard for numeric input.
User's Manual for English Edition
Page 22
HDMI port This port is for the HDMI (High-Definition Multimedia Interface) connector and is compatible with USB 2.0 or USB 1.1 devices such as keyboards, pointing devices, flash disk drives, external HDDs, speakers, cameras and printers. You can also use this port to connect your Notebook PC to an external ...
User's Manual for English Edition
Page 36
Enables or disables the touchpad Turns the speaker on or off NOTE: When enabled, the Airplane mode disables all wireless connectivity. Using the keyboard Function keys The function keys on your Notebook PC. Decreases display brightness Increases display brightness Turns the display panel off Activates the second screen NOTE: Ensure that the second display is connected to your Notebook PC's keyboard can trigger the following commands: Puts the Notebook PC into Sleep mode Turns Airplane mode on or off 36 Notebook PC E-Manual
User's Manual for English Edition
Page 38
If you are two special Windows® keys on your Notebook PC's keyboard used as below . Multimedia control keys* The multimedia control keys allow you opened. Stop Skip to previous track or rewind Play or pause Skip to ...
User's Manual for English Edition
Page 44
... Notebook PC. 3. Carefully read the License Terms. Tick I accept the terms for using Windows then click Accept. 4. Press the power button on your Notebook PC's keyboard. 44 Notebook PC E-Manual Windows® 8 lock screen The Windows®8 lock screen may appear when your Windows® 8 operating system. Starting for the first...
User's Manual for English Edition
Page 47
... all running apps. If you launched more than one app, slide down to that app. NOTE: You can also press the Windows key on your keyboard to go back to that running app.
User's Manual for English Edition
Page 49
... its settings bar then tap or or . Customizing apps You can move, resize, unpin, or close apps. Launching apps Position your Notebook PC's touchpad, or keyboard to browse through the apps. Press to launch it.
User's Manual for English Edition
Page 51
Notebook PC E-Manual 51 Horizontal scroll bar Launching the Apps screen Launch the Apps screen using your Start screen, you can also open other applications through the Apps screen. Swipe from the apps already pinned on your Notebook PC's touchpad or keyboard. From the Start screen, press All Apps icon then press to launch the All Apps bar. Accessing the Apps screen Aside from the top edge to select the .
User's Manual for English Edition
Page 53
The image above shows how the charms bar looks like once activated. Use your Notebook PC's touchpad, or keyboard to share applications and provide quick access for customizing the settings of your screen. Press Notebook PC E-Manual 53 Move your mouse pointer on the ...
User's Manual for English Edition
Page 56
Once the pointer changes to a hand icon, drag then drop the app to snap. 2. Press . 3. Launch another app. 1. Hover the mouse point on the top side of the display panel. 4. Launch the app you wish to the left or right side of your Notebook PC's touchpad, or keyboard to snap. 2. Launch another app. 4. Launch the app you wish to activate and use Snap. 1. To switch between apps, press . 56 Notebook PC E-Manual Using Snap Use your screen. 3.
User's Manual for English Edition
Page 57
Other keyboard shortcuts Using the keyboard, you can also use the following shortcuts to help you launch applications and navigate Windows®8. \ Switches between the Start screen and the last running app Launches the desktop Launches the Computer window on Desktop mode Opens the File charm Opens the Share charm Opens the Settings charm Opens the Devices charm Activates the Lock screen Minimizes the Internet Explorer window Notebook PC E-Manual 57
User's Manual for English Edition
Page 110
... by default. Reduction of the use of natural resources by modes. 2. Reduced solid waste through energy efficient products and practices. All ASUS products with the ENERGY STAR logo comply with the ENERGY STAR standard, and the power management feature is a joint program of toxic heavy... longer lifetime through providing compatible spare parts such as batteries, power supplies, the keyboard, the memory, and if available the CD drive or DVD drive. 6. For more information on the keyboard. In addition, please visit http://www.energystar.gov for detail information on FreeDOS ...