User's Manual for English Edition
Page 20
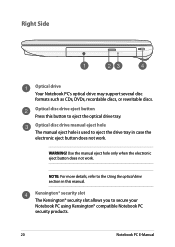
...manual. NOTE: For more details, refer to the Using the optical drive section in case the electronic eject button does not work . Use the manual eject hole only when the electronic eject button does not work . Right Side Optical drive Your Notebook PC's optical drive may support several ...disc formats such as CDs, DVDs, recordable discs, or rewritable discs. Optical disc drive manual eject hole The manual eject hole is used to eject the drive tray in this button to secure your Notebook PC using Kensington® compatible Notebook PC security products. 20 ...
...manual. NOTE: For more details, refer to the Using the optical drive section in case the electronic eject button does not work . Use the manual eject hole only when the electronic eject button does not work . Right Side Optical drive Your Notebook PC's optical drive may support several ...disc formats such as CDs, DVDs, recordable discs, or rewritable discs. Optical disc drive manual eject hole The manual eject hole is used to eject the drive tray in this button to secure your Notebook PC using Kensington® compatible Notebook PC security products. 20 ...
User's Manual for English Edition
Page 40
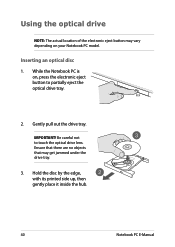
Gently pull out the drive tray. Ensure that there are no objects that may vary depending on , press the electronic eject button to touch the optical drive lens. Hold the disc by the edge, with its printed side up, then gently place it inside the hub. 40 Notebook PC E-Manual Using the optical drive NOTE: The actual location of the electronic eject button may get jammed under the drive tray. 3. IMPORTANT! Inserting an optical disc 1. While the Notebook PC is on your Notebook PC model. Be careful not to partially eject the optical drive tray. 2.
Gently pull out the drive tray. Ensure that there are no objects that may vary depending on , press the electronic eject button to touch the optical drive lens. Hold the disc by the edge, with its printed side up, then gently place it inside the hub. 40 Notebook PC E-Manual Using the optical drive NOTE: The actual location of the electronic eject button may get jammed under the drive tray. 3. IMPORTANT! Inserting an optical disc 1. While the Notebook PC is on your Notebook PC model. Be careful not to partially eject the optical drive tray. 2.
User's Manual for English Edition
Page 41
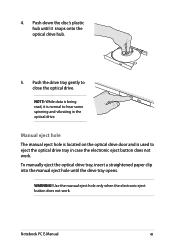
...optical drive hub. 5. Push the drive tray gently to hear some spinning and vibrating in case the electronic eject button does not work . Manual eject hole The manual eject hole is located on the optical drive door and is normal to close the optical drive. Notebook PC E-Manual... 41 Use the manual eject hole only when the electronic eject button does not work . To manually eject the optical drive tray, insert a straightened paper clip into the manual eject hole until it is used to eject the optical drive tray in the optical drive. WARNING...
...optical drive hub. 5. Push the drive tray gently to hear some spinning and vibrating in case the electronic eject button does not work . Manual eject hole The manual eject hole is located on the optical drive door and is normal to close the optical drive. Notebook PC E-Manual... 41 Use the manual eject hole only when the electronic eject button does not work . To manually eject the optical drive tray, insert a straightened paper clip into the manual eject hole until it is used to eject the optical drive tray in the optical drive. WARNING...


