User Guide
Page 3
... Takeback Services viii Product information for EU energy label viii Chapter 1: Product introduction 1.1 Welcome 1-1 1.2 Package contents 1-1 1.3 Monitor introduction 1-2 1.3.1 Front view 1-2 1.3.2 Back view 1-3 1.3.3 GamePlus function 1-4 1.3.4 GameVisual function 1-6 1.3.5 Other Function(s 1-7 ... 2-1 2.2 Cable management 2-2 2.3 Detaching the arm/base (for VESA .wall mount 2-2 2.4 Adjusting the monitor 2-3 2.5 Connecting the cables 2-4 2.6 Turning on/off the monitor 2-5 Chapter 3: General instructions 3.1 OSD (On-Screen Display) menu 3-1 3.1.1 How to reconfigure 3-1 3.1.2...
... Takeback Services viii Product information for EU energy label viii Chapter 1: Product introduction 1.1 Welcome 1-1 1.2 Package contents 1-1 1.3 Monitor introduction 1-2 1.3.1 Front view 1-2 1.3.2 Back view 1-3 1.3.3 GamePlus function 1-4 1.3.4 GameVisual function 1-6 1.3.5 Other Function(s 1-7 ... 2-1 2.2 Cable management 2-2 2.3 Detaching the arm/base (for VESA .wall mount 2-2 2.4 Adjusting the monitor 2-3 2.5 Connecting the cables 2-4 2.6 Turning on/off the monitor 2-5 Chapter 3: General instructions 3.1 OSD (On-Screen Display) menu 3-1 3.1.1 How to reconfigure 3-1 3.1.2...

User Guide
Page 4
... numérique de la classe B respecte toutes les exigences du Réglement sur le matériel brouiller du Canada. The use of the monitor to the graphics card is encouraged to try to correct the interference by the party responsible for connection of shielded cables for compliance could void...
... numérique de la classe B respecte toutes les exigences du Réglement sur le matériel brouiller du Canada. The use of the monitor to the graphics card is encouraged to try to correct the interference by the party responsible for connection of shielded cables for compliance could void...
User Guide
Page 5
... type of the following power supplies: - Contact a qualified service technician or your dealer immediately. • Slots and openings on the monitor cabinet. • To ensure satisfactory operation, use it may increase the ear-/headphones output voltage and therefore the sound pressure level. •...; The adapter is provided. • The monitor should be used for other purpose. Your device uses one of power source indicated on a stable surface. • Unplug the unit during...
... type of the following power supplies: - Contact a qualified service technician or your dealer immediately. • Slots and openings on the monitor cabinet. • To ensure satisfactory operation, use it may increase the ear-/headphones output voltage and therefore the sound pressure level. •...; The adapter is provided. • The monitor should be used for other purpose. Your device uses one of power source indicated on a stable surface. • Unplug the unit during...

User Guide
Page 6
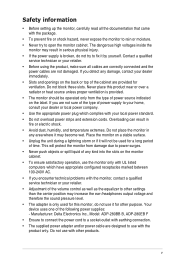
Please check local regulations for disposal of the crossed out wheeled bin indicates that can support the weight of the monitor in municipal waste. This symbol of electronic products. Prevent Tipping When using the display, fasten the monitor to a wall using a cord or chain that the product (electrical, electronic equipment, and mercury-containing button cell battery) should not be placed in order to prevent the monitor from falling. 1 M4 or M6 screw Cord 2 Cord or chain vi
Please check local regulations for disposal of the crossed out wheeled bin indicates that can support the weight of the monitor in municipal waste. This symbol of electronic products. Prevent Tipping When using the display, fasten the monitor to a wall using a cord or chain that the product (electrical, electronic equipment, and mercury-containing button cell battery) should not be placed in order to prevent the monitor from falling. 1 M4 or M6 screw Cord 2 Cord or chain vi
User Guide
Page 7
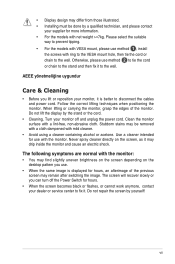
...-free, non-abrasive cloth. Stubborn stains may be done by a qualified technician, and please contact your monitor off the Power Switch for hours, an afterimage of the monitor. vii Do not lift the display by yourself! Never spray cleaner directly on the desktop pattern you lift...When the same image is better to the wall. Use a cleaner intended for more information. • For the models with the monitor. When lifting or carrying the monitor, grasp the edges of the previous screen may remain after switching the image. • Display design may differ from those illustrated....
...-free, non-abrasive cloth. Stubborn stains may be done by a qualified technician, and please contact your monitor off the Power Switch for hours, an afterimage of the monitor. vii Do not lift the display by yourself! Never spray cleaner directly on the desktop pattern you lift...When the same image is better to the wall. Use a cleaner intended for more information. • For the models with the monitor. When lifting or carrying the monitor, grasp the edges of the previous screen may remain after switching the image. • Display design may differ from those illustrated....
User Guide
Page 9
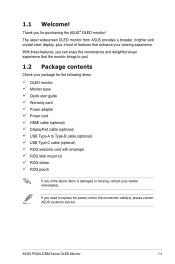
...OLED monitor Monitor base Quick start guide Warranty card Power adapter Power cord HDMI cable (optional) DisplayPort cable (optional) USB Type-A to Type-B cable (optional) USB Type-C cable (optional) ROG welcome card with envelope ROG Wall mount kit ROG sticker ROG pouch If any of features that the monitor... brings to replace the power cord or the connection cable(s), please contact ASUS... purchasing the ASUS® OLED monitor! The latest widescreen OLED monitor from ASUS provides a ...
...OLED monitor Monitor base Quick start guide Warranty card Power adapter Power cord HDMI cable (optional) DisplayPort cable (optional) USB Type-A to Type-B cable (optional) USB Type-C cable (optional) ROG welcome card with envelope ROG Wall mount kit ROG sticker ROG pouch If any of features that the monitor... brings to replace the power cord or the connection cable(s), please contact ASUS... purchasing the ASUS® OLED monitor! The latest widescreen OLED monitor from ASUS provides a ...

User Guide
Page 10
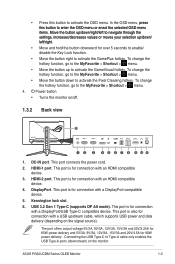
... or displays the "NO SIGNAL" message. • Press to exit the OSD menu when the OSD menu is as the below table. 1.3 Monitor introduction 1.3.1 Front view 1 234 1. To change the hotkey function, go to the MyFavorite > Shortcut > menu. • Press this button ...to activate the Input Select hotkey. Close button • Turns on the monitor when the monitor enters standby mode or displays the "NO SIGNAL" message. 1-2 Chapter 1: Product introduction Status Red Description ON OFF OFF Amber Standby mode...
... or displays the "NO SIGNAL" message. • Press to exit the OSD menu when the OSD menu is as the below table. 1.3 Monitor introduction 1.3.1 Front view 1 234 1. To change the hotkey function, go to the MyFavorite > Shortcut > menu. • Press this button ...to activate the Input Select hotkey. Close button • Turns on the monitor when the monitor enters standby mode or displays the "NO SIGNAL" message. 1-2 Chapter 1: Product introduction Status Red Description ON OFF OFF Amber Standby mode...
User Guide
Page 11
HDMI-2 port. ASUS PG32UCDM Series OLED Monitor 1-3 DC-IN port. This port is for connection with a DisplayPort compatible... menu. • Move the button down to Type-A cable only enables the USB Type-A ports (downstream) on the monitor. This port is for connection with a DisplayPort/USB Type-C compatible device. USB 3.2 Gen 1 Type-C (supports DP Alt...decreases values or moves your selection up to activate the GameVisual hotkey. Power button • Turns the monitor on the signal source). Connecting the USB Type-C to activate the Pixel Cleaning hotkey. In the ...
HDMI-2 port. ASUS PG32UCDM Series OLED Monitor 1-3 DC-IN port. This port is for connection with a DisplayPort compatible... menu. • Move the button down to Type-A cable only enables the USB Type-A ports (downstream) on the monitor. This port is for connection with a DisplayPort/USB Type-C compatible device. USB 3.2 Gen 1 Type-C (supports DP Alt...decreases values or moves your selection up to activate the GameVisual hotkey. Power button • Turns the monitor on the signal source). Connecting the USB Type-C to activate the Pixel Cleaning hotkey. In the ...

User Guide
Page 12
.... 12. Earphone jack. while the FPS (frames per second) counter lets you choose, or display the settings. 4. Display Alignment displays alignment lines on the monitor. 8. To activate GamePlus: 1. The connection enables the USB ports on 4 sides of the screen, serving as an easy and handy tool for first-person ... for connection with USB devices, such as USB keyboard/mouse, USB flash drive, etc. 10. Press the (5-way) button to line up multiple monitors perfectly. There are for connection with USB devices, such as USB keyboard/mouse, USB flash drive, etc. 9.
.... 12. Earphone jack. while the FPS (frames per second) counter lets you choose, or display the settings. 4. Display Alignment displays alignment lines on the monitor. 8. To activate GamePlus: 1. The connection enables the USB ports on 4 sides of the screen, serving as an easy and handy tool for first-person ... for connection with USB devices, such as USB keyboard/mouse, USB flash drive, etc. 10. Press the (5-way) button to line up multiple monitors perfectly. There are for connection with USB devices, such as USB keyboard/mouse, USB flash drive, etc. 9.

User Guide
Page 13
Timer Timer OFF 30:00 40:00 50:00 60:00 90:00 ASUS PG32UCDM Series OLED Monitor 1-5 Crosshair Crosshair Dynamic Crosshair OFF GamePlus - FPS Counter FPS FPS Counter OFF 001 Number Bar Graph GamePlus - Sniper/Sniper Night Vision Sniper OFF 1.2x 1.2x 1.5x 1.5x 2.0x 2.0x GamePlus - GamePlus Main Menu GamePlus FPS FPS Counter Crosshair Sniper Sniper Night Vision Timer Stopwatch Display Alignment GamPlus -
Timer Timer OFF 30:00 40:00 50:00 60:00 90:00 ASUS PG32UCDM Series OLED Monitor 1-5 Crosshair Crosshair Dynamic Crosshair OFF GamePlus - FPS Counter FPS FPS Counter OFF 001 Number Bar Graph GamePlus - Sniper/Sniper Night Vision Sniper OFF 1.2x 1.2x 1.5x 1.5x 2.0x 2.0x GamePlus - GamePlus Main Menu GamePlus FPS FPS Counter Crosshair Sniper Sniper Night Vision Timer Stopwatch Display Alignment GamPlus -
User Guide
Page 15
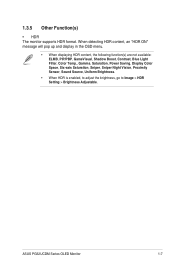
..., Sound Source, Uniform Brightness. • When HDR is enabled, to adjust the brightness, go to Image > HDR Setting > Brightness Adjustable. 1.3.5 Other Function(s) • HDR The monitor supports HDR format. ASUS PG32UCDM Series OLED Monitor 1-7
..., Sound Source, Uniform Brightness. • When HDR is enabled, to adjust the brightness, go to Image > HDR Setting > Brightness Adjustable. 1.3.5 Other Function(s) • HDR The monitor supports HDR format. ASUS PG32UCDM Series OLED Monitor 1-7

User Guide
Page 17
Open the box as illustrated. (Figure 1) 2. Hold the stand and lift the monitor carefully, then place it on a flat surface. (Figure 4) (Figure 1) 1 2 (Figure 2) 2 1 (Figure 4) (Figure 3) We recommend that you cover the table surface with soft cloth to prevent damage to the arm by fastening the bundled screw. (Figure 2) 3. Insert the base into the monitor. (Figure 3) 4. Attach the arm into the arm. Base screw size: M5 x 25 mm. ASUS PG32UCDM Series OLED Monitor 2-1 Fix the base to the monitor. 2.1 Attaching the arm/base To assemble the monitor base: 1.
Open the box as illustrated. (Figure 1) 2. Hold the stand and lift the monitor carefully, then place it on a flat surface. (Figure 4) (Figure 1) 1 2 (Figure 2) 2 1 (Figure 4) (Figure 3) We recommend that you cover the table surface with soft cloth to prevent damage to the arm by fastening the bundled screw. (Figure 2) 3. Insert the base into the monitor. (Figure 3) 4. Attach the arm into the arm. Base screw size: M5 x 25 mm. ASUS PG32UCDM Series OLED Monitor 2-1 Fix the base to the monitor. 2.1 Attaching the arm/base To assemble the monitor base: 1.

User Guide
Page 18
... cables with minimum weight/load 22.7kg (Screw size: M4 x 10 mm). 2-2 Chapter 2: Setup Attach the ROG wall mount kit to the back on the monitor. 2 1 Handle with caution to avoid injury or damage to the monitor. • The VESA wall mount kit (100 x 100 mm) is specially designed for VESA wall mount...) The detachable arm of this monitor is purchased separately. • Use only the UL Listed Wall Mount Bracket with the help of the cable management slot. • Arranging the cables 2.3 Detaching ...
... cables with minimum weight/load 22.7kg (Screw size: M4 x 10 mm). 2-2 Chapter 2: Setup Attach the ROG wall mount kit to the back on the monitor. 2 1 Handle with caution to avoid injury or damage to the monitor. • The VESA wall mount kit (100 x 100 mm) is specially designed for VESA wall mount...) The detachable arm of this monitor is purchased separately. • Use only the UL Listed Wall Mount Bracket with the help of the cable management slot. • Arranging the cables 2.3 Detaching ...

User Guide
Page 19
...; For optimal viewing, we recommend that you look at the full face of the monitor, then adjust the monitor to the angle that is most comfortable for you. • Hold the stand to -5˚, and it allows 15˚ swivel adjustment from falling when ...you change its angle. • You can also adjust the monitor's height within 80 mm. (Tilt) (Height adjustment) - 5° ~ + 20° 15° (Swivel) 80mm 15° ASUS PG32UCDM Series OLED Monitor 2-3
...; For optimal viewing, we recommend that you look at the full face of the monitor, then adjust the monitor to the angle that is most comfortable for you. • Hold the stand to -5˚, and it allows 15˚ swivel adjustment from falling when ...you change its angle. • You can also adjust the monitor's height within 80 mm. (Tilt) (Height adjustment) - 5° ~ + 20° 15° (Swivel) 80mm 15° ASUS PG32UCDM Series OLED Monitor 2-3
User Guide
Page 20
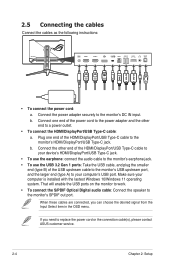
... with the lastest Windows 10/Windows 11 operating system. Make sure your computer's USB port. Connect one end of the USB upstream cable to the monitor's USB upstream port, and the larger end (type A) to a power outlet. • To connect the HDMI/DisplayPort/USB Type-C cable: a. b. ... smaller end (type B) of the HDMI/DisplayPort/USB Type-C cable to replace the power cord or the connection cable(s), please contact ASUS customer service. 2-4 Chapter 2: Setup 2.5 Connecting the cables Connect the cables as the following instructions: • To connect the power cord: a.
... with the lastest Windows 10/Windows 11 operating system. Make sure your computer's USB port. Connect one end of the USB upstream cable to the monitor's USB upstream port, and the larger end (type A) to a power outlet. • To connect the HDMI/DisplayPort/USB Type-C cable: a. b. ... smaller end (type B) of the HDMI/DisplayPort/USB Type-C cable to replace the power cord or the connection cable(s), please contact ASUS customer service. 2-4 Chapter 2: Setup 2.5 Connecting the cables Connect the cables as the following instructions: • To connect the power cord: a.
User Guide
Page 21
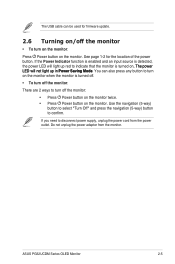
...to disconnect power supply, unplug the power cord from the monitor. You can be used for the location of the power button. If you need to confirm. Do not unplug the power adapter from the power outlet. ASUS PG32UCDM Series OLED Monitor 2-5 The power LED will light up in Power Saving... Mode. See page 1-2 for firmware update. 2.6 Turning on/off the monitor • To turn off the monitor: There are 2 ways to turn on the...
...to disconnect power supply, unplug the power cord from the monitor. You can be used for the location of the power button. If you need to confirm. Do not unplug the power adapter from the power outlet. ASUS PG32UCDM Series OLED Monitor 2-5 The power LED will light up in Power Saving... Mode. See page 1-2 for firmware update. 2.6 Turning on/off the monitor • To turn off the monitor: There are 2 ways to turn on the...
User Guide
Page 23
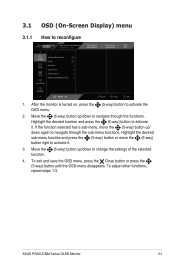
... the desired function and press the (5-way) button to reconfigure ROG STRIX PG32UCDM 3840x2160 60Hz GameVisual Racing Mode Input Source DisplayPort HDR OFF Gaming Image Color Variable Refresh Rate ELMB GamePlus GameVisual Shadow Boost ASUS DisplayWidget Center Input Select PIP/PBP Volume 50 Back Enter Exit ... To exit and save the OSD menu, press the Close button or press the (5-way) button until the OSD menu disappears. ASUS PG32UCDM Series OLED Monitor 3-1 Move the (5-way) button up/down to activate it . Highlight the desired sub-menu function and press the (5-way)...
... the desired function and press the (5-way) button to reconfigure ROG STRIX PG32UCDM 3840x2160 60Hz GameVisual Racing Mode Input Source DisplayPort HDR OFF Gaming Image Color Variable Refresh Rate ELMB GamePlus GameVisual Shadow Boost ASUS DisplayWidget Center Input Select PIP/PBP Volume 50 Back Enter Exit ... To exit and save the OSD menu, press the Close button or press the (5-way) button until the OSD menu disappears. ASUS PG32UCDM Series OLED Monitor 3-1 Move the (5-way) button up/down to activate it . Highlight the desired sub-menu function and press the (5-way)...
User Guide
Page 24
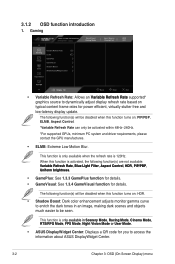
... update. The following function(s) will be disabled when this function turns on: HDR. • Shadow Boost: Dark color enhancement adjusts monitor gamma curve to enrich the dark tones in Scenery Mode, Racing Mode, Cinema Mode, RTS/RPG Mode, FPS Mode, Night Vision ..., Aspect Control. *Variable Refresh Rate can only be seen. Gaming ROG STRIX PG32UCDM 3840x2160 60Hz GameVisual Racing Mode Input Source DisplayPort HDR OFF Gaming Image Color Variable Refresh Rate ELMB GamePlus GameVisual Shadow Boost ASUS DisplayWidget Center Input Select PIP/PBP Volume 50 Back Enter Exit •...
... update. The following function(s) will be disabled when this function turns on: HDR. • Shadow Boost: Dark color enhancement adjusts monitor gamma curve to enrich the dark tones in Scenery Mode, Racing Mode, Cinema Mode, RTS/RPG Mode, FPS Mode, Night Vision ..., Aspect Control. *Variable Refresh Rate can only be seen. Gaming ROG STRIX PG32UCDM 3840x2160 60Hz GameVisual Racing Mode Input Source DisplayPort HDR OFF Gaming Image Color Variable Refresh Rate ELMB GamePlus GameVisual Shadow Boost ASUS DisplayWidget Center Input Select PIP/PBP Volume 50 Back Enter Exit •...
User Guide
Page 25
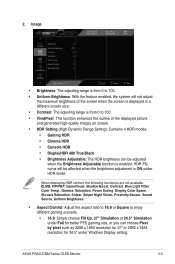
.... • 16:9: Simply choose Fill Up, 27" Simulation or 24.5" Simulation under Full for 24.5" under HDR mode. Image ROG STRIX PG32UCDM 3840x2160 60Hz GameVisual Racing Mode Input Source DisplayPort HDR OFF Brightness 30 Gaming Uniform Brightness Contrast 80 Image VividPixel 50 Color HDR Setting Aspect... Uniform Brightness: With the feature enabled, the system will be adjusted when the Brightness Adjustable function is ON under Windows Display setting. 2. ASUS PG32UCDM Series OLED Monitor 3-3 or you can be affected when the brightness adjustment is enabled.
.... • 16:9: Simply choose Fill Up, 27" Simulation or 24.5" Simulation under Full for 24.5" under HDR mode. Image ROG STRIX PG32UCDM 3840x2160 60Hz GameVisual Racing Mode Input Source DisplayPort HDR OFF Brightness 30 Gaming Uniform Brightness Contrast 80 Image VividPixel 50 Color HDR Setting Aspect... Uniform Brightness: With the feature enabled, the system will be adjusted when the Brightness Adjustable function is ON under Windows Display setting. 2. ASUS PG32UCDM Series OLED Monitor 3-3 or you can be affected when the brightness adjustment is enabled.
User Guide
Page 26
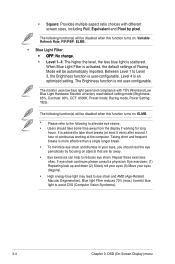
...: YES). It is not user-configurable. Between Level 1 to Level 3, the Brightness function is activated, the default settings of continuous working for long hours. The monitor uses low blue light panel and compliance with different screen sizes, including Full, Equivalent and Pixel by focusing on objects that are far away. •...
...: YES). It is not user-configurable. Between Level 1 to Level 3, the Brightness function is activated, the default settings of continuous working for long hours. The monitor uses low blue light panel and compliance with different screen sizes, including Full, Equivalent and Pixel by focusing on objects that are far away. •...


