
XG32VC Series User Guide
Page 2
... be registered trademarks or copyrights of ASUSTeK COMPUTER INC. ("ASUS"). Table of contents Notices...iii Safety information iv Care & Cleaning viii 1.1 Welcome 1-2 1.2 Package contents 1-2 1.3 Assembling the monitor 1-3 1.4 Connect cables 1-4 1.4.1 Rear of alteration is defaced... (1) the product is repaired, modified or altered, unless such repair, modification of the LCD monitor 1-4 1.5 Monitor introduction 1-5 1.5.1 Using the Controls button 1-5 2.1 Adjusting the monitor 2-1 2.2 Outline dimension 2-2 2.3 Detaching the arm/stand (for identification or explanation and to ...
... be registered trademarks or copyrights of ASUSTeK COMPUTER INC. ("ASUS"). Table of contents Notices...iii Safety information iv Care & Cleaning viii 1.1 Welcome 1-2 1.2 Package contents 1-2 1.3 Assembling the monitor 1-3 1.4 Connect cables 1-4 1.4.1 Rear of alteration is defaced... (1) the product is repaired, modified or altered, unless such repair, modification of the LCD monitor 1-4 1.5 Monitor introduction 1-5 1.5.1 Using the Controls button 1-5 2.1 Adjusting the monitor 2-1 2.2 Outline dimension 2-2 2.3 Detaching the arm/stand (for identification or explanation and to ...

XG32VC Series User Guide
Page 3
... device, pursuant to Part 15 of the Canadian Interference -Causing Equipment Regulations. Notices Federal Communications Commission Statement This device complies with Part 15 of the monitor to the graphics card is required to assure compliance with FCC regulations. Changes or modifications to this unit not expressly approved by one or more...
... device, pursuant to Part 15 of the Canadian Interference -Causing Equipment Regulations. Notices Federal Communications Commission Statement This device complies with Part 15 of the monitor to the graphics card is required to assure compliance with FCC regulations. Changes or modifications to this unit not expressly approved by one or more...

XG32VC Series User Guide
Page 4
...Slots and openings on the label. And, when disconnecting the earthing connection, be operated only from the mains. • Please use the monitor only with UL listed computers which have appropriate configured receptacles marked between 100 ~ 240V AC. • The socket-outlet shall be installed ...service technician or your local power standard. • Do not overload power strips and extension cords. If you encounter technical problems with the monitor, contact a qualified servicer. • Provide an earthing connection before the mains plug is broken, do not try to fix it by ...
...Slots and openings on the label. And, when disconnecting the earthing connection, be operated only from the mains. • Please use the monitor only with UL listed computers which have appropriate configured receptacles marked between 100 ~ 240V AC. • The socket-outlet shall be installed ...service technician or your local power standard. • Do not overload power strips and extension cords. If you encounter technical problems with the monitor, contact a qualified servicer. • Provide an earthing connection before the mains plug is broken, do not try to fix it by ...

XG32VC Series User Guide
Page 7
.... vii Prevent Tipping When using the display, fasten the LCD to a wall using a cord or chain that can support the weight of the monitor in order to prevent the monitor from falling. 1 M4 or M6 Screw Cord 2 Cord or chain • Display design may differ from those illustrated. • Installing must be...
.... vii Prevent Tipping When using the display, fasten the LCD to a wall using a cord or chain that can support the weight of the monitor in order to prevent the monitor from falling. 1 M4 or M6 Screw Cord 2 Cord or chain • Display design may differ from those illustrated. • Installing must be...

XG32VC Series User Guide
Page 8
...anymore, contact your dealer or service center to disconnect the cables and power cord. Follow the correct lifting techniques when positioning the monitor. Clean the monitor surface with mild cleaner. • Avoid using a cleaner containing alcohol or acetone. Stubborn stains may remain after switching the image.... This symbol of the monitor. AEEE yönetmeliğine uygundur The following symptoms are normal with the LCD. Do not repair the screen by the stand ...
...anymore, contact your dealer or service center to disconnect the cables and power cord. Follow the correct lifting techniques when positioning the monitor. Clean the monitor surface with mild cleaner. • Avoid using a cleaner containing alcohol or acetone. Stubborn stains may remain after switching the image.... This symbol of the monitor. AEEE yönetmeliğine uygundur The following symptoms are normal with the LCD. Do not repair the screen by the stand ...

XG32VC Series User Guide
Page 9
Optional documentation Your product package may include optional documentation that may have been added by your dealer. These documents are not part of the standard package. Refer to the following sources for additional information and for product and software updates. 1. ASUS LCD Monitor XG Series 1-1 ASUS websites The ASUS websites worldwide provide updated information on ASUS hardware and software products. Where to find more information Refer to http://www.asus.com 2.
Optional documentation Your product package may include optional documentation that may have been added by your dealer. These documents are not part of the standard package. Refer to the following sources for additional information and for product and software updates. 1. ASUS LCD Monitor XG Series 1-1 ASUS websites The ASUS websites worldwide provide updated information on ASUS hardware and software products. Where to find more information Refer to http://www.asus.com 2.

XG32VC Series User Guide
Page 10
... for purchasing the ASUS® LCD monitor! The latest widescreen LCD monitor from ASUS provides a crisper, broader, and brighter display, plus a host of features that the monitor brings you for the following items: LCD Monitor Monitor Base Quick Start Guide... Warranty Card 1x Power Cord 1x HDMI Cable 1x DP Cable 1x Power Adapter 1x USB 3.0 Cable 1x USB-C Cable ROG...
... for purchasing the ASUS® LCD monitor! The latest widescreen LCD monitor from ASUS provides a crisper, broader, and brighter display, plus a host of features that the monitor brings you for the following items: LCD Monitor Monitor Base Quick Start Guide... Warranty Card 1x Power Cord 1x HDMI Cable 1x DP Cable 1x Power Adapter 1x USB 3.0 Cable 1x USB-C Cable ROG...

XG32VC Series User Guide
Page 11
Fix the base to the angle that you . 2 1 ASUS LCD Monitor XG Series 1-3 1.3 Assembling the monitor To assemble the monitor: • While assembling the monitor arm/base, we recommend that is most comfortable for you keep the monitor inside its EPS packaging. Adjust the monitor to the arm by fastening the bundled screw. 3. Then insert the base into the arm. 2. Remove the monitor from its EPS (Expanded Polystyrene) packaging. 1. Align the screw hole on the arm with the bundled screw on the base.
Fix the base to the angle that you . 2 1 ASUS LCD Monitor XG Series 1-3 1.3 Assembling the monitor To assemble the monitor: • While assembling the monitor arm/base, we recommend that is most comfortable for you keep the monitor inside its EPS packaging. Adjust the monitor to the arm by fastening the bundled screw. 3. Then insert the base into the arm. 2. Remove the monitor from its EPS (Expanded Polystyrene) packaging. 1. Align the screw hole on the arm with the bundled screw on the base.

XG32VC Series User Guide
Page 12
HDMI Port 2. DC-IN Port 9. USB C/DP Port (PD 5V/2A) 4. USB3.0 Upstream Port 6. 1.4 Connect cables 1.4.1 Rear of the LCD monitor 9 HDMI USB-C/ DCIN 1 2 34 5 6 7 8 1. USB3.0 Downstream Port 8. Kensington Lock 1-4 Chapter 1: Product Introduction DisplayPort 3. USB3.0 Downstream Port 7. Earphone Jack 5.
HDMI Port 2. DC-IN Port 9. USB C/DP Port (PD 5V/2A) 4. USB3.0 Upstream Port 6. 1.4 Connect cables 1.4.1 Rear of the LCD monitor 9 HDMI USB-C/ DCIN 1 2 34 5 6 7 8 1. USB3.0 Downstream Port 8. Kensington Lock 1-4 Chapter 1: Product Introduction DisplayPort 3. USB3.0 Downstream Port 7. Earphone Jack 5.

XG32VC Series User Guide
Page 13
...function is as the below table. To active GamePlus: ASUS LCD Monitor XG Series 1-5 Power Indicator: • The color definition of the power indicator is specially designed for users when playing different types of the monitor to switch from eight video preset modes (Scenery Mode,...Mode) with GameVisual ™ Video Intelligence Technology. 4. GameVisual: • Press this button to turn the monitor on/off . 3. Press any key to turn on the monitor when monitor is power off . GamePlus: • GamePlus: The GamePlus Function provides a toolkit and creates a better gaming...
...function is as the below table. To active GamePlus: ASUS LCD Monitor XG Series 1-5 Power Indicator: • The color definition of the power indicator is specially designed for users when playing different types of the monitor to switch from eight video preset modes (Scenery Mode,...Mode) with GameVisual ™ Video Intelligence Technology. 4. GameVisual: • Press this button to turn the monitor on/off . 3. Press any key to turn on the monitor when monitor is power off . GamePlus: • GamePlus: The GamePlus Function provides a toolkit and creates a better gaming...

XG32VC Series User Guide
Page 15
...; For optimal viewing, we recommend that you look at the full face of the monitor, then adjust the monitor to the angle that the monitor slightly shakes while you change its angle. • You can also adjust the monitor's height within +/- 10 cm. -3.5 ~ 18.5 10cm 26° 26° It is normal that is...
...; For optimal viewing, we recommend that you look at the full face of the monitor, then adjust the monitor to the angle that the monitor slightly shakes while you change its angle. • You can also adjust the monitor's height within +/- 10 cm. -3.5 ~ 18.5 10cm 26° 26° It is normal that is...

XG32VC Series User Guide
Page 17
... mount. To detach the arm/stand 1. ASUS LCD Monitor XG Series 2-3 The detachable stand of the monitor. 4. Remove the four (4) screws securing the arm to the rear of this monitor is specially designed for VESA wall mount) • Avoid damaging the monitor surface. Detach the stand (arm and base...) from the monitor. 2 1 • Use only the UL Listed Wall Mount Bracket with minimum weight/load 28.8...
... mount. To detach the arm/stand 1. ASUS LCD Monitor XG Series 2-3 The detachable stand of the monitor. 4. Remove the four (4) screws securing the arm to the rear of this monitor is specially designed for VESA wall mount) • Avoid damaging the monitor surface. Detach the stand (arm and base...) from the monitor. 2 1 • Use only the UL Listed Wall Mount Bracket with minimum weight/load 28.8...

XG32VC Series User Guide
Page 18
... bar, and then use the Up or Down keys (depending on the indicators in the menu. Press the Up and Down keys to make changes. 6. ASUS LCD Monitor XG Series 3-1 To select a highlighted item from one icon to the previous menu. 3.1 3.1.1 OSD (On-Screen Display) menu How to display the OSD ... Setup Overclocking Variable OD FreeSync Premium Pro ELMB/ELMB SYNC GamePlus GameVisual Shadow Boost MOVE/ENTER BACK HDMI 1024x768@ 72Hz Scenery Mode Aura Off ROG Strix XG32VC HDR OFF EXIT 1. Press the Up and Down keys to switch the options in the menu) to select the desired parameters. 5.
... bar, and then use the Up or Down keys (depending on the indicators in the menu. Press the Up and Down keys to make changes. 6. ASUS LCD Monitor XG Series 3-1 To select a highlighted item from one icon to the previous menu. 3.1 3.1.1 OSD (On-Screen Display) menu How to display the OSD ... Setup Overclocking Variable OD FreeSync Premium Pro ELMB/ELMB SYNC GamePlus GameVisual Shadow Boost MOVE/ENTER BACK HDMI 1024x768@ 72Hz Scenery Mode Aura Off ROG Strix XG32VC HDR OFF EXIT 1. Press the Up and Down keys to switch the options in the menu) to select the desired parameters. 5.

XG32VC Series User Guide
Page 19
...Instruction Including Level 0~Level 5. • FreeSync Premium Pro: It can select for your preference. • Shadow Boost : Dark color enhancement adjust monitor gamma curve to enrich the dark tones in First Person Shooter (FPS) games. • GameVisual: This function contains eight sub-functions that you ...System Setup Overclocking Variable OD FreeSync Premium Pro ELMB/ELMB SYNC GamePlus GameVisual Shadow Boost HDMI 1024x768@ 72Hz Scenery Mode Aura Off ROG Strix XG32VC HDR OFF MOVE/ENTER BACK EXIT • Overclocking: This function allows you can allow a FreeSync Premium Pro ...
...Instruction Including Level 0~Level 5. • FreeSync Premium Pro: It can select for your preference. • Shadow Boost : Dark color enhancement adjust monitor gamma curve to enrich the dark tones in First Person Shooter (FPS) games. • GameVisual: This function contains eight sub-functions that you ...System Setup Overclocking Variable OD FreeSync Premium Pro ELMB/ELMB SYNC GamePlus GameVisual Shadow Boost HDMI 1024x768@ 72Hz Scenery Mode Aura Off ROG Strix XG32VC HDR OFF MOVE/ENTER BACK EXIT • Overclocking: This function allows you can allow a FreeSync Premium Pro ...

XG32VC Series User Guide
Page 20
...ASUS Gaming HDR and Console Mode). HDR item will be locked when connected to 100. • HDR: High Dynamic Range. Gaming Image Color Input Select Lighting Effect MyFavorite System Setup Brightness Contrast HDR Vivldplxel ASCR Aspect Control Blue Light Filter 100 80 60 HDMI 1024x768@ 72Hz Scenery Mode Aura Off ROG...adjusting range is from 0 to AMD FreeSync2 HDR video. • Vivldplxel: ASUS Exclusive Technology that brings lifelike visuals for crystal-clear and detail-oriented enjoyment. ASUS LCD Monitor XG Series 3-3 2. Image You can adjust Brightness, Contrast, HDR, VividPixel ...
...ASUS Gaming HDR and Console Mode). HDR item will be locked when connected to 100. • HDR: High Dynamic Range. Gaming Image Color Input Select Lighting Effect MyFavorite System Setup Brightness Contrast HDR Vivldplxel ASCR Aspect Control Blue Light Filter 100 80 60 HDMI 1024x768@ 72Hz Scenery Mode Aura Off ROG...adjusting range is from 0 to AMD FreeSync2 HDR video. • Vivldplxel: ASUS Exclusive Technology that brings lifelike visuals for crystal-clear and detail-oriented enjoyment. ASUS LCD Monitor XG Series 3-3 2. Image You can adjust Brightness, Contrast, HDR, VividPixel ...

XG32VC Series User Guide
Page 22
3. Gaming Image Color Input Select Lighting Effect MyFavorite System Setup Color Temp. Gamma Saturation HDMI 1024x768@ 72Hz Scenery Mode Aura Off ROG Strix XG32VC HDR OFF 50 MOVE/ENTER BACK EXIT • Color Temp.: Contains three preset color modes (Cool, Normal, Warm) and User Mode. • Gamma: ... 0 ~ 100. Color Select the image color you like from 0 to 100. • In the User Mode, colors of R (Red), G (Green), and B (Blue) are user-configurable; ASUS LCD Monitor XG Series 3-5 the adjusting range is from this function.
3. Gaming Image Color Input Select Lighting Effect MyFavorite System Setup Color Temp. Gamma Saturation HDMI 1024x768@ 72Hz Scenery Mode Aura Off ROG Strix XG32VC HDR OFF 50 MOVE/ENTER BACK EXIT • Color Temp.: Contains three preset color modes (Cool, Normal, Warm) and User Mode. • Gamma: ... 0 ~ 100. Color Select the image color you like from 0 to 100. • In the User Mode, colors of R (Red), G (Green), and B (Blue) are user-configurable; ASUS LCD Monitor XG Series 3-5 the adjusting range is from this function.
XG32VC Series User Guide
Page 23
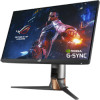
... System Setup Aura Sync Aura RGB HDMI 1024x768@ 72Hz Scenery Mode Aura Off ROG Strix XG32VC HDR OFF MOVE/ENTER BACK EXIT • Aura Sync: Allows you can select an Aura RGB light effect for the monitor and change settings for information on how to turn the Aura RGB light effect...and Type-C Gaming Image Color Input Select Lighting Effect MyFavorite System Setup HDMI DisplayPort Type-C MOVE/ENTER BACK HDMI 1024x768@ 72Hz Scenery Mode Aura Off ROG Strix XG32VC HDR OFF EXIT 5. Select "OFF" if you want to turn on or off the Aura Sync function that synchronizes the Aura RGB light...
... System Setup Aura Sync Aura RGB HDMI 1024x768@ 72Hz Scenery Mode Aura Off ROG Strix XG32VC HDR OFF MOVE/ENTER BACK EXIT • Aura Sync: Allows you can select an Aura RGB light effect for the monitor and change settings for information on how to turn the Aura RGB light effect...and Type-C Gaming Image Color Input Select Lighting Effect MyFavorite System Setup HDMI DisplayPort Type-C MOVE/ENTER BACK HDMI 1024x768@ 72Hz Scenery Mode Aura Off ROG Strix XG32VC HDR OFF EXIT 5. Select "OFF" if you want to turn on or off the Aura Sync function that synchronizes the Aura RGB light...
XG32VC Series User Guide
Page 24
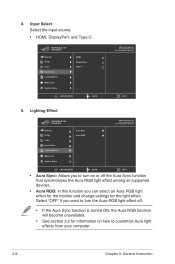
MyFavorite You can do your setting according to your favorite. ASUS LCD Monitor XG Series 3-7 Gaming Image Color Input Select Lighting Effect MyFavorite System Setup Shortcut Customised Setting HDMI 1024x768@ 72Hz Scenery Mode Aura Off ROG Strix XG32VC HDR OFF MOVE/ENTER BACK EXIT • Shortcut: User can select from "GamePlus, GameVisual, Brightness, Contrast...
MyFavorite You can do your setting according to your favorite. ASUS LCD Monitor XG Series 3-7 Gaming Image Color Input Select Lighting Effect MyFavorite System Setup Shortcut Customised Setting HDMI 1024x768@ 72Hz Scenery Mode Aura Off ROG Strix XG32VC HDR OFF MOVE/ENTER BACK EXIT • Shortcut: User can select from "GamePlus, GameVisual, Brightness, Contrast...

XG32VC Series User Guide
Page 26
ASUS LCD Monitor XG Series 3-9 • DisplayPort Version: Select DP 1.1 if your graphics card is not compatible with DP 1.1. • Information:Displays the monitor information. • All Reset: Selects "Yes" to revert all settings to the factory default mode.
ASUS LCD Monitor XG Series 3-9 • DisplayPort Version: Select DP 1.1 if your graphics card is not compatible with DP 1.1. • Information:Displays the monitor information. • All Reset: Selects "Yes" to revert all settings to the factory default mode.

XG32VC Series User Guide
Page 28
...8226; Check if the power cord is properly installed and activated. • Check the audio source. ASUS LCD Monitor XG Series 3-11 Select "ON" to turn on power LED. • Check if the monitor and the computer are in the ON mode. • Make sure the signal cable is properly connected... is properly working. • Adjust the Contrast and Brightness settings via OSD. • Make sure the signal cable is properly connected to the monitor and the computer. • Move electrical devices that may cause electrical interference. • Inspect the signal cable and make sure that none of ...
...8226; Check if the power cord is properly installed and activated. • Check the audio source. ASUS LCD Monitor XG Series 3-11 Select "ON" to turn on power LED. • Check if the monitor and the computer are in the ON mode. • Make sure the signal cable is properly connected... is properly working. • Adjust the Contrast and Brightness settings via OSD. • Make sure the signal cable is properly connected to the monitor and the computer. • Move electrical devices that may cause electrical interference. • Inspect the signal cable and make sure that none of ...


