
XG32VC Series User Guide
Page 2
... warranty or service will not be extended if: (1) the product is repaired, modified or altered, unless such repair, modification of ASUSTeK COMPUTER INC. ("ASUS"). All Rights Reserved. No part of this manual may or may be registered trademarks or copyrights of their respective companies, and are used only for VESA wall mount 2-3 3.1 OSD (On-Screen Display) menu 3-1 3.1.1 How to infringe. or (2) the serial number of the...
... warranty or service will not be extended if: (1) the product is repaired, modified or altered, unless such repair, modification of ASUSTeK COMPUTER INC. ("ASUS"). All Rights Reserved. No part of this manual may or may be registered trademarks or copyrights of their respective companies, and are used only for VESA wall mount 2-3 3.1 OSD (On-Screen Display) menu 3-1 3.1.1 How to infringe. or (2) the serial number of the...

XG32VC Series User Guide
Page 4
...-outlet shall be installed near or over a radiator or heat source unless proper ventilation is provided. • The monitor should be used for ventilation. Never place this product near the equipment and shall be sure to open the monitor cabinet. Safety information • Before setting up the monitor, carefully read all cables are correctly connected and the power cables are not sure...
...-outlet shall be installed near or over a radiator or heat source unless proper ventilation is provided. • The monitor should be used for ventilation. Never place this product near the equipment and shall be sure to open the monitor cabinet. Safety information • Before setting up the monitor, carefully read all cables are correctly connected and the power cables are not sure...

XG32VC Series User Guide
Page 8
... to the nature of the crossed out wheeled bin indicates that you use. • When the same image is better to disconnect the cables and power cord. Use a cleaner intended for hours. • When the screen becomes black or flashes, or cannot work anymore, contact your monitor off the Power Switch and turn it may remain after switching the image. Do not lift the display by yourself!
... to the nature of the crossed out wheeled bin indicates that you use. • When the same image is better to disconnect the cables and power cord. Use a cleaner intended for hours. • When the screen becomes black or flashes, or cannot work anymore, contact your monitor off the Power Switch and turn it may remain after switching the image. Do not lift the display by yourself!

XG32VC Series User Guide
Page 13
... this button to turn the monitor on the monitor when monitor is power off . Power Button: • Press this hotkey to adjust the monitor settings. 6 6 5 5 4 4 3 3 2 2 1 1. To active GamePlus: ASUS LCD Monitor XG Series 1-5 GamePlus: • GamePlus: The GamePlus Function provides a toolkit and creates a better gaming environment for new gamers or beginners interested in First Person Shooter (FPS) games. Status Description White ON Amber Standby mode OFF OFF 2. Power...
... this button to turn the monitor on the monitor when monitor is power off . Power Button: • Press this hotkey to adjust the monitor settings. 6 6 5 5 4 4 3 3 2 2 1 1. To active GamePlus: ASUS LCD Monitor XG Series 1-5 GamePlus: • GamePlus: The GamePlus Function provides a toolkit and creates a better gaming environment for new gamers or beginners interested in First Person Shooter (FPS) games. Status Description White ON Amber Standby mode OFF OFF 2. Power...

XG32VC Series User Guide
Page 19
... the MOBA Mode, the Saturation and ASCR functions are fast moving. Particularly, Crosshair function is disabled if input V frequency less than 85Hz. • ELMB SYNC: ELMB SYNC on -screen objects are not userconfigurable. 3-2 Chapter 3: General Instruction Including Level 0~Level 5. • FreeSync Premium Pro: It can select for power efficient, virtually stutter free and low-latency display update. • ELMB: Check to adjust the refresh rate. •...
... the MOBA Mode, the Saturation and ASCR functions are fast moving. Particularly, Crosshair function is disabled if input V frequency less than 85Hz. • ELMB SYNC: ELMB SYNC on -screen objects are not userconfigurable. 3-2 Chapter 3: General Instruction Including Level 0~Level 5. • FreeSync Premium Pro: It can select for power efficient, virtually stutter free and low-latency display update. • ELMB: Check to adjust the refresh rate. •...

XG32VC Series User Guide
Page 20
..."W) and 16:9 (27"W). • Blue Light Filter: Adjust the energy level of blue light emitted from LED backlight. • Choose 4:3 to display the picture according to the original aspect ratio of the input source. 2. ASUS LCD Monitor XG Series 3-3 The adjusting range is from this main function. Image You can adjust Brightness, Contrast, HDR, VividPixel ,ASCR, Aspect Control and Blue Light Filter from 0 to AMD FreeSync2 HDR video. • Vivldplxel: ASUS Exclusive Technology that brings lifelike...
..."W) and 16:9 (27"W). • Blue Light Filter: Adjust the energy level of blue light emitted from LED backlight. • Choose 4:3 to display the picture according to the original aspect ratio of the input source. 2. ASUS LCD Monitor XG Series 3-3 The adjusting range is from this main function. Image You can adjust Brightness, Contrast, HDR, VividPixel ,ASCR, Aspect Control and Blue Light Filter from 0 to AMD FreeSync2 HDR video. • Vivldplxel: ASUS Exclusive Technology that brings lifelike...

XG32VC Series User Guide
Page 28
... signal cable and make sure that none of the pins are bent. • Perform Reset via OSD. • Adjust the R/G/B color settings or select the Color Temperature via OSD. • Adjust the volume settings of both your monitor and computer. • Make sure the computer sound card driver is properly installed and activated. • Check the audio source. 3.3 Troubleshooting (FAQ) Problem Possible Solution Power LED is not ON The power LED lights amber and there is no screen image Screen image is too light...
... signal cable and make sure that none of the pins are bent. • Perform Reset via OSD. • Adjust the R/G/B color settings or select the Color Temperature via OSD. • Adjust the volume settings of both your monitor and computer. • Make sure the computer sound card driver is properly installed and activated. • Check the audio source. 3.3 Troubleshooting (FAQ) Problem Possible Solution Power LED is not ON The power LED lights amber and there is no screen image Screen image is too light...

PG259QN Series User Guide
Page 5
... try to open the monitor cabinet. If you encounter technical problems with the monitor, contact a qualified service technician or your retailer. • Adjustment of the volume control as well as the equalizer to your home, consult your dealer or local power company. • Use the appropriate power plug which complies with your local power standard. • Do not overload power strips and extention cords. Manufacturer...
... try to open the monitor cabinet. If you encounter technical problems with the monitor, contact a qualified service technician or your retailer. • Adjustment of the volume control as well as the equalizer to your home, consult your dealer or local power company. • Use the appropriate power plug which complies with your local power standard. • Do not overload power strips and extention cords. Manufacturer...

PG259QN Series User Guide
Page 6
... the display by yourself! Turn off the Power Switch and turn off and unplug the power cord. Conventions used in completing a task. vi When lifting or carrying the monitor, grasp the edges of the monitor. Never spray cleaner directly on again to complete a task. Do not repair the screen by the stand or the cord. • Cleaning. Follow the correct lifting techniques when positioning the monitor. CAUTION...
... the display by yourself! Turn off the Power Switch and turn off and unplug the power cord. Conventions used in completing a task. vi When lifting or carrying the monitor, grasp the edges of the monitor. Never spray cleaner directly on again to complete a task. Do not repair the screen by the stand or the cord. • Cleaning. Follow the correct lifting techniques when positioning the monitor. CAUTION...
PG259QN Series User Guide
Page 9
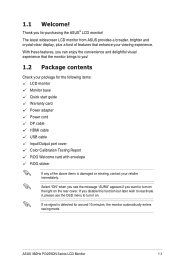
... package for the following items: LCD monitor Monitor base Quick start guide Warranty card Power adapter Power cord DP cable HDMI cable USB cable Input/Output port cover Color Calibration Testing Report ROG Welcome card with envelope ROG sticker If any of features that enhance your retailer immediately. ASUS 360Hz PG259QN Series LCD Monitor 1-1 With these features, you can enjoy the convenience and delightful visual experience that the monitor brings to you want to turn it , please use the OSD menu to reactivate it on the...
... package for the following items: LCD monitor Monitor base Quick start guide Warranty card Power adapter Power cord DP cable HDMI cable USB cable Input/Output port cover Color Calibration Testing Report ROG Welcome card with envelope ROG sticker If any of features that enhance your retailer immediately. ASUS 360Hz PG259QN Series LCD Monitor 1-1 With these features, you can enjoy the convenience and delightful visual experience that the monitor brings to you want to turn it , please use the OSD menu to reactivate it on the...
PG259QN Series User Guide
Page 11
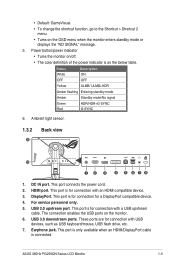
..., such as the below table. USB 3.0 downstream ports. Status Description White ON OFF OFF Yellow ULMB/ ULMB+HDR Amber flashing Entering standby mode Amber Standby mode/No signal Green Red HDR/HDR+G-SYNC G-SYNC 6. Ambient light sensor. 1.3.2 9 Back view 10 4 5 678 1. HDMI port. For service personnel only. 5. This port is for connection with an HDMI compatible device. 3. The connection enables the USB ports on the OSD menu when the monitor enters standby mode or displays the "NO SIGNAL" message. 5. ASUS 360Hz PG259QN Series LCD Monitor 1-3
..., such as the below table. USB 3.0 downstream ports. Status Description White ON OFF OFF Yellow ULMB/ ULMB+HDR Amber flashing Entering standby mode Amber Standby mode/No signal Green Red HDR/HDR+G-SYNC G-SYNC 6. Ambient light sensor. 1.3.2 9 Back view 10 4 5 678 1. HDMI port. For service personnel only. 5. This port is for connection with an HDMI compatible device. 3. The connection enables the USB ports on the OSD menu when the monitor enters standby mode or displays the "NO SIGNAL" message. 5. ASUS 360Hz PG259QN Series LCD Monitor 1-3

PG259QN Series User Guide
Page 18
... power adapter and the other end of the DisplayPort/HDMI cable to a power outlet. • To connect the DisplayPort/HDMI cable: a. The power indicator lights up in white to show that the monitor is installed with plug type to the monitor's earphone jack. • To use the USB 3.0 ports: Take the supplied USB 3.0 cable, and plug the smaller end (type B) of the power button. 2.5 Connecting the cables Connect the cables as the following instructions: For service only • To connect the power cord: a. b. Make...
... power adapter and the other end of the DisplayPort/HDMI cable to a power outlet. • To connect the DisplayPort/HDMI cable: a. The power indicator lights up in white to show that the monitor is installed with plug type to the monitor's earphone jack. • To use the USB 3.0 ports: Take the supplied USB 3.0 cable, and plug the smaller end (type B) of the power button. 2.5 Connecting the cables Connect the cables as the following instructions: For service only • To connect the power cord: a. b. Make...

PG259QN Series User Guide
Page 19
... ( ) button or move the ( ) button left repeatedly until the OSD menu disappears. To adjust other functions, repeat steps 1-3. 3.1.2 OSD function introduction 1. Move the ( ) button up /down again to change the settings of the LCD panel. Gaming Gaming Image Color Input Select Shortcut Lighting Effect System Setup Normal Mode HDR Off OD GamePlus GameVisual Dark Boost ULMB ULMB Pulse Width DisplayPort 1920x1080@360 Hz Racing Mode Aura Off ROG Swift 360Hz PG259QN MOVE...
... ( ) button or move the ( ) button left repeatedly until the OSD menu disappears. To adjust other functions, repeat steps 1-3. 3.1.2 OSD function introduction 1. Move the ( ) button up /down again to change the settings of the LCD panel. Gaming Gaming Image Color Input Select Shortcut Lighting Effect System Setup Normal Mode HDR Off OD GamePlus GameVisual Dark Boost ULMB ULMB Pulse Width DisplayPort 1920x1080@360 Hz Racing Mode Aura Off ROG Swift 360Hz PG259QN MOVE...

PG259QN Series User Guide
Page 20
... change. * Level 1~4: The higher the level, the less blue light is from 0 to alleviate eye strains: 3-2 Chapter 3: General Instructions Image Gaming Image Color Input Select Shortcut Lighting Effect System Setup Normal Mode HDR Off Brightness 67 Contrast 50 Variable Backlight Aspect Control Blue Light Filter DisplayPort 1920x1080@360 Hz Racing Mode Aura Off ROG Swift 360Hz PG259QN MOVE/ENTER BACK EXIT • Brightness: The adjusting range is scattered. This function is available when the refresh rate is...
... change. * Level 1~4: The higher the level, the less blue light is from 0 to alleviate eye strains: 3-2 Chapter 3: General Instructions Image Gaming Image Color Input Select Shortcut Lighting Effect System Setup Normal Mode HDR Off Brightness 67 Contrast 50 Variable Backlight Aspect Control Blue Light Filter DisplayPort 1920x1080@360 Hz Racing Mode Aura Off ROG Swift 360Hz PG259QN MOVE/ENTER BACK EXIT • Brightness: The adjusting range is scattered. This function is available when the refresh rate is...

PG259QN Series User Guide
Page 21
... (at the computer. Color Gaming Image Color Input Select Shortcut Lighting Effect System Setup Normal Mode HDR Off Color Temp. ASUS 360Hz PG259QN Series LCD Monitor 3-3 • Users should rest the eye periodically by focusing on and off. If eye strain continues please consult a physician. Eye exercises: (1) Repeating look up and down (2) Slowly roll your eyes (3) Move your desired input source and toggle the input auto switch function between on...
... (at the computer. Color Gaming Image Color Input Select Shortcut Lighting Effect System Setup Normal Mode HDR Off Color Temp. ASUS 360Hz PG259QN Series LCD Monitor 3-3 • Users should rest the eye periodically by focusing on and off. If eye strain continues please consult a physician. Eye exercises: (1) Repeating look up and down (2) Slowly roll your eyes (3) Move your desired input source and toggle the input auto switch function between on...
PG259QN Series User Guide
Page 22
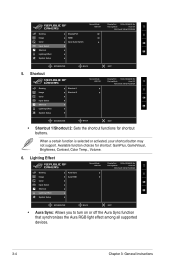
... Gaming Image Color Input Select Shortcut Lighting Effect System Setup Shortcut 1 Shortcut 2 EXIT DisplayPort 1920x1080@360 Hz Racing Mode Aura Off ROG Swift 360Hz PG259QN MOVE/ENTER BACK EXIT • Shortcut 1/Shortcut 2: Sets the shortcut functions for shortcut: GamPlus, GameVisual, Brightness, Contrast, Color Temp., Volume. 6. When a certain function is selected or activated, your shortcut button may not support. Gaming Image Color Input Select Shortcut Lighting Effect System Setup Normal Mode HDR Off DisplayPort HDMI Input Auto Switch...
... Gaming Image Color Input Select Shortcut Lighting Effect System Setup Shortcut 1 Shortcut 2 EXIT DisplayPort 1920x1080@360 Hz Racing Mode Aura Off ROG Swift 360Hz PG259QN MOVE/ENTER BACK EXIT • Shortcut 1/Shortcut 2: Sets the shortcut functions for shortcut: GamPlus, GameVisual, Brightness, Contrast, Color Temp., Volume. 6. When a certain function is selected or activated, your shortcut button may not support. Gaming Image Color Input Select Shortcut Lighting Effect System Setup Normal Mode HDR Off DisplayPort HDMI Input Auto Switch...
PG259QN Series User Guide
Page 23
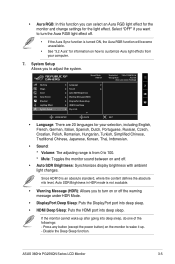
... Image Color Input Select Shortcut Lighting Effect System Setup Language Sound Auto SDR Brightness Warning Message (HDR) DisplayPort Deep Sleep HDMI Deep Sleep Key Lock DisplayPort 1920x1080@360 Hz Racing Mode Aura Off ROG Swift 360Hz PG259QN MOVE/ENTER BACK EXIT • Language: There are 20 languages for the light effect. Select "OFF" if you to adjust the system. Disable the Deep Sleep function. Press any button (except the power button) on or off . • Auto SDR Brightness: Synchronizes display brightness...
... Image Color Input Select Shortcut Lighting Effect System Setup Language Sound Auto SDR Brightness Warning Message (HDR) DisplayPort Deep Sleep HDMI Deep Sleep Key Lock DisplayPort 1920x1080@360 Hz Racing Mode Aura Off ROG Swift 360Hz PG259QN MOVE/ENTER BACK EXIT • Language: There are 20 languages for the light effect. Select "OFF" if you to adjust the system. Disable the Deep Sleep function. Press any button (except the power button) on or off . • Auto SDR Brightness: Synchronizes display brightness...

PG259QN Series User Guide
Page 26
Resolution Pixel pitch Brightness (Typ.) Contrast Ratio (Typ.) Viewing angle(H/V) CR>10 Display colors Response time Color temperature selection Analog input Digital input Earphone jack Audio input Speaker (Built-in) USB 3.0 port Colors Power LED Tilt Swivel Height adjustment VESA wall mount Kensington lock Voltage rating Power consumption Temperature (Operating) Temperature (Non-operating) Dimensions (W x H x D) Weight (Esti.) Multi-languages TFT LCD 24.5"W (16:9, 62.18 cm) wide screen 1920 x 1080 0.2829 mm x 0.2802 mm 400 cd/m2 1000:1 178˚/178˚ 16.7 M 1 ms (Gray to...
Resolution Pixel pitch Brightness (Typ.) Contrast Ratio (Typ.) Viewing angle(H/V) CR>10 Display colors Response time Color temperature selection Analog input Digital input Earphone jack Audio input Speaker (Built-in) USB 3.0 port Colors Power LED Tilt Swivel Height adjustment VESA wall mount Kensington lock Voltage rating Power consumption Temperature (Operating) Temperature (Non-operating) Dimensions (W x H x D) Weight (Esti.) Multi-languages TFT LCD 24.5"W (16:9, 62.18 cm) wide screen 1920 x 1080 0.2829 mm x 0.2802 mm 400 cd/m2 1000:1 178˚/178˚ 16.7 M 1 ms (Gray to...
PG259QN Series User Guide
Page 27
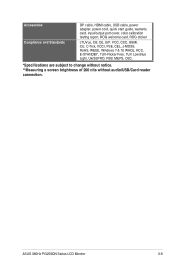
Accessories Compliance and Standards DP cable, HDMI cable, USB cable, power adapter, power cord, quick start guide, warranty card, input/output port cover, color calibration testing report, ROG welcome card, ROG sticker cTUVus, CB, CE, ErP, FCC, CCC, BSMI, CU, C-Tick, VCCI, PSE, CEL, J-MOSS, RoHS, WEEE, Windows 7 & 10 WHQL, KCC, E-STANDBY, TUV-Flicker Free, TUV Low Blue Light, UkrSEPRO, PSB, MEPS, CEC. *Specifications are subject to change without notice. **Measuring a screen brightness of 200 nits without audio/USB/Card reader connection. ASUS 360Hz PG259QN Series LCD Monitor 3-9
Accessories Compliance and Standards DP cable, HDMI cable, USB cable, power adapter, power cord, quick start guide, warranty card, input/output port cover, color calibration testing report, ROG welcome card, ROG sticker cTUVus, CB, CE, ErP, FCC, CCC, BSMI, CU, C-Tick, VCCI, PSE, CEL, J-MOSS, RoHS, WEEE, Windows 7 & 10 WHQL, KCC, E-STANDBY, TUV-Flicker Free, TUV Low Blue Light, UkrSEPRO, PSB, MEPS, CEC. *Specifications are subject to change without notice. **Measuring a screen brightness of 200 nits without audio/USB/Card reader connection. ASUS 360Hz PG259QN Series LCD Monitor 3-9

PG259QN Series User Guide
Page 29
... ON • Press the power button to check if the monitor is in the ON mode. • Check if the power cord is properly present in the ON mode. • Make sure the signal cable is properly connected the monitor and the computer. • Inspect the signal cable and make sure not look white) that may cause electrical interference. Screen image is too light or dark • Adjust the Contrast and Brightness settings via OSD. ASUS 360Hz PG259QN Series LCD Monitor 3-11
... ON • Press the power button to check if the monitor is in the ON mode. • Check if the power cord is properly present in the ON mode. • Make sure the signal cable is properly connected the monitor and the computer. • Inspect the signal cable and make sure not look white) that may cause electrical interference. Screen image is too light or dark • Adjust the Contrast and Brightness settings via OSD. ASUS 360Hz PG259QN Series LCD Monitor 3-11


