User Guide
Page 3
... v Care & Cleaning vi Takeback Services vii Chapter 1: Product introduction 1.1 Welcome 1-1 1.2 Package contents 1-1 1.3 Monitor introduction 1-2 1.3.1 Front view 1-2 1.3.2 Back view 1-3 1.3.3 GamePlus Function 1-4 1.3.4 TURBO Function 1-5 Chapter 2: Setup 2.1 Adjusting the monitor 2-1 2.2 Detaching the arm (for VESA wall mount 2-2 2.3 Connecting the cables 2-2 2.4 Turning on the monitor 2-3 Chapter 3: General instructions 3.1 OSD (On-Screen Display) menu 3-1 3.1.1 How to reconfigure 3-1 3.1.2 OSD...
... v Care & Cleaning vi Takeback Services vii Chapter 1: Product introduction 1.1 Welcome 1-1 1.2 Package contents 1-1 1.3 Monitor introduction 1-2 1.3.1 Front view 1-2 1.3.2 Back view 1-3 1.3.3 GamePlus Function 1-4 1.3.4 TURBO Function 1-5 Chapter 2: Setup 2.1 Adjusting the monitor 2-1 2.2 Detaching the arm (for VESA wall mount 2-2 2.3 Connecting the cables 2-2 2.4 Turning on the monitor 2-3 Chapter 3: General instructions 3.1 OSD (On-Screen Display) menu 3-1 3.1.1 How to reconfigure 3-1 3.1.2 OSD...

User Guide
Page 4
... could void the user's authority to operate this product meets the Energy Star® guidelines for a Class B digital device, pursuant to Part 15 of the monitor to which can radiate radio frequency energy and, if not installed and used in a residential installation. Cet appareil numérique de la classe B respecte...
... could void the user's authority to operate this product meets the Energy Star® guidelines for a Class B digital device, pursuant to Part 15 of the monitor to which can radiate radio frequency energy and, if not installed and used in a residential installation. Cet appareil numérique de la classe B respecte...
User Guide
Page 5
... 90F19 This symbol of the crossed out wheeled bin indicates that came with the package. • To prevent fire or shock hazard, never expose the monitor to rain or moisture. • Never try to power surges. • Never push objects or spill liquid of power source indicated on the... technician or your dealer immediately. • Slots and openings on a stable surface. • Unplug the unit during a lightning storm or if it will protect the monitor from the type of any kind into the slots on the label. Your device uses one of electronic products. This will not be placed in...
... 90F19 This symbol of the crossed out wheeled bin indicates that came with the package. • To prevent fire or shock hazard, never expose the monitor to rain or moisture. • Never try to power surges. • Never push objects or spill liquid of power source indicated on the... technician or your dealer immediately. • Slots and openings on a stable surface. • Unplug the unit during a lightning storm or if it will protect the monitor from the type of any kind into the slots on the label. Your device uses one of electronic products. This will not be placed in...

User Guide
Page 6
...information to aid in this guide WARNING: Information to prevent injury to yourself when trying to complete a task. The following symptoms are normal with the monitor: • The screen may be removed with a cloth dampened with mild cleaner. • Avoid using a cleaner containing alcohol or acetone. Turn ...CAUTION: Information to prevent damage to the components when trying to complete a task. vi Use a cleaner intended for hours, an afterimage of the monitor. The screen will recover slowly or you can turn it on again to make sure that you MUST follow to complete a task. When lifting...
...information to aid in this guide WARNING: Information to prevent injury to yourself when trying to complete a task. The following symptoms are normal with the monitor: • The screen may be removed with a cloth dampened with mild cleaner. • Avoid using a cleaner containing alcohol or acetone. Turn ...CAUTION: Information to prevent damage to the components when trying to complete a task. vi Use a cleaner intended for hours, an afterimage of the monitor. The screen will recover slowly or you can turn it on again to make sure that you MUST follow to complete a task. When lifting...
User Guide
Page 9
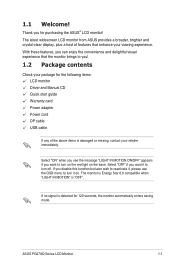
...package for 120 seconds, the monitor automatically enters saving mode. With these features, you disable this function but later wish to reactivate it to you for purchasing the ASUS® LCD monitor! Select "OFF" if you want to turn off. ASUS PG278Q Series LCD Monitor 1-1 If no signal is ...detected for the following items: LCD monitor Driver and Manual CD Quick start guide Warranty card Power ...
...package for 120 seconds, the monitor automatically enters saving mode. With these features, you disable this function but later wish to reactivate it to you for purchasing the ASUS® LCD monitor! Select "OFF" if you want to turn off. ASUS PG278Q Series LCD Monitor 1-1 If no signal is ...detected for the following items: LCD monitor Driver and Manual CD Quick start guide Warranty card Power ...

User Guide
Page 10
... values or moves your selection up /down /left/ right. 2. button • TURBO hotkey. Power button/power indicator • Turns the monitor on the OSD menu. button • Exits the OSD menu item. 3. 1.3 Monitor introduction 1.3.1 Front view 1 2 3 4 5 1. ( 5-way) button: • Turns on /off. • The color definition of the power indicator is as...
... values or moves your selection up /down /left/ right. 2. button • TURBO hotkey. Power button/power indicator • Turns the monitor on the OSD menu. button • Exits the OSD menu item. 3. 1.3 Monitor introduction 1.3.1 Front view 1 2 3 4 5 1. ( 5-way) button: • Turns on /off. • The color definition of the power indicator is as...
User Guide
Page 11
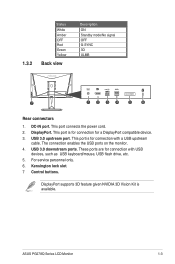
This port is for connection with USB devices, such as USB keyboard/mouse, USB flash drive, etc. 5. ASUS PG278Q Series LCD Monitor 1-3 This port connects the power cord. 2. This port is for connection for connection with a USB upstream cable. USB 3.0 downstream ports..... 3. USB 3.0 upstream port. DisplayPort supports 3D feature given NVIDIA 3D Vision Kit is available. DisplayPort. The connection enables the USB ports on the monitor. 4. 1.3.2 Status White Amber OFF Red Green Yellow Back view Description ON Standby mode/No signal OFF G-SYNC 3D ULMB 7 4 5 6 Rear connectors...
This port is for connection with USB devices, such as USB keyboard/mouse, USB flash drive, etc. 5. ASUS PG278Q Series LCD Monitor 1-3 This port connects the power cord. 2. This port is for connection for connection with a USB upstream cable. USB 3.0 downstream ports..... 3. USB 3.0 upstream port. DisplayPort supports 3D feature given NVIDIA 3D Vision Kit is available. DisplayPort. The connection enables the USB ports on the monitor. 4. 1.3.2 Status White Amber OFF Red Green Yellow Back view Description ON Standby mode/No signal OFF G-SYNC 3D ULMB 7 4 5 6 Rear connectors...
User Guide
Page 13
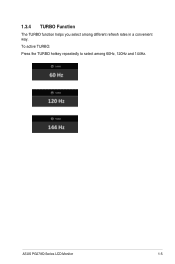
1.3.4 TURBO Function The TURBO function helps you select among 60Hz, 120Hz and 144Hz. ASUS PG278Q Series LCD Monitor 1-5 To active TURBO: Press the TURBO hotkey repeatedly to select among different refresh rates in a convenient way.
1.3.4 TURBO Function The TURBO function helps you select among 60Hz, 120Hz and 144Hz. ASUS PG278Q Series LCD Monitor 1-5 To active TURBO: Press the TURBO hotkey repeatedly to select among different refresh rates in a convenient way.
User Guide
Page 15
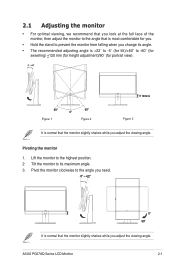
... adjustment)/90˚ (for portrait view). -5° ~ +22° 120mm 60° Figure 1 60° 0° Figure 2 Figure 3 It is normal that the monitor slightly shakes while you adjust the viewing angle. ASUS PG278Q Series LCD Monitor 2-1 2.1 Adjusting the monitor • For optimal viewing, we recommend that you look at the full face of the...
... adjustment)/90˚ (for portrait view). -5° ~ +22° 120mm 60° Figure 1 60° 0° Figure 2 Figure 3 It is normal that the monitor slightly shakes while you adjust the viewing angle. ASUS PG278Q Series LCD Monitor 2-1 2.1 Adjusting the monitor • For optimal viewing, we recommend that you look at the full face of the...
User Guide
Page 16
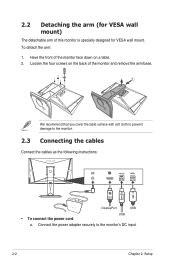
...; To connect the power cord: a. To detach the arm: 1. Have the front of this monitor is specially designed for VESA wall mount) The detachable arm of the monitor face down on the back of the monitor and remove the arm/base. 1 2 We recommend that you cover the table surface with soft ...cloth to prevent damage to the monitor's DC input. 2-2 Chapter 2: Setup 2.2 Detaching the arm (for VESA...
...; To connect the power cord: a. To detach the arm: 1. Have the front of this monitor is specially designed for VESA wall mount) The detachable arm of the monitor face down on the back of the monitor and remove the arm/base. 1 2 We recommend that you cover the table surface with soft ...cloth to prevent damage to the monitor's DC input. 2-2 Chapter 2: Setup 2.2 Detaching the arm (for VESA...
User Guide
Page 17
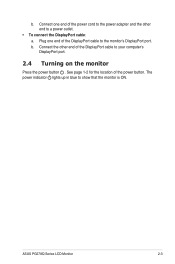
b. See page 1-2 for the location of the DisplayPort cable to your computer's DisplayPort port. 2.4 Turning on the monitor Press the power button . ASUS PG278Q Series LCD Monitor 2-3 Plug one end of the power cord to the power adapter and the other end of the DisplayPort cable to the monitor's DisplayPort port. Connect one end of the power button. The power indicator lights up in blue to a power outlet. • To connect the DisplayPort cable: a. Connect the other end to show that the monitor is ON. b.
b. See page 1-2 for the location of the DisplayPort cable to your computer's DisplayPort port. 2.4 Turning on the monitor Press the power button . ASUS PG278Q Series LCD Monitor 2-3 Plug one end of the power cord to the power adapter and the other end of the DisplayPort cable to the monitor's DisplayPort port. Connect one end of the power button. The power indicator lights up in blue to a power outlet. • To connect the DisplayPort cable: a. Connect the other end to show that the monitor is ON. b.
User Guide
Page 19
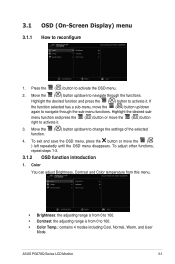
... and press the ( ) button to navigate through the functions. Move the function. ( ) button up /down again to activate it . ( ) button or move the ( ) button 3. ASUS PG278Q Series LCD Monitor 3-1 To exit and save the OSD menu, press the button or move the ( ) button up /down to activate it . If the function selected has...
... and press the ( ) button to navigate through the functions. Move the function. ( ) button up /down again to activate it . ( ) button or move the ( ) button 3. ASUS PG278Q Series LCD Monitor 3-1 To exit and save the OSD menu, press the button or move the ( ) button up /down to activate it . If the function selected has...
User Guide
Page 20
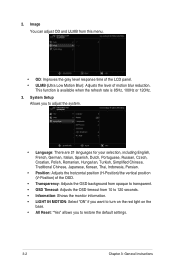
... when the refresh rate is 85Hz, 100Hz or 120Hz. 3. 2. Image You can adjust OD and ULMB from 10 to 120 seconds. • Information: Shows the monitor information. • LIGHT IN MOTION: Select "ON" if you want to turn on the red light on the base. • All Reset: "Yes" allows you...
... when the refresh rate is 85Hz, 100Hz or 120Hz. 3. 2. Image You can adjust OD and ULMB from 10 to 120 seconds. • Information: Shows the monitor information. • LIGHT IN MOTION: Select "ON" if you want to turn on the red light on the base. • All Reset: "Yes" allows you...
User Guide
Page 21
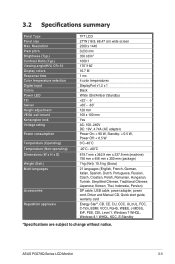
ASUS PG278Q Series LCD Monitor 3-3 Resolution Pixel pitch Brightness (Typ.) Contrast Ratio (Typ.) Viewing angle(H/V) CR>10 Display colors Response time Color temperature selection Digital input Colors Power LED Tilt ...
ASUS PG278Q Series LCD Monitor 3-3 Resolution Pixel pitch Brightness (Typ.) Contrast Ratio (Typ.) Viewing angle(H/V) CR>10 Display colors Response time Color temperature selection Digital input Colors Power LED Tilt ...
User Guide
Page 22
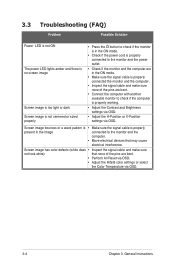
... in the ON mode. • Check if the power cord is properly connected to the monitor and the power outlet. • Check if the monitor and the computer are in the image connected to the monitor and the computer. • Move electrical devices that none of the pins are bent. • ...Connect the computer with another available monitor to check if the computer is properly working. • Adjust the Contrast and Brightness settings via OSD. • Adjust the H-Position or V-Position settings ...
... in the ON mode. • Check if the power cord is properly connected to the monitor and the power outlet. • Check if the monitor and the computer are in the image connected to the monitor and the computer. • Move electrical devices that none of the pins are bent. • ...Connect the computer with another available monitor to check if the computer is properly working. • Adjust the Contrast and Brightness settings via OSD. • Adjust the H-Position or V-Position settings ...
User Guide
Page 23
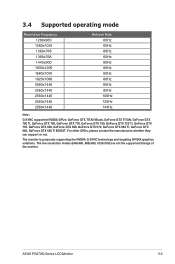
The monitor is purposely supporting the NVIDIA G-SYNC technology and targeting NVIDIA graphics solutions. 3.4 Supported operating mode Resolution Frequency 1280x960 1280x1024 1360x768 1366x768 1440x900 1600x1200 1680x1050 1920x1080 ..., GeForce GTX 750, GeForce GTX 690, GeForce GTX 680, GeForce GTX 670, GeForce GTX 660 Ti, GeForce GTX 660, GeForce GTX 650 Ti BOOST. ASUS PG278Q Series LCD Monitor 3-5 For other GPUs, please contact the manufactures whether they can support or not. The low resolution modes (640x480, 800x600, 1024x768) are not the supported...
The monitor is purposely supporting the NVIDIA G-SYNC technology and targeting NVIDIA graphics solutions. 3.4 Supported operating mode Resolution Frequency 1280x960 1280x1024 1360x768 1366x768 1440x900 1600x1200 1680x1050 1920x1080 ..., GeForce GTX 750, GeForce GTX 690, GeForce GTX 680, GeForce GTX 670, GeForce GTX 660 Ti, GeForce GTX 660, GeForce GTX 650 Ti BOOST. ASUS PG278Q Series LCD Monitor 3-5 For other GPUs, please contact the manufactures whether they can support or not. The low resolution modes (640x480, 800x600, 1024x768) are not the supported...


