User Guide
Page 2
...ERROR IN THIS MANUAL OR PRODUCT. ASUS ASSUMES NO RESPONSIBILITY OR LIABILITY FOR ANY ERRORS OR INACCURACIES THAT MAY APPEAR IN THIS MANUAL, INCLUDING THE PRODUCTS AND SOFTWARE DESCRIBED IN IT. ii No part of their respective companies, and are used only for backup purposes, without intent to the owners...FOR A PARTICULAR PURPOSE. SPECIFICATIONS AND INFORMATION CONTAINED IN THIS MANUAL ARE FURNISHED FOR INFORMATIONAL USE ONLY, AND ARE SUBJECT TO CHANGE AT ANY TIME WITHOUT NOTICE, AND SHOULD NOT BE CONSTRUED AS A COMMITMENT BY ASUS. Product warranty or service will not be registered...
...ERROR IN THIS MANUAL OR PRODUCT. ASUS ASSUMES NO RESPONSIBILITY OR LIABILITY FOR ANY ERRORS OR INACCURACIES THAT MAY APPEAR IN THIS MANUAL, INCLUDING THE PRODUCTS AND SOFTWARE DESCRIBED IN IT. ii No part of their respective companies, and are used only for backup purposes, without intent to the owners...FOR A PARTICULAR PURPOSE. SPECIFICATIONS AND INFORMATION CONTAINED IN THIS MANUAL ARE FURNISHED FOR INFORMATIONAL USE ONLY, AND ARE SUBJECT TO CHANGE AT ANY TIME WITHOUT NOTICE, AND SHOULD NOT BE CONSTRUED AS A COMMITMENT BY ASUS. Product warranty or service will not be registered...
User Guide
Page 3
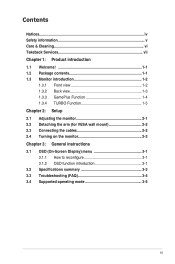
...& Cleaning vi Takeback Services vii Chapter 1: Product introduction 1.1 Welcome 1-1 1.2 Package contents 1-1 1.3 Monitor introduction 1-2 1.3.1 Front view 1-2 1.3.2 Back view 1-3 1.3.3 GamePlus Function 1-4 1.3.4 TURBO Function 1-5 Chapter 2: Setup 2.1 Adjusting the monitor 2-1 2.2 Detaching the arm (for VESA wall mount 2-2 2.3 Connecting the cables 2-2 2.4 Turning on the monitor 2-3 Chapter 3: General instructions 3.1 OSD (On-Screen Display) menu 3-1 3.1.1 How to reconfigure 3-1 3.1.2 OSD function introduction 3-1 3.2 Specifications summary 3-3 3.3 Troubleshooting...
...& Cleaning vi Takeback Services vii Chapter 1: Product introduction 1.1 Welcome 1-1 1.2 Package contents 1-1 1.3 Monitor introduction 1-2 1.3.1 Front view 1-2 1.3.2 Back view 1-3 1.3.3 GamePlus Function 1-4 1.3.4 TURBO Function 1-5 Chapter 2: Setup 2.1 Adjusting the monitor 2-1 2.2 Detaching the arm (for VESA wall mount 2-2 2.3 Connecting the cables 2-2 2.4 Turning on the monitor 2-3 Chapter 3: General instructions 3.1 OSD (On-Screen Display) menu 3-1 3.1.1 How to reconfigure 3-1 3.1.2 OSD function introduction 3-1 3.2 Specifications summary 3-3 3.3 Troubleshooting...

User Guide
Page 4
... manufacturer's instructions, may cause harmful interference to correct the interference by turning the equipment off and on, the user is subject to the following measures: • Reorient or relocate the receiving antenna. • Increase the separation between the equipment and receiver. • Connect the equipment to an outlet on a circuit different from digital apparatus set out...
... manufacturer's instructions, may cause harmful interference to correct the interference by turning the equipment off and on, the user is subject to the following measures: • Reorient or relocate the receiving antenna. • Increase the separation between the equipment and receiver. • Connect the equipment to an outlet on a circuit different from digital apparatus set out...
User Guide
Page 5
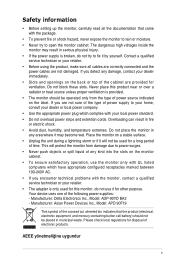
... by yourself. Contact a qualified service technician or your dealer immediately. • Slots and openings on the monitor cabinet. • To ensure satisfactory operation, use it may result in municipal waste. Please check local regulations for other purpose. Safety information • Before setting up the monitor, carefully read all cables are correctly connected and the power cables are not damaged. The dangerous...
... by yourself. Contact a qualified service technician or your dealer immediately. • Slots and openings on the monitor cabinet. • To ensure satisfactory operation, use it may result in municipal waste. Please check local regulations for other purpose. Safety information • Before setting up the monitor, carefully read all cables are correctly connected and the power cables are not damaged. The dangerous...

User Guide
Page 6
... are normal with the monitor. IMPORTANT: Information that the flicker disappears. • You may remain after switching the image. vi Use a cleaner intended for hours. • When the screen becomes black or flashes, or cannot work anymore, contact your dealer or service center to fix it is better to disconnect the cables and power cord. Turn your monitor, it . Do not lift the display by yourself! NOTE...
... are normal with the monitor. IMPORTANT: Information that the flicker disappears. • You may remain after switching the image. vi Use a cleaner intended for hours. • When the screen becomes black or flashes, or cannot work anymore, contact your dealer or service center to fix it is better to disconnect the cables and power cord. Turn your monitor, it . Do not lift the display by yourself! NOTE...
User Guide
Page 7
...asus.com 2. Refer to http://csr.asus.com/english/Takeback.htm for detail recycling information in providing solutions for our customers to be able to the following sources for additional information and for protecting our environment. ASUS websites The ASUS websites worldwide provide updated information on ASUS hardware and software...documentation that may have been added by your dealer. These documents are not part of the standard package. We believe in different region. Takeback Services ASUS recycling and takeback programs come from our commitment to the highest standards for ...
...asus.com 2. Refer to http://csr.asus.com/english/Takeback.htm for detail recycling information in providing solutions for our customers to be able to the following sources for additional information and for protecting our environment. ASUS websites The ASUS websites worldwide provide updated information on ASUS hardware and software...documentation that may have been added by your dealer. These documents are not part of the standard package. We believe in different region. Takeback Services ASUS recycling and takeback programs come from our commitment to the highest standards for ...
User Guide
Page 9
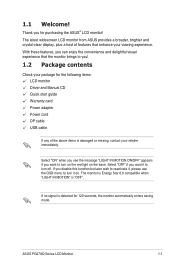
... package for the following items: LCD monitor Driver and Manual CD Quick start guide Warranty card Power adapter Power cord DP cable USB cable If any of features that enhance your retailer immediately. Select "OFF" if you disable this function but later wish to reactivate it, please use the OSD menu to turn it to turn off. The latest widescreen LCD monitor from ASUS provides a broader, brighter and crystal-clear display, plus a host of the...
... package for the following items: LCD monitor Driver and Manual CD Quick start guide Warranty card Power adapter Power cord DP cable USB cable If any of features that enhance your retailer immediately. Select "OFF" if you disable this function but later wish to reactivate it, please use the OSD menu to turn it to turn off. The latest widescreen LCD monitor from ASUS provides a broader, brighter and crystal-clear display, plus a host of the...

User Guide
Page 10
... the function needed. 4. Power button/power indicator • Turns the monitor on the OSD menu. Move the ( ) button up /down to select and press ( ) to select among different refresh rates. 5. button • Exits the OSD menu item. 3. button • TURBO hotkey. button: • GamePlus hotkey. Enacts the selected OSD menu item. • Increases/Decreases values or moves your selection up /down /left/ right. 2. 1.3 Monitor introduction 1.3.1 Front view 1 2 3 4 5 1. ( 5-way) button: • Turns on...
... the function needed. 4. Power button/power indicator • Turns the monitor on the OSD menu. Move the ( ) button up /down to select and press ( ) to select among different refresh rates. 5. button • Exits the OSD menu item. 3. button • TURBO hotkey. button: • GamePlus hotkey. Enacts the selected OSD menu item. • Increases/Decreases values or moves your selection up /down /left/ right. 2. 1.3 Monitor introduction 1.3.1 Front view 1 2 3 4 5 1. ( 5-way) button: • Turns on...
User Guide
Page 11
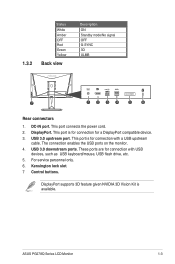
...Vision Kit is for connection for a DisplayPort compatible device. 3. USB 3.0 downstream ports. Kensington lock slot. 7 Control buttons. 1.3.2 Status White Amber OFF Red Green Yellow Back view Description ON Standby mode/No signal OFF G-SYNC 3D ULMB 7 4 5 6 Rear connectors 1. DisplayPort. The connection enables the USB ports on the monitor. 4. USB 3.0 upstream port. These ports are for connection with USB devices, such as USB keyboard/mouse, USB flash drive, etc. 5. DC-IN port. This port is for connection with a USB upstream cable. ASUS PG278Q Series LCD Monitor 1-3
...Vision Kit is for connection for a DisplayPort compatible device. 3. USB 3.0 downstream ports. Kensington lock slot. 7 Control buttons. 1.3.2 Status White Amber OFF Red Green Yellow Back view Description ON Standby mode/No signal OFF G-SYNC 3D ULMB 7 4 5 6 Rear connectors 1. DisplayPort. The connection enables the USB ports on the monitor. 4. USB 3.0 upstream port. These ports are for connection with USB devices, such as USB keyboard/mouse, USB flash drive, etc. 5. DC-IN port. This port is for connection with a USB upstream cable. ASUS PG278Q Series LCD Monitor 1-3

User Guide
Page 12
... GamePlus hotkey. 2. Press the button or move the settings. ( ) button up /down to go back, off, and exit. Crosshair GamePlus - Press the ( ) button or move the ( ) button right to confirm the function you choose, and move the ( ) button left to navigate through the 4.... Timer 1-4 Chapter 1: Product introduction Highlight the desired setting and press the ( ) button to select between Crosshair and Timer 3. GamePlus Main Menu GamePlus - ...
... GamePlus hotkey. 2. Press the button or move the settings. ( ) button up /down to go back, off, and exit. Crosshair GamePlus - Press the ( ) button or move the ( ) button right to confirm the function you choose, and move the ( ) button left to navigate through the 4.... Timer 1-4 Chapter 1: Product introduction Highlight the desired setting and press the ( ) button to select between Crosshair and Timer 3. GamePlus Main Menu GamePlus - ...
User Guide
Page 13
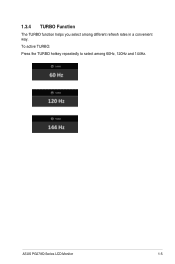
ASUS PG278Q Series LCD Monitor 1-5 To active TURBO: Press the TURBO hotkey repeatedly to select among different refresh rates in a convenient way. 1.3.4 TURBO Function The TURBO function helps you select among 60Hz, 120Hz and 144Hz.
ASUS PG278Q Series LCD Monitor 1-5 To active TURBO: Press the TURBO hotkey repeatedly to select among different refresh rates in a convenient way. 1.3.4 TURBO Function The TURBO function helps you select among 60Hz, 120Hz and 144Hz.
User Guide
Page 15
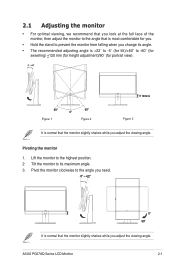
... -60˚ (for swiveling/ +120 mm (for height adjustment)/90˚ (for portrait view). -5° ~ +22° 120mm 60° Figure 1 60° 0° Figure 2 Figure 3 It is normal that the monitor slightly shakes while you adjust the viewing angle. ASUS PG278Q Series LCD Monitor 2-1 Lift the monitor to the highest position. 2 Tilt the monitor to the angle you need. -5° ~ +22° 0° 90°...
... -60˚ (for swiveling/ +120 mm (for height adjustment)/90˚ (for portrait view). -5° ~ +22° 120mm 60° Figure 1 60° 0° Figure 2 Figure 3 It is normal that the monitor slightly shakes while you adjust the viewing angle. ASUS PG278Q Series LCD Monitor 2-1 Lift the monitor to the highest position. 2 Tilt the monitor to the angle you need. -5° ~ +22° 0° 90°...
User Guide
Page 16
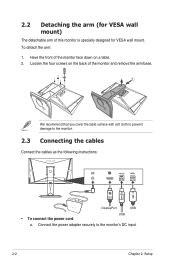
... four screws on a table. 2. Connect the power adapter securely to the monitor. 2.3 Connecting the cables Connect the cables as the following instructions: DisplayPort USB USB • To connect the power cord: a. To detach the arm: 1. 2.2 Detaching the arm (for VESA wall mount) The detachable arm of the monitor and remove the arm/base. 1 2 We recommend that you cover the table surface with soft cloth to prevent damage to the monitor's DC input. 2-2 Chapter 2: Setup Have...
... four screws on a table. 2. Connect the power adapter securely to the monitor. 2.3 Connecting the cables Connect the cables as the following instructions: DisplayPort USB USB • To connect the power cord: a. To detach the arm: 1. 2.2 Detaching the arm (for VESA wall mount) The detachable arm of the monitor and remove the arm/base. 1 2 We recommend that you cover the table surface with soft cloth to prevent damage to the monitor's DC input. 2-2 Chapter 2: Setup Have...
User Guide
Page 17
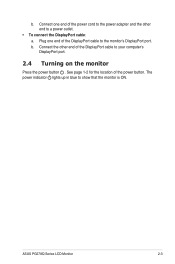
b. b. Connect one end of the DisplayPort cable to a power outlet. • To connect the DisplayPort cable: a. Plug one end of the power cord to the power adapter and the other end of the power button. See page 1-2 for the location of the DisplayPort cable to show that the monitor is ON. Connect the other end to the monitor's DisplayPort port. The power indicator lights up in blue to your computer's DisplayPort port. 2.4 Turning on the monitor Press the power button . ASUS PG278Q Series LCD Monitor 2-3
b. b. Connect one end of the DisplayPort cable to a power outlet. • To connect the DisplayPort cable: a. Plug one end of the power cord to the power adapter and the other end of the power button. See page 1-2 for the location of the DisplayPort cable to show that the monitor is ON. Connect the other end to the monitor's DisplayPort port. The power indicator lights up in blue to your computer's DisplayPort port. 2.4 Turning on the monitor Press the power button . ASUS PG278Q Series LCD Monitor 2-3
User Guide
Page 19
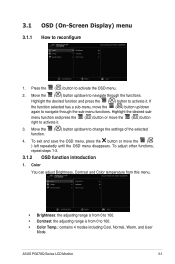
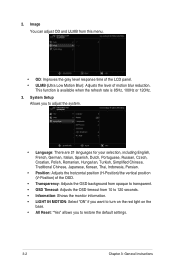
...; Contrast: the adjusting range is from 0 to activate the OSD menu. 2. Press the ( ) button to 100. • Color Temp.: contains 4 modes including Cool, Normal, Warm, and User Mode. menu function and press the right to navigate through the sub-menu functions. To adjust other functions, repeat steps 1-3. 3.1.2 OSD function introduction 1. To exit and save the OSD menu, press the button or move the ( ) button 3. Highlight the desired sub- ASUS PG278Q Series LCD Monitor 3-1 If...
...; Contrast: the adjusting range is from 0 to activate the OSD menu. 2. Press the ( ) button to 100. • Color Temp.: contains 4 modes including Cool, Normal, Warm, and User Mode. menu function and press the right to navigate through the sub-menu functions. To adjust other functions, repeat steps 1-3. 3.1.2 OSD function introduction 1. To exit and save the OSD menu, press the button or move the ( ) button 3. Highlight the desired sub- ASUS PG278Q Series LCD Monitor 3-1 If...
User Guide
Page 20
... 21 languages for your selection, including English, French, German, Italian, Spanish, Dutch, Portuguese, Russian, Czech, Croatian, Polish, Romanian, Hungarian, Turkish, Simplified Chinese, Traditional Chinese, Japanese, Korean, Thai, Indonesia, Persian. • Position: Adjusts the horizontal position (H-Position)/the vertical position (V-Position) of the OSD. • Transparency: Adjusts the OSD background from opaque to restore the default settings. 3-2 Chapter 3: General Instructions This function is available when the refresh rate is...
... 21 languages for your selection, including English, French, German, Italian, Spanish, Dutch, Portuguese, Russian, Czech, Croatian, Polish, Romanian, Hungarian, Turkish, Simplified Chinese, Traditional Chinese, Japanese, Korean, Thai, Indonesia, Persian. • Position: Adjusts the horizontal position (H-Position)/the vertical position (V-Position) of the OSD. • Transparency: Adjusts the OSD background from opaque to restore the default settings. 3-2 Chapter 3: General Instructions This function is available when the refresh rate is...
User Guide
Page 21
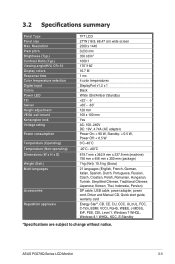
ASUS PG278Q Series LCD Monitor 3-3 Resolution Pixel pitch Brightness (Typ.) Contrast Ratio (Typ.) Viewing angle(H/V) CR>10 Display colors Response time Color temperature selection Digital input Colors Power LED Tilt Swivel Height adjustment VESA wall mount Kensington lock Voltage rating Power consumption Temperature (Operating) Temperature (Non-operating) Dimensions (W x H x D) Weight (Esti.) Multi-languages Accessories Regulation approvals TFT LCD 27"W (16:9, 68.47 cm) wide screen 2560 x 1440 0.233 mm 350 cd/m2 1000:1 170˚/160˚ 16.7 M 1 ms 4 color temperatures DisplayPort v1.2 x 1...
ASUS PG278Q Series LCD Monitor 3-3 Resolution Pixel pitch Brightness (Typ.) Contrast Ratio (Typ.) Viewing angle(H/V) CR>10 Display colors Response time Color temperature selection Digital input Colors Power LED Tilt Swivel Height adjustment VESA wall mount Kensington lock Voltage rating Power consumption Temperature (Operating) Temperature (Non-operating) Dimensions (W x H x D) Weight (Esti.) Multi-languages Accessories Regulation approvals TFT LCD 27"W (16:9, 68.47 cm) wide screen 2560 x 1440 0.233 mm 350 cd/m2 1000:1 170˚/160˚ 16.7 M 1 ms 4 color temperatures DisplayPort v1.2 x 1...
User Guide
Page 22
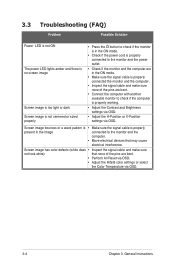
... All Reset via OSD. • Adjust the R/G/B color settings or select the Color Temperature via OSD. Screen image bounces or a wave pattern is • Make sure the signal cable is properly working. • Adjust the Contrast and Brightness settings via OSD. • Adjust the H-Position or V-Position settings via OSD. 3-4 Chapter 3: General Instructions Screen image has color defects (white does • Inspect the signal cable and make sure none of the pins are bent. • Connect the computer with another available monitor to check...
... All Reset via OSD. • Adjust the R/G/B color settings or select the Color Temperature via OSD. Screen image bounces or a wave pattern is • Make sure the signal cable is properly working. • Adjust the Contrast and Brightness settings via OSD. • Adjust the H-Position or V-Position settings via OSD. 3-4 Chapter 3: General Instructions Screen image has color defects (white does • Inspect the signal cable and make sure none of the pins are bent. • Connect the computer with another available monitor to check...
User Guide
Page 23
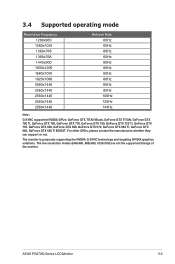
...3.4 Supported operating mode Resolution Frequency 1280x960 1280x1024 1360x768 1366x768 1440x900 1600x1200 1680x1050 1920x1080 2560x1440 2560x1440 2560x1440 2560x1440 2560x1440 Refresh Rate 60Hz 60Hz 60Hz 60Hz 60Hz 60Hz 60Hz 60Hz 60Hz 85Hz 100Hz 120Hz 144Hz Note: G-SYNC supported NVIDIA GPUs: GeForce GTX TITAN Black, ..., please contact the manufactures whether they can support or not. The monitor is purposely supporting the NVIDIA G-SYNC technology and targeting NVIDIA graphics solutions. ASUS PG278Q Series LCD Monitor 3-5 The low resolution modes (640x480, 800x600, 1024x768) are not the...
...3.4 Supported operating mode Resolution Frequency 1280x960 1280x1024 1360x768 1366x768 1440x900 1600x1200 1680x1050 1920x1080 2560x1440 2560x1440 2560x1440 2560x1440 2560x1440 Refresh Rate 60Hz 60Hz 60Hz 60Hz 60Hz 60Hz 60Hz 60Hz 60Hz 85Hz 100Hz 120Hz 144Hz Note: G-SYNC supported NVIDIA GPUs: GeForce GTX TITAN Black, ..., please contact the manufactures whether they can support or not. The monitor is purposely supporting the NVIDIA G-SYNC technology and targeting NVIDIA graphics solutions. ASUS PG278Q Series LCD Monitor 3-5 The low resolution modes (640x480, 800x600, 1024x768) are not the...

User Guide
Page 24
3-6 Chapter 3: General Instructions
3-6 Chapter 3: General Instructions


