User Manual
Page 12
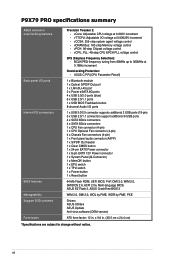
...Flash ROM, UEFI BIOS, PnP, DMI 2.0, WfM 2.0, SM BIOS 2.6, ACPI 2.0a, Multi-language BIOS, ASUS EZ Flash 2, ASUS CrashFree BIOS 3 WfM 2.0, DMI 2.0, WOL by PME, WOR by PME, PXE Drivers ASUS Utilities ASUS Update Anti-virus software (OEM version) ATX form factor... 6 x USB 2.0/1.1 ports 1 x USB BIOS Flashback button 8-channel Audio I /O connectors BIOS features Manageability Support DVD contents Form factor Precision Tweaker 2: - x 9.6 in . vCore: Adjustable CPU voltage at 0.005V increment - P9X79 PRO specifications summary ASUS exclusive overclocking features Back panel I/O ports Internal ...
...Flash ROM, UEFI BIOS, PnP, DMI 2.0, WfM 2.0, SM BIOS 2.6, ACPI 2.0a, Multi-language BIOS, ASUS EZ Flash 2, ASUS CrashFree BIOS 3 WfM 2.0, DMI 2.0, WOL by PME, WOR by PME, PXE Drivers ASUS Utilities ASUS Update Anti-virus software (OEM version) ATX form factor... 6 x USB 2.0/1.1 ports 1 x USB BIOS Flashback button 8-channel Audio I /O connectors BIOS features Manageability Support DVD contents Form factor Precision Tweaker 2: - x 9.6 in . vCore: Adjustable CPU voltage at 0.005V increment - P9X79 PRO specifications summary ASUS exclusive overclocking features Back panel I/O ports Internal ...

User Manual
Page 18
... goes beyond traditional keyboard-only controls. USB BIOS Flashback USB BIOS Flashback offers the most accessed info - It allows overclockers to install. Worry-free overclocking for enhanced system control - ASUS Q-Design ASUS Q-Design enhances your motherboard against static electricity and shields it convenient and easy to try new BIOS versions easily, without the usual "fingers" - making...
... goes beyond traditional keyboard-only controls. USB BIOS Flashback USB BIOS Flashback offers the most accessed info - It allows overclockers to install. Worry-free overclocking for enhanced system control - ASUS Q-Design ASUS Q-Design enhances your motherboard against static electricity and shields it convenient and easy to try new BIOS versions easily, without the usual "fingers" - making...

User Manual
Page 37
... the next set is not properly installed. switch to the latest BIOS version from the ASUS website at www.asus.com. • If you download and update to boot and load BIOS default settings. MemOK! A messgae will appear during POST reminding you that the BIOS has been restored to its default settings. • We recommend ... seconds for the system to begin automatic memory compatibility tuning for the exact location of failsafe settings. function. • The MemOK! Chapter 2 • Refer to BIOS overclocking, press the MemOK! switch lights continuously. ASUS P9X79 PRO 2-17
... the next set is not properly installed. switch to the latest BIOS version from the ASUS website at www.asus.com. • If you download and update to boot and load BIOS default settings. MemOK! A messgae will appear during POST reminding you that the BIOS has been restored to its default settings. • We recommend ... seconds for the system to begin automatic memory compatibility tuning for the exact location of failsafe settings. function. • The MemOK! Chapter 2 • Refer to BIOS overclocking, press the MemOK! switch lights continuously. ASUS P9X79 PRO 2-17
User Manual
Page 46
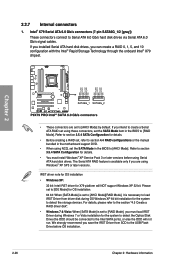
...to section 4.4 RAID configurations or the manual bundled in the motherboard support DVD. • When using these connectors, set the SATA Mode in the BIOS to [AHCI Mode] by default. Intel® X79 Serial ATA 6.0 Gb/s connectors (7-pin SATA6G_1/2 [gray]) These connectors connect to the USB...ATA hard disk drives. Refer to section 3.5.4 SATA Configuration for details. • You must install Windows® XP Service Pack 3 or later versions before OS installation. 2-26 Chapter 2: Hardware information If you installed Serial ATA hard disk drives, you intend to create a Serial ATA RAID ...
...to section 4.4 RAID configurations or the manual bundled in the motherboard support DVD. • When using these connectors, set the SATA Mode in the BIOS to [AHCI Mode] by default. Intel® X79 Serial ATA 6.0 Gb/s connectors (7-pin SATA6G_1/2 [gray]) These connectors connect to the USB...ATA hard disk drives. Refer to section 3.5.4 SATA Configuration for details. • You must install Windows® XP Service Pack 3 or later versions before OS installation. 2-26 Chapter 2: Hardware information If you installed Serial ATA hard disk drives, you intend to create a Serial ATA RAID ...
User Manual
Page 47
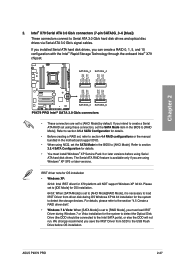
...configuration with the Intel® Rapid Storage Technology through the onboard Intel® X79 chipset. ASUS P9X79 PRO 2-27 We strongly recommend you save the IRST Driver from driver disk during Windows 7 or...driver for OS installation. 64 bit: When [SATA Mode] is set the SATA Mode item in the BIOS to [AHCI Mode] by default. Refer to detect the storage devices. For details, please refer to...These connectors connect to the USB Flash Drive before using Windows® XP SP3 or later versions. Refer to section 3.5.4 SATA Configuration for details. • You must load IRST Driver ...
...configuration with the Intel® Rapid Storage Technology through the onboard Intel® X79 chipset. ASUS P9X79 PRO 2-27 We strongly recommend you save the IRST Driver from driver disk during Windows 7 or...driver for OS installation. 64 bit: When [SATA Mode] is set the SATA Mode item in the BIOS to [AHCI Mode] by default. Refer to detect the storage devices. For details, please refer to...These connectors connect to the USB Flash Drive before using Windows® XP SP3 or later versions. Refer to section 3.5.4 SATA Configuration for details. • You must load IRST Driver ...

User Manual
Page 48
... • If you want to install a Windows operating system to a RAID configuration created using NCQ, set the Marvell Storage Controller item in the BIOS to [Enabled]. Refer to section 3.5.6 Onboard Devices Configuration for data drives only. For Windows Vista / Windows 7 OS, load only the Marvell 91xx...Driver. 2-28 Chapter 2: Hardware information ATAPI device is not supported. • You must install Windows® XP Service Pack 3 or later versions before using Serial ATA hard disk drives. • When using the Marvell SATA controller, you have to Serial ATA 6.0 Gb/s hard disk drives...
... • If you want to install a Windows operating system to a RAID configuration created using NCQ, set the Marvell Storage Controller item in the BIOS to [Enabled]. Refer to section 3.5.6 Onboard Devices Configuration for data drives only. For Windows Vista / Windows 7 OS, load only the Marvell 91xx...Driver. 2-28 Chapter 2: Hardware information ATAPI device is not supported. • You must install Windows® XP Service Pack 3 or later versions before using Serial ATA hard disk drives. • When using the Marvell SATA controller, you have to Serial ATA 6.0 Gb/s hard disk drives...

User Manual
Page 67
...the light starts to flash. 5 The flashing rate of the light signal accelerates along with the WHITE interior. 3 Press the BIOS Flashback button for help. This may have risks. Improper installation of interruption, please follow the recommended procedures again to reboot, please ...USB portable disk, and place it in USB storage and push the dedicated button for the ultimate convenience! 1 Download the BIOS Flashback program from the ASUS service website (www.asus.com). It allows overclockers to try new BIOS versions easily without having to flash the BIOS. ASUS P9X79 PRO 2-47
...the light starts to flash. 5 The flashing rate of the light signal accelerates along with the WHITE interior. 3 Press the BIOS Flashback button for help. This may have risks. Improper installation of interruption, please follow the recommended procedures again to reboot, please ...USB portable disk, and place it in USB storage and push the dedicated button for the ultimate convenience! 1 Download the BIOS Flashback program from the ASUS service website (www.asus.com). It allows overclockers to try new BIOS versions easily without having to flash the BIOS. ASUS P9X79 PRO 2-47

User Manual
Page 77
... when prompted to create/confirm the password. • If you to clear the BIOS password. Advanced Mode Exit Main Ai Tweaker Advanced Monitor BIOS Information BIOS Version Build Date EC F/W Version ME Version 0228 x64 08/26/2011 MBECE-X79-0208 7.1.20.1089 CPU Information Genuine Intel(R)...Administrator or User Password items on how to boot or enter Setup. After you enter the Advanced Mode of the BIOS Setup program. Chapter 3 ASUS P9X79 PRO 3-5 UEFI BIOS Utility - 3.3 Main menu The Main menu screen appears when you set a password, these items show the default...
... when prompted to create/confirm the password. • If you to clear the BIOS password. Advanced Mode Exit Main Ai Tweaker Advanced Monitor BIOS Information BIOS Version Build Date EC F/W Version ME Version 0228 x64 08/26/2011 MBECE-X79-0208 7.1.20.1089 CPU Information Genuine Intel(R)...Administrator or User Password items on how to boot or enter Setup. After you enter the Advanced Mode of the BIOS Setup program. Chapter 3 ASUS P9X79 PRO 3-5 UEFI BIOS Utility - 3.3 Main menu The Main menu screen appears when you set a password, these items show the default...

User Manual
Page 94
...heat production. F1: General Help F2: Previous Values F5: Optimized Defaults F10: Save ESC: Exit Version 2.10.1208. Configuration options: [Disabled] [Enabled] Chapter 3 3-22 Chapter 3: BIOS setup Enhanced Intel SpeedStep Technology [Enabled] Enhanced Intel SpeedStep Technology, allows the system operation system to ...memory parameters will be auto optimized. →←: Select Screen ↑↓: Select Item Enter: Select +/-: Change Opt. UEFI BIOS Utility - CPU Ratio [Auto] This item allows user manually adjust the maximum non-turbo CPU ratio, The value will be limit ...
...heat production. F1: General Help F2: Previous Values F5: Optimized Defaults F10: Save ESC: Exit Version 2.10.1208. Configuration options: [Disabled] [Enabled] Chapter 3 3-22 Chapter 3: BIOS setup Enhanced Intel SpeedStep Technology [Enabled] Enhanced Intel SpeedStep Technology, allows the system operation system to ...memory parameters will be auto optimized. →←: Select Screen ↑↓: Select Item Enter: Select +/-: Change Opt. UEFI BIOS Utility - CPU Ratio [Auto] This item allows user manually adjust the maximum non-turbo CPU ratio, The value will be limit ...

User Manual
Page 98
... CHD [Auto] Allows you to malfunction. Chapter 3 3-26 Chapter 3: BIOS setup DRAM Read REF Voltage on Channel C/D. F1: General Help F2: Previous Values F5: Optimized Defaults F10: Save ESC: Exit Version 2.10.1208. Copyright (C) 2011 American Megatrends, Inc. The values range ...from 0.3950x to 0.6300x with a 0.005x interval. UEFI BIOS Utility - Different ratio might enhance DRAM overclocking ability. Advanced Mode Exit Main...
... CHD [Auto] Allows you to malfunction. Chapter 3 3-26 Chapter 3: BIOS setup DRAM Read REF Voltage on Channel C/D. F1: General Help F2: Previous Values F5: Optimized Defaults F10: Save ESC: Exit Version 2.10.1208. Copyright (C) 2011 American Megatrends, Inc. The values range ...from 0.3950x to 0.6300x with a 0.005x interval. UEFI BIOS Utility - Different ratio might enhance DRAM overclocking ability. Advanced Mode Exit Main...

User Manual
Page 99
... this menu show the CPU-related information that the BIOS automatically detects. Chapter 3 ASUS P9X79 PRO 3-27 F1: General Help F2: Previous Values F3: Shortcut F5: Optimized Defaults F6: ASUS Ratio Boost F10: Save ESC: Exit F12: Print Screen Version 2.10.1208. Hyper-threading [Enabled] The Intel ...The items shown in this screen may be different due to the CPU you installed. Copyright (C) 2011 American Megatrends, Inc. UEFI BIOS Utility - Advanced Mode Exit Main Ai Tweaker Advanced Back Advanced\ CPU Configuration > CPU Configuration Genuine Intel(R) CPU @ 2.30GHz CPU...
... this menu show the CPU-related information that the BIOS automatically detects. Chapter 3 ASUS P9X79 PRO 3-27 F1: General Help F2: Previous Values F3: Shortcut F5: Optimized Defaults F6: ASUS Ratio Boost F10: Save ESC: Exit F12: Print Screen Version 2.10.1208. Hyper-threading [Enabled] The Intel ...The items shown in this screen may be different due to the CPU you installed. Copyright (C) 2011 American Megatrends, Inc. UEFI BIOS Utility - Advanced Mode Exit Main Ai Tweaker Advanced Back Advanced\ CPU Configuration > CPU Configuration Genuine Intel(R) CPU @ 2.30GHz CPU...

User Manual
Page 100
...Intel SpeedStep Technology Enabled Turbo Mode Enabled CPU C1E Auto CPU C3 Report Auto CPU C6 Report Auto CPU C7 Report Auto Version 2.10.1208. Configuration options: [All] [1] [2] [3] [4] [5] Limit CPUID Maximum [Disabled] [Enabled] Allows legacy operating systems to your ...CPU model. Chapter 3 3-28 Chapter 3: BIOS setup CPU Ratio [Auto] Allows you to run multiple operating systems separately and simultaneously, enabling one system to set the ratio between the...
...Intel SpeedStep Technology Enabled Turbo Mode Enabled CPU C1E Auto CPU C3 Report Auto CPU C6 Report Auto CPU C7 Report Auto Version 2.10.1208. Configuration options: [All] [1] [2] [3] [4] [5] Limit CPUID Maximum [Disabled] [Enabled] Allows legacy operating systems to your ...CPU model. Chapter 3 3-28 Chapter 3: BIOS setup CPU Ratio [Auto] Allows you to run multiple operating systems separately and simultaneously, enabling one system to set the ratio between the...

User Manual
Page 105
...Select +/-: Change Opt. F1: General Help F2: Previous Values F3: Shortcut F5: Optimized Defaults F6: ASUS Ratio Boost F10: Save ESC: Exit F12: Print Screen Version 2.10.1208. 3.5.6 Onboard Devices Configuraton UEFI BIOS Utility - Azalia HD Audio [Enabled] [Disabled] Disables the controller. [Enabled] Enables the High Definition ...audio module supports. [HD] [AC97] Sets the front panel audio connector (AAFP) mode to legacy AC'97 Chapter 3 ASUS P9X79 PRO 3-33 Copyright (C) 2011 American Megatrends, Inc. Sets the front panel audio connector (AAFP) mode to high definition audio.
...Select +/-: Change Opt. F1: General Help F2: Previous Values F3: Shortcut F5: Optimized Defaults F6: ASUS Ratio Boost F10: Save ESC: Exit F12: Print Screen Version 2.10.1208. 3.5.6 Onboard Devices Configuraton UEFI BIOS Utility - Azalia HD Audio [Enabled] [Disabled] Disables the controller. [Enabled] Enables the High Definition ...audio module supports. [HD] [AC97] Sets the front panel audio connector (AAFP) mode to legacy AC'97 Chapter 3 ASUS P9X79 PRO 3-33 Copyright (C) 2011 American Megatrends, Inc. Sets the front panel audio connector (AAFP) mode to high definition audio.

User Manual
Page 114
.... Chapter 3 3-42 Chapter 3: BIOS setup 3.8.3 ASUS O.C. Load from Profile Allows you to load the previous BIOS settings saved in the BIOS Flash. �K�e��y��in a profile number from the same memory/CPU configuration and BIOS version. Profile This item allows you to the BIOS Flash, and create a profile. UEFI BIOS Utility - Profile Configuration Setup...
.... Chapter 3 3-42 Chapter 3: BIOS setup 3.8.3 ASUS O.C. Load from Profile Allows you to load the previous BIOS settings saved in the BIOS Flash. �K�e��y��in a profile number from the same memory/CPU configuration and BIOS version. Profile This item allows you to the BIOS Flash, and create a profile. UEFI BIOS Utility - Profile Configuration Setup...
User Manual
Page 117
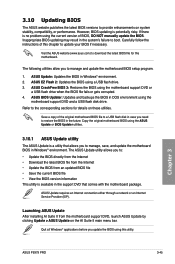
... you to: • Update the BIOS directly from the Internet • Download the latest BIOS file from the Internet • Update the BIOS from the motherboard support DVD, launch ASUS Update by clicking Update > ASUS Update on system stability, compatibility, or performance. Chapter 3 ASUS P9X79 PRO 3-45 ASUS BIOS Updater: Updates and backups the BIOS in the support DVD that allows...
... you to: • Update the BIOS directly from the Internet • Download the latest BIOS file from the Internet • Update the BIOS from the motherboard support DVD, launch ASUS Update by clicking Update > ASUS Update on system stability, compatibility, or performance. Chapter 3 ASUS P9X79 PRO 3-45 ASUS BIOS Updater: Updates and backups the BIOS in the support DVD that allows...

User Manual
Page 118
...BIOS version that you want to download. You can decide whether to change the boot logo or No to avoid network traffic. Updating the BIOS through the Internet To update the BIOS through the Internet: 1. Chapter 3 4. Click Yes if you to continue. 5. From the ASUS Update screen, select Update BIOS... from Internet, and then click Next. 2. Click Next. Follow the onscreen instructions to enable the BIOS downgradable function and auto BIOS backup function, check the checkboxs before the two items on...
...BIOS version that you want to download. You can decide whether to change the boot logo or No to avoid network traffic. Updating the BIOS through the Internet To update the BIOS through the Internet: 1. Chapter 3 4. Click Yes if you to continue. 5. From the ASUS Update screen, select Update BIOS... from Internet, and then click Next. 2. Click Next. Follow the onscreen instructions to enable the BIOS downgradable function and auto BIOS backup function, check the checkboxs before the two items on...

User Manual
Page 141
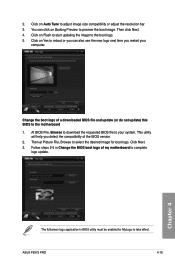
... BIOS version on your system. • Download BIOS from Internet Download the latest BIOS utility from the ASUS service website (www.asus.com) and save for later use. • Update BIOS from file Use the BIOS utility demanded from the motherboard support DVD, launch ASUS Update by following the directions on this convenient updating feature. ASUS P9X79 PRO 4-17 Chapter 4 4.3.11 ASUS Update ASUS...
... BIOS version on your system. • Download BIOS from Internet Download the latest BIOS utility from the ASUS service website (www.asus.com) and save for later use. • Update BIOS from file Use the BIOS utility demanded from the motherboard support DVD, launch ASUS Update by following the directions on this convenient updating feature. ASUS P9X79 PRO 4-17 Chapter 4 4.3.11 ASUS Update ASUS...
User Manual
Page 143
... boot image. Follow steps 2-5 in BIOS utility must be enabled for boot logo. Click on Booting Preview to your computer. Then at Picture File, Browse to select the desired image for MyLogo to the boot logo. 5. 2. Click Next. 3. ASUS P9X79 PRO 4-19 This utility will help you ...restart your system. You can also see the new logo next time you detect the compatibility of the BIOS version. 2. Then click Next. 4. Click on Auto Tune to reboot or ...
... boot image. Follow steps 2-5 in BIOS utility must be enabled for boot logo. Click on Booting Preview to your computer. Then at Picture File, Browse to select the desired image for MyLogo to the boot logo. 5. 2. Click Next. 3. ASUS P9X79 PRO 4-19 This utility will help you ...restart your system. You can also see the new logo next time you detect the compatibility of the BIOS version. 2. Then click Next. 4. Click on Auto Tune to reboot or ...
User Manual
Page 150
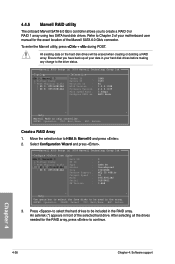
... └ Free Physical Disks ├ PD 0: ST3160812AS └ PD 8: ST3160812AS Information Vendor ID : Device ID : Revision ID : BIOS Version : Firmware Version: PCIe Speed Rate : Configure SATA as: 1B4B 9130 B1 1.0.0.1028 2.2.0.1105 5.0Gbps AHCI Mode ▶ ▶ Help Marvell RAID on...9492; PD 8: ST3160812AS Port ID : PD ID : Type : Status : Size : Feature Support : Current Speed : Model : Serial : FW Version : 0 0 SATA PD Unconfigured 152626MB MCQ 3G 48Bits 3G ST3160812AS 9LS0F4HL 3.AAE ▶ ▶ Help Use space bar to select the free disks ...
... └ Free Physical Disks ├ PD 0: ST3160812AS └ PD 8: ST3160812AS Information Vendor ID : Device ID : Revision ID : BIOS Version : Firmware Version: PCIe Speed Rate : Configure SATA as: 1B4B 9130 B1 1.0.0.1028 2.2.0.1105 5.0Gbps AHCI Mode ▶ ▶ Help Marvell RAID on...9492; PD 8: ST3160812AS Port ID : PD ID : Type : Status : Size : Feature Support : Current Speed : Model : Serial : FW Version : 0 0 SATA PD Unconfigured 152626MB MCQ 3G 48Bits 3G ST3160812AS 9LS0F4HL 3.AAE ▶ ▶ Help Use space bar to select the free disks ...
User Manual
Page 152
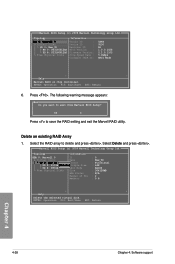
...│ ├ PD 0: ST3160812AS │ └ PD 8: ST3160812AS └ Free Physical Disks Information Vendor ID : Device ID : Revision ID : BIOS Version : Firmware Version: PCIe Speed Rate : Configure SATA as: 1B4B 9130 B1 1.0.0.1028 2.2.0.1105 5.0Gbps AHCI Mode ▶ ▶ Help Marvell RAID on chip controller. ENTER...to delete and press . Delete an existing RAID Array 1. Select the RAID array to exit from Marvell BIOS Setup? Marvell BIOS Setup (c) 2009 Marvell Technology Group Ltd. Yes No Press to save the RAID setting and exit the Marvell RAID...
...│ ├ PD 0: ST3160812AS │ └ PD 8: ST3160812AS └ Free Physical Disks Information Vendor ID : Device ID : Revision ID : BIOS Version : Firmware Version: PCIe Speed Rate : Configure SATA as: 1B4B 9130 B1 1.0.0.1028 2.2.0.1105 5.0Gbps AHCI Mode ▶ ▶ Help Marvell RAID on chip controller. ENTER...to delete and press . Delete an existing RAID Array 1. Select the RAID array to exit from Marvell BIOS Setup? Marvell BIOS Setup (c) 2009 Marvell Technology Group Ltd. Yes No Press to save the RAID setting and exit the Marvell RAID...


