
User Manual
Page 5
Contents 4.3.6 ASUS FAN Xpert 4-11 4.3.7 ASUS Probe II 4-12 4.3.8 Audio configurations 4-13 4.4 RAID configurations 4-14 4.4.1 RAID definitions 4-14 4.4.2 Installing Serial ATA hard disks 4-15 4.4.3 ...Before you begin 5-1 5.1.3 Installing two CrossFireX™ graphics cards 5-2 5.1.4 Installing the device drivers 5-3 5.1.5 Enabling the ATI® CrossFireX™ technology 5-3 5.2 NVIDIA® SLI™ technology 5-4 5.2.1 Requirements 5-4 5.2.2 Installing two SLI-ready graphics cards 5-4 5.2.3 Installing the device drivers 5-5 5.2.4 Enabling the NVIDIA®...
Contents 4.3.6 ASUS FAN Xpert 4-11 4.3.7 ASUS Probe II 4-12 4.3.8 Audio configurations 4-13 4.4 RAID configurations 4-14 4.4.1 RAID definitions 4-14 4.4.2 Installing Serial ATA hard disks 4-15 4.4.3 ...Before you begin 5-1 5.1.3 Installing two CrossFireX™ graphics cards 5-2 5.1.4 Installing the device drivers 5-3 5.1.5 Enabling the ATI® CrossFireX™ technology 5-3 5.2 NVIDIA® SLI™ technology 5-4 5.2.1 Requirements 5-4 5.2.2 Installing two SLI-ready graphics cards 5-4 5.2.3 Installing the device drivers 5-5 5.2.4 Enabling the NVIDIA®...
User Manual
Page 8
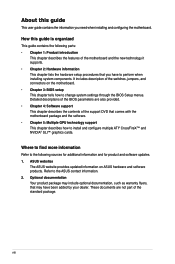
...to the following parts: • Chapter 1: Product introduction This chapter describes the features of the switches, jumpers, and connectors on ASUS hardware and software products. viii About this guide is organized This guide contains the following sources for additional information and for product ...the hardware setup procedures that may have to install and configure multiple ATI® CrossFireX™ and NVIDIA® SLI™ graphics cards. ASUS websites The ASUS website provides updated information on the motherboard. • Chapter 3: BIOS setup This chapter tells how to the...
...to the following parts: • Chapter 1: Product introduction This chapter describes the features of the switches, jumpers, and connectors on ASUS hardware and software products. viii About this guide is organized This guide contains the following sources for additional information and for product ...the hardware setup procedures that may have to install and configure multiple ATI® CrossFireX™ and NVIDIA® SLI™ graphics cards. ASUS websites The ASUS website provides updated information on the motherboard. • Chapter 3: BIOS setup This chapter tells how to the...
User Manual
Page 13
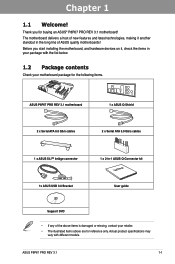
..., and hardware devices on it another standout in your package with different models. Before you for the following items. Chapter 1 ASUS P8P67 PRO REV 3.1 motherboard 1 x ASUS Q-Shield 2 x Serial ATA 6.0 Gb/s cables 2 x Serial ATA 3.0 Gb/s cables 1 x ASUS SLI™ bridge connector 1x ASUS USB 3.0 Bracket 1 x 2-in-1 ASUS Q-Connector kit User Manual User guide Support DVD • If any of...
..., and hardware devices on it another standout in your package with different models. Before you for the following items. Chapter 1 ASUS P8P67 PRO REV 3.1 motherboard 1 x ASUS Q-Shield 2 x Serial ATA 6.0 Gb/s cables 2 x Serial ATA 3.0 Gb/s cables 1 x ASUS SLI™ bridge connector 1x ASUS USB 3.0 Bracket 1 x 2-in-1 ASUS Q-Connector kit User Manual User guide Support DVD • If any of...
User Manual
Page 14
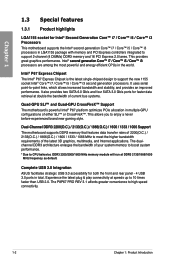
...and Internet applications. Experience the latest plug & play connectivity at double the bandwidth of current bus systems. Quad-GPU SLI™ and Quad-GPU CrossFireX™ Support The motherboard's powerful Intel® P67 platform optimizes PCIe allocation in ...ASUS facilitates strategic USB 3.0 accessibility for both the front and rear panel - 4 USB 3.0 ports in the world. Dual-Channel DDR3 2200(O.C.) / 2133(O.C.) / 1866(O.C.) / 1600 / 1333 / 1066 Support The motherboard supports DDR3 memory that features data transfer rates of either SLI™ or CrossFireX™. The P8P67 PRO...
...and Internet applications. Experience the latest plug & play connectivity at double the bandwidth of current bus systems. Quad-GPU SLI™ and Quad-GPU CrossFireX™ Support The motherboard's powerful Intel® P67 platform optimizes PCIe allocation in ...ASUS facilitates strategic USB 3.0 accessibility for both the front and rear panel - 4 USB 3.0 ports in the world. Dual-Channel DDR3 2200(O.C.) / 2133(O.C.) / 1866(O.C.) / 1600 / 1333 / 1066 Support The motherboard supports DDR3 memory that features data transfer rates of either SLI™ or CrossFireX™. The P8P67 PRO...
User Manual
Page 33
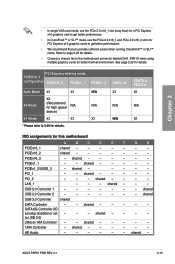
...• In CrossFireX™ or SLI™ mode, use the PCIe ...SLI™ mode. PCIEx16_3 - shared - - - - - PCI_2 - - - LAN_1 - - - shared - - - - PCI Express sharing mode PCIEX16_3 configuration PCIEX16_3 PCIEX1_1 PCIEX1_2 USB3_34 Auto Mode X1 X1 N/A X1 X4 X4 Mode (Recommend for high speed N/A N/A N/A device) X1 Mode X1 X1 X1 N/A * Please refer to USB 3.0) JMicron ATA Controller - - PCIEx1_1 - - PCI_1 - - shared - - - - USB 2.0 Controller 1 - - - - - - - shared - - - - - - shared - - - - - - ASUS P8P67 PRO...
...• In CrossFireX™ or SLI™ mode, use the PCIe ...SLI™ mode. PCIEx16_3 - shared - - - - - PCI_2 - - - LAN_1 - - - shared - - - - PCI Express sharing mode PCIEX16_3 configuration PCIEX16_3 PCIEX1_1 PCIEX1_2 USB3_34 Auto Mode X1 X1 N/A X1 X4 X4 Mode (Recommend for high speed N/A N/A N/A device) X1 Mode X1 X1 X1 N/A * Please refer to USB 3.0) JMicron ATA Controller - - PCIEx1_1 - - PCI_1 - - shared - - - - USB 2.0 Controller 1 - - - - - - - shared - - - - - - shared - - - - - - ASUS P8P67 PRO...
User Manual
Page 130
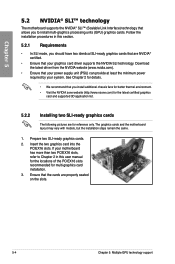
...units (GPU) graphics cards. Ensure that your system. Follow the installation procedures in this section. 5.2.1 Requirements • In SLI mode, you should have two identical SLI-ready graphics cards that are NVIDIA® certified. • Ensure that the cards are for details. • We ... your power supply unit (PSU) can provide at least the minimum power required by your graphics card driver supports the NVIDIA SLI technology. Prepare two SLI-ready graphics cards. 2. The graphics cards and the motherboard layout may vary with models, but the installation steps remain the ...
...units (GPU) graphics cards. Ensure that your system. Follow the installation procedures in this section. 5.2.1 Requirements • In SLI mode, you should have two identical SLI-ready graphics cards that are NVIDIA® certified. • Ensure that the cards are for details. • We ... your power supply unit (PSU) can provide at least the minimum power required by your graphics card driver supports the NVIDIA SLI technology. Prepare two SLI-ready graphics cards. 2. The graphics cards and the motherboard layout may vary with models, but the installation steps remain the ...
User Manual
Page 131
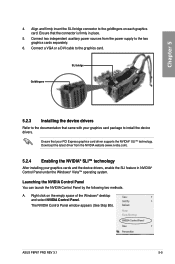
...independent auxiliary power sources from the NVIDIA website (www.nvidia.com). 5.2.4 Enabling the NVIDIA® SLI™ technology After installing your graphics cards and the device drivers, enable the SLI feature in place. 5. Right click on each graphics card. Launching the NVIDIA Control Panel You...on the empty space of the Windows® desktop and select NVIDIA Control Panel. The NVIDIA Control Panel window appears (See Step B5). ASUS P8P67 PRO REV 3.1 5-5 Connect a VGA or a DVI cable to the documentation that the connector is firmly in NVIDIA® Control Panel under ...
...independent auxiliary power sources from the NVIDIA website (www.nvidia.com). 5.2.4 Enabling the NVIDIA® SLI™ technology After installing your graphics cards and the device drivers, enable the SLI feature in place. 5. Right click on each graphics card. Launching the NVIDIA Control Panel You...on the empty space of the Windows® desktop and select NVIDIA Control Panel. The NVIDIA Control Panel window appears (See Step B5). ASUS P8P67 PRO REV 3.1 5-5 Connect a VGA or a DVI cable to the documentation that the connector is firmly in NVIDIA® Control Panel under ...
User Manual
Page 133
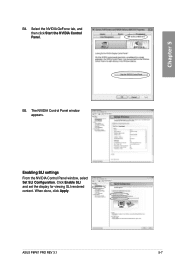
Enabling SLI settings From the NVIDIA Control Panel window, select Set SLI Configuration. The NVIDIA Control Panel window appears. When done, click Apply. Chapter 5 B5. ASUS P8P67 PRO REV 3.1 5-7 Select the NVIDIA GeForce tab, and then click Start the NVIDIA Control Panel. Click Enable SLI and set the display for viewing SLI rendered content. B4.
Enabling SLI settings From the NVIDIA Control Panel window, select Set SLI Configuration. The NVIDIA Control Panel window appears. When done, click Apply. Chapter 5 B5. ASUS P8P67 PRO REV 3.1 5-7 Select the NVIDIA GeForce tab, and then click Start the NVIDIA Control Panel. Click Enable SLI and set the display for viewing SLI rendered content. B4.


