User Manual
Page 6
... Canadian Department of the crossed out wheeled bin indicates that the battery should not be placed in our products at ASUS REACH website at http://csr.asus.com/english/REACH.htm. If this equipment does cause harmful interference to operate this unit not expressly approved by one... disposal of parts and recycling. REACH Complying with the limits for help. These limits are designed to this equipment. This equipment has been tested and found to Part 15 of Chemicals) regulatory framework, we published the chemical substances in municipal waste. DO NOT throw the motherboard in...
... Canadian Department of the crossed out wheeled bin indicates that the battery should not be placed in our products at ASUS REACH website at http://csr.asus.com/english/REACH.htm. If this equipment does cause harmful interference to operate this unit not expressly approved by one... disposal of parts and recycling. REACH Complying with the limits for help. These limits are designed to this equipment. This equipment has been tested and found to Part 15 of Chemicals) regulatory framework, we published the chemical substances in municipal waste. DO NOT throw the motherboard in...
User Manual
Page 34
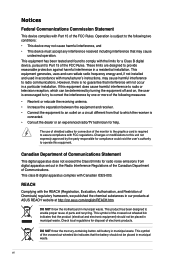
...reinstall the DIMM before using the MemOK! switch Installing DIMMs that you download and update to the latest BIOS version from the ASUS website at www.asus.com. • If you turn off the computer and unplug the power cord for about 30 seconds for successful boot....(Qualified Vendors Lists) in this user manual or on a bare or opencase system. switch to begin automatic memory compatibility tuning for the system to test one set of failsafe settings. Chapter 2 • Refer to section 2.8 Onboard LEDs for overclockers and gamers who continually change settings to enhance system...
...reinstall the DIMM before using the MemOK! switch Installing DIMMs that you download and update to the latest BIOS version from the ASUS website at www.asus.com. • If you turn off the computer and unplug the power cord for about 30 seconds for successful boot....(Qualified Vendors Lists) in this user manual or on a bare or opencase system. switch to begin automatic memory compatibility tuning for the system to test one set of failsafe settings. Chapter 2 • Refer to section 2.8 Onboard LEDs for overclockers and gamers who continually change settings to enhance system...
User Manual
Page 37
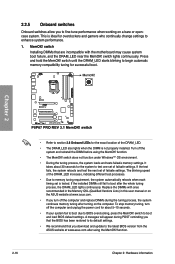
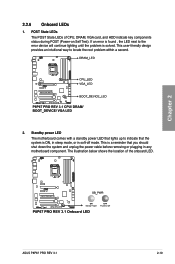
The illustration below shows the location of CPU, DRAM, VGA card, and HDD indicate key components status during POST (Power-on Self Test). This is solved. 2.2.6 Onboard LEDs 1. Chapter 2 ASUS P8P67 PRO REV 3.1 2-19 This user-friendly design provides an intuitional way to indicate that you should shut down the system and unplug the power...
The illustration below shows the location of CPU, DRAM, VGA card, and HDD indicate key components status during POST (Power-on Self Test). This is solved. 2.2.6 Onboard LEDs 1. Chapter 2 ASUS P8P67 PRO REV 3.1 2-19 This user-friendly design provides an intuitional way to indicate that you should shut down the system and unplug the power...
User Manual
Page 65
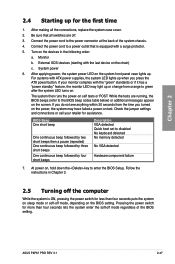
... switch for the first time 1. After applying power, the system power LED on the BIOS setting. At power on the screen. ASUS P8P67 PRO REV 3.1 2-47 Chapter 2 2.4 Starting up . While the tests are off mode regardless of the system chassis. 4. Check the jumper settings and connections or call your monitor complies with the last...
... switch for the first time 1. After applying power, the system power LED on the BIOS setting. At power on the screen. ASUS P8P67 PRO REV 3.1 2-47 Chapter 2 2.4 Starting up . While the tests are off mode regardless of the system chassis. 4. Check the jumper settings and connections or call your monitor complies with the last...
User Manual
Page 67
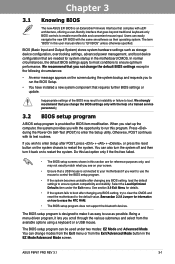
...term "BIOS" in the following circumstances: • An error message appears on the screen during the Power-On Self-Test (POST) to ensure system compatibility and stability. The BIOS setup program is connected to your screen. • Ensure...test routines. We strongly recommend that requires further BIOS settings or update. Chapter 3 Chapter 3: 3.1 Knowing BIOS BIOS setup The new ASUS EFI BIOS is provided for BIOS item modification. If you scroll through the various submenus and select from the Exit/Advanced Mode button in the motherboard CMOS. Chapter 3 ASUS P8P67 PRO...
...term "BIOS" in the following circumstances: • An error message appears on the screen during the Power-On Self-Test (POST) to ensure system compatibility and stability. The BIOS setup program is connected to your screen. • Ensure...test routines. We strongly recommend that requires further BIOS settings or update. Chapter 3 Chapter 3: 3.1 Knowing BIOS BIOS setup The new ASUS EFI BIOS is provided for BIOS item modification. If you scroll through the various submenus and select from the Exit/Advanced Mode button in the motherboard CMOS. Chapter 3 ASUS P8P67 PRO...
User Manual
Page 97
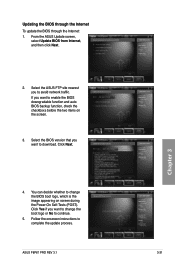
... the BIOS downgradable function and auto BIOS backup function, check the checkboxs before the two items on screen during the Power‑On Self-Tests (POST). Chapter 3 4. ASUS P8P67 PRO REV 3.1 3-31 Click Yes if you to complete the update process. Follow the onscreen instructions to avoid network traffic. Select the BIOS version that...
... the BIOS downgradable function and auto BIOS backup function, check the checkboxs before the two items on screen during the Power‑On Self-Tests (POST). Chapter 3 4. ASUS P8P67 PRO REV 3.1 3-31 Click Yes if you to complete the update process. Follow the onscreen instructions to avoid network traffic. Select the BIOS version that...
User Manual
Page 113
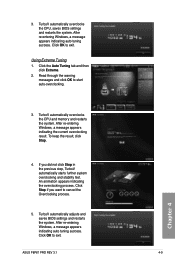
... if you did not click Stop in the previous step, TurboV automatically starts further system overclocking and stability test. Click OK to exit. TurboV automatically overclocks the CPU and memory and restarts the system. ASUS P8P67 PRO REV 3.1 4-9 Chapter 4 After re-entering Windows, a message appears indicating the current overclocking result. An animation appears indicating...
... if you did not click Stop in the previous step, TurboV automatically starts further system overclocking and stability test. Click OK to exit. TurboV automatically overclocks the CPU and memory and restarts the system. ASUS P8P67 PRO REV 3.1 4-9 Chapter 4 After re-entering Windows, a message appears indicating the current overclocking result. An animation appears indicating...

