User Manual
Page 26
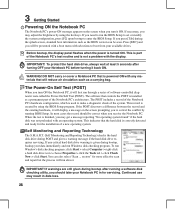
...bootup, backup your available drives. IMPORTANT! The POST includes a record of the Notebook PC's hardware configuration, which is given during the splash screen, standard boot information such as the BIOS version can also select "Scan ... In most cases the record should take your Notebook PC before turning... 5 seconds after running BIOS Setup. This record is correctly detected and ready for servicing. This indicates that will display a message on the screen when you turn ON the Notebook PC, it ON. IMPORTANT! This is powered ON with the display. DO NOT carry or cover a ...
...bootup, backup your available drives. IMPORTANT! The POST includes a record of the Notebook PC's hardware configuration, which is given during the splash screen, standard boot information such as the BIOS version can also select "Scan ... In most cases the record should take your Notebook PC before turning... 5 seconds after running BIOS Setup. This record is correctly detected and ready for servicing. This indicates that will display a message on the screen when you turn ON the Notebook PC, it ON. IMPORTANT! This is powered ON with the display. DO NOT carry or cover a ...
User Manual
Page 27
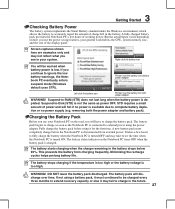
... long when the battery power is connected to charge as soon as power OFF. The battery pack begins to external power using the power adapter. Screen captures shown here are examples only and may not reflect what you will discharge over time. Pointer over the battery icon with power adapter. Suspend...
... long when the battery power is connected to charge as soon as power OFF. The battery pack begins to external power using the power adapter. Screen captures shown here are examples only and may not reflect what you will discharge over time. Pointer over the battery icon with power adapter. Suspend...
User Manual
Page 30
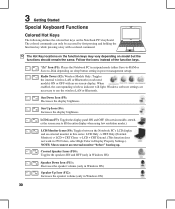
...key while pressing a key with an on sleep button setting in suspend mode (either Save-to-RAM or Save-to-Disk depending on -screen-display. 3 Getting Started Special Keyboard Functions Colored Hot Keys The following defines the colored hot keys on model but the functions should remain ...the same. stretches the screen area to use the wireless LAN or Bluetooth. The Hot Key locations on the function keys may vary depending on the Notebook PC's keyboard...
...key while pressing a key with an on sleep button setting in suspend mode (either Save-to-RAM or Save-to-Disk depending on -screen-display. 3 Getting Started Special Keyboard Functions Colored Hot Keys The following defines the colored hot keys on model but the functions should remain ...the same. stretches the screen area to use the wireless LAN or Bluetooth. The Hot Key locations on the function keys may vary depending on the Notebook PC's keyboard...
User Manual
Page 31
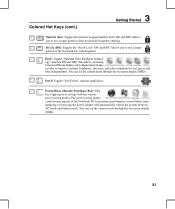
... application. Allows you to use a larger portion of the keyboard for number entering. You can see the current mode through the on -screen display (OSD). Allows you to use a larger portion of the keyboard for cell navigation. Fn+C: Toggles "Splendid Video Intelligent Technology" function...+Space Bar): This key toggles power savings between AC mode and battery mode. You can see the current mode through the on -screen display (OSD). 31 Applying or removing the power adapter will automatically switch the system between various power saving modes. Colored Hot Keys...
... application. Allows you to use a larger portion of the keyboard for number entering. You can see the current mode through the on -screen display (OSD). Allows you to use a larger portion of the keyboard for cell navigation. Fn+C: Toggles "Splendid Video Intelligent Technology" function...+Space Bar): This key toggles power savings between AC mode and battery mode. You can see the current mode through the on -screen display (OSD). 31 Applying or removing the power adapter will automatically switch the system between various power saving modes. Colored Hot Keys...

User Manual
Page 38
... Slide finger left Slide finger right Slide finger backward Scrolling (on the right side to move the pointer around or select items displayed on the screen with the use of a standard desktop mouse. The touchpad is electrostatic sensitive, objects cannot be avoided. Because the touchpad is pressure sensitive and contains no...
... Slide finger left Slide finger right Slide finger backward Scrolling (on the right side to move the pointer around or select items displayed on the screen with the use of a standard desktop mouse. The touchpad is electrostatic sensitive, objects cannot be avoided. Because the touchpad is pressure sensitive and contains no...

User Manual
Page 39
With the pointer over the item you select, and while keeping the left button and slide finger on the screen you select. Clicking Tapping Press the left button twice and release. Lightly but rapidly strike the touchpad twice. You can simply double-tap on the ...
With the pointer over the item you select, and while keeping the left button and slide finger on the screen you select. Clicking Tapping Press the left button twice and release. Lightly but rapidly strike the touchpad twice. You can simply double-tap on the ...

User Manual
Page 60
Select Add a Bluetooth Device on the bottom of the mouse. Or Launch Bluetooth Devices from this screen. The bottom sensor should glow red. • Push the "RESET" button on the taskbar menu. 3b. Or double click the Wireless Console icon on the ...
Select Add a Bluetooth Device on the bottom of the mouse. Or Launch Bluetooth Devices from this screen. The bottom sensor should glow red. • Push the "RESET" button on the taskbar menu. 3b. Or double click the Wireless Console icon on the ...

User Manual
Page 63
On the Security screen, select Change Supervisor or Change User Password. Type in a password and press [Enter]. 3. Password is then set. 2. To clear the password: 2. Leave the password field blank and press [Enter]. 4. A-7 Security Setting 1. Password is then cleared. Select each item and press [Enter] to select a device. Re-type the password and press [Enter]. 1. System BIOS Settings Boot Device A Appendix 1. On the Boot screen, select Boot Device Priority. 2.
On the Security screen, select Change Supervisor or Change User Password. Type in a password and press [Enter]. 3. Password is then set. 2. To clear the password: 2. Leave the password field blank and press [Enter]. 4. A-7 Security Setting 1. Password is then cleared. Select each item and press [Enter] to select a device. Re-type the password and press [Enter]. 1. System BIOS Settings Boot Device A Appendix 1. On the Boot screen, select Boot Device Priority. 2.
User Manual
Page 67
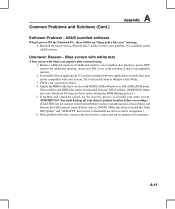
...to protect yourself from viruses.) (NOTE: Make sure that you have installed software applications recently, they may not be downloaded from the ASUS website. (WARNING: Make sure your local service center and ask an engineer for viruses. 4. If you have installed an anti-virus...BIOS files can be an "Open policy file error" message. Common Problems and Solutions (Cont.) A Appendix Software Problem - Blue screen with white text A blue screen with white text appears after purchase, power OFF, remove the additional memory, and power ON to reinstall your entire system. (...
...to protect yourself from viruses.) (NOTE: Make sure that you have installed software applications recently, they may not be downloaded from the ASUS website. (WARNING: Make sure your local service center and ask an engineer for viruses. 4. If you have installed an anti-virus...BIOS files can be an "Open policy file error" message. Common Problems and Solutions (Cont.) A Appendix Software Problem - Blue screen with white text A blue screen with white text appears after purchase, power OFF, remove the additional memory, and power ON to reinstall your entire system. (...
User Manual
Page 71
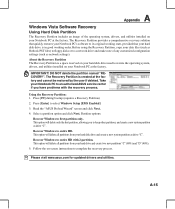
... your hard disk drive used to complete the recovery process. Press [F9] during bootup (requires a Recovery Partition) 2. Follow the on-screen instructions to restore the operating system, drivers, and utilities installed on your Notebook PC at the factory. DO NOT delete the partition named ...is in good working order. Take your Notebook PC to entire HD. A-15 IMPORTANT! Read the "ASUS Preload Wizard" screen and click Next. 4. Recover Windows to an authorized ASUS service center if you to entire HD with the recovery process. A Appendix Windows Vista Software Recovery Using...
... your hard disk drive used to complete the recovery process. Press [F9] during bootup (requires a Recovery Partition) 2. Follow the on-screen instructions to restore the operating system, drivers, and utilities installed on your Notebook PC at the factory. DO NOT delete the partition named ...is in good working order. Take your Notebook PC to entire HD. A-15 IMPORTANT! Read the "ASUS Preload Wizard" screen and click Next. 4. Recover Windows to an authorized ASUS service center if you to entire HD with the recovery process. A Appendix Windows Vista Software Recovery Using...
User Manual
Page 72
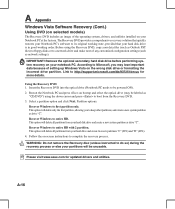
... make note of any customized configuration settings (such as drive "C". Using the Recovery DVD: 1. Restart the Notebook PC and press on -screen instructions to keep other partitions, and create a new system partition as network settings). Partition options: Recover Windows to boot from the Recovery DVD... using the Recovery DVD, copy your hard drive and create two new partitions "C" (60%) and "D" (40%). 4. Please visit www.asus.com for more details. This option will delete all partitions from your data files (such as drive "C". Remove the optional secondary hard disk ...
... make note of any customized configuration settings (such as drive "C". Using the Recovery DVD: 1. Restart the Notebook PC and press on -screen instructions to keep other partitions, and create a new system partition as network settings). Partition options: Recover Windows to boot from the Recovery DVD... using the Recovery DVD, copy your hard drive and create two new partitions "C" (60%) and "D" (40%). 4. Please visit www.asus.com for more details. This option will delete all partitions from your data files (such as drive "C". Remove the optional secondary hard disk ...


