
K8V-X user's manual
Page 5
Contents 2.6.1 Boot Device Priority 2-30 2.6.2 Hard Disk Drives 2-30 2.6 Boot menu 2-30 2.6.3 Boot Settings Configuration 2-31 2.6.4 Security 2-32 2.7 Exit menu 2-34 Chapter 3: Software support 3.1 Install an operating system 3-2 3.2 Support CD information 3-2 3.2.1 Running the support CD 3-2 3.2.2 Drivers menu 3-3 3.2.3 Utilities menu 3-4 3.2.4 Manual menu 3-5 3.2.5 ASUS Contact Information 3-5 3.3 ASUS Instant Music Lite 3-6 3.4 VIA RAID configurations 3-8 3.4.1 Installing hard disks 3-8 3.4.2 VIA RAID configurations 3-9 3.5 Creating a RAID driver disk 3-10 3.6 Cool 'n' ...
Contents 2.6.1 Boot Device Priority 2-30 2.6.2 Hard Disk Drives 2-30 2.6 Boot menu 2-30 2.6.3 Boot Settings Configuration 2-31 2.6.4 Security 2-32 2.7 Exit menu 2-34 Chapter 3: Software support 3.1 Install an operating system 3-2 3.2 Support CD information 3-2 3.2.1 Running the support CD 3-2 3.2.2 Drivers menu 3-3 3.2.3 Utilities menu 3-4 3.2.4 Manual menu 3-5 3.2.5 ASUS Contact Information 3-5 3.3 ASUS Instant Music Lite 3-6 3.4 VIA RAID configurations 3-8 3.4.1 Installing hard disks 3-8 3.4.2 VIA RAID configurations 3-9 3.5 Creating a RAID driver disk 3-10 3.6 Cool 'n' ...

K8V-X user's manual
Page 13
... replacement of the industry's first x86-64 technology. The Serial ATA specification allows for RAID 0 and RAID 1 functions. AGP 8X support AGP 8X (AGP 3.0) is the VGA interface specification that dynamically and automatically changes the CPU speed, voltage and amount of power depending on AMD's 64-bit architecture, which represents the landmark introduction of the Parallel ATA storage interface. Serial ATA RAID solution The motherboard provides a high-performance Serial ATA RAID controller that enhance hard disk...
... replacement of the industry's first x86-64 technology. The Serial ATA specification allows for RAID 0 and RAID 1 functions. AGP 8X support AGP 8X (AGP 3.0) is the VGA interface specification that dynamically and automatically changes the CPU speed, voltage and amount of power depending on AMD's 64-bit architecture, which represents the landmark introduction of the Parallel ATA storage interface. Serial ATA RAID solution The motherboard provides a high-performance Serial ATA RAID controller that enhance hard disk...
K8V-X user's manual
Page 14
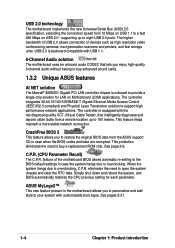
... motherboard allows you to support high performance network applications. Simply shut down and reboot the system, and BIOS automatically restores the CPU previous setting for LAN on USB 2.0 - ASUS MyLogo2™ This new feature present in case when the BIOS codes and data are corrupted. USB 2.0 is onboard to buy advanced sound cards. 1.3.2 Unique ASUS features AI NET solution The Marvell® 88E8001 Gigabit PCI LAN controller chipset is backward compatible with customizable boot...
... motherboard allows you to support high performance network applications. Simply shut down and reboot the system, and BIOS automatically restores the CPU previous setting for LAN on USB 2.0 - ASUS MyLogo2™ This new feature present in case when the BIOS codes and data are corrupted. USB 2.0 is onboard to buy advanced sound cards. 1.3.2 Unique ASUS features AI NET solution The Marvell® 88E8001 Gigabit PCI LAN controller chipset is backward compatible with customizable boot...
K8V-X user's manual
Page 27
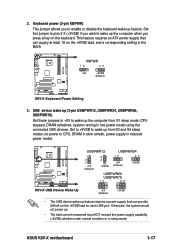
... each USB port. Set to +5VSB to CPU, DRAM in slow refresh, power supply in low power mode) using the connected USB devices. ASUS K8V-X motherboard 1-17 Set this jumper to pins 2-3 (+5VSB) if you wish to enable or disable the keyboard wake-up feature. 2. KBPWR 12 23 +5V +5VSB (Default) K8V-X ® K8V-X Keyboard Power Setting 3. USB device wake-up (3-pin USBPWR12, USBPWR34, USBPWR56, USBPWR78) Set these jumpers to +5V to wake up the computer from S3 and S4 sleep modes (no power to wake up feature requires a power supply that...
... each USB port. Set to +5VSB to CPU, DRAM in slow refresh, power supply in low power mode) using the connected USB devices. ASUS K8V-X motherboard 1-17 Set this jumper to pins 2-3 (+5VSB) if you wish to enable or disable the keyboard wake-up feature. 2. KBPWR 12 23 +5V +5VSB (Default) K8V-X ® K8V-X Keyboard Power Setting 3. USB device wake-up (3-pin USBPWR12, USBPWR34, USBPWR56, USBPWR78) Set these jumpers to +5V to wake up the computer from S3 and S4 sleep modes (no power to wake up feature requires a power supply that...
K8V-X user's manual
Page 35
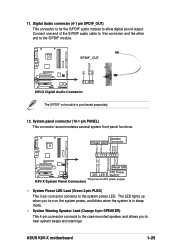
... S/PDIF audio cable to this connector and the other end to the system power LED. The LED lights up when you turn on the system power, and blinks when the system is in sleep mode. • System Warning Speaker Lead (Orange 4-pin SPEAKER) This 4-pin connector connects to the case-mounted speaker and allows you to allow digital sound output. ASUS K8V-X motherboard 1-25 PWR Ground Reset Ground K8V-X Reset SW ATX Power ® IDE_LED Switch* * Requires an ATX power supply. Speaker Power LED Connector PLED...
... S/PDIF audio cable to this connector and the other end to the system power LED. The LED lights up when you turn on the system power, and blinks when the system is in sleep mode. • System Warning Speaker Lead (Orange 4-pin SPEAKER) This 4-pin connector connects to the case-mounted speaker and allows you to allow digital sound output. ASUS K8V-X motherboard 1-25 PWR Ground Reset Ground K8V-X Reset SW ATX Power ® IDE_LED Switch* * Requires an ATX power supply. Speaker Power LED Connector PLED...

K8V-X user's manual
Page 39
... or reset the system while updating the BIOS! Copy the original (or the latest) motherboard BIOS to the bootable floppy disk. 2.1.2 Using AFUDOS to type the exact BIOS file name at the prompt. 2. Click Start, then select Run. Follow succeeding screen instructions. 2. Write the BIOS file name on the screen is your CD-ROM drive. You need to update the BIOS To update the BIOS using the AFUDOS.EXE utility: 1. Save the BIOS file to the bootable floppy disk. 5. ASUS K8V-X motherboard...
... or reset the system while updating the BIOS! Copy the original (or the latest) motherboard BIOS to the bootable floppy disk. 2.1.2 Using AFUDOS to type the exact BIOS file name at the prompt. 2. Click Start, then select Run. Follow succeeding screen instructions. 2. Write the BIOS file name on the screen is your CD-ROM drive. You need to update the BIOS To update the BIOS using the AFUDOS.EXE utility: 1. Save the BIOS file to the bootable floppy disk. 5. ASUS K8V-X motherboard...

K8V-X user's manual
Page 46
... the item. Press Up/Down arrow keys or PageUp/PageDown keys to display the other items (Advanced, Power, Boot, and Exit) on the menu bar have their respective menu items. Main menu items Use [ENTER], [TAB] or [SHIFT-TAB] to display a pop-up window Scroll bar At the top right corner of the menu screen is a brief description of options. Select Screen Select Item +- You can not...
... the item. Press Up/Down arrow keys or PageUp/PageDown keys to display the other items (Advanced, Power, Boot, and Exit) on the menu bar have their respective menu items. Main menu items Use [ENTER], [TAB] or [SHIFT-TAB] to display a pop-up window Scroll bar At the top right corner of the menu screen is a brief description of options. Select Screen Select Item +- You can not...
K8V-X user's manual
Page 48
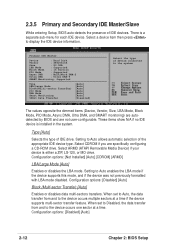
..., and SMART monitoring) are autodetected by BIOS and are specifically configuring a CD-ROM drive. Configuration options: [Disabled] [Auto] Block (Multi-sector Transfer) [Auto] Enables or disables data multi-sectors transfers. These items show N/A if no IDE device is either a ZIP, LS-120, or MO drive. Select ARMD (ATAPI Removable Media Device) if your device is installed in the system. Primary IDE Master Device : Hard Disk Vendor : ST320413A Size : 20.0GB LBA Mode : Supported Block Mode : 16 Sectors PIO Mode : Supported Async...
..., and SMART monitoring) are autodetected by BIOS and are specifically configuring a CD-ROM drive. Configuration options: [Disabled] [Auto] Block (Multi-sector Transfer) [Auto] Enables or disables data multi-sectors transfers. These items show N/A if no IDE device is either a ZIP, LS-120, or MO drive. Select ARMD (ATAPI Removable Media Device) if your device is installed in the system. Primary IDE Master Device : Hard Disk Vendor : ST320413A Size : 20.0GB LBA Mode : Supported Block Mode : 16 Sectors PIO Mode : Supported Async...

K8V-X user's manual
Page 55
The default and configuration options vary depending on the speed of AGP card you to select the type of Primary VGA in case of multiple video controllers. This allows you installed. Configuration options: [PCI] [AGP] Search for MDA Resources [Yes] Sets whether to display the sub-menu. 2.4.2 Chipset The Chipset menu items allow search for MDA resources. AGP Fast Write [Enabled] Enables or disables the AGP Fast Write feature. Configuration options: [32MB] [64MB] [128MB] [256MB] ASUS K8V-X motherboard 2-19...
The default and configuration options vary depending on the speed of AGP card you to select the type of Primary VGA in case of multiple video controllers. This allows you installed. Configuration options: [PCI] [AGP] Search for MDA Resources [Yes] Sets whether to display the sub-menu. 2.4.2 Chipset The Chipset menu items allow search for MDA resources. AGP Fast Write [Enabled] Enables or disables the AGP Fast Write feature. Configuration options: [32MB] [64MB] [128MB] [256MB] ASUS K8V-X motherboard 2-19...

K8V-X user's manual
Page 56
... PCI Delay Transaction [Disabled] Enables or disables the PCI Delay transaction feature. USB Configuration Module Version - 2.23.2-7.4 USB Devices Enabled: None USB 1.1 Ports Configuration USB 2.0 Controller Legacy USB Support USB 2.0 Controller Mode [USB 8 Ports] [Enabled] [Auto] [FullSpeed] Enables USB host controllers. Configuration options: [Disabled] [USB 2 Ports] [USB 4 Ports] [USB 6 Ports] [USB 8 Ports] USB 2.0 Controller [Enabled] Allows you to display the configuration options. Select an item then press to change the USB-related features. The Module Version and USB Devices...
... PCI Delay Transaction [Disabled] Enables or disables the PCI Delay transaction feature. USB Configuration Module Version - 2.23.2-7.4 USB Devices Enabled: None USB 1.1 Ports Configuration USB 2.0 Controller Legacy USB Support USB 2.0 Controller Mode [USB 8 Ports] [Enabled] [Auto] [FullSpeed] Enables USB host controllers. Configuration options: [Disabled] [USB 2 Ports] [USB 4 Ports] [USB 6 Ports] [USB 8 Ports] USB 2.0 Controller [Enabled] Allows you to display the configuration options. Select an item then press to change the USB-related features. The Module Version and USB Devices...
K8V-X user's manual
Page 57
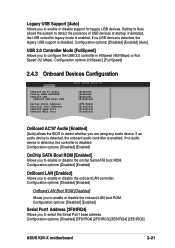
.../IRQ4] [2E8/IRQ3] ASUS K8V-X motherboard 2-21 Legacy USB Support [Auto] Allows you to select the Serial Port1 base address. if no USB device is detected, the legacy USB support is disabled. Configuration options: [HiSpeed ] [Full Speed] 2.4.3 Onboard Devices Configuration Onboard AC'97 Audio OnChip SATA BOOTROM OnBoard LAN OnBoard LAN Boot ROM Serial Port1 Address Parallel Port Address OnBoard Game Port OnBoard MIDI Port [Enabled] [Enabled] [Enabled] [Disabled] [3F8/IRQ4] [Disabled] [Disabled] [Disabled] OnBoard AC'97 Audio [Enabled] [Auto] allows the BIOS to detect whether you...
.../IRQ4] [2E8/IRQ3] ASUS K8V-X motherboard 2-21 Legacy USB Support [Auto] Allows you to select the Serial Port1 base address. if no USB device is detected, the legacy USB support is disabled. Configuration options: [HiSpeed ] [Full Speed] 2.4.3 Onboard Devices Configuration Onboard AC'97 Audio OnChip SATA BOOTROM OnBoard LAN OnBoard LAN Boot ROM Serial Port1 Address Parallel Port Address OnBoard Game Port OnBoard MIDI Port [Enabled] [Enabled] [Enabled] [Disabled] [3F8/IRQ4] [Disabled] [Disabled] [Disabled] OnBoard AC'97 Audio [Enabled] [Auto] allows the BIOS to detect whether you...

K8V-X user's manual
Page 62
...) Auto] 2.5.2 Repost Video on S3 Resume [No] Determines whether to invoke VGA BIOS POST on S3 Resume ACPI 2.0 Support ACPI APIC Support APM Configuration Hardware Monitor [S1 (POS) & S3 (STR] [No] [No] [Enabled] Select the ACPI state used for System Suspend. 2.5.1 Suspend Mode [S1 (POS) & S3 (STR)] Allows you to select the ACPI state to be used for ACPI 2.0 specifications. Configuration options: [Disabled] [Enabled] 2-26 Chapter 2: BIOS Setup Configuration options: [No] [Yes] 2.5.3 ACPI 2.0 Support [No] Allows you to change the settings...
...) Auto] 2.5.2 Repost Video on S3 Resume [No] Determines whether to invoke VGA BIOS POST on S3 Resume ACPI 2.0 Support ACPI APIC Support APM Configuration Hardware Monitor [S1 (POS) & S3 (STR] [No] [No] [Enabled] Select the ACPI state used for System Suspend. 2.5.1 Suspend Mode [S1 (POS) & S3 (STR)] Allows you to select the ACPI state to be used for ACPI 2.0 specifications. Configuration options: [Disabled] [Enabled] 2-26 Chapter 2: BIOS Setup Configuration options: [No] [Yes] 2.5.3 ACPI 2.0 Support [No] Allows you to change the settings...
K8V-X user's manual
Page 68
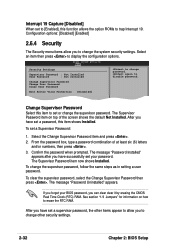
... password box, type a password combination of the screen shows the default Not Installed. To change the supervisor password, follow the same steps as in setting a user password. After you have set a supervisor password, the other security settings. 2-32 Chapter 2: BIOS Setup Change Supervisor Password Select this item to change other items appear to allow you can clear clear it by erasing the CMOS Real Time Clock (RTC) RAM. After you to set or change the supervisor password...
... password box, type a password combination of the screen shows the default Not Installed. To change the supervisor password, follow the same steps as in setting a user password. After you have set a supervisor password, the other security settings. 2-32 Chapter 2: BIOS Setup Change Supervisor Password Select this item to change other items appear to allow you can clear clear it by erasing the CMOS Real Time Clock (RTC) RAM. After you to set or change the supervisor password...
K8V-X user's manual
Page 69
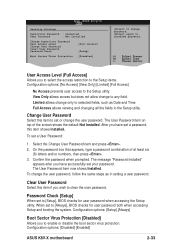
... Setup utility. On the password box that appears, type a password combination of the screen shows the default Not Installed. The message "Password Installed" appears after you to any field. The User Password item on top of at least six (6) letters and/or numbers, then press . 3. Configuration options: [Setup] [Always] Boot Sector Virus Protection [Disabled] Allows you have set your password. Configuration options: [Disabled] [Enabled] ASUS K8V-X motherboard 2-33 View Only allows access but does not allow change to enable...
... Setup utility. On the password box that appears, type a password combination of the screen shows the default Not Installed. The message "Password Installed" appears after you to any field. The User Password item on top of at least six (6) letters and/or numbers, then press . 3. Configuration options: [Setup] [Always] Boot Sector Virus Protection [Disabled] Allows you have set your password. Configuration options: [Disabled] [Enabled] ASUS K8V-X motherboard 2-33 View Only allows access but does not allow change to enable...
K8V-X user's manual
Page 72
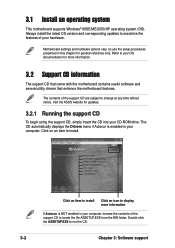
... of the support CD to display more information. 3.2 Support CD information The support CD that came with the motherboard contains useful software and several utility drivers that enhance the motherboard features. Click an item to install Click an icon to locate the file ASSETUP.EXE from the BIN folder. Motherboard settings and hardware options vary, so use the setup procedures presented in your CD-ROM drive. Visit the ASUS website for...
... of the support CD to display more information. 3.2 Support CD information The support CD that came with the motherboard contains useful software and several utility drivers that enhance the motherboard features. Click an item to install Click an icon to locate the file ASSETUP.EXE from the BIN folder. Motherboard settings and hardware options vary, so use the setup procedures presented in your CD-ROM drive. Visit the ASUS website for...

K8V-X user's manual
Page 74
... the motherboard supports. Anti-virus Utility The anti-virus application scans, identifies, and removes computer viruses. ASUS Screen Saver Installs the ASUS screen saver. 3-4 Chapter 3: Software support ASUS PC Probe This smart utility monitors the fan speed, CPU temperature, and system voltages, and alerts you on any detected problems. This utility helps you can connect to download the latest version of the BIOS from the ASUS website. ASUS Update This program allows you to the ASUS website. Microsoft DirectX Driver Installs the...
... the motherboard supports. Anti-virus Utility The anti-virus application scans, identifies, and removes computer viruses. ASUS Screen Saver Installs the ASUS screen saver. 3-4 Chapter 3: Software support ASUS PC Probe This smart utility monitors the fan speed, CPU temperature, and system voltages, and alerts you on any detected problems. This utility helps you can connect to download the latest version of the BIOS from the ASUS website. ASUS Update This program allows you to the ASUS website. Microsoft DirectX Driver Installs the...

K8V-X user's manual
Page 76
... user guide. BIOS automatically detects and displays the installed drive type. 5. A "beep" indicates this case, power up features (LAN, keyboard, mouse, USB) are deactivated. This feature is supported by pressing the key during the Power On Self-Tests (POST). 3. Otherwise, you installed and enabled an add-on sound card. • Instant Music Lite only supports PS/2 keyboard. Select the CD-ROM drive that you don't have only one optical drive (either CD-ROM, DVD-ROM, or CD-RW) installed in audio...
... user guide. BIOS automatically detects and displays the installed drive type. 5. A "beep" indicates this case, power up features (LAN, keyboard, mouse, USB) are deactivated. This feature is supported by pressing the key during the Power On Self-Tests (POST). 3. Otherwise, you installed and enabled an add-on sound card. • Instant Music Lite only supports PS/2 keyboard. Select the CD-ROM drive that you don't have only one optical drive (either CD-ROM, DVD-ROM, or CD-RW) installed in audio...
K8V-X user's manual
Page 78
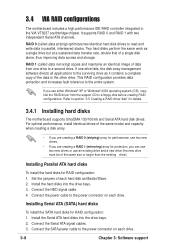
... or Windows® 2000 operating system (OS), copy first the RAID driver from one drive fails, the disk array management software directs all applications to a floppy disk before creating RAID configurations. Set the jumpers of a single disk alone, thus improving data access and storage. Connect the power cable to section "3.5 Creating a RAID driver disk" for protection, you are creating a RAID 1 (mirroring) array for details. 3.4.1 Installing hard disks The motherboard supports UltraDMA 133/100/66 and Serial ATA hard disk drives. RAID 0 (called...
... or Windows® 2000 operating system (OS), copy first the RAID driver from one drive fails, the disk array management software directs all applications to a floppy disk before creating RAID configurations. Set the jumpers of a single disk alone, thus improving data access and storage. Connect the power cable to section "3.5 Creating a RAID driver disk" for protection, you are creating a RAID 1 (mirroring) array for details. 3.4.1 Installing hard disks The motherboard supports UltraDMA 133/100/66 and Serial ATA hard disk drives. RAID 0 (called...
K8V-X user's manual
Page 80
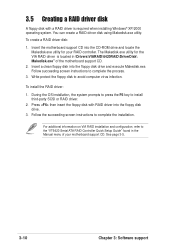
... Makedisk.exe utility for your motherboard support CD. 3.5 Creating a RAID driver disk A floppy disk with RAID driver into the floppy disk drive. 3. Insert the motherboard support CD into the floppy disk drive and execute Makedisk.exe. Follow the succeeding screen instructions to complete the process. 3. To create a RAID driver disk: 1. Follow succeeding screen instructions to complete the installation. For additional information on VIA RAID installation and configuration, refer to the "VT6420 Serial ATA RAID Controller Quick Setup Guide" found in \Drivers\VIARAID\6420RAID...
... Makedisk.exe utility for your motherboard support CD. 3.5 Creating a RAID driver disk A floppy disk with RAID driver into the floppy disk drive. 3. Insert the motherboard support CD into the floppy disk drive and execute Makedisk.exe. Follow the succeeding screen instructions to complete the process. 3. To create a RAID driver disk: 1. Follow succeeding screen instructions to complete the installation. For additional information on VIA RAID installation and configuration, refer to the "VT6420 Serial ATA RAID Controller Quick Setup Guide" found in \Drivers\VIARAID\6420RAID...
K8V-X user's manual
Page 81
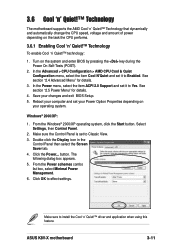
... your operating system. Click OK to install the Cool 'n' Quiet!™ driver and application when using this feature. 3.6 Cool 'n' Quiet!™ Technology The motherboard supports the AMD Cool 'n' Quiet!™ Technology that dynamically and automatically change the CPU speed, voltage and amount of power depending on the system and enter BIOS by pressing the key during the Power On Self-Tests (POST). 2. Reboot your changes and exit BIOS Setup. 5. Select Settings, then Control Panel. 2.
... your operating system. Click OK to install the Cool 'n' Quiet!™ driver and application when using this feature. 3.6 Cool 'n' Quiet!™ Technology The motherboard supports the AMD Cool 'n' Quiet!™ Technology that dynamically and automatically change the CPU speed, voltage and amount of power depending on the system and enter BIOS by pressing the key during the Power On Self-Tests (POST). 2. Reboot your changes and exit BIOS Setup. 5. Select Settings, then Control Panel. 2.


