
K8V-X user's manual
Page 12
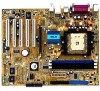
...and the VIA K8T800 chipset to 3GB of system memory with the list below. 1.2 Package contents Check your motherboard package for the following items. ASUS K8V-X motherboard ASUS motherboard support CD 1 x Ultra DMA 133/100/66 cables 2 x Serial ATA cables 1 x IDE cable 1 x Floppy disk cable ...features, the motherboard takes you ahead in the long line of power computing! Supporting up to set a new benchmark for buying the ASUS® K8V-X motherboard! 1.1 Welcome! Before you for an effective desktop platform solution. Thank you start installing the motherboard, and hardware devices on...
...and the VIA K8T800 chipset to 3GB of system memory with the list below. 1.2 Package contents Check your motherboard package for the following items. ASUS K8V-X motherboard ASUS motherboard support CD 1 x Ultra DMA 133/100/66 cables 2 x Serial ATA cables 1 x IDE cable 1 x Floppy disk cable ...features, the motherboard takes you ahead in the long line of power computing! Supporting up to set a new benchmark for buying the ASUS® K8V-X motherboard! 1.1 Welcome! Before you for an effective desktop platform solution. Thank you start installing the motherboard, and hardware devices on...

K8V-X user's manual
Page 13
... link designed to increase the communication speed between integrated circuits in compatibility, performance, investment protection, and reduced total cost of up to powerful speaker systems. ASUS K8V-X motherboard 1-3 1.3 Special features 1.3.1 Product Highlights Latest processor technology The AMD Athlon™ 64 desktop processor is based on the task the CPU performs. Serial ATA...
... link designed to increase the communication speed between integrated circuits in compatibility, performance, investment protection, and reduced total cost of up to powerful speaker systems. ASUS K8V-X motherboard 1-3 1.3 Special features 1.3.1 Product Highlights Latest processor technology The AMD Athlon™ 64 desktop processor is based on the task the CPU performs. Serial ATA...

K8V-X user's manual
Page 15
..., peripherals, and/or components. See page 2-5. Before you to playback audio CDs even without booting the system to Windows®. Just press the ASUS Instant Music special function keys and enjoy the music! Onboard LED The motherboard comes with the component. 5. Instant Music Lite This unique feature allows ... cord is switched off mode, a reminder that you install motherboard components or change any motherboard settings. 1. Unplug the power cord from a floppy disk. K8V-X ® K8V-X Onboard LED SB_PWR ON Standby Power OFF Powered Off ASUS K8V-X motherboard 1-5
..., peripherals, and/or components. See page 2-5. Before you to playback audio CDs even without booting the system to Windows®. Just press the ASUS Instant Music special function keys and enjoy the music! Onboard LED The motherboard comes with the component. 5. Instant Music Lite This unique feature allows ... cord is switched off mode, a reminder that you install motherboard components or change any motherboard settings. 1. Unplug the power cord from a floppy disk. K8V-X ® K8V-X Onboard LED SB_PWR ON Standby Power OFF Powered Off ASUS K8V-X motherboard 1-5
K8V-X user's manual
Page 17
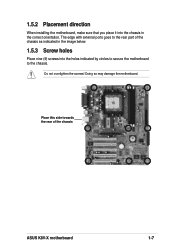
The edge with external ports goes to the chassis. 1.5.2 Placement direction When installing the motherboard, make sure that you place it into the chassis in the image below. 1.5.3 Screw holes Place nine (9) screws into the holes indicated by circles to secure the motherboard to the rear part of the chassis ASUS K8V-X motherboard 1-7 Doing so may damage the motherboard. Do not overtighten the screws! Place this side towards the rear of the chassis as indicated in the correct orientation.
The edge with external ports goes to the chassis. 1.5.2 Placement direction When installing the motherboard, make sure that you place it into the chassis in the image below. 1.5.3 Screw holes Place nine (9) screws into the holes indicated by circles to secure the motherboard to the rear part of the chassis ASUS K8V-X motherboard 1-7 Doing so may damage the motherboard. Do not overtighten the screws! Place this side towards the rear of the chassis as indicated in the correct orientation.
K8V-X user's manual
Page 19
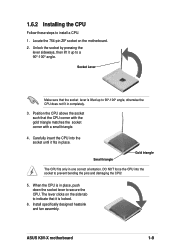
... in completely. 3. Install specifically designed heatsink and fan assembly. Locate the 754-pin ZIF socket on the side tab to a 90°-100° angle. ASUS K8V-X motherboard 1-9 Socket Lever Make sure that the socket lever is in place, push down the socket lever to 90°-100° angle, otherwise the...
... in completely. 3. Install specifically designed heatsink and fan assembly. Locate the 754-pin ZIF socket on the side tab to a 90°-100° angle. ASUS K8V-X motherboard 1-9 Socket Lever Make sure that the socket lever is in place, push down the socket lever to 90°-100° angle, otherwise the...

K8V-X user's manual
Page 21
... 400 DDR 400 DDR 400 DDR 333 DDR 333 DDR 400 DDR 333 DDR 333 DDR 333 DDR 333 DDR 333 DDR 333 DDR 333 ASUS K8V-X motherboard 1-11 Single Side - Single Side Double Side Single Side Double Side Single Side Single Side Double Side Double Side Single Side Single Side Double...
... 400 DDR 400 DDR 400 DDR 333 DDR 333 DDR 400 DDR 333 DDR 333 DDR 333 DDR 333 DDR 333 DDR 333 DDR 333 ASUS K8V-X motherboard 1-11 Single Side - Single Side Double Side Single Side Double Side Single Side Single Side Double Side Double Side Single Side Single Side Double...

K8V-X user's manual
Page 23
... and/or software applications for the expansion card according to the card. Unlock a DIMM socket by pressing the retaining clips outward. 2. Turn on the socket. 3. ASUS K8V-X motherboard 1-13 Align a DIMM on the socket such that came with a notch so that it fits in place and the DIMM is keyed with the...
... and/or software applications for the expansion card according to the card. Unlock a DIMM socket by pressing the retaining clips outward. 2. Turn on the socket. 3. ASUS K8V-X motherboard 1-13 Align a DIMM on the socket such that came with a notch so that it fits in place and the DIMM is keyed with the...
K8V-X user's manual
Page 25
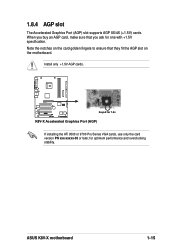
Install only +1.5V AGP cards. 1.8.4 AGP slot The Accelerated Graphics Port (AGP) slot supports AGP 8X/4X (+1.5V) cards. When you buy an AGP card, make sure that they fit the AGP slot on the motherboard. ASUS K8V-X motherboard 1-15 Note the notches on the card golden fingers to ensure that you ask for optimum performance and overclocking stability. K8V-X Keyed for 1.5v ® K8V-X Accelerated Graphics Port (AGP) If installing the ATi 9500 or 9700 Pro Series VGA cards, use only the card version PN xxx-xxxxx-30 or later, for one with +1.5V specification.
Install only +1.5V AGP cards. 1.8.4 AGP slot The Accelerated Graphics Port (AGP) slot supports AGP 8X/4X (+1.5V) cards. When you buy an AGP card, make sure that they fit the AGP slot on the motherboard. ASUS K8V-X motherboard 1-15 Note the notches on the card golden fingers to ensure that you ask for optimum performance and overclocking stability. K8V-X Keyed for 1.5v ® K8V-X Accelerated Graphics Port (AGP) If installing the ATi 9500 or 9700 Pro Series VGA cards, use only the card version PN xxx-xxxxx-30 or later, for one with +1.5V specification.
K8V-X user's manual
Page 27
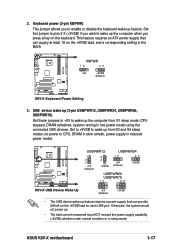
...current consumed must NOT exceed the power supply capability (+5VSB) whether under normal condition or in low power mode) using the connected USB devices. ASUS K8V-X motherboard 1-17 Set this jumper to wake up feature requires a power supply that can provide 500mA on the keyboard. USBPWR12 USBPWR34 2 1... +5V (Default) 3 2 +5VSB 12 +5V (Default) 23 +5VSB K8V-X USBPWR56 USBPWR78 12 23 ® K8V-X USB Device Wake Up +5V (Default) +5VSB • The USB device wake-up from S1 sleep mode (CPU stopped, DRAM ...
...current consumed must NOT exceed the power supply capability (+5VSB) whether under normal condition or in low power mode) using the connected USB devices. ASUS K8V-X motherboard 1-17 Set this jumper to wake up feature requires a power supply that can provide 500mA on the keyboard. USBPWR12 USBPWR34 2 1... +5V (Default) 3 2 +5VSB 12 +5V (Default) 23 +5VSB K8V-X USBPWR56 USBPWR78 12 23 ® K8V-X USB Device Wake Up +5V (Default) +5VSB • The USB device wake-up from S1 sleep mode (CPU stopped, DRAM ...

K8V-X user's manual
Page 29
... are available for a PS/2 keyboard. This 9-pin COM1 port is for connecting USB 2.0 devices. 8. This purple connector is for connecting USB 2.0 devices. 9. USB 2.0 ports 3 and 4. ASUS K8V-X motherboard 1-19 These two 4-pin Universal Serial Bus (USB) ports are available for serial devices. 10. This jack connects to external audio output devices. 11...
... are available for a PS/2 keyboard. This 9-pin COM1 port is for connecting USB 2.0 devices. 8. This purple connector is for connecting USB 2.0 devices. 9. USB 2.0 ports 3 and 4. ASUS K8V-X motherboard 1-19 These two 4-pin Universal Serial Bus (USB) ports are available for serial devices. 10. This jack connects to external audio output devices. 11...
K8V-X user's manual
Page 31
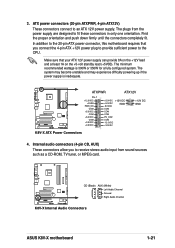
... system may become unstable and may experience difficulty powering up if the power supply is 300W or 350W for a fully configured system. ATXPWR ATX12V K8V-X ® Pin 1 +12.0VDC +5VSB PWR_OK COM +5.0VDC COM +5.0VDC COM +3.3VDC +3.3VDC +5.0VDC +12V DC +5.0VDC -5.0VDC ..., TV tuner, or MPEG card. The minimum recommended wattage is inadequate. CD (Black) AUX (White) K8V-X Left Audio Channel Ground Right Audio Channel ® K8V-X Internal Audio Connectors ASUS K8V-X motherboard 1-21 ATX power connectors (20-pin ATXPWR, 4-pin ATX12V) These connectors connect to fit these ...
... system may become unstable and may experience difficulty powering up if the power supply is 300W or 350W for a fully configured system. ATXPWR ATX12V K8V-X ® Pin 1 +12.0VDC +5VSB PWR_OK COM +5.0VDC COM +5.0VDC COM +3.3VDC +3.3VDC +5.0VDC +12V DC +5.0VDC -5.0VDC ..., TV tuner, or MPEG card. The minimum recommended wattage is inadequate. CD (Black) AUX (White) K8V-X Left Audio Channel Ground Right Audio Channel ® K8V-X Internal Audio Connectors ASUS K8V-X motherboard 1-21 ATX power connectors (20-pin ATXPWR, 4-pin ATX12V) These connectors connect to fit these ...

K8V-X user's manual
Page 33
... the jumper cap from the pins. +5VSB_MB Chassis Signal GND CHASSIS K8V-X ® K8V-X Chassis Alarm Lead (Default) ASUS K8V-X motherboard 1-23 When you are connecting the front panel audio cable. ® K8V-X FP_AUDIO BLINE_OUT_L BLINE_OUT_R +5VA AGND Line out_L NC Line out_R MICPWR MIC2 K8V-X Front Panel Audio Connector 8. Front panel audio connector (10-1 pin...
... the jumper cap from the pins. +5VSB_MB Chassis Signal GND CHASSIS K8V-X ® K8V-X Chassis Alarm Lead (Default) ASUS K8V-X motherboard 1-23 When you are connecting the front panel audio cable. ® K8V-X FP_AUDIO BLINE_OUT_L BLINE_OUT_R +5VA AGND Line out_L NC Line out_R MICPWR MIC2 K8V-X Front Panel Audio Connector 8. Front panel audio connector (10-1 pin...
K8V-X user's manual
Page 35
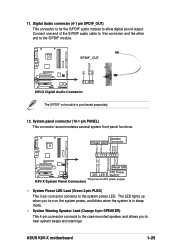
... Panel Connectors • System Power LED Lead (Green 3-pin PLED) This 3-pin connector connects to allow digital sound output. ASUS K8V-X motherboard 1-25 Digital Audio connector (6-1 pin SPDIF_OUT) This connector is for the S/PDIF audio module to the system power LED. The LED lights ...up when you to the S/PDIF module. SPDIF_OUT K8V-X ® K8V-X Digital Audio Connector The S/PDIF out module is in sleep mode. • System Warning Speaker Lead (Orange 4-pin SPEAKER) This 4-pin connector ...
... Panel Connectors • System Power LED Lead (Green 3-pin PLED) This 3-pin connector connects to allow digital sound output. ASUS K8V-X motherboard 1-25 Digital Audio connector (6-1 pin SPDIF_OUT) This connector is for the S/PDIF audio module to the system power LED. The LED lights ...up when you to the S/PDIF module. SPDIF_OUT K8V-X ® K8V-X Digital Audio Connector The S/PDIF out module is in sleep mode. • System Warning Speaker Lead (Orange 4-pin SPEAKER) This 4-pin connector ...

K8V-X user's manual
Page 37
Detailed descriptions of the BIOS parameters are also provided. Chapter 2 This chapter tells how to change system settings through the BIOS Setup menus. BIOS information ASUS K8V-X motherboard 2-1
Detailed descriptions of the BIOS parameters are also provided. Chapter 2 This chapter tells how to change system settings through the BIOS Setup menus. BIOS information ASUS K8V-X motherboard 2-1

K8V-X user's manual
Page 39
...) to a bootable floppy disk. Reading file ..... done Erasing flash .... e. What you copied to type the exact BIOS file name at the prompt. 2. ASUS K8V-X motherboard 2-3 At the DOS prompt, type the command line: afudos /i[filename] where [filename] means the latest (or original) BIOS file that contains the BIOS file. 3. ...
...) to a bootable floppy disk. Reading file ..... done Erasing flash .... e. What you copied to type the exact BIOS file name at the prompt. 2. ASUS K8V-X motherboard 2-3 At the DOS prompt, type the command line: afudos /i[filename] where [filename] means the latest (or original) BIOS file that contains the BIOS file. 3. ...

K8V-X user's manual
Page 41
... Utility - Checking for your motherboard and rename the downloaded file as "K8VX.ROM". 4. If all the necessary files are found !" ASUS K8V-X motherboard 2-5 Make sure that contains the BIOS file. To launch EZ Flash, press during the Power-On Self Tests (POST). appears. &#...is displayed. 3. Version 1.10 Copyright (C) 2002 American Megatrends, Inc. To update the BIOS using a DOS-based utility. Visit the ASUS website (www.asus.com) to display the following. Make sure to a floppy disk. 2. Reboot the system. 3. Insert the floppy disk that the floppy...
... Utility - Checking for your motherboard and rename the downloaded file as "K8VX.ROM". 4. If all the necessary files are found !" ASUS K8V-X motherboard 2-5 Make sure that contains the BIOS file. To launch EZ Flash, press during the Power-On Self Tests (POST). appears. &#...is displayed. 3. Version 1.10 Copyright (C) 2002 American Megatrends, Inc. To update the BIOS using a DOS-based utility. Visit the ASUS website (www.asus.com) to display the following. Make sure to a floppy disk. 2. Reboot the system. 3. Insert the floppy disk that the floppy...

K8V-X user's manual
Page 43
... The support CD contains the a working BIOS for floppy... Bad BIOS checksum. Checking for floppy... Completed. Boot the system. 2. Visit ASUS website (www.asus.com) to download the latest BIOS file. DO NOT shut down or reset the system while updating the BIOS! When a corrupted BIOS ... the system automatically checks the CD-ROM. 3. Floppy not found ! When the BIOS update process is detected, the following screen message appears. ASUS K8V-X motherboard 2-7 Bad BIOS checksum. Reading file "K8VX.ROM". Completed. Checking for CD-ROM... CD-ROM found in the CD-ROM. Doing ...
... The support CD contains the a working BIOS for floppy... Bad BIOS checksum. Checking for floppy... Completed. Boot the system. 2. Visit ASUS website (www.asus.com) to download the latest BIOS file. DO NOT shut down or reset the system while updating the BIOS! When a corrupted BIOS ... the system automatically checks the CD-ROM. 3. Floppy not found ! When the BIOS update process is detected, the following screen message appears. ASUS K8V-X motherboard 2-7 Bad BIOS checksum. Reading file "K8VX.ROM". Completed. Checking for CD-ROM... CD-ROM found in the CD-ROM. Doing ...
K8V-X user's manual
Page 45
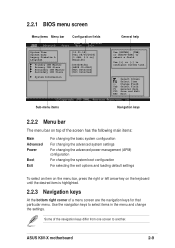
Select Screen Select Item +- Use the navigation keys to another. ASUS K8V-X motherboard 2-9 Some of a menu screen are the navigation keys for that particular menu. Use [+] or [-] to select a field. Change Field Tab Select Field F1 General ... desired item is highlighted. 2.2.3 Navigation keys At the bottom right corner of the navigation keys differ from one screen to select items in ] [English] :[ST320413A] :[ASUS CD-S340] :[Not Detected] :[Not Detected] Use [ENTER], [TAB] or [SHIFT-TAB] to configure system time. 2.2.1 BIOS menu screen Menu items Menu bar Configuration fields...
Select Screen Select Item +- Use the navigation keys to another. ASUS K8V-X motherboard 2-9 Some of a menu screen are the navigation keys for that particular menu. Use [+] or [-] to select a field. Change Field Tab Select Field F1 General ... desired item is highlighted. 2.2.3 Navigation keys At the bottom right corner of the navigation keys differ from one screen to select items in ] [English] :[ST320413A] :[ASUS CD-S340] :[Not Detected] :[Not Detected] Use [ENTER], [TAB] or [SHIFT-TAB] to configure system time. 2.2.1 BIOS menu screen Menu items Menu bar Configuration fields...

K8V-X user's manual
Page 47
...-S340] : [Not Detected] : [Not Detected] Use [ENTER], [TAB] or [SHIFT-TAB] to select a field. Configuration options: [Français] [German] [English] ASUS K8V-X motherboard 2-11 2.3 Main menu When you enter the BIOS Setup program, the Main menu screen appears giving you an overview of floppy drive installed. Configuration ...
...-S340] : [Not Detected] : [Not Detected] Use [ENTER], [TAB] or [SHIFT-TAB] to select a field. Configuration options: [Français] [German] [English] ASUS K8V-X motherboard 2-11 2.3 Main menu When you enter the BIOS Setup program, the Main menu screen appears giving you an overview of floppy drive installed. Configuration ...

K8V-X user's manual
Page 49
... menu gives you an overview of the general system specifications. AMI BIOS Version Build Date ID : 08.00.08 : 08/04/03 : K8V-X_031 System Memory Size : 256MB AMI BIOS Displays the auto-detected BIOS information. System Memory Displays the auto-detected system memory. Configuration options: ...[Auto] [0] [1] [2] [3] [4] DMA Mode [Auto] Selects the DMA mode. The items in this menu are auto-detected by BIOS. ASUS K8V-X motherboard 2-13 Configuration options: [Auto] [Disabled] [Enabled] 32Bit Data Transfer [Disabled] Enables or disables 32-bit data transfer. PIO Mode [...
... menu gives you an overview of the general system specifications. AMI BIOS Version Build Date ID : 08.00.08 : 08/04/03 : K8V-X_031 System Memory Size : 256MB AMI BIOS Displays the auto-detected BIOS information. System Memory Displays the auto-detected system memory. Configuration options: ...[Auto] [0] [1] [2] [3] [4] DMA Mode [Auto] Selects the DMA mode. The items in this menu are auto-detected by BIOS. ASUS K8V-X motherboard 2-13 Configuration options: [Auto] [Disabled] [Enabled] 32Bit Data Transfer [Disabled] Enables or disables 32-bit data transfer. PIO Mode [...


