H87-PRO User's Manual
Page 3
... About this guide...vii H87-PRO specifications summary ix Package contents...xii Installation tools and components xiii Chapter 1: Product introduction 1.1 Special features 1-1 1.1.1 Product highlights 1-1 1.1.2 DIGI+ VRM Digital Power Design 1-2 1.1.3 ASUS Exclusive Features 1-2 1.1.4 ASUS Quiet Thermal Solution 1-3 1.1.5 ASUS EZ DIY 1-4 1.1.6 Other special features 1-5 1.2 Motherboard overview 1-5 1.2.1 Before you proceed 1-5 1.2.2 Motherboard layout 1-6 1.2.3 Central Processing Unit (CPU 1-8 1.2.4 System memory 1-9 1.2.5 Expansion...
... About this guide...vii H87-PRO specifications summary ix Package contents...xii Installation tools and components xiii Chapter 1: Product introduction 1.1 Special features 1-1 1.1.1 Product highlights 1-1 1.1.2 DIGI+ VRM Digital Power Design 1-2 1.1.3 ASUS Exclusive Features 1-2 1.1.4 ASUS Quiet Thermal Solution 1-3 1.1.5 ASUS EZ DIY 1-4 1.1.6 Other special features 1-5 1.2 Motherboard overview 1-5 1.2.1 Before you proceed 1-5 1.2.2 Motherboard layout 1-6 1.2.3 Central Processing Unit (CPU 1-8 1.2.4 System memory 1-9 1.2.5 Expansion...
H87-PRO User's Manual
Page 4
...EZ Mode 3-3 3.2.2 Advanced Mode 3-4 3.3 My Favorites 3-6 3.4 Main menu 3-7 3.5 Ai Tweaker menu 3-9 3.6 Advanced menu 3-22 3.6.1 CPU Configuration 3-23 3.6.2 PCH Configuration 3-26 3.6.3 SATA Configuration 3-27 3.6.4 System Agent Configuration 3-28 3.6.5 USB Configuration 3-30 3.6.6 Platform Misc Configuration...Network Stack 3-35 3.7 Monitor menu 3-36 3.8 Boot menu 3-39 3.9 Tools menu 3-46 3.9.1 ASUS EZ Flash 2 Utility 3-46 3.9.2 ASUS O.C. Profile 3-46 3.9.3 ASUS SPD Information 3-47 3.10 Exit menu 3-48 3.11 Updating BIOS 3-49 Chapter 4: Software support ...
...EZ Mode 3-3 3.2.2 Advanced Mode 3-4 3.3 My Favorites 3-6 3.4 Main menu 3-7 3.5 Ai Tweaker menu 3-9 3.6 Advanced menu 3-22 3.6.1 CPU Configuration 3-23 3.6.2 PCH Configuration 3-26 3.6.3 SATA Configuration 3-27 3.6.4 System Agent Configuration 3-28 3.6.5 USB Configuration 3-30 3.6.6 Platform Misc Configuration...Network Stack 3-35 3.7 Monitor menu 3-36 3.8 Boot menu 3-39 3.9 Tools menu 3-46 3.9.1 ASUS EZ Flash 2 Utility 3-46 3.9.2 ASUS O.C. Profile 3-46 3.9.3 ASUS SPD Information 3-47 3.10 Exit menu 3-48 3.11 Updating BIOS 3-49 Chapter 4: Software support ...
H87-PRO User's Manual
Page 9
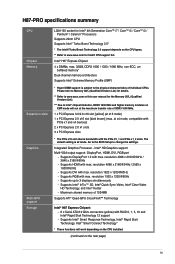
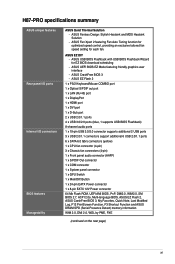
...Intel® chipset limitation, DDR3 1600 MHz and higher memory modules on the next page) ix The default setting is subject to www.asus.com for Intel® CPU support list. resolution 4096 x 2160@24Hz / 2560 x 1600@60Hz - Supports up to change the settings. Go to the BIOS ...slots 3 x PCI Express slots * The PCIe x16 slot shares bandwidth with max. Supports RGB with the PCIe X1_1 and PCIe x1_2 slots. H87-PRO specifications summary CPU Chipset Memory Expansion slots Graphics Multi-GPU support Storage LGA1150 socket for Intel® 4th Generation Core™ i7 / Core™ i5 / ...
...Intel® chipset limitation, DDR3 1600 MHz and higher memory modules on the next page) ix The default setting is subject to www.asus.com for Intel® CPU support list. resolution 4096 x 2160@24Hz / 2560 x 1600@60Hz - Supports up to change the settings. Go to the BIOS ...slots 3 x PCI Express slots * The PCIe x16 slot shares bandwidth with max. Supports RGB with the PCIe X1_1 and PCIe x1_2 slots. H87-PRO specifications summary CPU Chipset Memory Expansion slots Graphics Multi-GPU support Storage LGA1150 socket for Intel® 4th Generation Core™ i7 / Core™ i5 / ...

H87-PRO User's Manual
Page 10
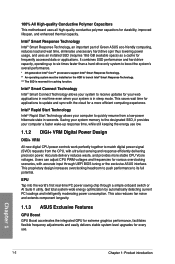
... Steel Back I /O to ensure the best quality, reliability, and durability. ASUS USB 3.0 Boost featuring speedy USB 3.0 transmission - ASUS AI Suite 3 - ASUS Network iControl featuring instant network bandwidth domination for the CPU and iGPU - H87-PRO specifications summary LAN Audio USB ASUS unique features Realtek® RTL8111G Gigabit LAN controller Realtek® ALC887 8-Channel High Definition Audio CODEC...
... Steel Back I /O to ensure the best quality, reliability, and durability. ASUS USB 3.0 Boost featuring speedy USB 3.0 transmission - ASUS AI Suite 3 - ASUS Network iControl featuring instant network bandwidth domination for the CPU and iGPU - H87-PRO specifications summary LAN Audio USB ASUS unique features Realtek® RTL8111G Gigabit LAN controller Realtek® ALC887 8-Channel High Definition Audio CODEC...
H87-PRO User's Manual
Page 11
...pin USB 3.0/2.0 connector supports additional 2 USB ports 3 x USB 2.0/1.1 connectors support additional 6 USB 2.0/1.1 ports 6 x SATA 6.0 Gb/s connectors (yellow) 1 x CPU fan connector (4-pin) 3 x Chassis fan connectors (4-pin) 1 x Front panel audio connector (AAFP) 1 x S/PDIF Out connector 1 x COM connector 1 x System panel connector... ASUS Fan Xpert 2 featuring Fan Auto Tuning function for optimized speed control, providing an exclusive tailored fan speed setting for EZ BIOS download scheduling - ASUS Fanless Design: Stylish Heatsink and MOS Heatsink Solution - H87-PRO specifications summary ASUS ...
...pin USB 3.0/2.0 connector supports additional 2 USB ports 3 x USB 2.0/1.1 connectors support additional 6 USB 2.0/1.1 ports 6 x SATA 6.0 Gb/s connectors (yellow) 1 x CPU fan connector (4-pin) 3 x Chassis fan connectors (4-pin) 1 x Front panel audio connector (AAFP) 1 x S/PDIF Out connector 1 x COM connector 1 x System panel connector... ASUS Fan Xpert 2 featuring Fan Auto Tuning function for optimized speed control, providing an exclusive tailored fan speed setting for EZ BIOS download scheduling - ASUS Fanless Design: Stylish Heatsink and MOS Heatsink Solution - H87-PRO specifications summary ASUS ...

H87-PRO User's Manual
Page 13
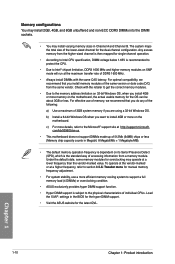
xiii Installation tools and components 1 bag of screws Philips (cross) screwdriver PC chassis Power supply unit Intel LGA 1150 CPU Intel LGA 1150 compatible CPU Fan DDR3 DIMM SATA hard disk drive SATA optical disc drive (optional) Graphics card (optional) The tools and components in the table above are not included in the motherboard package.
xiii Installation tools and components 1 bag of screws Philips (cross) screwdriver PC chassis Power supply unit Intel LGA 1150 CPU Intel LGA 1150 compatible CPU Fan DDR3 DIMM SATA hard disk drive SATA optical disc drive (optional) Graphics card (optional) The tools and components in the table above are not included in the motherboard package.
H87-PRO User's Manual
Page 16
... delivery reduces waste, and provides more efficient computing experience. This also reduces fan noise and extends component longevity. 1.1.3 ASUS Exclusive Features GPU Boost GPU Boost accelerates the integrated GPU for extreme graphics performance, facilitates flexible frequency adjustments and easily ...into the world's first real-time PC power saving chip through UEFI BIOS tuning or the exclusive ASUS interface. Chapter 1 1-2 Chapter 1: Product introduction Users can adjust CPU PWM voltages and frequencies for various overclocking scenarios, with the cloud for every use low. 1.1.2 ...
... delivery reduces waste, and provides more efficient computing experience. This also reduces fan noise and extends component longevity. 1.1.3 ASUS Exclusive Features GPU Boost GPU Boost accelerates the integrated GPU for extreme graphics performance, facilitates flexible frequency adjustments and easily ...into the world's first real-time PC power saving chip through UEFI BIOS tuning or the exclusive ASUS interface. Chapter 1 1-2 Chapter 1: Product introduction Users can adjust CPU PWM voltages and frequencies for various overclocking scenarios, with the cloud for every use low. 1.1.2 ...

H87-PRO User's Manual
Page 21
...) 15. Onboard LED (SB_PWR) Page 1-20 1-22 1-21 1-8 1-14 1-15 1-9 1-13 1-18 1-17 1-15 1-23 1-19 1-19 1-20 1-15 Chapter 1 ASUS H87-PRO 1-7 USB 3.0 connector (20-1 pin USB3_12) 10. GPU Boost switch 6. USB 2.0 connectors (10-1 pin USB910, USB1112, USB1314) 14. Clear RTC RAM (3-pin CLRTC) ... 5. System panel connector (20-8 pin PANEL) 13. MemOK! Front panel audio connector (10-1 pin AAFP) 16. DDR3 DIMM sockets 8. CPU & Chassis fan connectors (4-pin CPU_FAN, 4-pin CHA_FAN1~3) 4. ATX power connectors (24-pin EATXPWR, 8-pin EATX12V) 3. Layout contents Connectors/Jumpers/Buttons and ...
...) 15. Onboard LED (SB_PWR) Page 1-20 1-22 1-21 1-8 1-14 1-15 1-9 1-13 1-18 1-17 1-15 1-23 1-19 1-19 1-20 1-15 Chapter 1 ASUS H87-PRO 1-7 USB 3.0 connector (20-1 pin USB3_12) 10. GPU Boost switch 6. USB 2.0 connectors (10-1 pin USB910, USB1112, USB1314) 14. Clear RTC RAM (3-pin CLRTC) ... 5. System panel connector (20-8 pin PANEL) 13. MemOK! Front panel audio connector (10-1 pin AAFP) 16. DDR3 DIMM sockets 8. CPU & Chassis fan connectors (4-pin CPU_FAN, 4-pin CHA_FAN1~3) 4. ATX power connectors (24-pin EATXPWR, 8-pin EATX12V) 3. Layout contents Connectors/Jumpers/Buttons and ...

H87-PRO User's Manual
Page 22
...™ i7 / Core™ i5 / Core™ i3, Pentium®, and Celeron® processors. H87-PRO H87-PRO CPU socket LGA1150 • Ensure that the PnP cap is missing, or if you install the correct CPU designed for the LGA1150 socket only. ASUS will process Return Merchandise Authorization (RMA) requests only if the motherboard comes with a surface...
...™ i7 / Core™ i5 / Core™ i3, Pentium®, and Celeron® processors. H87-PRO H87-PRO CPU socket LGA1150 • Ensure that the PnP cap is missing, or if you install the correct CPU designed for the LGA1150 socket only. ASUS will process Return Merchandise Authorization (RMA) requests only if the motherboard comes with a surface...
H87-PRO User's Manual
Page 24
...refer to the physical characteristics of the lower-sized channel for single-channel operation. • According to Intel CPU specification, DIMM voltage below 1.65V is recommended to protect the CPU. • Due to Intel® chipset limitation, DDR3 1600 MHz and higher memory modules on its ... default state, some memory modules for overclocking may install varying memory sizes in the BIOS for the hyper DIMM support. • Visit the ASUS website for the latest QVL. Chapter 1 1-10 Chapter 1: Product introduction For optimal compatibility, we recommend that you are using a 32-bit...
...refer to the physical characteristics of the lower-sized channel for single-channel operation. • According to Intel CPU specification, DIMM voltage below 1.65V is recommended to protect the CPU. • Due to Intel® chipset limitation, DDR3 1600 MHz and higher memory modules on its ... default state, some memory modules for overclocking may install varying memory sizes in the BIOS for the hyper DIMM support. • Visit the ASUS website for the latest QVL. Chapter 1 1-10 Chapter 1: Product introduction For optimal compatibility, we recommend that you are using a 32-bit...
H87-PRO User's Manual
Page 29
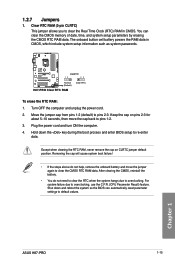
... data. Plug the power cord and turn ON the computer. 4. Clear RTC RAM (3-pin CLRTC) This jumper allows you to overclocking, use the C.P.R. (CPU Parameter Recall) feature. Turn OFF the computer and unplug the power cord. 2. For system failure due to clear the Real Time Clock (RTC) RAM in...cause system boot failure! • If the steps above do not need to clear the RTC when the system hangs due to pins 2-3. Chapter 1 ASUS H87-PRO 1-15 Keep the cap on CLRTC jumper default position. Except when clearing the RTC RAM, never remove the cap on pins 2-3 for about 5-10 ...
... data. Plug the power cord and turn ON the computer. 4. Clear RTC RAM (3-pin CLRTC) This jumper allows you to overclocking, use the C.P.R. (CPU Parameter Recall) feature. Turn OFF the computer and unplug the power cord. 2. For system failure due to clear the Real Time Clock (RTC) RAM in...cause system boot failure! • If the steps above do not need to clear the RTC when the system hangs due to pins 2-3. Chapter 1 ASUS H87-PRO 1-15 Keep the cap on CLRTC jumper default position. Except when clearing the RTC RAM, never remove the cap on pins 2-3 for about 5-10 ...

H87-PRO User's Manual
Page 35
... install two VGA cards, we recommend that the 4-pin CPU fan cable is securely installed to the fan connectors. CPU_FAN CHA_FAN2 CPU FAN PWM CPU FAN IN CPU FAN PWR GND CHA FAN PWM CHA FAN IN CHA FAN PWR GND H87-PRO CHA_FAN1 CHA_FAN3 GND CHA FAN PWR CHA FAN IN CHA FAN... CHA FAN PWM CHA FAN IN CHA FAN PWR GND H87-PRO Fan connectors • DO NOT forget to connect the fan cables to the CPU fan connector. • The CPU_FAN connector supports the CPU fan of the connector. These are not jumpers! Chapter 1 ASUS H87-PRO 1-21 CPU & Chassis fan connectors (4-pin CPU_FAN, 4-pin CHA_FAN1~3)...
... install two VGA cards, we recommend that the 4-pin CPU fan cable is securely installed to the fan connectors. CPU_FAN CHA_FAN2 CPU FAN PWM CPU FAN IN CPU FAN PWR GND CHA FAN PWM CHA FAN IN CHA FAN PWR GND H87-PRO CHA_FAN1 CHA_FAN3 GND CHA FAN PWR CHA FAN IN CHA FAN... CHA FAN PWM CHA FAN IN CHA FAN PWR GND H87-PRO Fan connectors • DO NOT forget to connect the fan cables to the CPU fan connector. • The CPU_FAN connector supports the CPU fan of the connector. These are not jumpers! Chapter 1 ASUS H87-PRO 1-21 CPU & Chassis fan connectors (4-pin CPU_FAN, 4-pin CHA_FAN1~3)...

H87-PRO User's Manual
Page 41
... on the placement of PnP cap on the socket or damaging the CPU. 2-4 Chapter 2: Basic Installation DO NOT install a CPU designed for LGA1150 socket only. 2.1.2 CPU installation Your motherboard's LGA1150 socket may come with the PnP cap under the load plate. Refer to the following sections on how to ...prevent bending the pins on your CPU socket's load plate. Intel® LGA1150 socket (PnP cap on the load plate) Ensure that you install the correct CPU designed for LGA1155 and LGA1156 sockets on the load plate or with the PnP cap...
... on the placement of PnP cap on the socket or damaging the CPU. 2-4 Chapter 2: Basic Installation DO NOT install a CPU designed for LGA1150 socket only. 2.1.2 CPU installation Your motherboard's LGA1150 socket may come with the PnP cap under the load plate. Refer to the following sections on how to ...prevent bending the pins on your CPU socket's load plate. Intel® LGA1150 socket (PnP cap on the load plate) Ensure that you install the correct CPU designed for LGA1155 and LGA1156 sockets on the load plate or with the PnP cap...

H87-PRO User's Manual
Page 42
4 5 2.1.3 CPU heatsink and fan assembly installation Apply the Thermal Interface Material to the CPU heatsink and CPU before you install the heatsink and fan if necessary. To install the CPU heatsink and fan assembly 1 A 2 B B A Chapter 2 ASUS H87-PRO 2-5
4 5 2.1.3 CPU heatsink and fan assembly installation Apply the Thermal Interface Material to the CPU heatsink and CPU before you install the heatsink and fan if necessary. To install the CPU heatsink and fan assembly 1 A 2 B B A Chapter 2 ASUS H87-PRO 2-5

H87-PRO User's Manual
Page 43
3 4 To uninstall the CPU heatsink and fan assembly 1 Chapter 2 2 B A B A 2-6 Chapter 2: Basic Installation
3 4 To uninstall the CPU heatsink and fan assembly 1 Chapter 2 2 B A B A 2-6 Chapter 2: Basic Installation

H87-PRO User's Manual
Page 58
..., then select Advanced Mode or press hot key for entering the BIOS setup program can be changed. Displays the CPU temperature, CPU voltage output, DRAM information, and CPU/chassis fan speed Selects the display language of the BIOS setup program Exits the BIOS setup program without saving the ... right hand side Selects the boot device priority • The boot device options vary depending on the devices you enter the BIOS setup program. ASUS H87-PRO 3-3 3.2.1 EZ Mode By default, the EZ Mode screen appears when you installed to the system. • The Boot Menu(F8) button...
..., then select Advanced Mode or press hot key for entering the BIOS setup program can be changed. Displays the CPU temperature, CPU voltage output, DRAM information, and CPU/chassis fan speed Selects the display language of the BIOS setup program Exits the BIOS setup program without saving the ... right hand side Selects the boot device priority • The boot device options vary depending on the devices you enter the BIOS setup program. ASUS H87-PRO 3-3 3.2.1 EZ Mode By default, the EZ Mode screen appears when you installed to the system. • The Boot Menu(F8) button...
H87-PRO User's Manual
Page 64
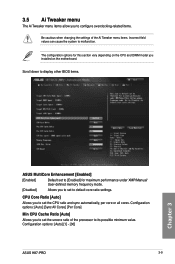
... set to [Enabled] for this section vary depending on the CPU and DIMM model you installed on the motherboard. Configuration options: [Auto] [1] - [30] ASUS H87-PRO 3-9 Configuration options: [Auto] [Sync All Cores] [Per Core] Min CPU Cache Ratio [Auto] Allows you to set the CPU ratio and sync automatically, per core or all cores. The configuration...
... set to [Enabled] for this section vary depending on the CPU and DIMM model you installed on the motherboard. Configuration options: [Auto] [1] - [30] ASUS H87-PRO 3-9 Configuration options: [Auto] [Sync All Cores] [Per Core] Min CPU Cache Ratio [Auto] Allows you to set the CPU ratio and sync automatically, per core or all cores. The configuration...

H87-PRO User's Manual
Page 65
...or equal to the 2-Core Ratio Limit. 2-Core Ratio Limit [Auto] Allows you to set the 3-Core Ratio Limit. Select [Auto] to apply the CPU default Turbo Ratio setting or manually assign a 1-Core Ratio Limit value that is higher than or equal to the 3-Core Ratio Limit. 1-Core/2-Core/3-Core...operating frequency. The frequency may vary depending on the system loading. [Manual] Use the or keys to 100:100. Select [Auto] to apply the CPU default Turbo Ratio setting or manually assign a 3-Core Ratio Limit value that is higher than or equal to the 3-Core Ratio Limit. 1-Core Limit must...
...or equal to the 2-Core Ratio Limit. 2-Core Ratio Limit [Auto] Allows you to set the 3-Core Ratio Limit. Select [Auto] to apply the CPU default Turbo Ratio setting or manually assign a 1-Core Ratio Limit value that is higher than or equal to the 3-Core Ratio Limit. 1-Core/2-Core/3-Core...operating frequency. The frequency may vary depending on the system loading. [Manual] Use the or keys to 100:100. Select [Auto] to apply the CPU default Turbo Ratio setting or manually assign a 3-Core Ratio Limit value that is higher than or equal to the 3-Core Ratio Limit. 1-Core Limit must...

H87-PRO User's Manual
Page 69
...of every component. [T. Higher value gets a higher voltage and better overclocking performance, but increases the CPU and VRM thermal conditions. The thermal conditions should be monitored. CPU Current Capability [Auto] Allows you to configure the total power range, and extends the overclocking frequency... options: [Auto] [Regular] [Medium] [High] [Ultra High] [Extreme] The actual performance boost may vary depending on the CPU. Configuration options: [Auto] [Optimized] [Extreme] [Manual Adjustment] DO NOT remove the thermal module when setting this item to adjust...
...of every component. [T. Higher value gets a higher voltage and better overclocking performance, but increases the CPU and VRM thermal conditions. The thermal conditions should be monitored. CPU Current Capability [Auto] Allows you to configure the total power range, and extends the overclocking frequency... options: [Auto] [Regular] [Medium] [High] [Ultra High] [Extreme] The actual performance boost may vary depending on the CPU. Configuration options: [Auto] [Optimized] [Extreme] [Manual Adjustment] DO NOT remove the thermal module when setting this item to adjust...

H87-PRO User's Manual
Page 70
... precautionary actions to increase or decrease the switching frequency of the external regulator exceeds the threshold. Configuration options: [Auto] [Disabled] [Enabled] Chapter 3 ASUS H87-PRO 3-15 Configuration options: [Auto] [Disabled] [Enabled] CPU Integrated VR Fault Management [Auto] Disable this item to adjust the value. Enhanced Intel SpeedStep Technology [Enabled] Allows you to be taken...
... precautionary actions to increase or decrease the switching frequency of the external regulator exceeds the threshold. Configuration options: [Auto] [Disabled] [Enabled] Chapter 3 ASUS H87-PRO 3-15 Configuration options: [Auto] [Disabled] [Enabled] CPU Integrated VR Fault Management [Auto] Disable this item to adjust the value. Enhanced Intel SpeedStep Technology [Enabled] Allows you to be taken...


