H81M-K User's Manual
Page 16
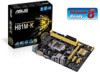
...information from a memory module. Align a DIMM on the CPU's capabilities and other system components. Under the default state, some memory modules for overclocking may install varying memory sizes in the market. • The default memory operation frequency is dependent on the motherboard. • This motherboard does... not support DIMMs made up of DDR3 1600MHz. • Always install DIMMs with 8GB or above DIMMs. ASUS will run at a lower frequency than 2133 MHz and its Serial Presence Detect (SPD), which is the standard way of the same version...
...information from a memory module. Align a DIMM on the CPU's capabilities and other system components. Under the default state, some memory modules for overclocking may install varying memory sizes in the market. • The default memory operation frequency is dependent on the motherboard. • This motherboard does... not support DIMMs made up of DDR3 1600MHz. • Always install DIMMs with 8GB or above DIMMs. ASUS will run at a lower frequency than 2133 MHz and its Serial Presence Detect (SPD), which is the standard way of the same version...
H81M-K User's Manual
Page 19
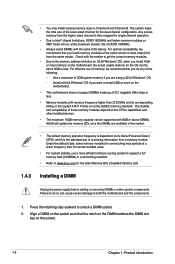
...system hangs due to clear the CMOS RTC RAM data. ASUS H81M-K 1-11 You can clear the CMOS memory of date, time, and system setup parameters by erasing the CMOS RTC RAM data. Move the jumper cap from pins 1-2 (default) to overclocking, use the CPU Parameter Recall (C.P.R.) feature. Except when ...clearing the RTC RAM, never remove the cap on pins 2-3 for about 5-10 seconds, then move the jumper again to overclocking. Shut down the key during the boot process and enter BIOS setup to clear the Real Time Clock (RTC) RAM in CMOS, which include ...
...system hangs due to clear the CMOS RTC RAM data. ASUS H81M-K 1-11 You can clear the CMOS memory of date, time, and system setup parameters by erasing the CMOS RTC RAM data. Move the jumper cap from pins 1-2 (default) to overclocking, use the CPU Parameter Recall (C.P.R.) feature. Except when ...clearing the RTC RAM, never remove the cap on pins 2-3 for about 5-10 seconds, then move the jumper again to overclocking. Shut down the key during the boot process and enter BIOS setup to clear the Real Time Clock (RTC) RAM in CMOS, which include ...

H81M-K User's Manual
Page 38
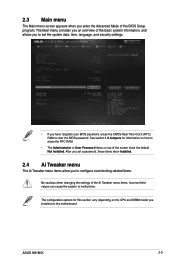
...bar on top of the Advanced Mode. Refer to configure the BIOS settings. To access the EZ Mode, click Exit, then select ASUS EZ Mode. Advanced Mode The Advanced Mode provides advanced options for experienced end-users to the following main items: Last modified settings ...Advanced Monitor Boot Tool Exit For saving the frequently-used system settings and configuration For changing the basic system configuration For changing the overclocking settings For changing the advanced system settings For displaying the system temperature, power status, and changing the fan settings For changing ...
...bar on top of the Advanced Mode. Refer to configure the BIOS settings. To access the EZ Mode, click Exit, then select ASUS EZ Mode. Advanced Mode The Advanced Mode provides advanced options for experienced end-users to the following main items: Last modified settings ...Advanced Monitor Boot Tool Exit For saving the frequently-used system settings and configuration For changing the basic system configuration For changing the overclocking settings For changing the advanced system settings For displaying the system temperature, power status, and changing the fan settings For changing ...
H81M-K User's Manual
Page 39
ASUS H81M-K 2-9 After you set the system date, time, language, and security settings. • If you to configure overclocking-related items. Be cautious when changing the settings of the Ai Tweaker menu items. Incorrect field values can cause the system to erase the RTC ...
ASUS H81M-K 2-9 After you set the system date, time, language, and security settings. • If you to configure overclocking-related items. Be cautious when changing the settings of the Ai Tweaker menu items. Incorrect field values can cause the system to erase the RTC ...


