Asus H81M-P Support and Manuals
Get Help and Manuals for this Asus item

Popular Asus H81M-P Manual Pages
User Guide - Page 1

H81M-P
Motherboard
User Guide - Page 2

... SUCH DAMAGES ARISING FROM ANY DEFECT OR ERROR IN THIS MANUAL OR PRODUCT. SPECIFICATIONS AND INFORMATION CONTAINED IN THIS MANUAL ARE FURNISHED FOR INFORMATIONAL USE ONLY, AND ARE SUBJECT TO CHANGE AT ANY TIME WITHOUT NOTICE, AND SHOULD NOT BE CONSTRUED AS A COMMITMENT BY ASUS.
Product warranty or service will be reproduced, transmitted, transcribed, stored in...
User Guide - Page 4

... circuit.
• Ensure that your power supply is set to or from the system, ensure that the power cables for the devices are unplugged before the signal cables are connected. About this guide is broken, do not try to change system settings through the BIOS Setup menus. iv Operation safety
• Before installing the motherboard and adding devices on a stable...
User Guide - Page 6

...the CPU installed.
(continued on the next page)
vi resolution 1920x1200@60Hz - Please refer to Memory QVL for details.
** Refer to www.asus.com for the following items.
Motherboard
ASUS H81M-P motherboard
Cables
2 x Serial ATA 6.0 Gb/s cables
Accessories
1 x I/O Shield
Application DVD
Support DVD
Documentation
User Guide
If any of the above items is subject to Intel® chipset...
User Guide - Page 8

...Support DVD
Operating System Support Form factor
64 Mb Flash ROM, UEFI AMI BIOS, PnP, DMI2.0, WfM2.0, SM BIOS 2.7, ACPI 2.0a, Multi-language BIOS, ASUS EZ Flash 2, ASUS CrashFree BIOS 3, My Favorites, Quick Note, Last Modified log, F12 PrintScreen, F3 Shortcut functions and ASUS DRAM SPD (Serial Presence Detect) memory information
WfM 2.0, DMI 2.0, WOL by PME, PXE
Drivers
ASUS utilities
EZ Update...
User Guide - Page 9

...place it . Ensure that the ATX power supply is switched off or the power cord is detached from the power supply. Product introduction
1
1.1 Before you proceed
Take note of the following precautions before you install motherboard components or change any motherboard settings.
• Unplug the power cord from the wall socket before installing or removing the motherboard. ASUS H81M-P
1-1
User Guide - Page 17

... you removed earlier. 6. Install the software drivers for the card.
2. ASUS H81M-P
1-9 To remove a DIMM
B
A
1.5.1 Installing an expansion card
To install an expansion card:
1. When using PCI cards on BIOS setup.
2. Replace the system cover.
1.5.2 Configuring an expansion card
After installing the expansion card, configure it and make the necessary hardware settings for the expansion...
User Guide - Page 22

..., set the Front Panel Type item in the BIOS setup to [HD]. 2.
CPU_FAN
CPU FAN PWM CPU FAN IN
CPU FAN PWR GND
H81M-P
CHA_FAN
GND CHA FAN PWR CHA FAN IN +5V
H81M-P ...cable to this connector, set to [AC97]. Do not place jumper caps on the motherboard, ensuring that supports either HD Audio or legacy AC`97 audio standard. Only the 4-pin CPU fan support the ASUS Fan Xpert feature.
...
User Guide - Page 24
...
+3 Volts
+3 Volts
PIN 1
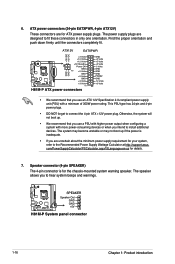
H81M-P ATX power connectors
GND +5 Volts +5 Volts +5 Volts -5 Volts GND GND GND PSON# GND -12 Volts +3 Volts
• We recommend that you intend to the Recommended Power Supply Wattage Calculator at http://support.asus. Otherwise, the system will not boot up if the power is for your system, refer to install additional devices. The system...
User Guide - Page 29

...and
firmware
Model Name: H81M-P Version:0203 Release Date: 06/25/2014
File: H81M-P-ASUS-0205.CAP Model Name: H81M-P Version:0205 Release Date: 07/02/2014
C:\Users\test\Downloads\H81M-P-ASUS-02... With this utlity, you can also manually update the saved BIOS and select a boot logo when the system goes into POST. Copy the original motherboard BIOS using the ASUS Update
utility.
2.1.1 EZ Update
EZ...
User Guide - Page 30

... keys to find the USB flash disk that contains the latest BIOS file to the USB port. 2. To update the BIOS using FAT32/16 on a single partition only.
• Ensure to load the BIOS default settings to ensure system compatibility and stability. 2.1.2 ASUS EZ Flash 2
The ASUS EZ Flash 2 feature allows you start using an OS‑based...
User Guide - Page 31

... EZ Flash 2 utility automatically. 4. ASUS H81M-P
2-3 Download the latest
BIOS file from http://support.asus.com and
save them in your USB flash drive is not supported under FreeDOS environment. Before updating BIOS • Prepare the motherboard support DVD and a USB flash drive. • Download the latest BIOS file and BIOS Updater from the ASUS website at www.asus.com. Turn on your...
User Guide - Page 32

... select boot device:
E1: ASUS DVD-E818A6T (4069MB) USB DISK 2.0 (3824MB)
UEFI: (FAT) USB DISK 2.0 (3824MB) Enter Setup
and to move selection ENTER to select boot device ESC to Drive D (USB flash drive). ISOLINUX 3.20 2006-08-26 Copyright (C) 1994-2005 H. C:/> d: D:/>
Updating the BIOS file To update the BIOS file: 1. Boot your computer then...
User Guide - Page 33

...is not supported due to select the BIOS file and press .
4.
Ensure to load the BIOS default settings to exit BIOS Updater.
6. See Chapter 2 of your computer. Restart your motherboard user guide for DOS V1.30 [2014/01/01]
Current ROM BOARD: H81M-P VER: 0302 (H :00 B :00) DATE: 07/15/2014
PATH: C:\
Update ROM BOARD: Unknown VER: Unknown DATE: Unknown
C:
FORMAN~1
D:
H81MP.CAP...
User Guide - Page 34

... any BIOS setting, try to clear the CMOS and reset the motherboard to the default value.
See section 2.10 Exit Menu for information on how to erase the RTC RAM. The BIOS screens include navigation keys and brief online help to guide you
failed to enter BIOS Setup using the BIOS Setup program.
2.2 BIOS setup program
Use the BIOS Setup program to update the BIOS or...
Asus H81M-P Reviews
We have not received any reviews for Asus yet.