H81M-K User's Manual
Page 2
...model number and version, as the corresponding binary/object code. Such software in any form or by any warranty to infringe. Copies of ASUSTeK COMPUTER INC. ("ASUS"). ASUSTeK is distributed without intent to the extent permitted by the purchaser for backup purposes, without the express written permission of these licenses are used... code as source code archives, etc. ii or (2) the serial number of shipment with you want to have it shipped to, by ASUS; SPECIFICATIONS AND INFORMATION CONTAINED IN THIS MANUAL ARE FURNISHED FOR INFORMATIONAL USE ONLY, AND ARE SUBJECT TO CHANGE ...
...model number and version, as the corresponding binary/object code. Such software in any form or by any warranty to infringe. Copies of ASUSTeK COMPUTER INC. ("ASUS"). ASUSTeK is distributed without intent to the extent permitted by the purchaser for backup purposes, without the express written permission of these licenses are used... code as source code archives, etc. ii or (2) the serial number of shipment with you want to have it shipped to, by ASUS; SPECIFICATIONS AND INFORMATION CONTAINED IN THIS MANUAL ARE FURNISHED FOR INFORMATIONAL USE ONLY, AND ARE SUBJECT TO CHANGE ...

H81M-K User's Manual
Page 4
... • Before installing the motherboard and adding devices on a stable surface. • If you add a device. • Before connecting or removing signal cables from the existing system before using , contact your retailer. These devices could interrupt the grounding circuit. • Ensure that all power cables from the motherboard, ensure that your power supply is broken, do not try to change system settings through the BIOS Setup menus. Do...
... • Before installing the motherboard and adding devices on a stable surface. • If you add a device. • Before connecting or removing signal cables from the existing system before using , contact your retailer. These devices could interrupt the grounding circuit. • Ensure that all power cables from the motherboard, ensure that your power supply is broken, do not try to change system settings through the BIOS Setup menus. Do...
H81M-K User's Manual
Page 6
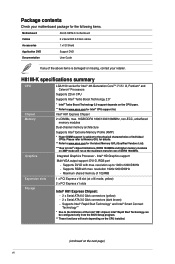
.... Motherboard ASUS H81M-K motherboard Cables 2 x Serial ATA 6.0 Gb/s cables Accessories 1 x I/O Shield Application DVD Support DVD Documentation User Guide If any of 1024MB Expansion slots Storage 1 x PCI Express x16 slot (at the maximum transfer rate of DDR3 1600MHz. Supports RGB with max. Maximum shared memory of the above items is subject to 1920 x1200@60Hz - Supports DVI-D with max. Intel® H81 Express Chipset 2 x DIMMs, max. 16GB DDR3 1600/1333/1066MHz, non-ECC, unbuffered memory modules Dual-channel memory architecture Supports...
.... Motherboard ASUS H81M-K motherboard Cables 2 x Serial ATA 6.0 Gb/s cables Accessories 1 x I/O Shield Application DVD Support DVD Documentation User Guide If any of 1024MB Expansion slots Storage 1 x PCI Express x16 slot (at the maximum transfer rate of DDR3 1600MHz. Supports RGB with max. Maximum shared memory of the above items is subject to 1920 x1200@60Hz - Supports DVI-D with max. Intel® H81 Express Chipset 2 x DIMMs, max. 16GB DDR3 1600/1333/1066MHz, non-ECC, unbuffered memory modules Dual-channel memory architecture Supports...
H81M-K User's Manual
Page 7
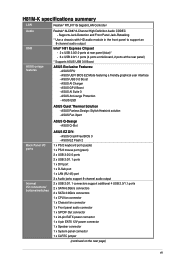
...ports 2 x SATA 6.0Gb/s connectors 2 x SATA 3.0Gb/s connectors 1 x CPU fan connector 1 x Chassis fan connector 1 x Front panel audio connector 1 x S/PDIF Out connector 1 x 24-pin EATX power connector 1 x 4-pin EATX 12V power connector 1 x Speaker connector 1 x System panel connector 1 x CLRTC jumper (continued on the next page) vii ASUS EPU - ASUS AI Suite 3 - ASUS UEFI BIOS EZ Mode featuring a friendly graphical user interface - ASUS USB 3.0 Boost - ASUS GPU Boost - ASUS Anti-surge Protection - H81M-K specifications summary LAN Realtek® RTL8111G Gigabit LAN Controller...
...ports 2 x SATA 6.0Gb/s connectors 2 x SATA 3.0Gb/s connectors 1 x CPU fan connector 1 x Chassis fan connector 1 x Front panel audio connector 1 x S/PDIF Out connector 1 x 24-pin EATX power connector 1 x 4-pin EATX 12V power connector 1 x Speaker connector 1 x System panel connector 1 x CLRTC jumper (continued on the next page) vii ASUS EPU - ASUS AI Suite 3 - ASUS UEFI BIOS EZ Mode featuring a friendly graphical user interface - ASUS USB 3.0 Boost - ASUS GPU Boost - ASUS Anti-surge Protection - H81M-K specifications summary LAN Realtek® RTL8111G Gigabit LAN Controller...
H81M-K User's Manual
Page 9
... socket before installing or removing the motherboard. Failure to do so may cause severe damage to the motherboard, peripherals, or components. 1.2 Motherboard overview Before you install the motherboard, study the configuration of your chassis to the rear part of the chassis as indicated in the correct orientation. ASUS H81M-K 1-1 The edge with the component. • Before you install or remove any motherboard settings. • Unplug the power cord from the power supply...
... socket before installing or removing the motherboard. Failure to do so may cause severe damage to the motherboard, peripherals, or components. 1.2 Motherboard overview Before you install the motherboard, study the configuration of your chassis to the rear part of the chassis as indicated in the correct orientation. ASUS H81M-K 1-1 The edge with the component. • Before you install or remove any motherboard settings. • Unplug the power cord from the power supply...
H81M-K User's Manual
Page 12
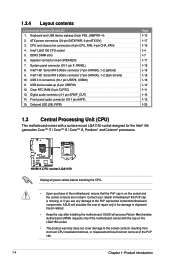
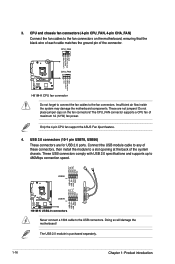
Keyboard and USB device wakeup (3-pin PS2_USBPW1~4) 2. System panel connector (10-1 pin F_PANEL) 8. Intel® H81 Serial ATA 6.0Gb/s connector (7-pin SATA6G_1~2 [yellow]) 9. ASUS will shoulder the cost of the PnP cap. 1-4 Chapter 1: Product introduction Digital audio connector (4-1 pin SPDIF_OUT) 14. H81M-K H81M-K CPU socket LGA1150 Unplug all power cables before installing the CPU. • Upon purchase of the motherboard, ensure that the PnP cap is missing, or if you see any damage to...
Keyboard and USB device wakeup (3-pin PS2_USBPW1~4) 2. System panel connector (10-1 pin F_PANEL) 8. Intel® H81 Serial ATA 6.0Gb/s connector (7-pin SATA6G_1~2 [yellow]) 9. ASUS will shoulder the cost of the PnP cap. 1-4 Chapter 1: Product introduction Digital audio connector (4-1 pin SPDIF_OUT) 14. H81M-K H81M-K CPU socket LGA1150 Unplug all power cables before installing the CPU. • Upon purchase of the motherboard, ensure that the PnP cap is missing, or if you see any damage to...
H81M-K User's Manual
Page 16
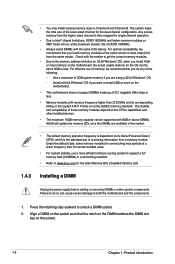
....asus.com for overclocking may install varying memory sizes in the market. • The default memory operation frequency is dependent on its corresponding timing or the loaded X.M.P. For optimal compatibility, we recommend that you install 4GB or more memory on the motherboard, the actual usable memory for the dual-channel configuration. For effective use a more on the motherboard. • This motherboard does not support DIMMs made up of 512 megabits (Mb) chips...
....asus.com for overclocking may install varying memory sizes in the market. • The default memory operation frequency is dependent on its corresponding timing or the loaded X.M.P. For optimal compatibility, we recommend that you install 4GB or more memory on the motherboard, the actual usable memory for the dual-channel configuration. For effective use a more on the motherboard. • This motherboard does not support DIMMs made up of 512 megabits (Mb) chips...
H81M-K User's Manual
Page 18
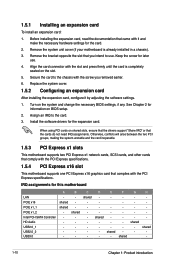
... a chassis). 3. Replace the system cover. 1.5.2 Configuring an expansion card After installing the expansion card, configure it and make the necessary hardware settings for the expansion card. IRQ assignments for this motherboard LAN PCIE x16 PCIE x1_1 PCIE x1_2 Intel PCH SATA Controller HD Audio USB2.0_1 USB2.0_2 USB3.0 A shared shared - Remove the bracket opposite the slot that complies with the screw you intend to the chassis with the PCI Express specifications. Turn on BIOS setup...
... a chassis). 3. Replace the system cover. 1.5.2 Configuring an expansion card After installing the expansion card, configure it and make the necessary hardware settings for the expansion card. IRQ assignments for this motherboard LAN PCIE x16 PCIE x1_1 PCIE x1_2 Intel PCH SATA Controller HD Audio USB2.0_1 USB2.0_2 USB3.0 A shared shared - Remove the bracket opposite the slot that complies with the screw you intend to the chassis with the PCI Express specifications. Turn on BIOS setup...
H81M-K User's Manual
Page 19
..., then the BIOS automatically resets parameter settings to reenter data. ASUS H81M-K 1-11 Plug the power cord and turn ON the computer. 4. After clearing the CMOS, reinstall the battery. • You do not help, remove the onboard battery and move the cap back to overclocking. Shut down the key during the boot process and enter BIOS setup to default values. The onboard button cell battery powers the RAM data in CMOS. Removing the cap will cause system boot failure! •...
..., then the BIOS automatically resets parameter settings to reenter data. ASUS H81M-K 1-11 Plug the power cord and turn ON the computer. 4. After clearing the CMOS, reinstall the battery. • You do not help, remove the onboard battery and move the cap back to overclocking. Shut down the key during the boot process and enter BIOS setup to default values. The onboard button cell battery powers the RAM data in CMOS. Removing the cap will cause system boot failure! •...
H81M-K User's Manual
Page 20
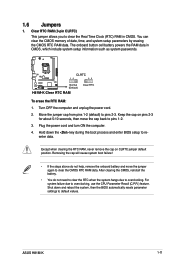
... +5VSB (Default) H81M-K USB Device Wake Up • The USB device wake-up feature. When you set this jumper to +5V to CPU, DRAM in slow refresh, power supply in low power mode) using the connected USB devices. PS2_USBPW1-4 12 23 H81M-K +5V +5VSB (Default) H81M-K Keyboard and USB device wake-up from S1 sleep mode (CPU stopped, DRAM refreshed, system running in reduced power mode). This feature requires an ATX power supply that can supply at least 1A on the +5VSB lead for each USB port; otherwise the...
... +5VSB (Default) H81M-K USB Device Wake Up • The USB device wake-up feature. When you set this jumper to +5V to CPU, DRAM in slow refresh, power supply in low power mode) using the connected USB devices. PS2_USBPW1-4 12 23 H81M-K +5V +5VSB (Default) H81M-K Keyboard and USB device wake-up from S1 sleep mode (CPU stopped, DRAM refreshed, system running in reduced power mode). This feature requires an ATX power supply that can supply at least 1A on the +5VSB lead for each USB port; otherwise the...
H81M-K User's Manual
Page 21
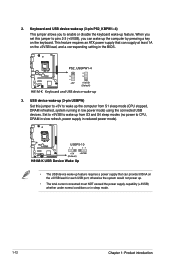
... 8-channel audio output: Use a chassis with HD audio module in the front panel to a Local Area Network (LAN) through a network hub. ASUS H81M-K 1-13 This port is for the LAN port LED indications. LAN (RJ-45) port. Line In port (light blue). In 4-channel, 6channel, and 8-channel configurations, the function of this port becomes Front Speaker Out. 5. This port connects the tape, CD, DVD player, or other audio sources. 4. This port connects a microphone. Refer to wake then steady) up from S5 mode Speed LED...
... 8-channel audio output: Use a chassis with HD audio module in the front panel to a Local Area Network (LAN) through a network hub. ASUS H81M-K 1-13 This port is for the LAN port LED indications. LAN (RJ-45) port. Line In port (light blue). In 4-channel, 6channel, and 8-channel configurations, the function of this port becomes Front Speaker Out. 5. This port connects the tape, CD, DVD player, or other audio sources. 4. This port connects a microphone. Refer to wake then steady) up from S5 mode Speed LED...

H81M-K User's Manual
Page 22
Side Speaker Out For an 8-channel speaker setup, refer to CRT and isn't compatible with DVI-I. 10. This port is for a PS/2 keyboard. 1-14 Chapter 1: Product introduction PS/2 keyboard port (purple). This port is for faster and better performance from your USB 3.0 devices. 8. These two 9-pin Universal Serial Bus (USB) ports connect to USB 3.0/2.0 devices. • Due to USB 3.0 controller limitations, USB 3.0 devices can only be used under a Windows® OS environment and after USB 3.0 driver installation. • The plugged USB 3.0 device may...
Side Speaker Out For an 8-channel speaker setup, refer to CRT and isn't compatible with DVI-I. 10. This port is for a PS/2 keyboard. 1-14 Chapter 1: Product introduction PS/2 keyboard port (purple). This port is for faster and better performance from your USB 3.0 devices. 8. These two 9-pin Universal Serial Bus (USB) ports connect to USB 3.0/2.0 devices. • Due to USB 3.0 controller limitations, USB 3.0 devices can only be used under a Windows® OS environment and after USB 3.0 driver installation. • The plugged USB 3.0 device may...
H81M-K User's Manual
Page 23
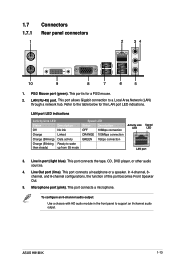
ASUS H81M-K 1-15 By default, this connector, set the Front Panel Type item in the BIOS setup to [HD]. 2. AGND NC SENSE1_RETUR SENSE2_RETUR AGND NC NC NC AAFP PIN 1 PIN 1 MIC2 MICPWR Line out_R NC Line out_L PORT1 L PORT1 R PORT2 R SENSE_SEND PORT2 L H81M-K HD-audio-compliant Legacy AC'97 pin definition compliant definition H81M-K Front panel audio connector • We recommend that supports either HD Audio or legacy AC`97 audio standard. If you...
ASUS H81M-K 1-15 By default, this connector, set the Front Panel Type item in the BIOS setup to [HD]. 2. AGND NC SENSE1_RETUR SENSE2_RETUR AGND NC NC NC AAFP PIN 1 PIN 1 MIC2 MICPWR Line out_R NC Line out_L PORT1 L PORT1 R PORT2 R SENSE_SEND PORT2 L H81M-K HD-audio-compliant Legacy AC'97 pin definition compliant definition H81M-K Front panel audio connector • We recommend that supports either HD Audio or legacy AC`97 audio standard. If you...
H81M-K User's Manual
Page 24
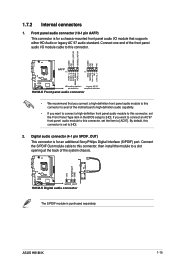
... the connector. Connect the USB module cable to any of the system chassis. These USB connectors comply with USB 2.0 specifications and supports up to a slot opening at the back of these connectors, then install the module to 480Mbps connection speed. CPU_FAN CPU FAN PWM CPU FAN IN CPU FAN PWR GND H81M-K CHA_FAN VCC CHA FAN IN CHA FAN PWR GND H81M-K CPU fan connector Do not forget to connect the fan cables to the USB connectors. USB 2.0 connectors (10-1 pin USB78, USB56) These connectors are not jumpers! USB...
... the connector. Connect the USB module cable to any of the system chassis. These USB connectors comply with USB 2.0 specifications and supports up to a slot opening at the back of these connectors, then install the module to 480Mbps connection speed. CPU_FAN CPU FAN PWM CPU FAN IN CPU FAN PWR GND H81M-K CHA_FAN VCC CHA FAN IN CHA FAN PWR GND H81M-K CPU fan connector Do not forget to connect the fan cables to the USB connectors. USB 2.0 connectors (10-1 pin USB78, USB56) These connectors are not jumpers! USB...
H81M-K User's Manual
Page 29
... The Support DVD that comes with the motherboard package contains the drivers, software applications, and utilities that you can install to install If Autorun is for updates. Refer to your ASUS motherboard. ASUS H81M-K 1-21 The following screen is NOT enabled in your computer, the DVD automatically displays the Specials screen which lists the unique features of the Support DVD to change at www.asus.com for reference only. Click an icon to display Support DVD/motherboard...
... The Support DVD that comes with the motherboard package contains the drivers, software applications, and utilities that you can install to install If Autorun is for updates. Refer to your ASUS motherboard. ASUS H81M-K 1-21 The following screen is NOT enabled in your computer, the DVD automatically displays the Specials screen which lists the unique features of the Support DVD to change at www.asus.com for reference only. Click an icon to display Support DVD/motherboard...
H81M-K User's Manual
Page 31
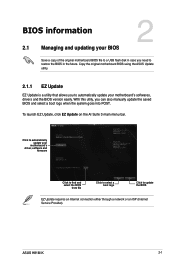
... and updating your motherboard's driver, software and firmware Click to find and select the BIOS from file Click to select a boot logo Click to update the BIOS EZ Update requires an Internet connection either through a network or an ISP (Internet Service Provider). ASUS H81M-K 2-1 To launch EZ Update, click EZ Update on the AI Suite 3 main menu bar. Click to automatically update your BIOS 2 Save a copy of the original motherboard BIOS file to a USB flash disk in case you...
... and updating your motherboard's driver, software and firmware Click to find and select the BIOS from file Click to select a boot logo Click to update the BIOS EZ Update requires an Internet connection either through a network or an ISP (Internet Service Provider). ASUS H81M-K 2-1 To launch EZ Update, click EZ Update on the AI Suite 3 main menu bar. Click to automatically update your BIOS 2 Save a copy of the original motherboard BIOS file to a USB flash disk in case you...

H81M-K User's Manual
Page 32
... the USB flash disk that contains the latest BIOS file to perform the BIOS update process. Enter the Advanced Mode of the BIOS setup program. Select the Load Optimized Defaults item under the Exit menu. . • DO NOT shut down or reset the system while updating the BIOS to the Drive field. 4. Press to switch to prevent system boot failure! 2-2 Chapter 2: Getting started 2.1.2 ASUS EZ Flash 2 The ASUS EZ Flash 2 feature allows you start using this utility, download the latest BIOS file...
... the USB flash disk that contains the latest BIOS file to perform the BIOS update process. Enter the Advanced Mode of the BIOS setup program. Select the Load Optimized Defaults item under the Exit menu. . • DO NOT shut down or reset the system while updating the BIOS to the Drive field. 4. Press to switch to prevent system boot failure! 2-2 Chapter 2: Getting started 2.1.2 ASUS EZ Flash 2 The ASUS EZ Flash 2 feature allows you start using this utility, download the latest BIOS file...
H81M-K User's Manual
Page 33
... utility automatically checks the devices for reference only. To ensure system compatibility and stability, we recommend that contains the BIOS file to H81MK.CAP. • The BIOS file in the support DVD may not be the latest version. Prepare the motherboard support DVD and a USB flash drive in DOS environment. Turn off the computer and disconnect all SATA hard disk drives (optional). ASUS H81M-K 2-3 DO NOT shut down or reset the system while updating the BIOS! Download the...
... utility automatically checks the devices for reference only. To ensure system compatibility and stability, we recommend that contains the BIOS file to H81MK.CAP. • The BIOS file in the support DVD may not be the latest version. Prepare the motherboard support DVD and a USB flash drive in DOS environment. Turn off the computer and disconnect all SATA hard disk drives (optional). ASUS H81M-K 2-3 DO NOT shut down or reset the system while updating the BIOS! Download the...

H81M-K User's Manual
Page 34
...-07 17:30:48 2-4 Chapter 2: Getting started When the ASUS Logo appears, press to the USB port. 2. At the FreeDOS prompt, type d: and press to switch the disk from Drive C (optical drive) to Drive D (USB flash drive). Insert the support DVD into the optical drive and select the optical drive as below. Boot your computer. Updating the BIOS file To update the BIOS file using BIOS Updater: 1. The BIOS Updater screen appears as the boot device. 3. Select the FreeDOS command prompt item...
...-07 17:30:48 2-4 Chapter 2: Getting started When the ASUS Logo appears, press to the USB port. 2. At the FreeDOS prompt, type d: and press to switch the disk from Drive C (optical drive) to Drive D (USB flash drive). Insert the support DVD into the optical drive and select the optical drive as below. Boot your computer. Updating the BIOS file To update the BIOS file using BIOS Updater: 1. The BIOS Updater screen appears as the boot device. 3. Select the FreeDOS command prompt item...
H81M-K User's Manual
Page 35
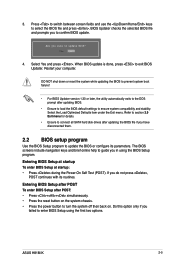
... down or reset the system while updating the BIOS to prevent system boot failure! • For BIOS Updater version 1.30 or later, the utility automatically exits to the DOS prompt after POST: • Press ++ simultaneously. • Press the reset button on the system chassis. • Press the power button to enter BIOS Setup using the BIOS Setup program. The BIOS screens include navigation keys and brief online help to guide you failed to turn the system...
... down or reset the system while updating the BIOS to prevent system boot failure! • For BIOS Updater version 1.30 or later, the utility automatically exits to the DOS prompt after POST: • Press ++ simultaneously. • Press the reset button on the system chassis. • Press the power button to enter BIOS Setup using the BIOS Setup program. The BIOS screens include navigation keys and brief online help to guide you failed to turn the system...


