
User Guide
Page 3
... iv About this guide iv Package contents vi H81M-CT specifications summary vi Chapter 1: Product introduction 1.1 Before you proceed 1-1 1.2 Motherboard overview 1-1 1.3 Central Processing Unit (CPU 1-3 1.4 System memory 1-7 1.5 Expansion slots 1-9 1.6 Jumpers 1-11 1.7 Connectors 1-12 1.8 Onboard LEDs 1-19 1.9 Software support 1-20 Chapter 2: BIOS information 2.1 Managing and updating your BIOS 2-1 2.2 BIOS setup program 2-6 2.3 My Favorites 2-9 2.4 Main menu 2-10...
... iv About this guide iv Package contents vi H81M-CT specifications summary vi Chapter 1: Product introduction 1.1 Before you proceed 1-1 1.2 Motherboard overview 1-1 1.3 Central Processing Unit (CPU 1-3 1.4 System memory 1-7 1.5 Expansion slots 1-9 1.6 Jumpers 1-11 1.7 Connectors 1-12 1.8 Onboard LEDs 1-19 1.9 Software support 1-20 Chapter 2: BIOS information 2.1 Managing and updating your BIOS 2-1 2.2 BIOS setup program 2-6 2.3 My Favorites 2-9 2.4 Main menu 2-10...
User Guide
Page 4
... all the manuals that came with the product, contact a qualified service technician or your retailer. Detailed descriptions fo the BIOS parameters are unplugged. • Seek professional assistance before using an adapter or extension cord. How this guide This user guide...broken, do not try to moisture. • Place the product on the motherboard. • Chapter 2: BIOS information This chapter discusses changing system settings through the BIOS Setup menus. Operation safety • Before installing the motherboard and adding components, carefully read all power cables ...
... all the manuals that came with the product, contact a qualified service technician or your retailer. Detailed descriptions fo the BIOS parameters are unplugged. • Seek professional assistance before using an adapter or extension cord. How this guide This user guide...broken, do not try to moisture. • Place the product on the motherboard. • Chapter 2: BIOS information This chapter discusses changing system settings through the BIOS Setup menus. Operation safety • Before installing the motherboard and adding components, carefully read all power cables ...
User Guide
Page 7
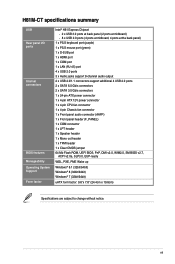
H81M-CT specifications summary USB Rear panel I/O ports Internal connectors BIOS features Manageability Operating System Support Form factor Intel® H81 Express Chipset - 2 x USB 3.0 ports at back panel (2 ports at midboard) - 8 x USB 2.0 ports (4 ports at midboard, ...header (F_PANEL) 1 x COM connector 1 x LPT header 1 x Speaker header 1 x Mono out header 1 x TPM header 1 x Clear CMOS jumper 64 Mb Flash ROM, UEFI BIOS, PnP, DMI v2.0, WfM2.0, SM BIOS v2.7, ACPI v2.0a, SLP3.0, EUP-ready WOL, PXE, PME Wake up Windows® 8.1 (32bit/64bit) Windows® 8 (32bit/64bit) Windows® 7 (32bit...
H81M-CT specifications summary USB Rear panel I/O ports Internal connectors BIOS features Manageability Operating System Support Form factor Intel® H81 Express Chipset - 2 x USB 3.0 ports at back panel (2 ports at midboard) - 8 x USB 2.0 ports (4 ports at midboard, ...header (F_PANEL) 1 x COM connector 1 x LPT header 1 x Speaker header 1 x Mono out header 1 x TPM header 1 x Clear CMOS jumper 64 Mb Flash ROM, UEFI BIOS, PnP, DMI v2.0, WfM2.0, SM BIOS v2.7, ACPI v2.0a, SLP3.0, EUP-ready WOL, PXE, PME Wake up Windows® 8.1 (32bit/64bit) Windows® 8 (32bit/64bit) Windows® 7 (32bit...
User Guide
Page 10
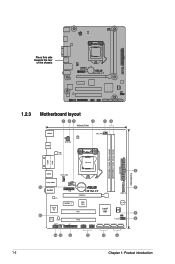
Place this side towards the rear of the chassis H81M-CT 1.2.3 Motherboard layout 1 23 4 19.8cm(7.8in) 15 KBMS HDMI DIGI +VRM ATX12V ASM 1442K CPU_FAN COM1 VGA DDR3 DIMM_A1 (64bit, 240-pin module) DDR3 DIMM_B1 (... module) EATXPWR 24.4cm(9.6in) LGA1150 2 USB56 CHA_FAN LAN_USB34 COM2 16 AUDIO RTL 8111G BATTERY TPM H81M-CT PCIEX16 6 USB3_12 15 Super I/O PCIEX1_1 ASM 1083 PCI1 ALC 887- VD2 SB_PWR PCI2 BUZZER Intel® 8Mb H81 BIOS 7 CLRTC F_PANEL 8 AAFP MONO_OUT LPT USB910 USB1112 SATA6G_1 SATA6G_2 SATA3G_1 SATA3G_2 14 13 12 11 10...
Place this side towards the rear of the chassis H81M-CT 1.2.3 Motherboard layout 1 23 4 19.8cm(7.8in) 15 KBMS HDMI DIGI +VRM ATX12V ASM 1442K CPU_FAN COM1 VGA DDR3 DIMM_A1 (64bit, 240-pin module) DDR3 DIMM_B1 (... module) EATXPWR 24.4cm(9.6in) LGA1150 2 USB56 CHA_FAN LAN_USB34 COM2 16 AUDIO RTL 8111G BATTERY TPM H81M-CT PCIEX16 6 USB3_12 15 Super I/O PCIEX1_1 ASM 1083 PCI1 ALC 887- VD2 SB_PWR PCI2 BUZZER Intel® 8Mb H81 BIOS 7 CLRTC F_PANEL 8 AAFP MONO_OUT LPT USB910 USB1112 SATA6G_1 SATA6G_2 SATA3G_1 SATA3G_2 14 13 12 11 10...
User Guide
Page 17
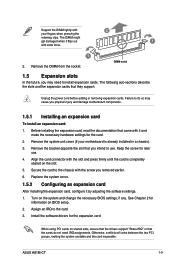
... Remove the system unit cover (if your fingers when pressing the retaining clips. Turn on the slot. 5. See Chapter 2 for the card. 2. ASUS H81M-CT 1-9 Support the DIMM lightly with extra force. 1 2. The DIMM might get damaged when it by adjusting the software settings. 1. DIMM notch 1.5 Expansion...slots, ensure that the drivers support "Share IRQ" or that came with it and make the necessary hardware settings for information on BIOS setup. 2. Unplug the power cord before adding or removing expansion cards. Align the card connector with the screw you physical injury ...
... Remove the system unit cover (if your fingers when pressing the retaining clips. Turn on the slot. 5. See Chapter 2 for the card. 2. ASUS H81M-CT 1-9 Support the DIMM lightly with extra force. 1 2. The DIMM might get damaged when it by adjusting the software settings. 1. DIMM notch 1.5 Expansion...slots, ensure that the drivers support "Share IRQ" or that came with it and make the necessary hardware settings for information on BIOS setup. 2. Unplug the power cord before adding or removing expansion cards. Align the card connector with the screw you physical injury ...
User Guide
Page 19
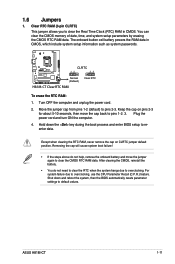
Hold down and reboot the system, then the BIOS automatically resets parameter settings to reenter data. After clearing the CMOS, reinstall the battery. • You do not help, remove the onboard battery and move ... Recall (C.P.R.) feature. Shut down the key during the boot process and enter BIOS setup to default values. ASUS H81M-CT 1-11 Clear RTC RAM (3-pin CLRTC) This jumper allows you to clear the CMOS RTC RAM data. H81M-CT CLRTC 12 23 Normal (Default) H81M-CT Clear RTC RAM Clear RTC To erase the RTC RAM: 1. Turn OFF...
Hold down and reboot the system, then the BIOS automatically resets parameter settings to reenter data. After clearing the CMOS, reinstall the battery. • You do not help, remove the onboard battery and move ... Recall (C.P.R.) feature. Shut down the key during the boot process and enter BIOS setup to default values. ASUS H81M-CT 1-11 Clear RTC RAM (3-pin CLRTC) This jumper allows you to clear the CMOS RTC RAM data. H81M-CT CLRTC 12 23 Normal (Default) H81M-CT Clear RTC RAM Clear RTC To erase the RTC RAM: 1. Turn OFF...
User Guide
Page 23
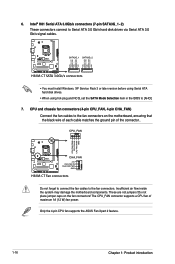
...• When using hot-plug and NCQ, set the SATA Mode Selection item in the BIOS setup to this connector, set the Front Panel Type item in the BIOS to Serial ATA 6.0 Gb/s hard disk drives via Serial ATA 6.0 Gb/s signal cables. ...~2) These connectors connect to [AHCI]. See section 2.6.7 Onboard Devices Configuration for details. ASUS H81M-CT 1-15 H81M-CT SATA6G_1 SATA6G_2 GND RSATA_RXP1 RSATA_RXN1 GND RSATA_TXN1 RSATA_TXP1 GND GND RSATA_RXP2 RSATA_RXN2 GND RSATA_TXN2 RSATA_TXP2 GND H81M-CT SATA 6.0Gb/s connectors • You must install Windows. By default, this connector is...
...• When using hot-plug and NCQ, set the SATA Mode Selection item in the BIOS setup to this connector, set the Front Panel Type item in the BIOS to Serial ATA 6.0 Gb/s hard disk drives via Serial ATA 6.0 Gb/s signal cables. ...~2) These connectors connect to [AHCI]. See section 2.6.7 Onboard Devices Configuration for details. ASUS H81M-CT 1-15 H81M-CT SATA6G_1 SATA6G_2 GND RSATA_RXP1 RSATA_RXN1 GND RSATA_TXN1 RSATA_TXP1 GND GND RSATA_RXP2 RSATA_RXN2 GND RSATA_TXN2 RSATA_TXP2 GND H81M-CT SATA 6.0Gb/s connectors • You must install Windows. By default, this connector is...
User Guide
Page 24
... before using Serial ATA hard disk drives. • When using hot-plug and NCQ, set the SATA Mode Selection item in the BIOS to the fan connectors. These are not jumpers! Do not place jumper caps on the motherboard, ensuring that the black wire of each...to [AHCI] 7. Insufficient air flow inside the system may damage the motherboard components. 6. Only the 4-pin CPU fan supports the ASUS Fan Xpert 2 feature. 1-16 Chapter 1: Product introduction H81M-CT SATA3G_1 SATA3G_2 GND RSATA_RXP1 RSATA_RXN1 GND RSATA_TXN1 RSATA_TXP1 GND GND RSATA_RXP2 RSATA_RXN2 GND RSATA_TXN2 RSATA_TXP2 GND...
... before using Serial ATA hard disk drives. • When using hot-plug and NCQ, set the SATA Mode Selection item in the BIOS to the fan connectors. These are not jumpers! Do not place jumper caps on the motherboard, ensuring that the black wire of each...to [AHCI] 7. Insufficient air flow inside the system may damage the motherboard components. 6. Only the 4-pin CPU fan supports the ASUS Fan Xpert 2 feature. 1-16 Chapter 1: Product introduction H81M-CT SATA3G_1 SATA3G_2 GND RSATA_RXP1 RSATA_RXN1 GND RSATA_TXN1 RSATA_TXP1 GND GND RSATA_RXP2 RSATA_RXN2 GND RSATA_TXN2 RSATA_TXP2 GND...
User Guide
Page 29
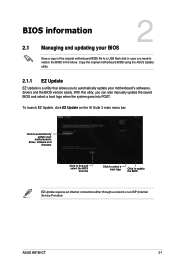
... driver, software and firmware Click to find and select the BIOS from file Click to select a boot logo Click to update the BIOS EZ Update requires an Internet connection either through a network or an ISP (Internet Service Provider). ASUS H81M-CT 2-1 To launch EZ Update, click EZ Update on the AI... Suite 3 main menu bar. Click to automatically update your BIOS 2 Save a copy of the original motherboard BIOS file to a USB flash disk in case you need to ...
... driver, software and firmware Click to find and select the BIOS from file Click to select a boot logo Click to update the BIOS EZ Update requires an Internet connection either through a network or an ISP (Internet Service Provider). ASUS H81M-CT 2-1 To launch EZ Update, click EZ Update on the AI... Suite 3 main menu bar. Click to automatically update your BIOS 2 Save a copy of the original motherboard BIOS file to a USB flash disk in case you need to ...
User Guide
Page 30
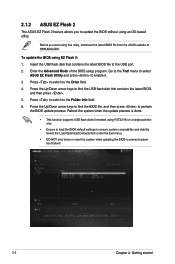
Before you to the USB port. 2. To update the BIOS using this utility, download the latest BIOS file from the ASUS website at www.asus.com. Press the Up/Down arrow keys to find the BIOS file, and then press to prevent system boot failure! 2-2 Chapter 2: Getting started Select the Load Optimized ... using FAT32/16 on a single partition only. • Ensure to load the BIOS default settings to the Folder Info field. 6. Enter the Advanced Mode of the BIOS setup program. Go to the Tool menu to select ASUS EZ Flash Utility and press to the Drive field. 4. Press to switch to enable...
Before you to the USB port. 2. To update the BIOS using this utility, download the latest BIOS file from the ASUS website at www.asus.com. Press the Up/Down arrow keys to find the BIOS file, and then press to prevent system boot failure! 2-2 Chapter 2: Getting started Select the Load Optimized ... using FAT32/16 on a single partition only. • Ensure to load the BIOS default settings to the Folder Info field. 6. Enter the Advanced Mode of the BIOS setup program. Go to the Tool menu to select ASUS EZ Flash Utility and press to the Drive field. 4. Press to switch to enable...
User Guide
Page 31
... formatted using this utility, rename the BIOS file in the removable device into H81MCT.CAP. • The BIOS file in the support DVD may not be the latest version. The succeeding utility screens are for the BIOS file. Before updating BIOS 1. ASUS H81M-CT 2-3 DO NOT shut down or reset... the system while updating the BIOS! Download the latest BIOS file and BIOS Updater from the ASUS website at http://support.asus.com and save the BIOS file and BIOS Updater to restore the BIOS file when it ...
... formatted using this utility, rename the BIOS file in the removable device into H81MCT.CAP. • The BIOS file in the support DVD may not be the latest version. The succeeding utility screens are for the BIOS file. Before updating BIOS 1. ASUS H81M-CT 2-3 DO NOT shut down or reset... the system while updating the BIOS! Download the latest BIOS file and BIOS Updater from the ASUS website at http://support.asus.com and save the BIOS file and BIOS Updater to restore the BIOS file when it ...
User Guide
Page 32
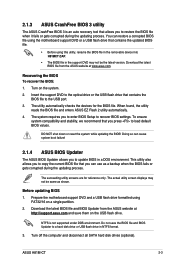
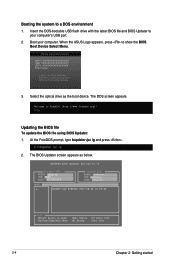
...: 1. Insert the DOS-bootable USB flash drive with the latest BIOS file and BIOS Updater to your computer. ASUSTek BIOS Updater for DOS V1.30 H81M-CT 0803 03/30/2015 H81MCT.CAP 8390656 2015-04-24 15:25:48 2-4 Chapter 2: Getting started When the ASUS Logo appears, press to a DOS environment 1. Select the optical drive...
...: 1. Insert the DOS-bootable USB flash drive with the latest BIOS file and BIOS Updater to your computer. ASUSTek BIOS Updater for DOS V1.30 H81M-CT 0803 03/30/2015 H81MCT.CAP 8390656 2015-04-24 15:25:48 2-4 Chapter 2: Getting started When the ASUS Logo appears, press to a DOS environment 1. Select the optical drive...
User Guide
Page 33
... you to ensure system compatibility and stability. Press to switch between screen fields and use the keys to exit BIOS Updater. When BIOS update is done, press to select the BIOS file and press . ASUS H81M-CT 2-5 Refer to section 2.10 Exit menu for details. • Ensure to connect all SATA hard disk drives after updating...
... you to ensure system compatibility and stability. Press to switch between screen fields and use the keys to exit BIOS Updater. When BIOS update is done, press to select the BIOS file and press . ASUS H81M-CT 2-5 Refer to section 2.10 Exit menu for details. • Ensure to connect all SATA hard disk drives after updating...
User Guide
Page 34
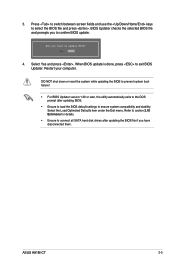
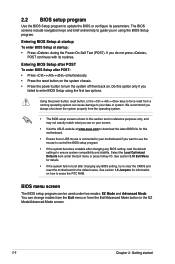
... at startup To enter BIOS Setup at www.asus.com to download the latest BIOS file for details. • If the system fails to boot after POST: • Press ++ simultaneously. • Press the reset button on the system chassis. • ... used under the Exit menu or press hotkey F5. If you see on your screen. • Visit the ASUS website at startup: • Press during the Power-On Self Test (POST). 2.2 BIOS setup program Use the BIOS Setup program to update the BIOS or configure its routines. See section 1.6 Jumpers for information on . Entering...
... at startup To enter BIOS Setup at www.asus.com to download the latest BIOS file for details. • If the system fails to boot after POST: • Press ++ simultaneously. • Press the reset button on the system chassis. • ... used under the Exit menu or press hotkey F5. If you see on your screen. • Visit the ASUS website at startup: • Press during the Power-On Self Test (POST). 2.2 BIOS setup program Use the BIOS Setup program to update the BIOS or configure its routines. See section 1.6 Jumpers for information on . Entering...
User Guide
Page 35
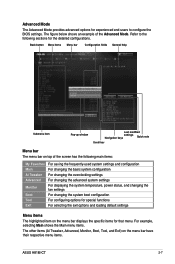
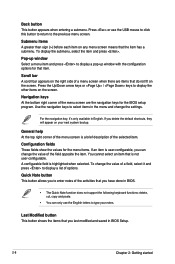
... special functions For selecting the exit options and loading default settings Menu items The highlighted item on the menu bar have their respective menu items. ASUS H81M-CT 2-7 Back button Menu items Menu bar Configuration fields General help Submenu item Pop-up window Last modified settings Navigation keys Quick note Scroll bar Menu... items (Ai Tweaker, Advanced, Monitor, Boot, Tool, and Exit) on the menu bar displays the specific items for the detailed configurations. Refer to configure the BIOS settings.
... special functions For selecting the exit options and loading default settings Menu items The highlighted item on the menu bar have their respective menu items. ASUS H81M-CT 2-7 Back button Menu items Menu bar Configuration fields General help Submenu item Pop-up window Last modified settings Navigation keys Quick note Scroll bar Menu... items (Ai Tweaker, Advanced, Monitor, Boot, Tool, and Exit) on the menu bar displays the specific items for the detailed configurations. Refer to configure the BIOS settings.
User Guide
Page 36
... the navigation key, it and press to type your next system bootup. Last Modified button This button shows the items that you have done in BIOS. • The Quick Note function does not support the following keyboard functions: delete, cut, copy and paste. • You can change the settings.... If you can only use the USB mouse to click this button to return to select items in BIOS Setup. 2-8 Chapter 2: Getting started Pop-up window with the configuration options for the BIOS setup program. Press or use the English letters to display a list of the menu screen is not...
... the navigation key, it and press to type your next system bootup. Last Modified button This button shows the items that you have done in BIOS. • The Quick Note function does not support the following keyboard functions: delete, cut, copy and paste. • You can change the settings.... If you can only use the USB mouse to click this button to return to select items in BIOS Setup. 2-8 Chapter 2: Getting started Pop-up window with the configuration options for the BIOS setup program. Press or use the English letters to display a list of the menu screen is not...
User Guide
Page 37
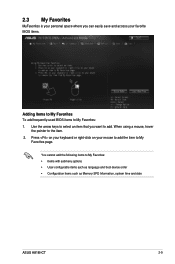
... and access your mouse to add the item to add. Press on your keyboard or right-click on your favorite BIOS items. Adding items to My Favorites To add frequently-used BIOS items to My Favorites: 1. When using a mouse, hover the pointer to My Favorites: • Items with... submenu options • User-configurable items such as language and boot device order • Configuration items such as Memory SPD Information, system time and date ASUS H81M-CT 2-9 You ...
... and access your mouse to add the item to add. Press on your keyboard or right-click on your favorite BIOS items. Adding items to My Favorites To add frequently-used BIOS items to My Favorites: 1. When using a mouse, hover the pointer to My Favorites: • Items with... submenu options • User-configurable items such as language and boot device order • Configuration items such as Memory SPD Information, system time and date ASUS H81M-CT 2-9 You ...

User Guide
Page 38
... Chapter 2: Getting started After you set the system date, time, language, and security settings. 2.4.1 System Language [English] Allows you to clear the BIOS password. See section 1.6 Jumpers for information on how to erase the RTC RAM. • The Administrator or User Password items on top of the... BIOS Setup program. Configuration options: [English] [Español 2.4.2 System Date [Day xx/xx/xxxx] Allows you to set the system date. 2.4.3 ...
... Chapter 2: Getting started After you set the system date, time, language, and security settings. 2.4.1 System Language [English] Allows you to clear the BIOS password. See section 1.6 Jumpers for information on how to erase the RTC RAM. • The Administrator or User Password items on top of the... BIOS Setup program. Configuration options: [English] [Español 2.4.2 System Date [Day xx/xx/xxxx] Allows you to set the system date. 2.4.3 ...
User Guide
Page 39
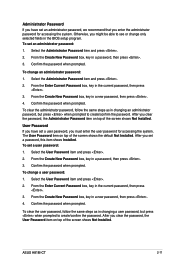
... the default Not Installed. Confirm the password when prompted. From the Create New Password box, key in a password, then press . 3. ASUS H81M-CT 2-11 Confirm the password when prompted. To clear the administrator password, follow the same steps as in changing an administrator password, but press...3. To set a user password: 1. To change a user password: 1. To clear the user password, follow the same steps as in the BIOS setup program. Otherwise, you might be able to create/confirm the password. After you clear the password, the User Password item on top of the...
... the default Not Installed. Confirm the password when prompted. From the Create New Password box, key in a password, then press . 3. ASUS H81M-CT 2-11 Confirm the password when prompted. To clear the administrator password, follow the same steps as in changing an administrator password, but press...3. To set a user password: 1. To change a user password: 1. To clear the user password, follow the same steps as in the BIOS setup program. Otherwise, you might be able to create/confirm the password. After you clear the password, the User Password item on top of the...
User Guide
Page 41
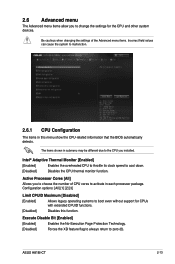
... shown in submenu may be different due to the CPU you to activate in this function. 2.6 Advanced menu The Advanced menu items allow you installed. ASUS H81M-CT 2-13 Intel® Adaptive Thermal Monitor [Enabled] [Enabled] Enables the overheated CPU to throttle its clock speed to zero (0). Active Processor Cores [All] Allows you... settings of CPU cores to change the settings for CPUs with extended CPUID functions. [Disabled] Disables this menu show the CPU-related information that the BIOS automatically detects.
... shown in submenu may be different due to the CPU you to activate in this function. 2.6 Advanced menu The Advanced menu items allow you installed. ASUS H81M-CT 2-13 Intel® Adaptive Thermal Monitor [Enabled] [Enabled] Enables the overheated CPU to throttle its clock speed to zero (0). Active Processor Cores [All] Allows you... settings of CPU cores to change the settings for CPUs with extended CPUID functions. [Disabled] Disables this menu show the CPU-related information that the BIOS automatically detects.


