
A8V-MX User''s Manual for English Edition
Page 3
Contents Notices vi Safety information vii A8V-MX specifications summary viii Chapter 1: Product introduction 1.1 Welcome 1-2 1.2 Package contents 1-2 1.3 Special features 1-2 1.3.1 Product highlights 1-2 1.3.2 Innovative ASUS features 1-4 1.4 Before you proceed 1-5 1.5 Motherboard overview 1-6 1.5.1 Motherboard layout 1-6 1.5.2 Placement direction 1-7 1.5.3 Screw holes 1-7 1.6 Central Processing Unit (CPU 1-8 1.7 System memory 1-10 1.7.1 Overview 1-10 1.7.2 Memory configurations 1-10 1.7.3 Installing a DIMM 1-14 1.7.4 Removing a DIMM 1-14 1.8 Expansion slots...
Contents Notices vi Safety information vii A8V-MX specifications summary viii Chapter 1: Product introduction 1.1 Welcome 1-2 1.2 Package contents 1-2 1.3 Special features 1-2 1.3.1 Product highlights 1-2 1.3.2 Innovative ASUS features 1-4 1.4 Before you proceed 1-5 1.5 Motherboard overview 1-6 1.5.1 Motherboard layout 1-6 1.5.2 Placement direction 1-7 1.5.3 Screw holes 1-7 1.6 Central Processing Unit (CPU 1-8 1.7 System memory 1-10 1.7.1 Overview 1-10 1.7.2 Memory configurations 1-10 1.7.3 Installing a DIMM 1-14 1.7.4 Removing a DIMM 1-14 1.8 Expansion slots...

A8V-MX User''s Manual for English Edition
Page 4
Contents Chapter 2: BIOS setup 2.1 Managing and updating your BIOS 2-2 2.1.1 Creating a bootable floppy disk 2-2 2.1.2 ASUS EZ Flash utility 2-3 2.1.3 AFUDOS utility 2-4 2.1.4 ASUS CrashFree BIOS 2 utility 2-6 2.1.5 ASUS Update utility 2-8 2.2 BIOS setup program 2-11 2.2.1 BIOS menu screen 2-12 2.2.2 Menu bar 2-12 2.2.3 Navigation ...Master/Slave 2-15 2.3.5 System Information 2-16 2.4 Advanced menu 2-17 2.4.1 JumperFree Configuration 2-17 2.4.2 USB Configuration 2-18 2.4.3 CPU Configuration 2-20 2.4.4 Chipset 2-21 2.4.5 Onboard Devices Configuration 2-28 2.4.6 PCI PnP 2-29 iv
Contents Chapter 2: BIOS setup 2.1 Managing and updating your BIOS 2-2 2.1.1 Creating a bootable floppy disk 2-2 2.1.2 ASUS EZ Flash utility 2-3 2.1.3 AFUDOS utility 2-4 2.1.4 ASUS CrashFree BIOS 2 utility 2-6 2.1.5 ASUS Update utility 2-8 2.2 BIOS setup program 2-11 2.2.1 BIOS menu screen 2-12 2.2.2 Menu bar 2-12 2.2.3 Navigation ...Master/Slave 2-15 2.3.5 System Information 2-16 2.4 Advanced menu 2-17 2.4.1 JumperFree Configuration 2-17 2.4.2 USB Configuration 2-18 2.4.3 CPU Configuration 2-20 2.4.4 Chipset 2-21 2.4.5 Onboard Devices Configuration 2-28 2.4.6 PCI PnP 2-29 iv

A8V-MX User''s Manual for English Edition
Page 8
A8V-MX specifications summary CPU Chipset System Bus Memory Expansion slots Graphics Storage Audio LAN USB Special features BIOS features Socket 939 for AMD Athlon™ 64FX/Athlon™ 64 ... Realtek® ALC653 6-channel CODEC S/PDIF out interface Realtek® RTL8201CL 10/100 LAN PHY Supports up to 8 USB 2.0 ports ASUS Q-Fan ASUS MyLogo™ 4 Mb Flash ROM, AMI BIOS, PnP, DMI, WfM2.0, ACPI 2.0a, SM BIOS 2.3, PXE flash utility ASUS EZ Flash ASUS CrashFree BIOS 2 ASUS C.P.R. (CPU Parameter Recall) (continued on the next page) viii
A8V-MX specifications summary CPU Chipset System Bus Memory Expansion slots Graphics Storage Audio LAN USB Special features BIOS features Socket 939 for AMD Athlon™ 64FX/Athlon™ 64 ... Realtek® ALC653 6-channel CODEC S/PDIF out interface Realtek® RTL8201CL 10/100 LAN PHY Supports up to 8 USB 2.0 ports ASUS Q-Fan ASUS MyLogo™ 4 Mb Flash ROM, AMI BIOS, PnP, DMI, WfM2.0, ACPI 2.0a, SM BIOS 2.3, PXE flash utility ASUS EZ Flash ASUS CrashFree BIOS 2 ASUS C.P.R. (CPU Parameter Recall) (continued on the next page) viii

A8V-MX User''s Manual for English Edition
Page 9
...A8V-MX specifications summary Rear panel Internal connectors Power Requirement Form Factor Manageability Support CD contents 1 x Parallel port 1 x LAN (RJ-45) port 4 x USB 2.0 ports 1 x Serial port (COM) 1 x PS/2 keyboard port 1 x PS/2 mouse port 6-channel audio ports 1 x Floppy disk drive connector 1 x Primary IDE connector 1 x Secondary IDE connector 4 x Serial ATA connectors 1 x Chassis intrusion connector 1 x CPU...WOL/WOR by PME, WO USB, WO KB/MS Device drivers ASUS PC Probe II ASUS Live Update utility Anti-virus software (OEM version) *Specifications are subject to change without notice. x 8.6...
...A8V-MX specifications summary Rear panel Internal connectors Power Requirement Form Factor Manageability Support CD contents 1 x Parallel port 1 x LAN (RJ-45) port 4 x USB 2.0 ports 1 x Serial port (COM) 1 x PS/2 keyboard port 1 x PS/2 mouse port 6-channel audio ports 1 x Floppy disk drive connector 1 x Primary IDE connector 1 x Secondary IDE connector 4 x Serial ATA connectors 1 x Chassis intrusion connector 1 x CPU...WOL/WOR by PME, WO USB, WO KB/MS Device drivers ASUS PC Probe II ASUS Live Update utility Anti-virus software (OEM version) *Specifications are subject to change without notice. x 8.6...

A8V-MX User''s Manual for English Edition
Page 14
... to ensure quiet, cool, and efficient operation. C.P.R. (CPU Parameter Recall) The C.P.R. See page 2-33 for details. No need to buy a replacement ROM chip. ASUS Q-Fan technology The ASUS Q-Fan technology smartly adjusts the CPU fan speed according to the system loading to your system... eliminates the need to overclocking. Simply shut down and reboot the system, and the BIOS automatically restores the CPU default setting for details. ASUS EZ Flash BIOS With the ASUS EZ Flash, you can easily update the system BIOS even before loading the operating system. See page 2-3...
... to ensure quiet, cool, and efficient operation. C.P.R. (CPU Parameter Recall) The C.P.R. See page 2-33 for details. No need to buy a replacement ROM chip. ASUS Q-Fan technology The ASUS Q-Fan technology smartly adjusts the CPU fan speed according to the system loading to your system... eliminates the need to overclocking. Simply shut down and reboot the system, and the BIOS automatically restores the CPU default setting for details. ASUS EZ Flash BIOS With the ASUS EZ Flash, you can easily update the system BIOS even before loading the operating system. See page 2-3...

A8V-MX User''s Manual for English Edition
Page 18
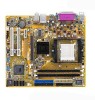
The 128-bit-wide memory data paths of the marked corner (with gold triangle) on the motherboard. ® A8V-MX A8V-MX CPU Socket 939 2. 1.6 Central Processing Unit (CPU) The motherboard comes with only 32-bit or 64-bit wide data paths. This mark should match a specific corner on the socket ...then lift it up to 90°-100° angle, otherwise the CPU does not fit in completely. 1-8 Chapter 1: Product introduction Gold triangle Installing the CPU To install a CPU: 1. Locate the 939-pin ZIF socket on the CPU. Socket lever Make sure that the socket lever is lifted up to ...
The 128-bit-wide memory data paths of the marked corner (with gold triangle) on the motherboard. ® A8V-MX A8V-MX CPU Socket 939 2. 1.6 Central Processing Unit (CPU) The motherboard comes with only 32-bit or 64-bit wide data paths. This mark should match a specific corner on the socket ...then lift it up to 90°-100° angle, otherwise the CPU does not fit in completely. 1-8 Chapter 1: Product introduction Gold triangle Installing the CPU To install a CPU: 1. Locate the 939-pin ZIF socket on the CPU. Socket lever Make sure that the socket lever is lifted up to ...

A8V-MX User''s Manual for English Edition
Page 19
... this connector. Position the CPU above the socket such that came with a small triangle. 4. When the CPU is locked. 6. Hardware monitoring errors can occur if you fail to indicate that it fits in one correct orientation. 3. ASUS A8V-MX 1-9 Install a CPU heatsink and fan following the... instructions that the CPU corner with the gold triangle matches the ...
... this connector. Position the CPU above the socket such that came with a small triangle. 4. When the CPU is locked. 6. Hardware monitoring errors can occur if you fail to indicate that it fits in one correct orientation. 3. ASUS A8V-MX 1-9 Install a CPU heatsink and fan following the... instructions that the CPU corner with the gold triangle matches the ...

A8V-MX User''s Manual for English Edition
Page 21
...8226; HYB25D512800CE-5C 3 •• HYB25D512800CE-5B 3 •• W942508BH-5 2 •• (Continued on the next page) ASUS A8V-MX 1-11 DS 1024 MB KINGSTON KHX3200ULK2/1G - DS 256 MB SAMSUNG M381L3223ETM-CCC SAMSUNG SS 512 MB SAMSUNG M381L6423ETM-CCC SAMSUNG DS 256 ... SS Component CL A B V58C2256804SAT5(ECC) - • V58C2256804SAT5(ECC) - Recommended memory configurations Single-core CPU Mode Single-channel Dual-channel Sockets DIMM_A1 (black) DIMM_B1 (black) - DS 256 MB KINGSTON KVR400X64C3A/256 - Populated Populated Populated ...
...8226; HYB25D512800CE-5C 3 •• HYB25D512800CE-5B 3 •• W942508BH-5 2 •• (Continued on the next page) ASUS A8V-MX 1-11 DS 1024 MB KINGSTON KHX3200ULK2/1G - DS 256 MB SAMSUNG M381L3223ETM-CCC SAMSUNG SS 512 MB SAMSUNG M381L6423ETM-CCC SAMSUNG DS 256 ... SS Component CL A B V58C2256804SAT5(ECC) - • V58C2256804SAT5(ECC) - Recommended memory configurations Single-core CPU Mode Single-channel Dual-channel Sockets DIMM_A1 (black) DIMM_B1 (black) - DS 256 MB KINGSTON KVR400X64C3A/256 - Populated Populated Populated ...

A8V-MX User''s Manual for English Edition
Page 29
... 2-3 for about 5~10 seconds, then move the cap back to overclocking. For system failure due to pins 2-3. ASUS A8V-MX 1-19 Move the jumper cap from pins 1-2 (default) to overclocking, use the C.P.R. (CPU Parameter Recall) feature. To erase the RTC RAM: 1. 1.9 Jumpers 1. Plug the power cord and turn ON the...information such as system passwords. Keep the cap on CLRTC jumper default position. Removing the cap will cause system boot failure! ® A8V-MX A8V-MX Clear RTC RAM CLRTC 12 23 Normal (Default) Clear CMOS You do not need to clear the RTC when the system hangs due...
... 2-3 for about 5~10 seconds, then move the cap back to overclocking. For system failure due to pins 2-3. ASUS A8V-MX 1-19 Move the jumper cap from pins 1-2 (default) to overclocking, use the C.P.R. (CPU Parameter Recall) feature. To erase the RTC RAM: 1. 1.9 Jumpers 1. Plug the power cord and turn ON the...information such as system passwords. Keep the cap on CLRTC jumper default position. Removing the cap will cause system boot failure! ® A8V-MX A8V-MX Clear RTC RAM CLRTC 12 23 Normal (Default) Clear CMOS You do not need to clear the RTC when the system hangs due...

A8V-MX User''s Manual for English Edition
Page 30
..., USBPW34, USBPW56, USBPW78) Set these jumpers to +5V to wake up from S1 sleep mode (CPU stopped, DRAM refreshed, system running in sleep mode. 1-20 Chapter 1: Product introduction Set to +5VSB to additional USB ports. ® A8V-MX A8V-MX USB device wake-up USBPW12 USBPW34 12 23 +5V (Default) +5VSB USBPW56 USBPW78 12 23...
..., USBPW34, USBPW56, USBPW78) Set these jumpers to +5V to wake up from S1 sleep mode (CPU stopped, DRAM refreshed, system running in sleep mode. 1-20 Chapter 1: Product introduction Set to +5VSB to additional USB ports. ® A8V-MX A8V-MX USB device wake-up USBPW12 USBPW34 12 23 +5V (Default) +5VSB USBPW56 USBPW78 12 23...

A8V-MX User''s Manual for English Edition
Page 37
... flow inside the system may damage the motherboard components. These are not jumpers! CPU_FAN GND +12V Rotation ® A8V-MX CHA_FAN Rotation +12V GND A8V-MX Fan connectors 6 . CPU and Chassis fan connectors (3-pin CPU_FAN, 3-pin CHA_FAN) The fan connectors support cooling fans of 350mA~740mA (8.88W...ground pin of the system chassis. Digital audio connector (4-1 pin SPDIF_OUT) This connector is purchased separately. ® A8V-MX SPDIF A8V-MX Digital audio connector ASUS A8V-MX +5V SPDIFOUT GND 1-27 Connect the fan cables to the fan connectors. Do not forget to connect the ...
... flow inside the system may damage the motherboard components. These are not jumpers! CPU_FAN GND +12V Rotation ® A8V-MX CHA_FAN Rotation +12V GND A8V-MX Fan connectors 6 . CPU and Chassis fan connectors (3-pin CPU_FAN, 3-pin CHA_FAN) The fan connectors support cooling fans of 350mA~740mA (8.88W...ground pin of the system chassis. Digital audio connector (4-1 pin SPDIF_OUT) This connector is purchased separately. ® A8V-MX SPDIF A8V-MX Digital audio connector ASUS A8V-MX +5V SPDIFOUT GND 1-27 Connect the fan cables to the fan connectors. Do not forget to connect the ...

A8V-MX User''s Manual for English Edition
Page 58
... Screen Select Item F1 General Help F10 Save and Exit ESC Exit v02.58 (C)Copyright 1985-2004, American Megatrends, Inc. Processor Displays the auto-detected CPU specification. Configuration options: [Auto] [SWDMA0] [SWDMA1] [SWDMA2] [MWDMA0] [MWDMA1] [MWDMA2] [UDMA0] [UDMA1] [UDMA2] [UDMA3] [UDMA4] [UDMA5] [UDMA6] SMART Monitoring [Auto] Sets the Smart Monitoring, Analysis...
... Screen Select Item F1 General Help F10 Save and Exit ESC Exit v02.58 (C)Copyright 1985-2004, American Megatrends, Inc. Processor Displays the auto-detected CPU specification. Configuration options: [Auto] [SWDMA0] [SWDMA1] [SWDMA2] [MWDMA0] [MWDMA1] [MWDMA2] [UDMA0] [UDMA1] [UDMA2] [UDMA3] [UDMA4] [UDMA5] [UDMA6] SMART Monitoring [Auto] Sets the Smart Monitoring, Analysis...

A8V-MX User''s Manual for English Edition
Page 59
...BIOS SETUP UTILITY Config System Frequency/Voltage CPU FSB Frequency AGP/PCI Frequency (MHz) PCIE Frequency (MHz) [200 MHz] [Auto] [Auto] Adjust CPU FSB frequency. Configuration options: [Auto] [66.66/33.33] [75.4/37.7] [80/40] ASUS A8V-MX 2-17 2.4 Advanced menu The Advanced ...menu items allow you to malfunction. Main Advanced BIOS SETUP UTILITY Power Boot Exit Jumperfree Configuration USB Configuration CPU Configuration Chipset Onboard Devices Configuration PCI PnP Adjust system ...
...BIOS SETUP UTILITY Config System Frequency/Voltage CPU FSB Frequency AGP/PCI Frequency (MHz) PCIE Frequency (MHz) [200 MHz] [Auto] [Auto] Adjust CPU FSB frequency. Configuration options: [Auto] [66.66/33.33] [75.4/37.7] [80/40] ASUS A8V-MX 2-17 2.4 Advanced menu The Advanced ...menu items allow you to malfunction. Main Advanced BIOS SETUP UTILITY Power Boot Exit Jumperfree Configuration USB Configuration CPU Configuration Chipset Onboard Devices Configuration PCI PnP Adjust system ...

A8V-MX User''s Manual for English Edition
Page 62
NOTE: If an invalid ratio is set in this menu show the CPU-related information that the BIOS automatically detects. Select Screen Select Item Enter Update F1 General Help F10 Save and Exit ESC Exit v02.58 (C)Copyright ... to Change Freq. : Yes uCode Patch Level : 0x4D Cool 'n' Quiet [Disabled] Sets the ratio between CPU Core Clock and the FSB Frequency. 2.4.3 CPU Configuration The items in CMOS then actual and setpoint values may differ. Advanced CPU Configuration Module Version: 14.04 Physical Count: 1 Logical Count: 2 BIOS SETUP UTILITY AMD Athlon(tm) 64...
NOTE: If an invalid ratio is set in this menu show the CPU-related information that the BIOS automatically detects. Select Screen Select Item Enter Update F1 General Help F10 Save and Exit ESC Exit v02.58 (C)Copyright ... to Change Freq. : Yes uCode Patch Level : 0x4D Cool 'n' Quiet [Disabled] Sets the ratio between CPU Core Clock and the FSB Frequency. 2.4.3 CPU Configuration The items in CMOS then actual and setpoint values may differ. Advanced CPU Configuration Module Version: 14.04 Physical Count: 1 Logical Count: 2 BIOS SETUP UTILITY AMD Athlon(tm) 64...

A8V-MX User''s Manual for English Edition
Page 75
... ventilation. Configuration options: [Disabled] [90%] [80%] [70%] [60%] ASUS A8V-MX 2-33 If the fan is not connected to display the detected temperatures. Select a higher ratio if you to enable or disable the ASUS Q-Fan feature that smartly adjusts the fan speeds for the system. CPU Fan Speed [xxxxRPM] or [Ignored] The onboard hardware monitor...
... ventilation. Configuration options: [Disabled] [90%] [80%] [70%] [60%] ASUS A8V-MX 2-33 If the fan is not connected to display the detected temperatures. Select a higher ratio if you to enable or disable the ASUS Q-Fan feature that smartly adjusts the fan speeds for the system. CPU Fan Speed [xxxxRPM] or [Ignored] The onboard hardware monitor...

A8V-MX User''s Manual for English Edition
Page 76
...The configuration options for this item depend on the recommended temperature settings. Configuration options: [Disabled] [Enabled] 2-34 Chapter 2: BIOS setup CPU Target Temperature [XXXºC] Allows you to enable or disable the chassis intrusion function. If the fan is increased to the motherboard, ...fan speed in rotations per minute (RPM). Chassis Intrude [Disabled] Allows you to set the CPU temperature threshold when the CPU fan speed is not connected to lower CPU temperature. VCORE Voltage, 3.3V Voltage, 5V Voltage, 12V Voltage The onboard hardware monitor automatically detects...
...The configuration options for this item depend on the recommended temperature settings. Configuration options: [Disabled] [Enabled] 2-34 Chapter 2: BIOS setup CPU Target Temperature [XXXºC] Allows you to enable or disable the chassis intrusion function. If the fan is increased to the motherboard, ...fan speed in rotations per minute (RPM). Chassis Intrude [Disabled] Allows you to set the CPU temperature threshold when the CPU fan speed is not connected to lower CPU temperature. VCORE Voltage, 3.3V Voltage, 5V Voltage, 12V Voltage The onboard hardware monitor automatically detects...

A8V-MX User''s Manual for English Edition
Page 86
...detected problems. This utility helps you to update the motherboard BIOS in a Windows® environment. ASUS PC Probe II This smart utility monitors the fan speed, CPU temperature, and system voltages, and alerts you of your computer so you can enjoy watching TV and... documents in healthy operating condition. This utility requires an Internet connection either through a network or an Internet Service Provider (ISP). ASUS Update The ASUS Update utility allows you keep your computer. 3-4 Chapter 3: Software support 3.2.3 Utilities menu The Utilities menu shows the applications and ...
...detected problems. This utility helps you to update the motherboard BIOS in a Windows® environment. ASUS PC Probe II This smart utility monitors the fan speed, CPU temperature, and system voltages, and alerts you of your computer so you can enjoy watching TV and... documents in healthy operating condition. This utility requires an Internet connection either through a network or an Internet Service Provider (ISP). ASUS Update The ASUS Update utility allows you keep your computer. 3-4 Chapter 3: Software support 3.2.3 Utilities menu The Utilities menu shows the applications and ...


