
A8V-MX User''s Manual for English Edition
Page 8
A8V-MX specifications summary CPU Chipset System Bus Memory Expansion slots Graphics Storage Audio LAN USB Special features BIOS features Socket 939 for AMD Athlon™ 64FX/... Realtek® ALC653 6-channel CODEC S/PDIF out interface Realtek® RTL8201CL 10/100 LAN PHY Supports up to 8 USB 2.0 ports ASUS Q-Fan ASUS MyLogo™ 4 Mb Flash ROM, AMI BIOS, PnP, DMI, WfM2.0, ACPI 2.0a, SM BIOS 2.3, PXE flash utility ASUS EZ Flash ASUS CrashFree BIOS 2 ASUS C.P.R. (CPU Parameter Recall) (continued on the next page) viii
A8V-MX specifications summary CPU Chipset System Bus Memory Expansion slots Graphics Storage Audio LAN USB Special features BIOS features Socket 939 for AMD Athlon™ 64FX/... Realtek® ALC653 6-channel CODEC S/PDIF out interface Realtek® RTL8201CL 10/100 LAN PHY Supports up to 8 USB 2.0 ports ASUS Q-Fan ASUS MyLogo™ 4 Mb Flash ROM, AMI BIOS, PnP, DMI, WfM2.0, ACPI 2.0a, SM BIOS 2.3, PXE flash utility ASUS EZ Flash ASUS CrashFree BIOS 2 ASUS C.P.R. (CPU Parameter Recall) (continued on the next page) viii

A8V-MX User''s Manual for English Edition
Page 14
... ROM chip. No need to use a DOS-based utility or boot from the support CD in case the system hangs due to overclocking. See page 2-3 for each parameter. 1-4 Chapter 1: Product introduction When the system hangs due to ensure quiet, cool, and efficient operation. 1.3.2 Innovative ASUS features ASUS ...automatically restores the CPU default setting for details. This protection eliminates the need to restore the original BIOS data from a floppy disk. ASUS MyLogo™ This feature allows you to open the system chassis and clear the RTC data. See page 2-36 for details. See ...
... ROM chip. No need to use a DOS-based utility or boot from the support CD in case the system hangs due to overclocking. See page 2-3 for each parameter. 1-4 Chapter 1: Product introduction When the system hangs due to ensure quiet, cool, and efficient operation. 1.3.2 Innovative ASUS features ASUS ...automatically restores the CPU default setting for details. This protection eliminates the need to restore the original BIOS data from a floppy disk. ASUS MyLogo™ This feature allows you to open the system chassis and clear the RTC data. See page 2-36 for details. See ...

A8V-MX User''s Manual for English Edition
Page 16
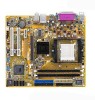
... USB12 USBPW12 USBPW34 LAN_USB34 ATX12V VIA K8M800 Top:Line In Center:Line Out Below:Mic In RTL8201CL AGP CR2032 3V Lithium Cell CMOS Power PCIEX1 A8V-MX PCI1 CLRTC ALC653 SB_PWR PCI2 FP_AUDIO AUX CD SPDIF USBPW56 USBPW78 ® USB56 CHA_FAN VIA VT8251 SATA2 SATA1 SATA4 SATA3 CHASSIS PANEL USB78 BIOS Flash...
... USB12 USBPW12 USBPW34 LAN_USB34 ATX12V VIA K8M800 Top:Line In Center:Line Out Below:Mic In RTL8201CL AGP CR2032 3V Lithium Cell CMOS Power PCIEX1 A8V-MX PCI1 CLRTC ALC653 SB_PWR PCI2 FP_AUDIO AUX CD SPDIF USBPW56 USBPW78 ® USB56 CHA_FAN VIA VT8251 SATA2 SATA1 SATA4 SATA3 CHASSIS PANEL USB78 BIOS Flash...

A8V-MX User''s Manual for English Edition
Page 38
... with USB 2.0 specification that supports up to the USB connectors. USB+5V USB_P8USB_P8+ GND NC USB+5V USB_P6USB_P6+ GND NC ® A8V-MX USB56 1 A8V-MX USB 2.0 connectors USB78 1 USB+5V USB_P7USB_P7+ GND USB+5V USB_P5USB_P5+ GND Never connect a 1 3 9 4 c a b l... (Black) Left Audio Channel Ground Ground Right Audio Channel Left Audio Channel Ground Ground Right Audio Channel ® A8V-MX A8V-MX Internal audio connectors 1-28 Chapter 1: Product introduction Internal audio connectors (4-pin CD [black], 4-pin AUX [white])...from sound sources such as a CD-ROM, TV tuner, or MPEG card.
... with USB 2.0 specification that supports up to the USB connectors. USB+5V USB_P8USB_P8+ GND NC USB+5V USB_P6USB_P6+ GND NC ® A8V-MX USB56 1 A8V-MX USB 2.0 connectors USB78 1 USB+5V USB_P7USB_P7+ GND USB+5V USB_P5USB_P5+ GND Never connect a 1 3 9 4 c a b l... (Black) Left Audio Channel Ground Ground Right Audio Channel Left Audio Channel Ground Ground Right Audio Channel ® A8V-MX A8V-MX Internal audio connectors 1-28 Chapter 1: Product introduction Internal audio connectors (4-pin CD [black], 4-pin AUX [white])...from sound sources such as a CD-ROM, TV tuner, or MPEG card.

A8V-MX User''s Manual for English Edition
Page 45
... + during POST to a floppy disk, then restart the system. 3. Make sure that you to update the BIOS without having to A8V-MX.ROM. ASUS A8V-MX 2-3 d. e. Press , then follow screen instructions to A 8 V - Visit the ASUS website (www.asus.com) to download the latest BIOS file for floppy... M X . EZFlash starting BIOS update Checking for the motherboard and rename the...
... + during POST to a floppy disk, then restart the system. 3. Make sure that you to update the BIOS without having to A8V-MX.ROM. ASUS A8V-MX 2-3 d. e. Press , then follow screen instructions to A 8 V - Visit the ASUS website (www.asus.com) to download the latest BIOS file for floppy... M X . EZFlash starting BIOS update Checking for the motherboard and rename the...

A8V-MX User''s Manual for English Edition
Page 46
...assigned filename not more than eight alphanumeric characters for the main filename and three alphanumeric characters for reference only. A:\>afudos /oOLDBIOS1.ROM Main filename Extension name 3. All rights reserved. The actual BIOS screen displays may not be exactly the same as backup when... the BIOS fails or gets corrupted during the updating process. Version 1.10 Copyright (C) 2002 American Megatrends, Inc. A:\>afudos /oOLDBIOS1.ROM AMI Firmware Update Utility - The utility copies the current BIOS file to the DOS prompt after copying the current BIOS file. 2-4 ...
...assigned filename not more than eight alphanumeric characters for the main filename and three alphanumeric characters for reference only. A:\>afudos /oOLDBIOS1.ROM Main filename Extension name 3. All rights reserved. The actual BIOS screen displays may not be exactly the same as backup when... the BIOS fails or gets corrupted during the updating process. Version 1.10 Copyright (C) 2002 American Megatrends, Inc. A:\>afudos /oOLDBIOS1.ROM AMI Firmware Update Utility - The utility copies the current BIOS file to the DOS prompt after copying the current BIOS file. 2-4 ...

A8V-MX User''s Manual for English Edition
Page 47
...created earlier. 3. done Erasing flash .... Copy the AFUDOS utility (afudos.exe) from the hard disk drive. A:\>afudos /iA8V-MX.ROM AMI Firmware Update Utility - done Erasing flash .... Reboot the system from the motherboard support CD to the DOS prompt after ..., then at the DOS prompt. 2. Version 1.10 Copyright (C) 2002 American Megatrends, Inc. A:\>afudos /iA8V-MX.ROM 4. done A:\> ASUS A8V-MX 2-5 Reading file ..... Visit the ASUS website (www.asus.com) and download the latest BIOS file for the motherboard. Reading file ..... All rights reserved. Updating the BIOS...
...created earlier. 3. done Erasing flash .... Copy the AFUDOS utility (afudos.exe) from the hard disk drive. A:\>afudos /iA8V-MX.ROM AMI Firmware Update Utility - done Erasing flash .... Reboot the system from the motherboard support CD to the DOS prompt after ..., then at the DOS prompt. 2. Version 1.10 Copyright (C) 2002 American Megatrends, Inc. A:\>afudos /iA8V-MX.ROM 4. done A:\> ASUS A8V-MX 2-5 Reading file ..... Visit the ASUS website (www.asus.com) and download the latest BIOS file for the motherboard. Reading file ..... All rights reserved. Updating the BIOS...

A8V-MX User''s Manual for English Edition
Page 48
...... Completed. The utility displays the following message and automatically checks the floppy disk for floppy... Bad BIOS checksum. Reading file "A8V-MX.ROM". Start flashing... DO NOT shut down or reset the system while updating the BIOS! Restart the system after the utility completes ...the updating process. 2-6 Chapter 2: BIOS setup R O M. Turn on the system. 2. 2.1.4 ASUS CrashFree BIOS 2 utility The ASUS CrashFree BIOS 2 is an auto recovery tool that you to the floppy disk drive. 3. Checking for the original or updated BIOS...
...... Completed. The utility displays the following message and automatically checks the floppy disk for floppy... Bad BIOS checksum. Reading file "A8V-MX.ROM". Start flashing... DO NOT shut down or reset the system while updating the BIOS! Restart the system after the utility completes ...the updating process. 2-6 Chapter 2: BIOS setup R O M. Turn on the system. 2. 2.1.4 ASUS CrashFree BIOS 2 utility The ASUS CrashFree BIOS 2 is an auto recovery tool that you to the floppy disk drive. 3. Checking for the original or updated BIOS...

A8V-MX User''s Manual for English Edition
Page 49
...no floppy disk is found, the utility automatically checks the optical drive for CD-ROM... Starting BIOS recovery... Reading file "A8V-MX.ROM". Doing so can cause system boot failure! 4. Visit the ASUS website (www.asus.com) to the optical drive. 3. Checking for the original or updated BIOS... file. Checking for this motherboard. CD-ROM found ! The recovered BIOS may not ...
...no floppy disk is found, the utility automatically checks the optical drive for CD-ROM... Starting BIOS recovery... Reading file "A8V-MX.ROM". Doing so can cause system boot failure! 4. Visit the ASUS website (www.asus.com) to the optical drive. 3. Checking for the original or updated BIOS... file. Checking for this motherboard. CD-ROM found ! The recovered BIOS may not ...

A8V-MX User''s Manual for English Edition
Page 57
... Mode [Auto] DMA Mode [Auto] Smart Monitoring [Auto] 32Bit Data Transfer [Enabled] Select Screen Select Item +- These values are specifically configuring a CD-ROM drive. Configuration options: [Disabled] [Auto] ASUS A8V-MX 2-15 Main BIOS SETUP UTILITY Primary IDE Master Device : Hard Disk Vendor : ST320410A Size : 20.0GB LBA Mode : Supported Block Mode : 16 Sectors...
... Mode [Auto] DMA Mode [Auto] Smart Monitoring [Auto] 32Bit Data Transfer [Enabled] Select Screen Select Item +- These values are specifically configuring a CD-ROM drive. Configuration options: [Disabled] [Auto] ASUS A8V-MX 2-15 Main BIOS SETUP UTILITY Primary IDE Master Device : Hard Disk Vendor : ST320410A Size : 20.0GB LBA Mode : Supported Block Mode : 16 Sectors...

A8V-MX User''s Manual for English Edition
Page 77
Select Screen Select Item +- Configuration options: [xxxxx Drive] [Disabled] ASUS A8V-MX 2-35 Select Screen Select Item Enter Go to change the system boot options. 2.6 Boot menu The Boot menu items allow you set the CD-ROM drive as the first boot device. A device enclosed in parenthesis has been disabled in the system. Main Advanced.... 2.6.1 Boot Device Priority Boot Device Priority 1st Boot Device 2nd Boot Device 3rd Boot Device BIOS SETUP UTILITY Boot [1st FLOPPY DRIVE] [PM-ST320410A] [PS-ASUS CD-S520/A] Specifies the boot sequence from the available devices.
Select Screen Select Item +- Configuration options: [xxxxx Drive] [Disabled] ASUS A8V-MX 2-35 Select Screen Select Item Enter Go to change the system boot options. 2.6 Boot menu The Boot menu items allow you set the CD-ROM drive as the first boot device. A device enclosed in parenthesis has been disabled in the system. Main Advanced.... 2.6.1 Boot Device Priority Boot Device Priority 1st Boot Device 2nd Boot Device 3rd Boot Device BIOS SETUP UTILITY Boot [1st FLOPPY DRIVE] [PM-ST320410A] [PS-ASUS CD-S520/A] Specifies the boot sequence from the available devices.

A8V-MX User''s Manual for English Edition
Page 78
... or disable support for the F1 key to select the power-on self tests (POST) while booting to decrease the time needed to use the ASUS MyLogo™ feature. Configuration options: [Disabled] [Enabled] [Auto] Wait for 'F1' If Error [Enabled] When set to [Disabled], BIOS performs all ...Boot [Enabled] Enabling this item to [Enabled to boot the system. 2.6.2 Boot Settings Configuration Boot Settings Configuration Quick Boot Full Screen Logo AddOn ROM Display Mode Bootup Num-Lock PS/2 Mouse Support Wait for 'F1' if Error Hit 'DEL' Message Display Interrupt 19 Capture BIOS SETUP UTILITY Boot...
... or disable support for the F1 key to select the power-on self tests (POST) while booting to decrease the time needed to use the ASUS MyLogo™ feature. Configuration options: [Disabled] [Enabled] [Auto] Wait for 'F1' If Error [Enabled] When set to [Disabled], BIOS performs all ...Boot [Enabled] Enabling this item to [Enabled to boot the system. 2.6.2 Boot Settings Configuration Boot Settings Configuration Quick Boot Full Screen Logo AddOn ROM Display Mode Bootup Num-Lock PS/2 Mouse Support Wait for 'F1' if Error Hit 'DEL' Message Display Interrupt 19 Capture BIOS SETUP UTILITY Boot...

A8V-MX User''s Manual for English Edition
Page 79
...The Supervisor Password item on top of at least six letters and/or numbers, then press . 3. Select the Change Supervisor Password item and press . 2. ASUS A8V-MX 2-37 The message "Password Installed" appears after you to [Enabled], this item shows I n s t a l l e d. Change Supervisor Password Select... you successfully set your password. again to display the configuration options. After you set a password, this function allows the option ROMs to set or change the supervisor password, follow the same steps as in setting a user password. To set a Supervisor Password...
...The Supervisor Password item on top of at least six letters and/or numbers, then press . 3. Select the Change Supervisor Password item and press . 2. ASUS A8V-MX 2-37 The message "Password Installed" appears after you to [Enabled], this item shows I n s t a l l e d. Change Supervisor Password Select... you successfully set your password. again to display the configuration options. After you set a password, this function allows the option ROMs to set or change the supervisor password, follow the same steps as in setting a user password. To set a Supervisor Password...


