User Guide
Page 3
... Configuring the wireless router 12 Using the web GUI 12 Chapter 3: Configuring the network clients Accessing the wireless router 13 Setting an IP address for wired or wireless client 13 Chapter 4: Configuring via the web GUI Configuring via the web GUI 21 Using the Network Map 22 Setting up WAN using the Quick Internet Setup (QIS 23 Using AiDisk 24 Managing EzQoS bandwidth 26 Upgrading the firmware 27 Restoring/Saving/Uploading settings 28 Using the USB application 29 Creating a user...
... Configuring the wireless router 12 Using the web GUI 12 Chapter 3: Configuring the network clients Accessing the wireless router 13 Setting an IP address for wired or wireless client 13 Chapter 4: Configuring via the web GUI Configuring via the web GUI 21 Using the Network Map 22 Setting up WAN using the Quick Internet Setup (QIS 23 Using AiDisk 24 Managing EzQoS bandwidth 26 Upgrading the firmware 27 Restoring/Saving/Uploading settings 28 Using the USB application 29 Creating a user...
User Guide
Page 5
... your network to work with the regulatory Notices and Safety Statements. IMPORTANT: Instructions that are available from the support CD. • Chapter 6: Troubleshooting This chapter provides you with a troubleshooting guide for solving common problems you may encounter when using its web graphics user interface (web GUI). • Chapter 5: Installing the utilities This chapter provides information on the utilities that you with your ASUS Wireless Router. • Chapter 4: Configuring...
... your network to work with the regulatory Notices and Safety Statements. IMPORTANT: Instructions that are available from the support CD. • Chapter 6: Troubleshooting This chapter provides you with a troubleshooting guide for solving common problems you may encounter when using its web graphics user interface (web GUI). • Chapter 5: Installing the utilities This chapter provides information on the utilities that you with your ASUS Wireless Router. • Chapter 4: Configuring...

User Guide
Page 10
... in Chapter 5 of this user manual. You may need to change the wireless router's default settings so as to your PC's LAN port. 10 RT-N13U Chapter 2: Setting up a wired connection The ASUS Wireless Router is supplied with proper configurations. Setting up the hardware The wireless router has integrated auto-crossover function, so use wired connection for wired connection. To set up a secure wireless network. It also provides you with WPS, a utility that you to the section...
... in Chapter 5 of this user manual. You may need to change the wireless router's default settings so as to your PC's LAN port. 10 RT-N13U Chapter 2: Setting up a wired connection The ASUS Wireless Router is supplied with proper configurations. Setting up the hardware The wireless router has integrated auto-crossover function, so use wired connection for wired connection. To set up a secure wireless network. It also provides you with WPS, a utility that you to the section...

User Guide
Page 12
... using a cable, launch your web browser and the login page of wireless router is ASUS. To select the network: 1. If your PC connects to the router wirelessly, you to configure the wireless router using the web GUI, refer to Chapter 4: Configuring via the web GUI. 12 RT-N13U Chapter 2: Setting up the hardware Wait for it to this default SSID. 3. Connect to connect. Click Start > Control Panel > Network Connections > Wireless Network Connection. 2. Configuring the wireless router The ASUS Wireless Router includes a web...
... using a cable, launch your web browser and the login page of wireless router is ASUS. To select the network: 1. If your PC connects to the router wirelessly, you to configure the wireless router using the web GUI, refer to Chapter 4: Configuring via the web GUI. 12 RT-N13U Chapter 2: Setting up the hardware Wait for it to this default SSID. 3. Connect to connect. Click Start > Control Panel > Network Connections > Wireless Network Connection. 2. Configuring the wireless router The ASUS Wireless Router includes a web...

User Guide
Page 22
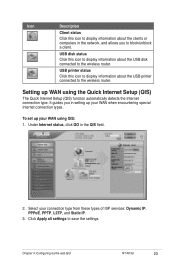
... code, MAC address, or turn the wireless radio on the QIS feature, refer to quickly set up your Wide Area Network (WAN) using the WPS Wizard. 3. It enables you to quickly set up WAN using the Quick Internet Setup (QIS) on the Internet connection status, WAN IP address, DNS, connection type, and gateway address. Launch the WPS wizard from the System status screen. 22 RT-N13U Chapter 4: Configuring via the web...
... code, MAC address, or turn the wireless radio on the QIS feature, refer to quickly set up your Wide Area Network (WAN) using the WPS Wizard. 3. It enables you to quickly set up WAN using the Quick Internet Setup (QIS) on the Internet connection status, WAN IP address, DNS, connection type, and gateway address. Launch the WPS wizard from the System status screen. 22 RT-N13U Chapter 4: Configuring via the web...
User Guide
Page 23
... guides you to the wireless router. Setting up your WAN when encountering special Internet connection types. Select your WAN using the Quick Internet Setup (QIS) The Quick Internet Setup (QIS) function automatically detects the Internet connection type. USB disk status Click this icon to display information about the USB disk connected to block/unblock a client. To set up your connection type from these types of ISP services: Dynamic IP, PPPoE, PPTP, L2TP, and Static IP. 3. Chapter 4: Configuring via the web...
... guides you to the wireless router. Setting up your WAN when encountering special Internet connection types. Select your WAN using the Quick Internet Setup (QIS) The Quick Internet Setup (QIS) function automatically detects the Internet connection type. USB disk status Click this icon to display information about the USB disk connected to block/unblock a client. To set up your connection type from these types of ISP services: Dynamic IP, PPPoE, PPTP, L2TP, and Static IP. 3. Chapter 4: Configuring via the web...
User Guide
Page 27
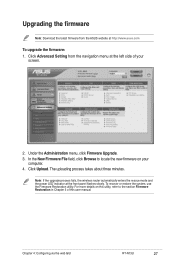
...: If the upgrade process fails, the wireless router automatically enters the rescue mode and the power LED indicator at the left side of this user manual. To recover or restore the system, use the Firmware Restoration utility. Click Advanced Setting from the ASUS website at http://www.asus.com To upgrade the firmware: 1. The uploading process takes about three minutes. Under the Administration menu, click Firmware Upgrade. 3. Chapter 4: Configuring via the web GUI RT...
...: If the upgrade process fails, the wireless router automatically enters the rescue mode and the power LED indicator at the left side of this user manual. To recover or restore the system, use the Firmware Restoration utility. Click Advanced Setting from the ASUS website at http://www.asus.com To upgrade the firmware: 1. The uploading process takes about three minutes. Under the Administration menu, click Firmware Upgrade. 3. Chapter 4: Configuring via the web GUI RT...
User Guide
Page 29
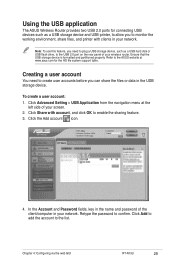
... Advanced Setting > USB Application from the navigation menu at www.asus.com for connecting USB devices such as a USB hard disk or USB flash drive, to the USB 2.0 port on the rear panel of your wireless router. Click Add to add the account to confirm. Click the Add account icon. 4. Chapter 4: Configuring via the web GUI RT-N13U 29 Creating a user account You need to plug a USB storage device, such as a USB storage device and USB...
... Advanced Setting > USB Application from the navigation menu at www.asus.com for connecting USB devices such as a USB hard disk or USB flash drive, to the USB 2.0 port on the rear panel of your wireless router. Click Add to add the account to confirm. Click the Add account icon. 4. Chapter 4: Configuring via the web GUI RT-N13U 29 Creating a user account You need to plug a USB storage device, such as a USB storage device and USB...
User Guide
Page 30
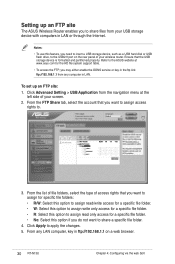
... only access for the HD file system support table. • To access the FTP, you need to insert a USB storage device, such as a USB hard disk or USB flash drive, to share a specific file folder. 4. From any computer in LAN or through the Internet. Click Advanced Setting > USB Application from the navigation menu at www.asus com for a specific file folder. • No: Select this feature, you may either enable the DDNS service or key in...
... only access for the HD file system support table. • To access the FTP, you need to insert a USB storage device, such as a USB hard disk or USB flash drive, to share a specific file folder. 4. From any computer in LAN or through the Internet. Click Advanced Setting > USB Application from the navigation menu at www.asus com for a specific file folder. • No: Select this feature, you may either enable the DDNS service or key in...
User Guide
Page 31
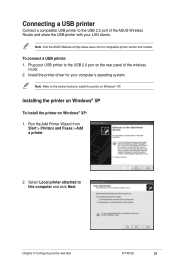
Install the printer driver for compatible printer vendor and models. Plug your computer's operating system. To connect a USB printer: 1. Note: Refer to the section below to install the printer on Windows® XP: 1. Run the Add Printer Wizard from Start > Printers and Faxes > Add a printer. 2. Select Local printer attached to this computer and click Next. Connecting a USB printer Connect a compatible USB printer to the USB 2.0 port of...
Install the printer driver for compatible printer vendor and models. Plug your computer's operating system. To connect a USB printer: 1. Note: Refer to the section below to install the printer on Windows® XP: 1. Run the Add Printer Wizard from Start > Printers and Faxes > Add a printer. 2. Select Local printer attached to this computer and click Next. Connecting a USB printer Connect a compatible USB printer to the USB 2.0 port of...

User Guide
Page 35
.... Refer to print. 13. Chapter 4: Configuring via the web GUI RT-N13U 35 The installation is supported by the ASUS Wireless Router. Note: If you use Remote Port which does not support Standard TCP/IP port, you have already installed the printer locally on the wireless router's web GUI. 12. After connecting your USB printer and installing the printer driver, you can now see the printer name...
.... Refer to print. 13. Chapter 4: Configuring via the web GUI RT-N13U 35 The installation is supported by the ASUS Wireless Router. Note: If you use Remote Port which does not support Standard TCP/IP port, you have already installed the printer locally on the wireless router's web GUI. 12. After connecting your USB printer and installing the printer driver, you can now see the printer name...

User Guide
Page 48
... Cable connection is not configured to use the local LAN, and is correct. Problem Cannot access the Internet via both wired network and wireless network). • Ensure that your web browser is configured to use a proxy server. 48 RT-N13U Chapter 6: Troubleshooting If the LED is not ON, change the cable and try again. • Restart your computer. • Refer to the Quick Start Guide of the wireless router and re-configure...
... Cable connection is not configured to use the local LAN, and is correct. Problem Cannot access the Internet via both wired network and wireless network). • Ensure that your web browser is configured to use a proxy server. 48 RT-N13U Chapter 6: Troubleshooting If the LED is not ON, change the cable and try again. • Restart your computer. • Refer to the Quick Start Guide of the wireless router and re-configure...
User Manual
Page 2
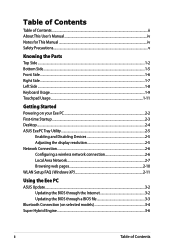
... User's Manual...iv Notes for This Manual...iv Safety Precautions...v Knowing the Parts Top Side...1-2 Bottom Side...1-5 Front Side...1-6 Right Side...1-7 Left Side...1-8 Keyboard Usage...1-9 Touchpad Usage...1-11 Getting Started Powering on your Eee PC...2-2 First-time Startup...2-3 Desktop...2-4 ASUS EeePC Tray Utility...2-5 Enabling and Disabling Devices 2-5 Adjusting the display resolution 2-5 Network Connection...2-6 Configuring a wireless network connection 2-6 Local Area Network 2-7 Browsing web pages 2-10 WLAN Setup FAQ (Windows XP 2-11 Using the Eee PC ASUS Update...3-2 Updating...
... User's Manual...iv Notes for This Manual...iv Safety Precautions...v Knowing the Parts Top Side...1-2 Bottom Side...1-5 Front Side...1-6 Right Side...1-7 Left Side...1-8 Keyboard Usage...1-9 Touchpad Usage...1-11 Getting Started Powering on your Eee PC...2-2 First-time Startup...2-3 Desktop...2-4 ASUS EeePC Tray Utility...2-5 Enabling and Disabling Devices 2-5 Adjusting the display resolution 2-5 Network Connection...2-6 Configuring a wireless network connection 2-6 Local Area Network 2-7 Browsing web pages 2-10 WLAN Setup FAQ (Windows XP 2-11 Using the Eee PC ASUS Update...3-2 Updating...
User Manual
Page 4
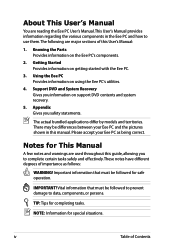
... this manual. About This User's Manual You are reading the Eee PC User's Manual.This User's Manual provides information regarding the various components in this User's Manual: 1. Knowing the Parts Provides information on getting started with the Eee PC. 3. Using the Eee PC Provides information on support DVD contents and system recovery. 5. Support DVD and System Recovery Gives you safety statements. TIP: Tips for safe operation. The actual bundled applications differ by models and...
... this manual. About This User's Manual You are reading the Eee PC User's Manual.This User's Manual provides information regarding the various components in this User's Manual: 1. Knowing the Parts Provides information on getting started with the Eee PC. 3. Using the Eee PC Provides information on support DVD contents and system recovery. 5. Support DVD and System Recovery Gives you safety statements. TIP: Tips for safe operation. The actual bundled applications differ by models and...
User Manual
Page 11
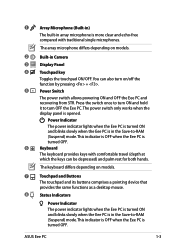
... power switch only works when the display panel is more clear and echo-free compared with comfortable travel (depth at which the keys can also turn OFF the Eee PC. The keyboard differs depending on models. 7 Touchpad and Buttons The touchpad and its buttons comprises a pointing device that provides the same functions as a desktop mouse. 8 Status Indicators Power Indicator The power indicator lights when the Eee PC is turned ON and blinks slowly when the Eee PC is in array microphone is opened...
... power switch only works when the display panel is more clear and echo-free compared with comfortable travel (depth at which the keys can also turn OFF the Eee PC. The keyboard differs depending on models. 7 Touchpad and Buttons The touchpad and its buttons comprises a pointing device that provides the same functions as a desktop mouse. 8 Status Indicators Power Indicator The power indicator lights when the Eee PC is turned ON and blinks slowly when the Eee PC is in array microphone is opened...
User Manual
Page 22
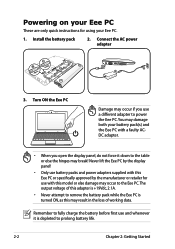
... of this adapter is turned ON, as this may result in the loss of working data. Connect the AC power adapter 3 1 2 2 1 3 110V-220V 3. Never lift the Eee PC by the display panel! • Only use battery packs and power adapters supplied with this Eee PC or specifically approved by the manufacturer or retailer for using your Eee PC. 1. Install the battery pack 2. Powering on your Eee PC These are only quick instructions for use with this model or...
... of this adapter is turned ON, as this may result in the loss of working data. Connect the AC power adapter 3 1 2 2 1 3 110V-220V 3. Never lift the Eee PC by the display panel! • Only use battery packs and power adapters supplied with this Eee PC or specifically approved by the manufacturer or retailer for using your Eee PC. 1. Install the battery pack 2. Powering on your Eee PC These are only quick instructions for use with this model or...

User Manual
Page 31
... like to enter the correct key before configuring a wireless network connection. Weak signal strength may fail the connection. WLAN Setup FAQ (Windows XP) If you need a correct key for the encrypted wireless network. 2. I am asked questions below for the wireless connection. Is my USB 3G wireless data card/wireless router compatible with Eee PC Windows XP OS? Ensure that the router setup is encrypted, you follow the instructions in the manual and fail to activate the wireless LAN function. 1.
... like to enter the correct key before configuring a wireless network connection. Weak signal strength may fail the connection. WLAN Setup FAQ (Windows XP) If you need a correct key for the encrypted wireless network. 2. I am asked questions below for the wireless connection. Is my USB 3G wireless data card/wireless router compatible with Eee PC Windows XP OS? Ensure that the router setup is encrypted, you follow the instructions in the manual and fail to activate the wireless LAN function. 1.
User Manual
Page 45
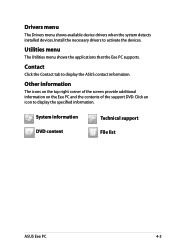
... information. Contact Click the Contact tab to display the ASUS contact information. Other information The icons on the top right corner of the screen provide additional information on the Eee PC and the contents of the support DVD. Drivers menu The Drivers menu shows available device drivers when the system detects installed devices. Utilities menu The Utilities menu shows the applications that the Eee PC supports. System information DVD content Technical support File list ASUS Eee PC 4-3
... information. Contact Click the Contact tab to display the ASUS contact information. Other information The icons on the top right corner of the screen provide additional information on the Eee PC and the contents of the support DVD. Drivers menu The Drivers menu shows available device drivers when the system detects installed devices. Utilities menu The Utilities menu shows the applications that the Eee PC supports. System information DVD content Technical support File list ASUS Eee PC 4-3
User Manual
Page 46
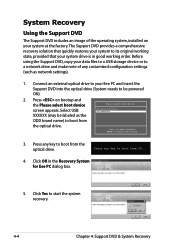
... powered ON). 2. Press any key to boot from the optical drive. ↑ and ↓ to move selection ENTER to start the system recovery. 4-4 Chapter 4: Support DVD & System Recovery System Recovery Using the Support DVD The Support DVD includes an image of any customized configuration settings (such as the Please select boot device: HDD:PM-ST9160310AS USB:XXXXXXXX ODD brand name) to its original working order. Press on your system at the factory...
... powered ON). 2. Press any key to boot from the optical drive. ↑ and ↓ to move selection ENTER to start the system recovery. 4-4 Chapter 4: Support DVD & System Recovery System Recovery Using the Support DVD The Support DVD includes an image of any customized configuration settings (such as the Please select boot device: HDD:PM-ST9160310AS USB:XXXXXXXX ODD brand name) to its original working order. Press on your system at the factory...
User Manual
Page 48
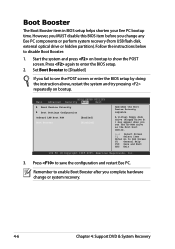
... screen or enter the BIOS setup by doing the instruction above, restart the system and try pressing repeatedly on bootup to [Disabled] If you complete hardware change any Eee PC components or perform system recovery (from USB flash disk, external optical drive or hidden partition). Main BIOS SETUP UTILITY Advanced Security Boot Exit Boot Device Priority Boot Settings Configuration OnBoard LAN Boot ROM [Enabled] Boot Booster [Disabled] Specifies the Boot Device Priority sequence. Set Boot Booster to show the POST screen. Press to enter the BIOS setup. 2. Press...
... screen or enter the BIOS setup by doing the instruction above, restart the system and try pressing repeatedly on bootup to [Disabled] If you complete hardware change any Eee PC components or perform system recovery (from USB flash disk, external optical drive or hidden partition). Main BIOS SETUP UTILITY Advanced Security Boot Exit Boot Device Priority Boot Settings Configuration OnBoard LAN Boot ROM [Enabled] Boot Booster [Disabled] Specifies the Boot Device Priority sequence. Set Boot Booster to show the POST screen. Press to enter the BIOS setup. 2. Press...


