User Manual
Page 2
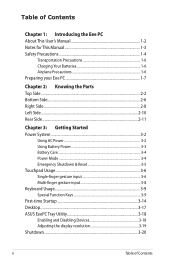
... Batteries 1-6 Airplane Precautions 1-6 Preparing your Eee PC 1-7 Chapter 2: Knowing the Parts Top Side...2-2 Bottom Side...2-6 Right Side...2-8 Left Side...2-10 Rear Side...2-11 Chapter 3: Getting Started Power System 3-2 Using AC Power 3-2 Using Battery Power 3-3 Battery Care...3-4 Power Mode...3-4 Emergency Shutdown & Reset 3-5 Touchpad Usage 3-6 Single-finger gesture input 3-6 Multi-finger gesture input 3-8 Keyboard Usage 3-9 Special Function Keys 3-9 First-time Startup 3-14 Desktop...3-17 ASUS EeePC Tray Utility 3-18 Enabling and Disabling Devices 3-18 Adjusting the display...
... Batteries 1-6 Airplane Precautions 1-6 Preparing your Eee PC 1-7 Chapter 2: Knowing the Parts Top Side...2-2 Bottom Side...2-6 Right Side...2-8 Left Side...2-10 Rear Side...2-11 Chapter 3: Getting Started Power System 3-2 Using AC Power 3-2 Using Battery Power 3-3 Battery Care...3-4 Power Mode...3-4 Emergency Shutdown & Reset 3-5 Touchpad Usage 3-6 Single-finger gesture input 3-6 Multi-finger gesture input 3-8 Keyboard Usage 3-9 Special Function Keys 3-9 First-time Startup 3-14 Desktop...3-17 ASUS EeePC Tray Utility 3-18 Enabling and Disabling Devices 3-18 Adjusting the display...

User Manual
Page 3
... of Contents Chapter 4: Using the Eee PC Network Connection 4-2 Configuring a wireless network connection 4-2 Configuring a network connection 4-4 Browsing web pages 4-10 ASUS Update 4-11 Updating the BIOS through the Internet 4-11 Updating the BIOS through a BIOS file 4-13 Bluetooth Connection(on selected models 4-14 ASUS Instant Key 4-16 Super Hybrid Engine 4-17 Super Hybrid Engine Modes 4-17 Eee Storage...4-18 Video Conferencing 4-20 Chapter 5: Support DVD &System Recovery Support DVD information 5-2 Running the support DVD 5-2 Drivers menu 5-2 Utilities menu 5-3 Contact...
... of Contents Chapter 4: Using the Eee PC Network Connection 4-2 Configuring a wireless network connection 4-2 Configuring a network connection 4-4 Browsing web pages 4-10 ASUS Update 4-11 Updating the BIOS through the Internet 4-11 Updating the BIOS through a BIOS file 4-13 Bluetooth Connection(on selected models 4-14 ASUS Instant Key 4-16 Super Hybrid Engine 4-17 Super Hybrid Engine Modes 4-17 Eee Storage...4-18 Video Conferencing 4-20 Chapter 5: Support DVD &System Recovery Support DVD information 5-2 Running the support DVD 5-2 Drivers menu 5-2 Utilities menu 5-3 Contact...
User Manual
Page 7
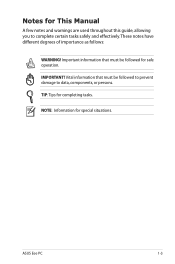
NOTE: Information for completing tasks. Notes for This Manual A few notes and warnings are used throughout this guide, allowing you to data, components, or persons. TIP: Tips for special situations. Vital information that must be followed for safe operation. ASUS Eee PC 1-3 Important information that must be followed to prevent damage to complete certain tasks safely and effectively.These notes have different degrees of importance as follows: WARNING! IMPORTANT!
NOTE: Information for completing tasks. Notes for This Manual A few notes and warnings are used throughout this guide, allowing you to data, components, or persons. TIP: Tips for special situations. Vital information that must be followed for safe operation. ASUS Eee PC 1-3 Important information that must be followed to prevent damage to complete certain tasks safely and effectively.These notes have different degrees of importance as follows: WARNING! IMPORTANT!

User Manual
Page 8
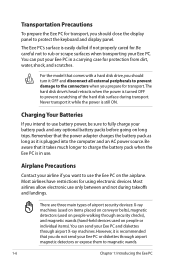
... and instructions. Wipe the Eee PC using a clean cellulose sponge or chamois cloth dampened with a solution of nonabrasive detergent and a few drops of the Eee PC. DO NOT disassemble the battery. 1-4 Chapter 1: Introducing the Eee PC DO NOT place together with small items that may scratch or enter the Eee PC. Seek servicing if the casing has been damaged. Disconnect the AC power and remove the battery...
... and instructions. Wipe the Eee PC using a clean cellulose sponge or chamois cloth dampened with a solution of nonabrasive detergent and a few drops of the Eee PC. DO NOT disassemble the battery. 1-4 Chapter 1: Introducing the Eee PC DO NOT place together with small items that may scratch or enter the Eee PC. Seek servicing if the casing has been damaged. Disconnect the AC power and remove the battery...

User Manual
Page 9
... wheeled bin indicates that the product (electrical, electronic equipment and mercury-containing button cell battery) should not be placed in municipal waste. DO NOT carry or cover an Eee PC that is powered ON with the rating. DO NOT use damaged power cords, accessories, or other chemicals on the bottom of the Eee PC and be sure that your power adapter complies...
... wheeled bin indicates that the product (electrical, electronic equipment and mercury-containing button cell battery) should not be placed in municipal waste. DO NOT carry or cover an Eee PC that is powered ON with the rating. DO NOT use damaged power cords, accessories, or other chemicals on the bottom of the Eee PC and be sure that your power adapter complies...
User Manual
Page 10
... the keyboard and display panel. Be careful not to charge the battery pack when the Eee PC is easily dulled if not properly cared for protection from dirt, water, shock, and scratches. Charging Your Batteries If you should turn it while the power is plugged into the computer and an AC power source. There are three main types of the hard disk surface...
... the keyboard and display panel. Be careful not to charge the battery pack when the Eee PC is easily dulled if not properly cared for protection from dirt, water, shock, and scratches. Charging Your Batteries If you should turn it while the power is plugged into the computer and an AC power source. There are three main types of the hard disk surface...

User Manual
Page 11
Install the battery pack 3 1 2 2. Connect the AC power adapter Your Eee PC may come with either a two or three-prong plug depending on territory. If a three-prong plug is provided, you must use a grounded AC outlet or use a properly grounded adapter to ensure safe operation of the Eee PC. ASUS Eee PC 1-7 Read the following chapters for using your Eee PC. 1 3 Preparing your Eee PC These are only quick instructions for detailed information. 1.
Install the battery pack 3 1 2 2. Connect the AC power adapter Your Eee PC may come with either a two or three-prong plug depending on territory. If a three-prong plug is provided, you must use a grounded AC outlet or use a properly grounded adapter to ensure safe operation of the Eee PC. ASUS Eee PC 1-7 Read the following chapters for using your Eee PC. 1 3 Preparing your Eee PC These are only quick instructions for detailed information. 1.

User Manual
Page 15
... the keyboard, mouse or touchpad will activate monitor again. 1 Built-in Camera The built-in array microphone is more clear and echo-free compared with traditional single microphones and can be used applications with one push of desktop monitors. The Eee PC uses an active matrix TFT LCD, which provides excellent viewing like that of a button. Use a soft cloth without chemical liquids (use plain water if necessary) to clean the display...
... the keyboard, mouse or touchpad will activate monitor again. 1 Built-in Camera The built-in array microphone is more clear and echo-free compared with traditional single microphones and can be used applications with one push of desktop monitors. The Eee PC uses an active matrix TFT LCD, which provides excellent viewing like that of a button. Use a soft cloth without chemical liquids (use plain water if necessary) to clean the display...
User Manual
Page 16
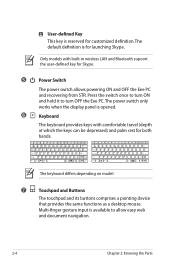
... touchpad and its buttons comprises a pointing device that provides the same functions as a desktop mouse. Press the switch once to turn ON and hold it to allow easy web and document navigation. 2-4 Chapter 2: Knowing the Parts The power switch only works when the display panel is opened. 6 Keyboard The keyboard provides keys with built-in wireless LAN and Bluetooth supoort the user-defined key for Skype. 5 Power Switch The power switch allows powering ON and OFF the Eee PC...
... touchpad and its buttons comprises a pointing device that provides the same functions as a desktop mouse. Press the switch once to turn ON and hold it to allow easy web and document navigation. 2-4 Chapter 2: Knowing the Parts The power switch only works when the display panel is opened. 6 Keyboard The keyboard provides keys with built-in wireless LAN and Bluetooth supoort the user-defined key for Skype. 5 Power Switch The power switch allows powering ON and OFF the Eee PC...

User Manual
Page 17
...Off The Battery Charge Indicator will not light when the battery is removed from the disk drive. Solid-State disk (SSD)/Hard disk (HDD) Indicator The solid-state disk drive/hard disk drive indicator blinks when data is written to -RAM (Suspend) mode. Wireless/Bluetooth Indicator This is only applicable on models with built-in wireless LAN/Bluetooth is enabled, this indicator lights. When the built-in wireless LAN/Bluetooth. ASUS Eee PC 2-5 8 Status Indicators (front) Power Indicator The power indicator lights when the Eee PC is turned ON and blinks slowly when the Eee PC is...
...Off The Battery Charge Indicator will not light when the battery is removed from the disk drive. Solid-State disk (SSD)/Hard disk (HDD) Indicator The solid-state disk drive/hard disk drive indicator blinks when data is written to -RAM (Suspend) mode. Wireless/Bluetooth Indicator This is only applicable on models with built-in wireless LAN/Bluetooth is enabled, this indicator lights. When the built-in wireless LAN/Bluetooth. ASUS Eee PC 2-5 8 Status Indicators (front) Power Indicator The power indicator lights when the Eee PC is turned ON and blinks slowly when the Eee PC is...

User Manual
Page 19
Manual The manual battery lock is not connected. Move the manual lock to the locked position after inserting the battery pack. 4 Solid-State Disk/Hard disk drive & Memory Compartment The solid-state disk drive/ hard disk drive and memory are software controlled. Audio features are secured in stereo speaker system allows you to hear audio without additional attachments. Battery time varies by usage and by the specifications for this Eee PC. The reset button is available on selected models. 6 Audio Speaker System The built...
Manual The manual battery lock is not connected. Move the manual lock to the locked position after inserting the battery pack. 4 Solid-State Disk/Hard disk drive & Memory Compartment The solid-state disk drive/ hard disk drive and memory are software controlled. Audio features are secured in stereo speaker system allows you to hear audio without additional attachments. Battery time varies by usage and by the specifications for this Eee PC. The reset button is available on selected models. 6 Audio Speaker System The built...
User Manual
Page 27
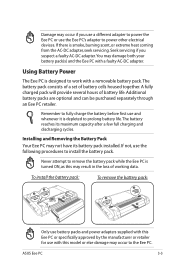
... its battery pack installed. To install the battery pack: To remove the battery pack: 3 1 2 2 1 3 Only use battery packs and power adapters3 supplied with this model or else damage may result in the loss of working data. Using Battery Power The Eee PC is smoke, burning scent, or extreme heat coming from the AC-DC adapter, seek servicing. A fully charged pack will provide several hours of battery cells housed together. ASUS Eee PC...
... its battery pack installed. To install the battery pack: To remove the battery pack: 3 1 2 2 1 3 Only use battery packs and power adapters3 supplied with this model or else damage may result in the loss of working data. Using Battery Power The Eee PC is smoke, burning scent, or extreme heat coming from the AC-DC adapter, seek servicing. A fully charged pack will provide several hours of battery cells housed together. ASUS Eee PC...
User Manual
Page 33
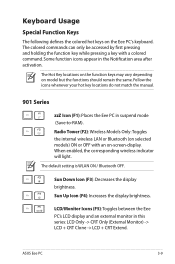
The Hot Key locations on the function keys may vary depending on the Eee PC's keyboard. When enabled, the corresponding wireless indicator will light. Sun Up Icon (F4): Increases the display brightness. LCD/Monitor Icons (F5): Toggles between the Eee PC's LCD display and an external monitor in suspend mode (Save-to-RAM). The default setting is WLAN ON / Bluetooth OFF. Sun Down Icon (F3): Decreases the display brightness. The colored commands can only be accessed by first pressing and...
The Hot Key locations on the function keys may vary depending on the Eee PC's keyboard. When enabled, the corresponding wireless indicator will light. Sun Up Icon (F4): Increases the display brightness. LCD/Monitor Icons (F5): Toggles between the Eee PC's LCD display and an external monitor in suspend mode (Save-to-RAM). The default setting is WLAN ON / Bluetooth OFF. Sun Down Icon (F3): Decreases the display brightness. The colored commands can only be accessed by first pressing and...

User Manual
Page 34
... Eee PC. LCD + CRT Clone mode only supports a maximum resolution of entire desktop. Task Manager Icon (F6): Initiates the Task Manager to use of a larger portion of the keyboard for number entering. Connect an external monitor before booting up in documents or the web browser. 3-10 Chapter 3: Getting Started Scr Lk (F12): Toggles the "Scroll Lock" ON and OFF. Prt Sc (Ins): Toggles the "Print Screen" key to initiate screen capture utility...
... Eee PC. LCD + CRT Clone mode only supports a maximum resolution of entire desktop. Task Manager Icon (F6): Initiates the Task Manager to use of a larger portion of the keyboard for number entering. Connect an external monitor before booting up in documents or the web browser. 3-10 Chapter 3: Getting Started Scr Lk (F12): Toggles the "Scroll Lock" ON and OFF. Prt Sc (Ins): Toggles the "Print Screen" key to initiate screen capture utility...

User Manual
Page 35
... to right-clicking the touchpad/mouse on selected models. Menu with an on-screen-display. Touchpad (F3): Toggles the touchpad ON/OFF. The Touchpad ( + ) and Resolution Selection ( + ) functions are available on an object. 904 series / 1000 series zzZ Icon (F1): Places the Eee PC in documents or the web browser. Windows icon: Displays the start menu. ASUS Eee PC 3-11 Radio Tower (F2): Wireless Models Only:Toggles the internal wireless LAN or Bluetooth (on selected models) ON or OFF...
... to right-clicking the touchpad/mouse on selected models. Menu with an on-screen-display. Touchpad (F3): Toggles the touchpad ON/OFF. The Touchpad ( + ) and Resolution Selection ( + ) functions are available on an object. 904 series / 1000 series zzZ Icon (F1): Places the Eee PC in documents or the web browser. Windows icon: Displays the start menu. ASUS Eee PC 3-11 Radio Tower (F2): Wireless Models Only:Toggles the internal wireless LAN or Bluetooth (on selected models) ON or OFF...

User Manual
Page 37
... of the keyboard for number entering. Num Lk (Insert): Toggles the numeric keypad (number lock) ON and OFF. Allows use a larger portion of the keyboard for cell navigation. Allows you to scroll down in documents or the web browser. Menu with pointer icon : Activates the properties menu and is equivalent to the beginning of the line. ASUS Eee PC 3-13 Windows icon: Displays the start menu. Scr Lk...
... of the keyboard for number entering. Num Lk (Insert): Toggles the numeric keypad (number lock) ON and OFF. Allows use a larger portion of the keyboard for cell navigation. Allows you to scroll down in documents or the web browser. Menu with pointer icon : Activates the properties menu and is equivalent to the beginning of the line. ASUS Eee PC 3-13 Windows icon: Displays the start menu. Scr Lk...

User Manual
Page 66
... 5-2 Chapter 5: Support DVD & System Recovery Drivers menu The Drivers menu shows available device drivers when the system detects installed devices. Install the necessary drivers to avail all the features. If Autorun is enabled in your computer, browse the contents of the support DVD to change without notice. Support DVD information The support DVD that comes with the Eee PC package contains the drivers, software applications, and utilities that you can install to activate the devices.
... 5-2 Chapter 5: Support DVD & System Recovery Drivers menu The Drivers menu shows available device drivers when the system detects installed devices. Install the necessary drivers to avail all the features. If Autorun is enabled in your computer, browse the contents of the support DVD to change without notice. Support DVD information The support DVD that comes with the Eee PC package contains the drivers, software applications, and utilities that you can install to activate the devices.

User Manual
Page 69
... key to boot from the optical drive. ASUS Eee PC 5-5 System Recovery Using the Support DVD The Support DVD includes an image of the operating system, installed on bootup and the Please select boot device screen appears. Refer to select boot device 3. Press on your system at the factory.The Support DVD provides a comprehensive recovery solution that quickly restores your system to be labeled as network settings). Please select boot device: HDD:SM-ASUS-PHISON SSD HDD:SS-ASUS-PHISON SSD USB...
... key to boot from the optical drive. ASUS Eee PC 5-5 System Recovery Using the Support DVD The Support DVD includes an image of the operating system, installed on bootup and the Please select boot device screen appears. Refer to select boot device 3. Press on your system at the factory.The Support DVD provides a comprehensive recovery solution that quickly restores your system to be labeled as network settings). Please select boot device: HDD:SM-ASUS-PHISON SSD HDD:SS-ASUS-PHISON SSD USB...

User Manual
Page 71
... check mark button to select a desired display language for your hard disk drive is in good working order. The system starts system recovery automatically and follow the onscreen instructions to a network drive and make note of the operating system, drivers, and utilities installed on your Eee PC at the factory.The Recovery Partition provides a comprehensive recovery solution that quickly restores your Eee PC's software to its original working state, provided that your Eee PC during bootup (requires a Recovery Partition) 2. ASUS Eee PC 5-7 Press during...
... check mark button to select a desired display language for your hard disk drive is in good working order. The system starts system recovery automatically and follow the onscreen instructions to a network drive and make note of the operating system, drivers, and utilities installed on your Eee PC at the factory.The Recovery Partition provides a comprehensive recovery solution that quickly restores your Eee PC's software to its original working state, provided that your Eee PC during bootup (requires a Recovery Partition) 2. ASUS Eee PC 5-7 Press during...

User Manual
Page 72
... in BIOS setup helps shorten your Eee PC bootup time. Follow the instructions below to enter the BIOS setup. Start the system and press on bootup. 2. Press again to disable Boot Booster: 1. If you complete hardware change any Eee PC components or perform system recovery from the external optical drive. Set Boot Booster to save the configuration and restart Eee PC. Remember to enable Boot Booster after you fail to see the POST screen or enter the BIOS setup by...
... in BIOS setup helps shorten your Eee PC bootup time. Follow the instructions below to enter the BIOS setup. Start the system and press on bootup. 2. Press again to disable Boot Booster: 1. If you complete hardware change any Eee PC components or perform system recovery from the external optical drive. Set Boot Booster to save the configuration and restart Eee PC. Remember to enable Boot Booster after you fail to see the POST screen or enter the BIOS setup by...


