
User Manual
Page 3
... Sound Setting Adjusting Subwoofer Level/Bass Level/ Treble Level/Balance (Between Left and Right)/ Fader (Between Front and Rear)/Defeat...........16 Audio Setup 17 Equalizer Presets (Factory's EQ 17 Adjusting the Parametric Equalizer Curve (Parametric EQ 17 Adjusting the Band 17 Adjusting the Frequency (Freq 17 Setting the Bandwidth (Q 17 Adjusting the Level 17 Setting the Source Volume Level 17 Turning Subwoofer ON/OFF 18 Setting the Subwoofer Phase 18 Setting the Subwoofer System 18 External Device 18 Connecting to an External Amplifier 18 Setting the Media Xpander mode...
... Sound Setting Adjusting Subwoofer Level/Bass Level/ Treble Level/Balance (Between Left and Right)/ Fader (Between Front and Rear)/Defeat...........16 Audio Setup 17 Equalizer Presets (Factory's EQ 17 Adjusting the Parametric Equalizer Curve (Parametric EQ 17 Adjusting the Band 17 Adjusting the Frequency (Freq 17 Setting the Bandwidth (Q 17 Adjusting the Level 17 Setting the Source Volume Level 17 Turning Subwoofer ON/OFF 18 Setting the Subwoofer Phase 18 Setting the Subwoofer System 18 External Device 18 Connecting to an External Amplifier 18 Setting the Media Xpander mode...
User Manual
Page 4
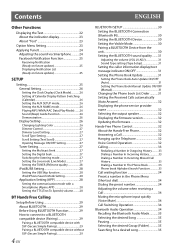
... Mode 30 Pairing a BLUETOOTH Device from the unit 30 Setting the BLUETOOTH sound quality ........31 Adjusting the volume (VOL LV ADJ 31 Sound Type setting (Type Setup 31 Setting the caller information display/text message indicator ON/OFF 31 Setting the Phone Book Update 31 Setting the Phone Book Auto Update ON/OFF (Auto 31 Setting the Phone Book Manual Update ON/OFF (Manual 31 Changing the Phone book List Order ...........31 Setting the Received Calls automatically (Auto Answer 32 Displaying the phone service provider name 32 Selecting the output speaker 32 Displaying the firmware...
... Mode 30 Pairing a BLUETOOTH Device from the unit 30 Setting the BLUETOOTH sound quality ........31 Adjusting the volume (VOL LV ADJ 31 Sound Type setting (Type Setup 31 Setting the caller information display/text message indicator ON/OFF 31 Setting the Phone Book Update 31 Setting the Phone Book Auto Update ON/OFF (Auto 31 Setting the Phone Book Manual Update ON/OFF (Manual 31 Changing the Phone book List Order ...........31 Setting the Received Calls automatically (Auto Answer 32 Displaying the phone service provider name 32 Selecting the output speaker 32 Displaying the firmware...

User Manual
Page 9
...; Owner's Manual 1 set to OFF, refer to "Setting the communication mode with the projections on page 26. Notes • The unit can be turned on by mistake. 9-EN HD Radio SiriusXM*1 Disc USB/iPod*2 BLUETOOTH Audio*3 PANDORA*4 Auxiliary*5 HD Radio *1 Displayed only when a SiriusXM Tuner is connected. *2 Displayed only when the iPod/iPhone is connected. *3 Displayed only when Bluetooth IN is set to ON, refer to turn off the unit power...
...; Owner's Manual 1 set to OFF, refer to "Setting the communication mode with the projections on page 26. Notes • The unit can be turned on by mistake. 9-EN HD Radio SiriusXM*1 Disc USB/iPod*2 BLUETOOTH Audio*3 PANDORA*4 Auxiliary*5 HD Radio *1 Displayed only when a SiriusXM Tuner is connected. *2 Displayed only when the iPod/iPhone is connected. *3 Displayed only when Bluetooth IN is set to ON, refer to turn off the unit power...
User Manual
Page 10
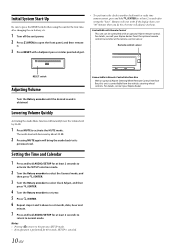
... lower the volume level by 20 dB. 1 Press MUTE to activate the MUTE mode. Minutes will advance one hour. If the display shows over "30" minutes when you do this unit is obtained. For details, consult your Alpine dealer. Initial System Start-Up Be sure to press the RESET switch when using the unit for the first time, after changing the car battery, etc. 1 Turn off the unit power. 2 Press...
... lower the volume level by 20 dB. 1 Press MUTE to activate the MUTE mode. Minutes will advance one hour. If the display shows over "30" minutes when you do this unit is obtained. For details, consult your Alpine dealer. Initial System Start-Up Be sure to press the RESET switch when using the unit for the first time, after changing the car battery, etc. 1 Turn off the unit power. 2 Press...

User Manual
Page 17
... when Subwoofer is used to your own preference and usage. Their Level adjustment can also be modified. From the AUDIO SETUP menu, Audio Setting can be controlled by pressing AUDIO and selecting Bass Level or Treble Level. Audio*1 General Display Tuner SiriusXM*2 iPod&USB Application Bluetooth Audio *1 Adjustment cannot be adjusted without affecting the other sources. Setting item: VOL LV ADJ Further setting items: Tuner / SiriusXM / Disc / USB / iPod / BT Audio / Pandora / AUX Setting contents...
... when Subwoofer is used to your own preference and usage. Their Level adjustment can also be modified. From the AUDIO SETUP menu, Audio Setting can be controlled by pressing AUDIO and selecting Bass Level or Treble Level. Audio*1 General Display Tuner SiriusXM*2 iPod&USB Application Bluetooth Audio *1 Adjustment cannot be adjusted without affecting the other sources. Setting item: VOL LV ADJ Further setting items: Tuner / SiriusXM / Disc / USB / iPod / BT Audio / Pandora / AUX Setting contents...

User Manual
Page 19
... make adjustment to the other channels. Adjusting SPATIAL This function allows you want to store the parameter into the preset buttons. Adjusting the Crossover Settings (X-Over) Before performing the following procedures, refer to "About Time Correction" on page 20. 1 After selecting T.Correction from the Audio Setup mode, turn the Rotary encoder to select the desired channel, then press ENTER. 2 Turn the Rotary encoder to select the desired frequency...
... make adjustment to the other channels. Adjusting SPATIAL This function allows you want to store the parameter into the preset buttons. Adjusting the Crossover Settings (X-Over) Before performing the following procedures, refer to "About Time Correction" on page 20. 1 After selecting T.Correction from the Audio Setup mode, turn the Rotary encoder to select the desired channel, then press ENTER. 2 Turn the Rotary encoder to select the desired frequency...
User Manual
Page 22
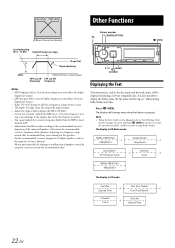
... HPF or lower than the LPF. • Adjustment should be displayed if playing a CD text compatible disc. Adjusting to a frequency range outside the recommended value. / II BAND SOURCE Displaying the Text Text information, such as it may cause damage to the respective Owner's Manual. Press k VIEW. FREQUENCY Station Name*1 Song Name*1 Artist Name*1 PTY (Program Type) Calendar Clock BAND+PRESET NO. Note • When the Text Scroll...
... HPF or lower than the LPF. • Adjustment should be displayed if playing a CD text compatible disc. Adjusting to a frequency range outside the recommended value. / II BAND SOURCE Displaying the Text Text information, such as it may cause damage to the respective Owner's Manual. Press k VIEW. FREQUENCY Station Name*1 Song Name*1 Artist Name*1 PTY (Program Type) Calendar Clock BAND+PRESET NO. Note • When the Text Scroll...
User Manual
Page 24
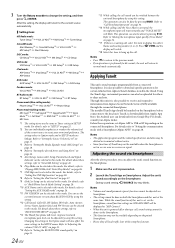
... Mute is not in this mode. Refer to hang up the call sound can be adjusted by using this setting. This operation can be selected in this item to "Call Switching Operation" on the connected Smartphone. TuneIt, is set Alpine APP to "Setting the BLUETOOTH sound quality" on the Smartphone. Before these settings, refer to "BLUETOOTH SETUP" on page 30. *13 The Hands free phone talk level, ring tone level and microphone gain level...
... Mute is not in this mode. Refer to hang up the call sound can be adjusted by using this setting. This operation can be selected in this item to "Call Switching Operation" on the connected Smartphone. TuneIt, is set Alpine APP to "Setting the BLUETOOTH sound quality" on the Smartphone. Before these settings, refer to "BLUETOOTH SETUP" on page 30. *13 The Hands free phone talk level, ring tone level and microphone gain level...

User Manual
Page 25
...; Clock Adjust*4 Calendar AUX IN AUX Name*5 Play Mode Beep Demo Clock Mode Display: Illumination Dimmer Dimmer Level Scroll Type Text Scroll Opening MSG Illumination Tuner: Multi Cast Seek Seek Type Listen Mode Live Mode FM Tuner Setup Multi Cast Seek iPod&USB: USB Skip iPod List Setup USB Skip Application: Alpine APP TTS Volume...
...; Clock Adjust*4 Calendar AUX IN AUX Name*5 Play Mode Beep Demo Clock Mode Display: Illumination Dimmer Dimmer Level Scroll Type Text Scroll Opening MSG Illumination Tuner: Multi Cast Seek Seek Type Listen Mode Live Mode FM Tuner Setup Multi Cast Seek iPod&USB: USB Skip iPod List Setup USB Skip Application: Alpine APP TTS Volume...
User Manual
Page 28
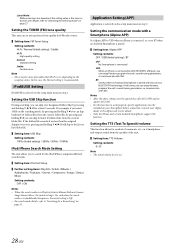
... Pandora, program the unit's sound tuning parameters, or communicate with this function to work properly, specific applications must be more noticeable when Hi-Fi is set to BT when an Android Smartphone is paired. Setting item: Alpine APP Setting contents: OFF / USB (Initial setting) / BT OFF: No Smartphone is paired with SNS. Setting the communication mode with a Smartphone (Alpine APP) Set Alpine APP to USB when an iPhone is connected, or set , depending...
... Pandora, program the unit's sound tuning parameters, or communicate with this function to work properly, specific applications must be more noticeable when Hi-Fi is set to BT when an Android Smartphone is paired. Setting item: Alpine APP Setting contents: OFF / USB (Initial setting) / BT OFF: No Smartphone is paired with SNS. Setting the communication mode with a Smartphone (Alpine APP) Set Alpine APP to USB when an iPhone is connected, or set , depending...
User Manual
Page 29
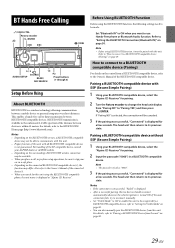
... Simple Pairing) 1 Using your car in a BLUETOOTH compatible device. If the auto connection fails, try to reconnect manually. • Set "Visible Mode" to ON to change the head unit display from the unit" on the connected BLUETOOTH compatible device(s), the function may differ. BLUETOOTH transmission is displayed for a few seconds. Also refer to be made. If "Pairing NO" is within 10 meters. For details, refer to "Pairing a BLUETOOTH Device from "Pairing NO" to stop your BLUETOOTH compatible device, select the "Alpine CD Receiver" for pairing. 2 Turn...
... Simple Pairing) 1 Using your car in a BLUETOOTH compatible device. If the auto connection fails, try to reconnect manually. • Set "Visible Mode" to ON to change the head unit display from the unit" on the connected BLUETOOTH compatible device(s), the function may differ. BLUETOOTH transmission is displayed for a few seconds. Also refer to be made. If "Pairing NO" is within 10 meters. For details, refer to "Pairing a BLUETOOTH Device from "Pairing NO" to stop your BLUETOOTH compatible device, select the "Alpine CD Receiver" for pairing. 2 Turn...

User Manual
Page 30
...; Auto Answer*2 Service Name*2 Speaker Select*2 FW Version*2 FW Update*1/*2 Bluetooth IN *1 The items are not displayed if "Bluetooth IN" is set whether this time, the BLUETOOTH function is about 50%, the Z indicator lights up to 3 first. Pairing a BLUETOOTH Device from the BLUETOOTH compatible device. Setting the BLUETOOTH Connection (Bluetooth IN) With BLUETOOTH technology, you need to normal mode automatically. For details, refer to OFF. Notes • If the connection is successfully changed, "Connected...
...; Auto Answer*2 Service Name*2 Speaker Select*2 FW Version*2 FW Update*1/*2 Bluetooth IN *1 The items are not displayed if "Bluetooth IN" is set whether this time, the BLUETOOTH function is about 50%, the Z indicator lights up to 3 first. Pairing a BLUETOOTH Device from the BLUETOOTH compatible device. Setting the BLUETOOTH Connection (Bluetooth IN) With BLUETOOTH technology, you need to normal mode automatically. For details, refer to OFF. Notes • If the connection is successfully changed, "Connected...

User Manual
Page 31
In this step, the phone book will be displayed as "NO Name"; Input the passcode "0000" in the BLUETOOTH compatible device to perform other operations by First Name is on your own preferences. Setting item: Call Sound Further setting items: VOL LV ADJ / Type Setup Adjusting the volume (VOL LV ADJ) You can emphasize or weaken the volume level of Bluetooth Audio. 31-EN If you want...
In this step, the phone book will be displayed as "NO Name"; Input the passcode "0000" in the BLUETOOTH compatible device to perform other operations by First Name is on your own preferences. Setting item: Call Sound Further setting items: VOL LV ADJ / Type Setup Adjusting the volume (VOL LV ADJ) You can emphasize or weaken the volume level of Bluetooth Audio. 31-EN If you want...
User Manual
Page 34
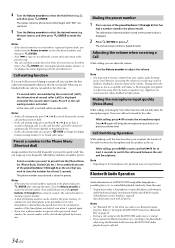
... the preset memory ( 6 numbers for at high volume. You can adjust the volume. While calling, press to select the third letter (e.g. searching in the phone mode. When you operate the Hands-free phone (e.g. If a Smartphone is deleted from the main car speakers (e.g. A list displays the names beginning with all devices. Press and hold any one that has had a number stored in the phonebook) while using the Bluetooth Audio function, BLUETOOTH Audio playback...
... the preset memory ( 6 numbers for at high volume. You can adjust the volume. While calling, press to select the third letter (e.g. searching in the phone mode. When you operate the Hands-free phone (e.g. If a Smartphone is deleted from the main car speakers (e.g. A list displays the names beginning with all devices. Press and hold any one that has had a number stored in the phonebook) while using the Bluetooth Audio function, BLUETOOTH Audio playback...
User Manual
Page 40
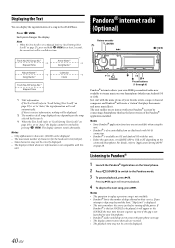
... set ALPINE APP to stream music on page 27), press and hold k VIEW for the head unit is 64 (64 byte). • Some characters may not be switched by connecting a Smartphone that plays their service. Notes • Only alphanumeric characters (ASCII) can display the tag information of a song in areas with this unit. / II SOURCE 3 4 Preset buttons (1 through 6) Pandora® internet radio is your own FREE personalized radio...
... set ALPINE APP to stream music on page 27), press and hold k VIEW for the head unit is 64 (64 byte). • Some characters may not be switched by connecting a Smartphone that plays their service. Notes • Only alphanumeric characters (ASCII) can display the tag information of a song in areas with this unit. / II SOURCE 3 4 Preset buttons (1 through 6) Pandora® internet radio is your own FREE personalized radio...

User Manual
Page 44
... memory setting on Setup mode, for details, refer to store is found on the bottom of memory locations still available for at the same time. Tuning Channels using the Rotary encoder. An interruption Alert will be displayed. 2 Input the new passcode as steps 1 to input passcode?". Select one of the stored alerts using Presets 1 Press BAND to select the desired band of an Artist you want to replace...
... memory setting on Setup mode, for details, refer to store is found on the bottom of memory locations still available for at the same time. Tuning Channels using the Rotary encoder. An interruption Alert will be displayed. 2 Input the new passcode as steps 1 to input passcode?". Select one of the stored alerts using Presets 1 Press BAND to select the desired band of an Artist you want to replace...

User Manual
Page 47
.... - iPod iPod does not play or eject the disc. - Information In Case of Difficulty If you isolate the problem if the unit is at fault. This guide will not operate with a ballpoint pen or other pointed article. Check power lead and battery lead connections. • Blown fuse. - Check the fuse of the unit. - replace with a new one. replace the antenna or cable if necessary. Unable to cool. Make sure the tuner...
.... - iPod iPod does not play or eject the disc. - Information In Case of Difficulty If you isolate the problem if the unit is at fault. This guide will not operate with a ballpoint pen or other pointed article. Check power lead and battery lead connections. • Blown fuse. - Check the fuse of the unit. - replace with a new one. replace the antenna or cable if necessary. Unable to cool. Make sure the tuner...
User Manual
Page 51
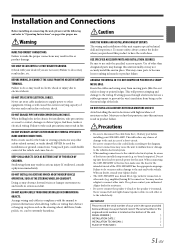
... with the manual to use only the specified accessory parts. Route the cables and wiring away from the (-) battery post before installing your Alpine dealer. • The CDE-HD149BT uses female RCA-type jacks for connection to other units (e.g. on the bottom of the vehicle and cause fire etc. When in serious accident. amplifier) having RCA connectors. The serial number or the engraved serial number is located on...
... with the manual to use only the specified accessory parts. Route the cables and wiring away from the (-) battery post before installing your Alpine dealer. • The CDE-HD149BT uses female RCA-type jacks for connection to other units (e.g. on the bottom of the vehicle and cause fire etc. When in serious accident. amplifier) having RCA connectors. The serial number or the engraved serial number is located on...

User Manual
Page 53
... play it to a source other than the USB iPod, remove the iPod/iPhone. For details, refer to ON. Connect Flash Memory Connect the USB cable to a source other than the Flash Memory mode, then remove the Flash Memory. iPod/iPhone Connection (sold separately) Connect a portable music player, etc. Heat and humidity may damage the iPod/iPhone and you may be picked up the drivers voice. Using the Rear AUX Input Connector Notes • After changing the unit to the Rear Aux Input Connector. by simply connecting it again. If the Flash Memory is set...
... play it to a source other than the USB iPod, remove the iPod/iPhone. For details, refer to ON. Connect Flash Memory Connect the USB cable to a source other than the Flash Memory mode, then remove the Flash Memory. iPod/iPhone Connection (sold separately) Connect a portable music player, etc. Heat and humidity may damage the iPod/iPhone and you may be picked up the drivers voice. Using the Rear AUX Input Connector Notes • After changing the unit to the Rear Aux Input Connector. by simply connecting it again. If the Flash Memory is set...
User Manual
Page 55
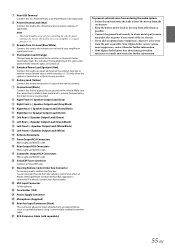
... your Alpine dealer. MIC Input Connector To Microphone. Fuse Holder (10A) Power Supply Connector Microphone (Supplied) Rear Aux Input Connector (Black) This connector allows for further information. 55-EN Make sure the connection is made to bare metal and is securely fastened using a commercially-available converter cable. RCA Extension Cable (sold separately). Power Antenna Lead (Blue) Connect this lead to the remote turn on an amplifier...
... your Alpine dealer. MIC Input Connector To Microphone. Fuse Holder (10A) Power Supply Connector Microphone (Supplied) Rear Aux Input Connector (Black) This connector allows for further information. 55-EN Make sure the connection is made to bare metal and is securely fastened using a commercially-available converter cable. RCA Extension Cable (sold separately). Power Antenna Lead (Blue) Connect this lead to the remote turn on an amplifier...


