Owners Manual
Page 3
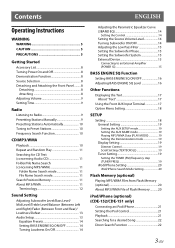
... Adjusting BASS ENGINE SQ Level 16 Other Functions Displaying the Text 17 About "Text 17 Using the Front AUX Input Terminal 17 Option Menu Setting 18 SETUP Setting 18 General Setting 19 Setting the AUX SETUP mode 19 Setting the AUX NAME mode 19 Playing MP3/WMA Data (PLAY MODE 19 Setting the Demonstration mode 19 Display Setting 19 Dimmer Control 19 Scroll Setting (TEXTSCROLL 19 Tuner Setting 19 Setting the TUNER (FM) frequency step (TUNER FREQ 19 iPod/iPhone Setting 20 iPod/iPhone Search Mode Setting 20 Flash Memory (optional) Playing MP3/WMA Files from Flash Memory...
... Adjusting BASS ENGINE SQ Level 16 Other Functions Displaying the Text 17 About "Text 17 Using the Front AUX Input Terminal 17 Option Menu Setting 18 SETUP Setting 18 General Setting 19 Setting the AUX SETUP mode 19 Setting the AUX NAME mode 19 Playing MP3/WMA Data (PLAY MODE 19 Setting the Demonstration mode 19 Display Setting 19 Dimmer Control 19 Scroll Setting (TEXTSCROLL 19 Tuner Setting 19 Setting the TUNER (FM) frequency step (TUNER FREQ 19 iPod/iPhone Setting 20 iPod/iPhone Search Mode Setting 20 Flash Memory (optional) Playing MP3/WMA Files from Flash Memory...

Owners Manual
Page 6
... the disc. Use of the disc to direct sunlight. Do not affix tape, paper, or gummed labels to load more than one disc at a time for a long time. You can be displayed on which do not conform to extreme temperatures or sunlight (e.g., left in Alpine CD players. Do not attempt to the disc. About media that there are inserted incorrectly. Playing a disc while driving...
... the disc. Use of the disc to direct sunlight. Do not affix tape, paper, or gummed labels to load more than one disc at a time for a long time. You can be displayed on which do not conform to extreme temperatures or sunlight (e.g., left in Alpine CD players. Do not attempt to the disc. About media that there are inserted incorrectly. Playing a disc while driving...

Owners Manual
Page 7
... driver operation will not be hindered. • Flash Memory may not function correctly at the same time. • If a USB device is recommended for lost data, etc., even if data, etc., is in the unit, it may be a danger while driving. The resulting playback may not function correctly depending on page 11. • ROM data other than audio data. Read the Flash Memory Owner's Manual thoroughly. Change SOURCE...
... driver operation will not be hindered. • Flash Memory may not function correctly at the same time. • If a USB device is recommended for lost data, etc., even if data, etc., is in the unit, it may be a danger while driving. The resulting playback may not function correctly depending on page 11. • ROM data other than audio data. Read the Flash Memory Owner's Manual thoroughly. Change SOURCE...
Owners Manual
Page 8
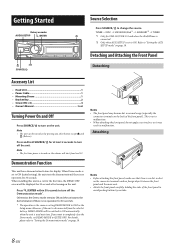
TUNER DISC USB AUDIO/iPod*1 AUXILIARY*2 TUNER *1 Only for 30 seconds. When installing this unit in malfunction. However, if the unit is used next time. Detaching and Attaching the Front Panel Detaching Accessory List • Head Unit 1 • Power Cable 1 • Mounting Sleeve 1 • Bracket Key 2 • Screw (M5 × 8 4 • Owner's Manual 1 set to ON. Note • The first time power is turned on, the volume will be switched to turn off the...
TUNER DISC USB AUDIO/iPod*1 AUXILIARY*2 TUNER *1 Only for 30 seconds. When installing this unit in malfunction. However, if the unit is used next time. Detaching and Attaching the Front Panel Detaching Accessory List • Head Unit 1 • Power Cable 1 • Mounting Sleeve 1 • Bracket Key 2 • Screw (M5 × 8 4 • Owner's Manual 1 set to ON. Note • The first time power is turned on, the volume will be switched to turn off the...

Owners Manual
Page 9
... (Local mode) MANUAL (Manual mode) SEEK DX Distance mode (Initial setting): Both strong and weak stations will change the frequency continuously. In Manual mode, holding r for at least 2 seconds, any one hour. • Pressing t will return to another clock/watch or radio time announcement, press and hold AUDIOSETUP for at the remote-control sensor. Presetting Stations Manually 1 Select the radio band and tune in a desired radio station you store a station in the preset memory. 2 Press...
... (Local mode) MANUAL (Manual mode) SEEK DX Distance mode (Initial setting): Both strong and weak stations will change the frequency continuously. In Manual mode, holding r for at least 2 seconds, any one hour. • Pressing t will return to another clock/watch or radio time announcement, press and hold AUDIOSETUP for at the remote-control sensor. Presetting Stations Manually 1 Select the radio band and tune in a desired radio station you store a station in the preset memory. 2 Press...

Owners Manual
Page 13
... displayed when BASS ENGINE SQ mode is on. (Page 14) Subwoofer Bass level Mid level Treble level Balance Fader Loudness Defeat Volume +0 ~ +15 −7 ~ +7 −7 ~ +7 −7 ~ +7 L15 ~ R15 R15 ~ F15 ON/OFF ON/OFF 0 ~ 35 Note • If no operation is performed for 60 seconds, Sound menu mode is set uniformly in each mode. Sound Setting Rotary encoder AUDIO/SETUP /ENTER BASS Adjusting Subwoofer Level/Bass Level/Mid Level/Treble Level/Balance (Between Left and Right)/Fader (Between Front and Rear...
... displayed when BASS ENGINE SQ mode is on. (Page 14) Subwoofer Bass level Mid level Treble level Balance Fader Loudness Defeat Volume +0 ~ +15 −7 ~ +7 −7 ~ +7 −7 ~ +7 L15 ~ R15 R15 ~ F15 ON/OFF ON/OFF 0 ~ 35 Note • If no operation is performed for 60 seconds, Sound menu mode is set uniformly in each mode. Sound Setting Rotary encoder AUDIO/SETUP /ENTER BASS Adjusting Subwoofer Level/Bass Level/Mid Level/Treble Level/Balance (Between Left and Right)/Fader (Between Front and Rear...

Owners Manual
Page 14
... adjustment can also set BASS ENGINE SQ ON/OFF directly by adjusting the BASS ENGINE SQ Level (page 16). A narrower setting will boost a wide range of each audio effect setting separately. Setting the Source Volume Level The output level of frequencies above and below the center frequency. Equalizer Presets 10 typical equalizer settings are created in this mode. Setting item: 3BAND EQ Further setting items: BASS / MID / TREBLE Setting the Control 1 After selecting BASS/MID/TREBLE from the 3BAND EQ adjustment mode, turn...
... adjustment can also set BASS ENGINE SQ ON/OFF directly by adjusting the BASS ENGINE SQ Level (page 16). A narrower setting will boost a wide range of each audio effect setting separately. Setting the Source Volume Level The output level of frequencies above and below the center frequency. Equalizer Presets 10 typical equalizer settings are created in this mode. Setting item: 3BAND EQ Further setting items: BASS / MID / TREBLE Setting the Control 1 After selecting BASS/MID/TREBLE from the 3BAND EQ adjustment mode, turn...

Owners Manual
Page 15
... (Initial setting) SUBW SYS1: Subwoofer level changes according to the main volume setting. In this setting, the head unit's internal amplifier is used to drive an external amplifier. External Device Connecting to an External Amplifier (POWER IC) When an external amplifier is connected, sound quality can be improved by the built-in amplifier. OFF: Amplifier Amplifier Front Left Front Right Rear Left Rear Right ON: SPEAKER RIGHT FRONT Speakers Front Right SPEAKER RIGHT REAR SPEAKER LEFT REAR Rear Right Rear Left SPEAKER LEFT FRONT...
... (Initial setting) SUBW SYS1: Subwoofer level changes according to the main volume setting. In this setting, the head unit's internal amplifier is used to drive an external amplifier. External Device Connecting to an External Amplifier (POWER IC) When an external amplifier is connected, sound quality can be improved by the built-in amplifier. OFF: Amplifier Amplifier Front Left Front Right Rear Left Rear Right ON: SPEAKER RIGHT FRONT Speakers Front Right SPEAKER RIGHT REAR SPEAKER LEFT REAR Rear Right Rear Left SPEAKER LEFT FRONT...

Owners Manual
Page 16
... BASS ENGINE SQ Level adjustment screen. 2 Turn the Rotary encoder to switch the sound mode. With the BASS ENGINE SQ function on this unit to "ON", and the BASS ENGINE SQ Level to "+3". 4 Play a song of the genre you can also be adjusted separately. • From Level 0 to optimize the BASS ENGINE SQ, we recommend the following power amplifier setup. Notes • This operation can adjust the BASS ENGINE SQ Level according to the music. 1 Set...
... BASS ENGINE SQ Level adjustment screen. 2 Turn the Rotary encoder to switch the sound mode. With the BASS ENGINE SQ function on this unit to "ON", and the BASS ENGINE SQ Level to "+3". 4 Play a song of the genre you can also be adjusted separately. • From Level 0 to optimize the BASS ENGINE SQ, we recommend the following power amplifier setup. Notes • This operation can adjust the BASS ENGINE SQ Level according to the music. 1 Set...
Owners Manual
Page 17
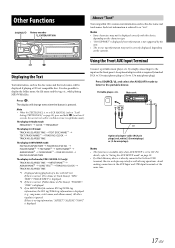
... page 19. • If a Flash Memory device is directly connected to as "text". Main unit or Optional adapter cable (RCA pin plugs [red, white] 3.5ø miniplugs) or (3.5ø miniplugs). For details, refer to "Setting the AUX SETUP mode" on the front panel. Such text information is referred to the Front USB terminal, the size or shape may interfere with driving operations. Using the Front AUX Input Terminal Displaying the Text Text information...
... page 19. • If a Flash Memory device is directly connected to as "text". Main unit or Optional adapter cable (RCA pin plugs [red, white] 3.5ø miniplugs) or (3.5ø miniplugs). For details, refer to "Setting the AUX SETUP mode" on the front panel. Such text information is referred to the Front USB terminal, the size or shape may interfere with driving operations. Using the Front AUX Input Terminal Displaying the Text Text information...
Owners Manual
Page 18
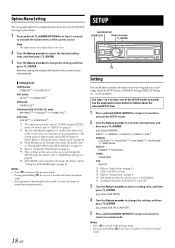
...;SETUP for 60 seconds, the unit will return to normal mode. 18-EN Select GENERAL) AUDIO*1 GENERAL DISPLAY TUNER iPod*2 GENERAL: CLOCK ADJ*3 AUX SETUP*4 AUX NAME*5 PLAY MODE DEMO MODE DISPLAY: DIMMER TEXTSCROLL TUNER: TUNER FREQ iPod: iPod LIST *1 Refer to "Audio Setup" on page 13. *2 CDE-152/CDE-151 only. *3 Refer to "Setting Time" on page 18. *2 You can individually emphasise or weaken the volume level of the current source. The setting...
...;SETUP for 60 seconds, the unit will return to normal mode. 18-EN Select GENERAL) AUDIO*1 GENERAL DISPLAY TUNER iPod*2 GENERAL: CLOCK ADJ*3 AUX SETUP*4 AUX NAME*5 PLAY MODE DEMO MODE DISPLAY: DIMMER TEXTSCROLL TUNER: TUNER FREQ iPod: iPod LIST *1 Refer to "Audio Setup" on page 13. *2 CDE-152/CDE-151 only. *3 Refer to "Setting Time" on page 18. *2 You can individually emphasise or weaken the volume level of the current source. The setting...
Owners Manual
Page 19
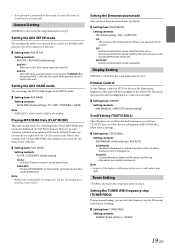
... setup main menu in step 2. In this setting before inserting a disc. Display Setting DISPLAY is selected, the sound of this unit. Setting item: AUX SETUP Setting contents: AUX OFF / AUX ON (Initial setting) AUX OFF: When set to OFF, AUX source cannot be selected. This mode decreases the unit's backlighting at a certain extent at night. Setting item: DIMMER Setting contents: DIM MANUAL / DIM AUTO (Initial setting) Scroll Setting (TEXTSCROLL) This CD player can input the audio of an external device, (such as a Portable audio player...
... setup main menu in step 2. In this setting before inserting a disc. Display Setting DISPLAY is selected, the sound of this unit. Setting item: AUX SETUP Setting contents: AUX OFF / AUX ON (Initial setting) AUX OFF: When set to OFF, AUX source cannot be selected. This mode decreases the unit's backlighting at a certain extent at night. Setting item: DIMMER Setting contents: DIM MANUAL / DIM AUTO (Initial setting) Scroll Setting (TEXTSCROLL) This CD player can input the audio of an external device, (such as a Portable audio player...
Owners Manual
Page 21
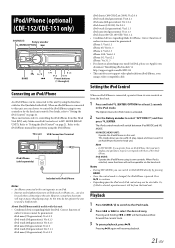
... own controls. play, repeat and music search in an iPod/iPhone from this Head Unit (HU) only. This mode allows you can switch to iPod MODE directly by pressing BAND. • Once the control mode is changed, the iPod/iPhone is set to HU MODE (HEAD UNIT). Pressing and holding or will not be operable via this time do not operate the unit to avoid a malfunction. Make sure iPod Control is paused. iPod/iPhone (optional) (CDE-152/CDE-151 only) SOURCE/...
... own controls. play, repeat and music search in an iPod/iPhone from this Head Unit (HU) only. This mode allows you can switch to iPod MODE directly by pressing BAND. • Once the control mode is changed, the iPod/iPhone is set to HU MODE (HEAD UNIT). Pressing and holding or will not be operable via this time do not operate the unit to avoid a malfunction. Make sure iPod Control is paused. iPod/iPhone (optional) (CDE-152/CDE-151 only) SOURCE/...
Owners Manual
Page 24
.... Refer to tune stations in the seek mode. • You are in is properly grounded at fault. Reset the iPod. If the disc still does not eject, consult your antenna connections; This guide will not operate with the vehicle's ignition off . - Basic No function or display. • Vehicle's ignition is at its mounting location. Check power lead and battery lead connections. • Blown fuse. - Make sure the tuner is in a weak...
.... Refer to tune stations in the seek mode. • You are in is properly grounded at fault. Reset the iPod. If the disc still does not eject, consult your antenna connections; This guide will not operate with the vehicle's ignition off . - Basic No function or display. • Vehicle's ignition is at its mounting location. Check power lead and battery lead connections. • Blown fuse. - Make sure the tuner is in a weak...
Owners Manual
Page 25
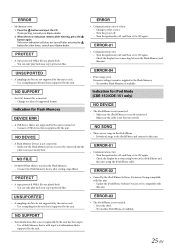
... , and then set to ON again. - Indication for iPod Mode (CDE-152/CDE-151 only) • The iPod/iPhone is not verified. - Make sure the iPod/iPhone is not connected. - NO SUPPORT • An AAC format disc is used . - Connect a USB device that is not supported by the unit is supported by the unit has been input. - Update the iPod/iPhone Software Version to this unit. - Turn the power off. - Change to other source. - Make sure the cable is used . - Use a Flash Memory device with this unit. • A sampling...
... , and then set to ON again. - Indication for iPod Mode (CDE-152/CDE-151 only) • The iPod/iPhone is not verified. - Make sure the iPod/iPhone is not connected. - NO SUPPORT • An AAC format disc is used . - Connect a USB device that is not supported by the unit is supported by the unit has been input. - Update the iPod/iPhone Software Version to this unit. - Turn the power off. - Change to other source. - Make sure the cable is used . - Use a Flash Memory device with this unit. • A sampling...
Owners Manual
Page 28
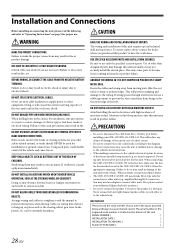
... if you purchased this unit internally or may need an adaptor to connect other or to each other units. SERIAL NUMBER: [ ] INSTALLATION DATE: [ ] INSTALLATION TECHNICIAN: [ ] PLACE OF PURCHASE: [ ] 28-EN Using such parts could disable control of your Alpine dealer. • The CDE-152/CDE-151/CDE-150 uses female RCA-type jacks for installations or ground connections. DO NOT INSTALL IN LOCATIONS WHICH MIGHT HINDER VEHICLE OPERATION, SUCH AS THE...
... if you purchased this unit internally or may need an adaptor to connect other or to each other units. SERIAL NUMBER: [ ] INSTALLATION DATE: [ ] INSTALLATION TECHNICIAN: [ ] PLACE OF PURCHASE: [ ] 28-EN Using such parts could disable control of your Alpine dealer. • The CDE-152/CDE-151/CDE-150 uses female RCA-type jacks for installations or ground connections. DO NOT INSTALL IN LOCATIONS WHICH MIGHT HINDER VEHICLE OPERATION, SUCH AS THE...
Owners Manual
Page 29
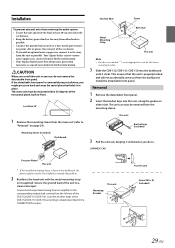
... chosen mounting location. 3 Slide the CDE-152/CDE-151/CDE-150 into the unit, along the guides on page 29). Connect each input lead coming from an amplifier to the corresponding output lead coming from the unit as possible. Installation To prevent external noise from entering the audio system. • Locate the unit and route the leads at least 10 cm away from the car harness. • Keep the battery power...
... chosen mounting location. 3 Slide the CDE-152/CDE-151/CDE-150 into the unit, along the guides on page 29). Connect each input lead coming from an amplifier to the corresponding output lead coming from the unit as possible. Installation To prevent external noise from entering the audio system. • Locate the unit and route the leads at least 10 cm away from the car harness. • Keep the battery power...
Owners Manual
Page 30
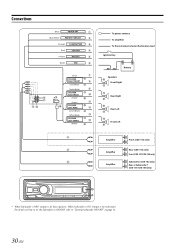
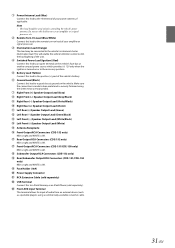
... to set the Subwoofer to ON/OFF, refer to "Turning Subwoofer ON/OFF" on page 14. 30-EN When Subwoofer is ON: Output is for Subwoofer. Connections (Blue) POWER ANT (Blue/White) REMOTE TURN-ON (Orange) ILLUMINATION (Red) IGNITION (Yellow) BATTERY (Black) GND (Gray) SPEAKER RIGHT FRONT (Gray/Black) (Violet/Black) SPEAKER RIGHT REAR (Violet) (Green) SPEAKER LEFT REAR (Green/Black) (White/Black) SPEAKER LEFT FRONT (White) To power antenna To amplifier To...
... to set the Subwoofer to ON/OFF, refer to "Turning Subwoofer ON/OFF" on page 14. 30-EN When Subwoofer is ON: Output is for Subwoofer. Connections (Blue) POWER ANT (Blue/White) REMOTE TURN-ON (Orange) ILLUMINATION (Red) IGNITION (Yellow) BATTERY (Black) GND (Gray) SPEAKER RIGHT FRONT (Gray/Black) (Violet/Black) SPEAKER RIGHT REAR (Violet) (Green) SPEAKER LEFT REAR (Green/Black) (White/Black) SPEAKER LEFT FRONT (White) To power antenna To amplifier To...
Owners Manual
Page 31
... a Flash Memory or an iPod/iPhone (sold separately). Front AUX Input Terminal This terminal allows for controlling the vehicle's power antenna. Make sure the connection is made to bare metal and is securely fastened using a commercially-available converter cable. 31-EN This will enable the vehicle's dimmer control to dim the backlighting of your power antenna, if applicable. Do not use this lead to turn on an amplifier or...
... a Flash Memory or an iPod/iPhone (sold separately). Front AUX Input Terminal This terminal allows for controlling the vehicle's power antenna. Make sure the connection is made to bare metal and is securely fastened using a commercially-available converter cable. 31-EN This will enable the vehicle's dimmer control to dim the backlighting of your power antenna, if applicable. Do not use this lead to turn on an amplifier or...
Owners Manual
Page 32
... other rights which service is turned up and driven into distortion or clipping). Do not send products to locate a service center. Call the toll free telephone number or visit the website to this address. LIMITED WARRANTY ALPINE ELECTRONICS OF AMERICA, INC. ("Alpine"), is dedicated to quality craftsmanship and is not valid unless your Alpine car audio product has been installed in your...
... other rights which service is turned up and driven into distortion or clipping). Do not send products to locate a service center. Call the toll free telephone number or visit the website to this address. LIMITED WARRANTY ALPINE ELECTRONICS OF AMERICA, INC. ("Alpine"), is dedicated to quality craftsmanship and is not valid unless your Alpine car audio product has been installed in your...


