
User Manual
Page 3
... the following guidelines when connecting and disconnecting power to the external power supply unit: • Install the power supply unit before cleaning. These openings must not be placed near water. • Do not place this product from overheating. Caution for ventilation to ensure reliable operation of internal components and to the AC power outlet. • Unplug the power cord before cleaning Unplug this product on...
... the following guidelines when connecting and disconnecting power to the external power supply unit: • Install the power supply unit before cleaning. These openings must not be placed near water. • Do not place this product from overheating. Caution for ventilation to ensure reliable operation of internal components and to the AC power outlet. • Unplug the power cord before cleaning Unplug this product on...

User Manual
Page 5
... require extensive work by the operating instructions, since improper adjustment of air around the projector is something wrong with your eyes. • Turn on . At least 50cm clearance from the wall outlet and refer servicing to qualified service personnel when: • the power cord or plug is damaged, cut or frayed • liquid was spilled into the projector's lens when the lamp is poorly...
... require extensive work by the operating instructions, since improper adjustment of air around the projector is something wrong with your eyes. • Turn on . At least 50cm clearance from the wall outlet and refer servicing to qualified service personnel when: • the power cord or plug is damaged, cut or frayed • liquid was spilled into the projector's lens when the lamp is poorly...

User Manual
Page 6
... ensure the projector completes its own removable cover. Allow the projector to cool for the fan to become heated and deformed or even cause a fire. Please be sure to change the lamp when is showing warning message. • When changing the lamp, please allow unit to cool down, and follow all changing instructions. • Reset the "Lamp Hour Reset" function from the Onscreen display "Management" menu after replacing the lamp module...
... ensure the projector completes its own removable cover. Allow the projector to cool for the fan to become heated and deformed or even cause a fire. Please be sure to change the lamp when is showing warning message. • When changing the lamp, please allow unit to cool down, and follow all changing instructions. • Reset the "Lamp Hour Reset" function from the Onscreen display "Management" menu after replacing the lamp module...

User Manual
Page 8
... detergent to clean the display housing. • Disconnect the power plug from the Onscreen display "Management" menu after replacing the lamp module. • When switching the projector off the product before disconnecting power. • Turn on the unit provided for a long period of time. Please be sure to change the lamp when it will detect the life of the lamp itself. Precautions Follow all changing instructions. • This...
... detergent to clean the display housing. • Disconnect the power plug from the Onscreen display "Management" menu after replacing the lamp module. • When switching the projector off the product before disconnecting power. • Turn on the unit provided for a long period of time. Please be sure to change the lamp when it will detect the life of the lamp itself. Precautions Follow all changing instructions. • This...

User Manual
Page 9
... 3 Projector Outlook 3 Control Panel 5 Remote Control Layout 6 MHL (Mobile High-Definition Link) Control 8 Getting Started 10 Connecting the Projector 10 Turning the Projector On/Off 11 Turning on the Projector 11 Turning the projector off 12 Adjusting the Projected Image 13 Adjusting the Height of Projected Image 13 How to optimize image size and distance 14 How to get a preferred image size by adjusting distance and zoom 16 User Controls 18 Installation menu 18 Onscreen Display (OSD) Menus 19 Color 20 Image 22 Setting 24 Management 27 Audio 28...
... 3 Projector Outlook 3 Control Panel 5 Remote Control Layout 6 MHL (Mobile High-Definition Link) Control 8 Getting Started 10 Connecting the Projector 10 Turning the Projector On/Off 11 Turning on the Projector 11 Turning the projector off 12 Adjusting the Projected Image 13 Adjusting the Height of Projected Image 13 How to optimize image size and distance 14 How to get a preferred image size by adjusting distance and zoom 16 User Controls 18 Installation menu 18 Onscreen Display (OSD) Menus 19 Color 20 Image 22 Setting 24 Management 27 Audio 28...
User Manual
Page 11
... economy (ECO) mode extend lamp life • Acer EcoProjeciton Technology delivers Intelligent power management approach and physical efficiency improvement • Equipped with HDMI™ & MHL connection supporting HDCP • Smart detection delivers quick, intelligent source detection • Multi-language onscreen display (OSD) menus • Manual focus projection lens zooms up to 1.1x • 2x digital zoom • Microsoft® Windows® 2000, XP, Vista®, Windows 7, Windows 8.1, Windows 10, Macintosh®...
... economy (ECO) mode extend lamp life • Acer EcoProjeciton Technology delivers Intelligent power management approach and physical efficiency improvement • Equipped with HDMI™ & MHL connection supporting HDCP • Smart detection delivers quick, intelligent source detection • Multi-language onscreen display (OSD) menus • Manual focus projection lens zooms up to 1.1x • 2x digital zoom • Microsoft® Windows® 2000, XP, Vista®, Windows 7, Windows 8.1, Windows 10, Macintosh®...

User Manual
Page 15
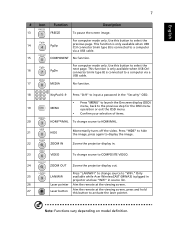
... Functions vary depending on model definition. 5 Control Panel 1 2 3 English 4 7 8 5 9 6 10 # Icon Function 1 POWER POWER 2 LAMP LAMP 3 TEMP TEMP 4 POWER Description Power Indicator LED Lamp Indicator LED Temp Indicator LED See the contents in "Turning the Projector On/Off" section. 5 Four directional select Use to select items or make keys adjustments to your selection. 6 BACK BACK Returns to the previous operation. 7 SOURCE SOURCE Changes the active source. 8 ENTER ENTER Confirm your selection of items. 9 Keystone Adjusts the image to compensate for distortion...
... Functions vary depending on model definition. 5 Control Panel 1 2 3 English 4 7 8 5 9 6 10 # Icon Function 1 POWER POWER 2 LAMP LAMP 3 TEMP TEMP 4 POWER Description Power Indicator LED Lamp Indicator LED Temp Indicator LED See the contents in "Turning the Projector On/Off" section. 5 Four directional select Use to select items or make keys adjustments to your selection. 6 BACK BACK Returns to the previous operation. 7 SOURCE SOURCE Changes the active source. 8 ENTER ENTER Confirm your selection of items. 9 Keystone Adjusts the image to compensate for distortion...

User Manual
Page 16
... playback. 6 Four directional select keys Use up, down, left, right buttons to select items or make adjustments to your selection. 7 3D Press "3D" to select 3D models. 8 SOURCE Changes the active source. 9 MODE Press "MODE" to select the display mode from Bright, Presentation, Standard, Video and User. 10 KEYSTONE Adjusts the image to compensate for distortion caused by tilting the projector. 11 BACK STOP Returns to the...
... playback. 6 Four directional select keys Use up, down, left, right buttons to select items or make adjustments to your selection. 7 3D Press "3D" to select 3D models. 8 SOURCE Changes the active source. 9 MODE Press "MODE" to select the display mode from Bright, Presentation, Standard, Video and User. 10 KEYSTONE Adjusts the image to compensate for distortion caused by tilting the projector. 11 BACK STOP Returns to the...
User Manual
Page 17
... the screen image. Press "HIDE" to hide the image, press again to display the image. 22 ZOOM IN Zooms the projector display in. 23 VIDEO To change source to HDMI/MHL. 21 HIDE Momentarily turns off the video. Note: Functions vary depending on model definition. Use this button to activate the laser pointer. For computer mode only. Only 25 LAN/WiFi available while Acer WirelessCAST (MWA3) is connected to a computer via a USB cable. 15...
... the screen image. Press "HIDE" to hide the image, press again to display the image. 22 ZOOM IN Zooms the projector display in. 23 VIDEO To change source to HDMI/MHL. 21 HIDE Momentarily turns off the video. Note: Functions vary depending on model definition. Use this button to activate the laser pointer. For computer mode only. Only 25 LAN/WiFi available while Acer WirelessCAST (MWA3) is connected to a computer via a USB cable. 15...

User Manual
Page 21
... source (computer, notebook, video player ,etc.). Power button The projector will turn blue. 3 Turn on the remote control to switch between inputs. English 11 Turning the Projector On/Off Turning on the Projector 1 Ensure that the power cord and signal cable are securely connected or press source direct key. • If you connect to multiple sources at the same time, use the "Source" button on either control panel or the remote control or direct source key on your source automatically. • If the screen displays "Lock" and "Source...
... source (computer, notebook, video player ,etc.). Power button The projector will turn blue. 3 Turn on the remote control to switch between inputs. English 11 Turning the Projector On/Off Turning on the Projector 1 Ensure that the power cord and signal cable are securely connected or press source direct key. • If you connect to multiple sources at the same time, use the "Source" button on either control panel or the remote control or direct source key on your source automatically. • If the screen displays "Lock" and "Source...
User Manual
Page 22
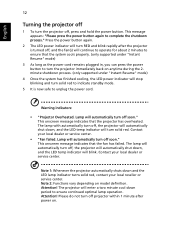
... power cord. This message appears: "Please press the power button again to turn the projector immediately back on . Note 2: Functions vary depending on model definition. The projector will enter a two minute cool down and the LED lamp indicator turns solid red, contact your local reseller or service center. Contact your local dealer or service center. • "Fan failed. This onscreen message indicates that the projector has overheated. Warning indicators: • "Projector Overheated. Attention! English 12 Turning...
... power cord. This message appears: "Please press the power button again to turn the projector immediately back on . Note 2: Functions vary depending on model definition. The projector will enter a two minute cool down and the LED lamp indicator turns solid red, contact your local reseller or service center. Contact your local dealer or service center. • "Fan failed. This onscreen message indicates that the projector has overheated. Warning indicators: • "Projector Overheated. Attention! English 12 Turning...

User Manual
Page 24
... from the screen, good image quality is positioned at 2 m distance. English 14 How to optimize image size and distance Consult the table below figure, the space of 89 cm height is required when located at a desired distance from the screen. • SVGA/XGA series If the projector is 2.0 m from base to top of image A 2.0 m Desired Distance Screen size Top Screen size Top Desired (Min zoom) (Max zoom) Distance (m) Diagonal (inch...
... from the screen, good image quality is positioned at 2 m distance. English 14 How to optimize image size and distance Consult the table below figure, the space of 89 cm height is required when located at a desired distance from the screen. • SVGA/XGA series If the projector is 2.0 m from base to top of image A 2.0 m Desired Distance Screen size Top Screen size Top Desired (Min zoom) (Max zoom) Distance (m) Diagonal (inch...
User Manual
Page 28
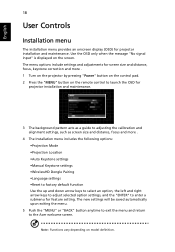
... the projector by pressing "Power" button on the control pad. 2 Press the "MENU" button on the remote control to launch the OSD for projector installation and maintenance. 3 The background pattern acts as a guide to adjusting the calibration and alignment settings, such as screen size and distance, focus and more . 4 The Installation menu includes the following options: •Projection Mode •Projection Location •Auto Keystone settings •Manual Keystone settings •WirelessHD Dongle Pairing •Language settings •Reset to factory default function Use...
... the projector by pressing "Power" button on the control pad. 2 Press the "MENU" button on the remote control to launch the OSD for projector installation and maintenance. 3 The background pattern acts as a guide to adjusting the calibration and alignment settings, such as screen size and distance, focus and more . 4 The Installation menu includes the following options: •Projection Mode •Projection Location •Auto Keystone settings •Manual Keystone settings •WirelessHD Dongle Pairing •Language settings •Reset to factory default function Use...
User Manual
Page 31
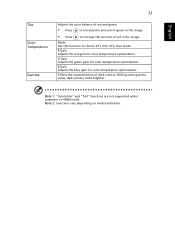
... of dark scenery. Note 2: Functions vary depending on model definition. With greater gamma value, dark scenery looks brighter. G Gain Adjusts the green gain for color temperature optimization. R Gain Adjusts the red gain for color temperature optimization. Effects the representation of red in the image. • Press to choose CT1, CT2, CT3, User mode. Note 1: "Saturation" and "Tint" functions are not supported under computer or HDMI mode.
... of dark scenery. Note 2: Functions vary depending on model definition. With greater gamma value, dark scenery looks brighter. G Gain Adjusts the green gain for color temperature optimization. R Gain Adjusts the red gain for color temperature optimization. Effects the representation of red in the image. • Press to choose CT1, CT2, CT3, User mode. Note 1: "Saturation" and "Tint" functions are not supported under computer or HDMI mode.
User Manual
Page 32
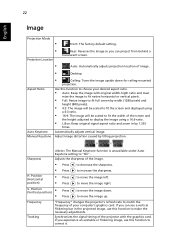
... Ratio Auto Keystone Manual Keystone • Ceiling: Turns the image upside down . Sharpness The Manual Keystone function is unavailable under Auto Keystone setting to move the image right. H. to "On". Adjust image distortion caused by 1.333 times. V. Position (Horizontal position) • Press • Press to move the image left. Position (Vertical position) • • Press Press to move the image down for ceiling-mounted projection. English 22 Image Projection Mode • Front: The factory default setting. • Projection Location Rear...
... Ratio Auto Keystone Manual Keystone • Ceiling: Turns the image upside down . Sharpness The Manual Keystone function is unavailable under Auto Keystone setting to move the image right. H. to "On". Adjust image distortion caused by 1.333 times. V. Position (Horizontal position) • Press • Press to move the image left. Position (Vertical position) • • Press Press to move the image down for ceiling-mounted projection. English 22 Image Projection Mode • Front: The factory default setting. • Projection Location Rear...
User Manual
Page 35
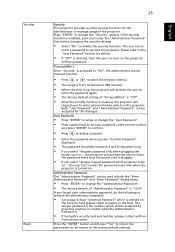
... Password" displayed. • The password should be between 4 and 8 characters long. • If you select "Always request password while projector turns on the projector without password. Administrator Password The "Administrator Password" can set your must enter the "Administrator Password" first before changing the security settings. • Select "On" to operate the projector. Press "ENTER" to change the "Administrator Password". • The factory default of "Administrator Password" is enabled, your password on the remote control...
... Password" displayed. • The password should be between 4 and 8 characters long. • If you select "Always request password while projector turns on the projector without password. Administrator Password The "Administrator Password" can set your must enter the "Administrator Password" first before changing the security settings. • Select "On" to operate the projector. Press "ENTER" to change the "Administrator Password". • The factory default of "Administrator Password" is enabled, your password on the remote control...

User Manual
Page 37
... . show warning message while user presses keypad.) • Disable "Full Lock" function, press "ENTER" key for 7 second, while user presses any key after power on model definition. English 27 Management ECO Mode High Altitude Turn Off Mode Auto Shutdown Menu Display Time (Seconds) AC Power On Control Panel Lock Lamp Hour Elapse Lamp Reminding Lamp Hour Reset Choose "On" to dim the projector lamp which will automatically shutdown when there is no signal input after the allocated time. (default is 15...
... . show warning message while user presses keypad.) • Disable "Full Lock" function, press "ENTER" key for 7 second, while user presses any key after power on model definition. English 27 Management ECO Mode High Altitude Turn Off Mode Auto Shutdown Menu Display Time (Seconds) AC Power On Control Panel Lock Lamp Hour Elapse Lamp Reminding Lamp Hour Reset Choose "On" to dim the projector lamp which will automatically shutdown when there is no signal input after the allocated time. (default is 15...
User Manual
Page 40
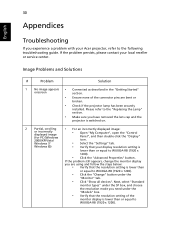
... Properties" button. If the problem still appears, change the monitor display you are bent or broken. • Check if the projector lamp has been securely installed. Next, select "Standard monitor types" under the SP box, and choose the resolution mode you have removed the lens cap and the projector is lower than or equal to the following troubleshooting guide. Please refer to the "Replacing the Lamp" section...
... Properties" button. If the problem still appears, change the monitor display you are bent or broken. • Check if the projector lamp has been securely installed. Next, select "Standard monitor types" under the SP box, and choose the resolution mode you have removed the lens cap and the projector is lower than or equal to the following troubleshooting guide. Please refer to the "Replacing the Lamp" section...
User Manual
Page 41
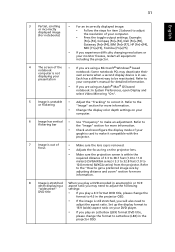
... display mode of your computer. 6 Image has vertical • Use "Frequency" to 10.0 meters) (WXGA series) from the projector. Refer to the or flickering "Image" section for more information. 8 Image is stretched When you play a 4:3 format DVD title, please change the format to correct it compatible with the projector. 7 Image is out of focus • Make sure the lens cap is removed. • Adjusts the focus...
... display mode of your computer. 6 Image has vertical • Use "Frequency" to 10.0 meters) (WXGA series) from the projector. Refer to the or flickering "Image" section for more information. 8 Image is stretched When you play a 4:3 format DVD title, please change the format to correct it compatible with the projector. 7 Image is out of focus • Make sure the lens cap is removed. • Adjusts the focus...

User Manual
Page 43
... power. 2 Lamp burns out or makes a popping sound When the lamp reaches the end of its recommended operating temperature and must be used. Prepare to all controls unplug the power cord and wait at least 30 seconds before it . Please also check the dust filters if they are installed. To replace the lamp, follow the procedures in the "Replacing the Lamp" section. the lamp is clogged with the Projector...
... power. 2 Lamp burns out or makes a popping sound When the lamp reaches the end of its recommended operating temperature and must be used. Prepare to all controls unplug the power cord and wait at least 30 seconds before it . Please also check the dust filters if they are installed. To replace the lamp, follow the procedures in the "Replacing the Lamp" section. the lamp is clogged with the Projector...


