User Manual
Page 5
... work by a qualified technician to restore the product to normal condition. The light may contaminate optical components. The projector must have free flowing air around it. • Locations where temperatures may become excessively high, such as opening or removing covers may contain small parts. This device and its enhancements may expose you to dangerous voltage points or other controls may result in performance, indicating...
... work by a qualified technician to restore the product to normal condition. The light may contaminate optical components. The projector must have free flowing air around it. • Locations where temperatures may become excessively high, such as opening or removing covers may contain small parts. This device and its enhancements may expose you to dangerous voltage points or other controls may result in performance, indicating...
User Manual
Page 6
... not keep using the projector if it is displayed. • Reset the Lamp Hour Reset function from the onscreen display Management menu after replacing the lamp module. • Do not attempt to disassemble the projector, as this could cause the object to become heated and deformed or even cause a fire. • The lamp becomes extremely hot during operation. Change the lamp when the warning message is securely installed. The projector may...
... not keep using the projector if it is displayed. • Reset the Lamp Hour Reset function from the onscreen display Management menu after replacing the lamp module. • Do not attempt to disassemble the projector, as this could cause the object to become heated and deformed or even cause a fire. • The lamp becomes extremely hot during operation. Change the lamp when the warning message is securely installed. The projector may...
User Manual
Page 8
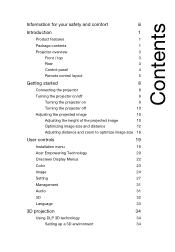
... top 3 Rear 3 Control panel 4 Remote control layout 5 Getting started 8 Connecting the projector 8 Turning the projector on/off 9 Turning the projector on 9 Turning the projector off 10 Adjusting the projected image 10 Adjusting the height of the projected image 10 Optimizing image size and distance 12 Adjusting distance and zoom to optimize image size 16 User controls 19 Installation menu 19 Acer Empowering Technology 20 Onscreen Display Menus 22 Color 23 Image 24 Setting 27 Management 31 Audio 31 3D 32 Language 33 3D projection 34 Using DLP 3D...
... top 3 Rear 3 Control panel 4 Remote control layout 5 Getting started 8 Connecting the projector 8 Turning the projector on/off 9 Turning the projector on 9 Turning the projector off 10 Adjusting the projected image 10 Adjusting the height of the projected image 10 Optimizing image size and distance 12 Adjusting distance and zoom to optimize image size 16 User controls 19 Installation menu 19 Acer Empowering Technology 20 Onscreen Display Menus 22 Color 23 Image 24 Setting 27 Management 31 Audio 31 3D 32 Language 33 3D projection 34 Using DLP 3D...
User Manual
Page 10
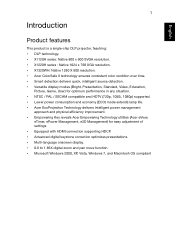
...) mode extends lamp life. • Acer EcoProjeciton Technology delivers Intelligent power management approach and physical efficiency improvement. • Empowering Key reveals Acer Empowering Technology utilities (Acer eView, eTimer, ePower Management, e3D Management) for easy adjustment of settings. • Equipped with HDMI connection supporting HDCP. • Advanced digital keystone correction optimizes presentations. • Multi-language onscreen display. • 0.8 to 1.85X digital zoom and pan move function. • Microsoft Windows...
...) mode extends lamp life. • Acer EcoProjeciton Technology delivers Intelligent power management approach and physical efficiency improvement. • Empowering Key reveals Acer Empowering Technology utilities (Acer eView, eTimer, ePower Management, e3D Management) for easy adjustment of settings. • Equipped with HDMI connection supporting HDCP. • Advanced digital keystone correction optimizes presentations. • Multi-language onscreen display. • 0.8 to 1.85X digital zoom and pan move function. • Microsoft Windows...
User Manual
Page 11
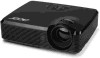
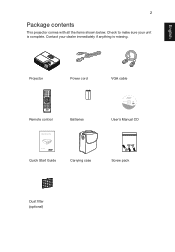
Contact your unit is missing. 1 Projector Power cord VGA cable Remote control acer Projector Batteries Quick Start Guide Quick Start Guide Carrying case User's Manual CD Screw pack Dust filter (optional) English English 2 Package contents This projector comes with all the items shown below. Check to make sure your dealer immediately if anything is complete.
Contact your unit is missing. 1 Projector Power cord VGA cable Remote control acer Projector Batteries Quick Start Guide Quick Start Guide Carrying case User's Manual CD Screw pack Dust filter (optional) English English 2 Package contents This projector comes with all the items shown below. Check to make sure your dealer immediately if anything is complete.
User Manual
Page 15
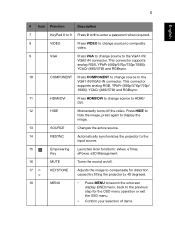
... 0 to 9 to enter a password when required. 8 VIDEO Press VIDEO to change source to composite video. 9 VGA Press VGA to change source to HDMI/ DVI. 12 HIDE Momentarily turns off . 17 KEYSTONE Adjusts the image to compensate for distortion caused by tilting the projector (± 40 degrees). 18 MENU • Press MENU to launch the onscreen display (OSD) menu, back to the previous step for the OSD menu operation or exit the OSD...
... 0 to 9 to enter a password when required. 8 VIDEO Press VIDEO to change source to composite video. 9 VGA Press VGA to change source to HDMI/ DVI. 12 HIDE Momentarily turns off . 17 KEYSTONE Adjusts the image to compensate for distortion caused by tilting the projector (± 40 degrees). 18 MENU • Press MENU to launch the onscreen display (OSD) menu, back to the previous step for the OSD menu operation or exit the OSD...
User Manual
Page 18
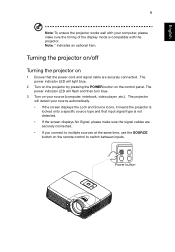
.... The power indicator LED will light blue. 2 Turn on the projector by pressing the POWER button on your source (computer, notebook, video player ,etc.). Power button English English 9 Note: To ensure the projector works well with the projector. The projector will flash and then turn blue. 3 Turn on the control panel. The power indicator LED will detect your computer, please make sure the timing of the display mode is compatible with your source automatically. • If the screen displays the Lock and Source icons...
.... The power indicator LED will light blue. 2 Turn on the projector by pressing the POWER button on your source (computer, notebook, video player ,etc.). Power button English English 9 Note: To ensure the projector works well with the projector. The projector will flash and then turn blue. 3 Turn on the control panel. The power indicator LED will detect your computer, please make sure the timing of the display mode is compatible with your source automatically. • If the screen displays the Lock and Source icons...
User Manual
Page 19
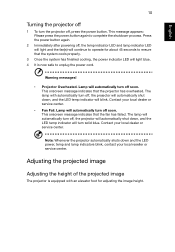
... shut down and the LED power, temp and lamp indicators blink, contact your local reseller or service center. Contact your local dealer or service center. • Fan Fail. Warning messages! • Projector Overheated. Adjusting the projected image Adjusting the height of the projected image The projector is now safe to ensure that the system cools properly. 3 Once the system has finished cooling, the power indicator LED will automatically turn off , press the power button. Lamp will turn solid blue. Lamp will light blue...
... shut down and the LED power, temp and lamp indicators blink, contact your local reseller or service center. Contact your local dealer or service center. • Fan Fail. Warning messages! • Projector Overheated. Adjusting the projected image Adjusting the height of the projected image The projector is now safe to ensure that the system cools properly. 3 Once the system has finished cooling, the power indicator LED will automatically turn off , press the power button. Lamp will turn solid blue. Lamp will light blue...
User Manual
Page 28
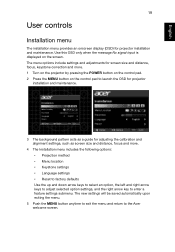
... the POWER button on the control pad. 2 Press the MENU button on the screen. The new settings will be saved automatically upon exiting the menu. 5 Push the MENU button anytime to exit the menu and return to enter a feature settings submenu. The menu options include settings and adjustments for screen size and distance, focus, keystone correction and more . 4 The Installation menu includes the following options: • Projection method • Menu location • Keystone settings • Language settings • Reset to factory defaults Use...
... the POWER button on the control pad. 2 Press the MENU button on the screen. The new settings will be saved automatically upon exiting the menu. 5 Push the MENU button anytime to exit the menu and return to enter a feature settings submenu. The menu options include settings and adjustments for screen size and distance, focus, keystone correction and more . 4 The Installation menu includes the following options: • Projection method • Menu location • Keystone settings • Language settings • Reset to factory defaults Use...
User Manual
Page 34
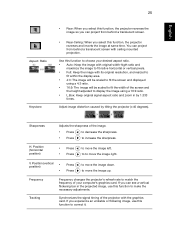
... graphics card. H. Frequency Tracking Frequency changes the projector's refresh rate to fit the screen and displayed using a 16:9 ratio. • L.Box: Keep original signal aspect ratio and zoom in the projected image, use this function, the projector reverses and inverts the image at same time. to to move the image right. Synchronizes the signal timing of your desired aspect ratio. • Auto: Keep the image with original width-higth ratio and...
... graphics card. H. Frequency Tracking Frequency changes the projector's refresh rate to fit the screen and displayed using a 16:9 ratio. • L.Box: Keep original signal aspect ratio and zoom in the projected image, use this function, the projector reverses and inverts the image at same time. to to move the image right. Synchronizes the signal timing of your desired aspect ratio. • Auto: Keep the image with original width-higth ratio and...
User Manual
Page 36
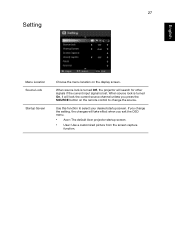
... menu. • Acer: The default Acer projector startup screen. • User: Use a customized picture from the screen capture function. 27 Setting English English Menu Location Source Lock Startup Screen Choose the menu location on the remote control to select your desired startup screen. Use this function to change the source. When source lock is turned Off, the projector will search for other signals if the current input signal is turned On, it will take effect when you press the SOURCE button on the display screen. When source lock...
... menu. • Acer: The default Acer projector startup screen. • User: Use a customized picture from the screen capture function. 27 Setting English English Menu Location Source Lock Startup Screen Choose the menu location on the remote control to select your desired startup screen. Use this function to change the source. When source lock is turned Off, the projector will search for other signals if the current input signal is turned On, it will take effect when you press the SOURCE button on the display screen. When source lock...
User Manual
Page 37
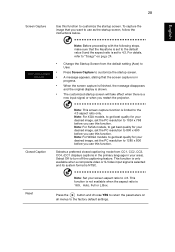
... use as the startup screen, follow the instructions below. Note: For XGA models, to get best quality for your desired image, set the PC resolution to 1024 x 768 before you want to use this function. Selects a preferred closed captioning mode from the default setting (Acer) to User. • Press Screen Capture to customize the startup screen. • A message appears, stating that the Keystone is set the PC resolution to the default...
... use as the startup screen, follow the instructions below. Note: For XGA models, to get best quality for your desired image, set the PC resolution to 1024 x 768 before you want to use this function. Selects a preferred closed captioning mode from the default setting (Acer) to User. • Press Screen Capture to customize the startup screen. • A message appears, stating that the Keystone is set the PC resolution to the default...

User Manual
Page 38
... select Always request password while projector turns on, the user has to manage projector use. If the security function is enabled, your password on the remote control and press MENU to confirm. • Press to enter the password again. • The factory default setting of Timeout(Min.) is Off. Press to change the User Password. • Use the number keys to set up , the projector will prompt the user to delete a character...
... select Always request password while projector turns on, the user has to manage projector use. If the security function is enabled, your password on the remote control and press MENU to confirm. • Press to enter the password again. • The factory default setting of Timeout(Min.) is Off. Press to change the User Password. • Use the number keys to set up , the projector will prompt the user to delete a character...
User Manual
Page 40
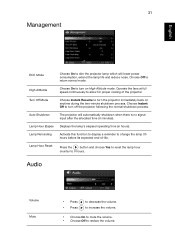
... mode. Auto Shutdown The projector will lower power consumption, extend the lamp life and reduce noise. Choose Off to dim the projector lamp which will automatically shutdown when there is no signal input after the allocated time (in hours). Lamp Hour Reset Press the button and choose Yes to reset the lamp hour counter to change the lamp 30 hours before its expected end-of the projector. Lamp Reminding Activate this function to display a reminder to 0 hours. Operate...
... mode. Auto Shutdown The projector will lower power consumption, extend the lamp life and reduce noise. Choose Off to dim the projector lamp which will automatically shutdown when there is no signal input after the allocated time (in hours). Lamp Hour Reset Press the button and choose Yes to reset the lamp hour counter to change the lamp 30 hours before its expected end-of the projector. Lamp Reminding Activate this function to display a reminder to 0 hours. Operate...
User Manual
Page 43
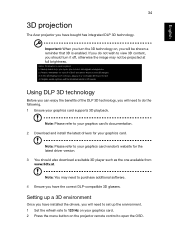
.... 2 Download and install the latest drivers for your graphics card vendor's website for the latest driver version. 3 You should turn the 3D technology on the projector remote control to your graphics card. Note: Please refer to open the OSD. Setting up the environment. 1 Set the refresh rate to 120 Hz on your graphics card. 2 Press the menu button on , you have the correct DLP...
.... 2 Download and install the latest drivers for your graphics card vendor's website for the latest driver version. 3 You should turn the 3D technology on the projector remote control to your graphics card. Note: Please refer to open the OSD. Setting up the environment. 1 Set the refresh rate to 120 Hz on your graphics card. 2 Press the menu button on , you have the correct DLP...
User Manual
Page 48
... screens computer is not when a second display device is in "Getting started" on the remote control. incorrectly • For an incorrectly displayed image: displayed image [For PC (Windows 95/98/2000/XP)] • Open My Computer > Control Panel, and then double-click the Display icon. • Select the Settings tab. • Verify that the resolution setting of the connector pins is bent or broken. • Check if the projector lamp...
... screens computer is not when a second display device is in "Getting started" on the remote control. incorrectly • For an incorrectly displayed image: displayed image [For PC (Windows 95/98/2000/XP)] • Open My Computer > Control Panel, and then double-click the Display icon. • Select the Settings tab. • Verify that the resolution setting of the connector pins is bent or broken. • Check if the projector lamp...
User Manual
Page 51
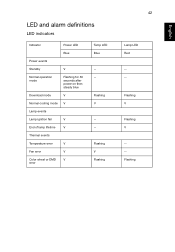
Flashing V Flashing V --Flashing English English Flashing V --- Flashing V Flashing 42 Lamp LED Red --- LED and alarm definitions LED indicators Indicator Power LED Blue Power events Standby V Normal operation mode Flashing for 30 seconds after power on then steady blue Download mode V Normal cooling mode V Lamp events Lamp ignition fail V End of lamp lifetime V Thermal events Temperature error V Fan error V Color wheel or DMD V error Temp LED Blue ---
Flashing V Flashing V --Flashing English English Flashing V --- Flashing V Flashing 42 Lamp LED Red --- LED and alarm definitions LED indicators Indicator Power LED Blue Power events Standby V Normal operation mode Flashing for 30 seconds after power on then steady blue Download mode V Normal cooling mode V Lamp events Lamp ignition fail V End of lamp lifetime V Thermal events Temperature error V Fan error V Color wheel or DMD V error Temp LED Blue ---
User Manual
Page 52
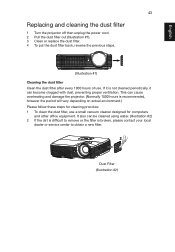
....) Please follow these steps for cleaning procdure: 1 To clean the dust filter, use . English English 43 Replacing and cleaning the dust filter 1 Turn the projector off then unplug the power cord. 2 Pull the dust filter out (Illustration #1). 3 Clean or replace the dust filter. 4 To put the dust filter back, reverse the previous steps. (Illustration #1) Cleaning the dust filter Clean the dust filter after every 1000 hours of use a small vacuum cleaner designed...
....) Please follow these steps for cleaning procdure: 1 To clean the dust filter, use . English English 43 Replacing and cleaning the dust filter 1 Turn the projector off then unplug the power cord. 2 Pull the dust filter out (Illustration #1). 3 Clean or replace the dust filter. 4 To put the dust filter back, reverse the previous steps. (Illustration #1) Cleaning the dust filter Clean the dust filter after every 1000 hours of use a small vacuum cleaner designed...

User Manual
Page 57
For final specs, please refer to change without notice. 48 English English Specifications The specifications listed below are subject to Acer's published marketing specifications. Projection system Resolution Computer compatibility Video compatibility Aspect ratio Displayable colors Projection lens Projection screen size (diagonal) Projection distance Throw ratio Horizontal scan rate Vertical refresh scan rate Lamp type Keystone correction Audio Weight Dimensions (W x D x H) Digital zoom Power supply Power consumption Operating temperature I/O connectors DLP® X1120H: Native ...
For final specs, please refer to change without notice. 48 English English Specifications The specifications listed below are subject to Acer's published marketing specifications. Projection system Resolution Computer compatibility Video compatibility Aspect ratio Displayable colors Projection lens Projection screen size (diagonal) Projection distance Throw ratio Horizontal scan rate Vertical refresh scan rate Lamp type Keystone correction Audio Weight Dimensions (W x D x H) Digital zoom Power supply Power consumption Operating temperature I/O connectors DLP® X1120H: Native ...

User Manual
Page 58
49 English English Standard package contents • Power cord • VGA cable • Remote control • Batteries (for remote control) • User's Manual CD • Quick Start Guide • Carrying case • Screw pack • Dust filter (optional) * Design and specifications are subject to change without notice.
49 English English Standard package contents • Power cord • VGA cable • Remote control • Batteries (for remote control) • User's Manual CD • Quick Start Guide • Carrying case • Screw pack • Dust filter (optional) * Design and specifications are subject to change without notice.


