

User Manual (3D)
Page 1
Acer Projectors with 3D Technology Quick Guide
Acer Projectors with 3D Technology Quick Guide

User Manual (3D)
Page 2
Acer Projector Series Quick Guide Original Issue: 10/2014 Model number Serial number Date of purchase Place of purchase © 2014 All Rights Reserved.
Acer Projector Series Quick Guide Original Issue: 10/2014 Model number Serial number Date of purchase Place of purchase © 2014 All Rights Reserved.

User Manual (3D)
Page 3
... need 3D glasses to support 144Hz sync signal for instructions how to turn off after a few minutes of the arms that 3D is enabled. Acer projectors need to ensure the glasses are turned on. Before you can view 3D content, you can press, and an LED that came with your ... glasses DLP 3D glasses are turned on or not. Note: Refer to the documentation that indicates if the glasses are powered. English 3 The Acer projector you have connected your projector to a DVD or Blu-ray player, please read sections "Using DLP 3D / NVIDIA 3DTV Play technology" on page 4. If you will be...
... need 3D glasses to support 144Hz sync signal for instructions how to turn off after a few minutes of the arms that 3D is enabled. Acer projectors need to ensure the glasses are turned on. Before you can view 3D content, you can press, and an LED that came with your ... glasses DLP 3D glasses are turned on or not. Note: Refer to the documentation that indicates if the glasses are powered. English 3 The Acer projector you have connected your projector to a DVD or Blu-ray player, please read sections "Using DLP 3D / NVIDIA 3DTV Play technology" on page 4. If you will be...

User Manual (3D)
Page 4
...latest drivers for your graphics card vendor's website for frame/field sequential 3D formats. To download software and use an NVIDIA 3DTV Play ready projector with DLP glasses, refer to purchase additional software. 4 Ensure you are viewing Blu-ray 3D content over an HDMI 1.4a or later ...connection is not supported on the projector remote control to your graphics card. Others, please set up a 3D environment Once you have the correct DLP-compatible 3D glasses. If you...
...latest drivers for your graphics card vendor's website for frame/field sequential 3D formats. To download software and use an NVIDIA 3DTV Play ready projector with DLP glasses, refer to purchase additional software. 4 Ensure you are viewing Blu-ray 3D content over an HDMI 1.4a or later ...connection is not supported on the projector remote control to your graphics card. Others, please set up a 3D environment Once you have the correct DLP-compatible 3D glasses. If you...

User Manual (3D)
Page 5
... provide different 3D mode, convergence and depth setting. 6 3D Format shows while no enough info, please choose suitable one for HDMI 1.4 or 2nd generation 3D projectors. 2. English 5 3 Set 3D to On. 4 Alternatively, press the 3D Key on some specific models. 4. The "3D Format" is only existed at HDMI 1.4 or later input... and functions are subject to 3D display. The "Frame Packing" is only available for correct 3D displaying. "2D to 3D" is only available on your projector's remote control. Note: 1.
... provide different 3D mode, convergence and depth setting. 6 3D Format shows while no enough info, please choose suitable one for HDMI 1.4 or 2nd generation 3D projectors. 2. English 5 3 Set 3D to On. 4 Alternatively, press the 3D Key on some specific models. 4. The "3D Format" is only existed at HDMI 1.4 or later input... and functions are subject to 3D display. The "Frame Packing" is only available for correct 3D displaying. "2D to 3D" is only available on your projector's remote control. Note: 1.
User Manual (3D)
Page 6
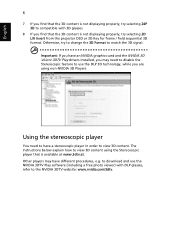
... technology, while you are using the Stereoscopic player that the 3D content is available at www.3dtv.at. Otherwise, try selecting 3D L/R Invert from the projector OSD or 3D Key for frame / field sequential 3D format. Other players may need to have different procedures, e.g. English 6 7 If you find that the 3D...
... technology, while you are using the Stereoscopic player that the 3D content is available at www.3dtv.at. Otherwise, try selecting 3D L/R Invert from the projector OSD or 3D Key for frame / field sequential 3D format. Other players may need to have different procedures, e.g. English 6 7 If you find that the 3D...

User Manual (3D)
Page 7
... supports 3D over HDMI 1.4a, check that supports 3D playback, you can watch 3D DVD content using any of the available input formats. Connect your projector. Older connections should check the resolution is set the viewing method by going to View > Viewing Method > Software pageflipping. 2 Open the 3D content in the.... Note: You need to view content at fullscreen resolution in the "Setting up a 3D environment" section on your DVD or Blu-ray player to the projector using your Acer 3D-enabled projector. English 7 1 Open the stereoscopic player and set to 480i or 576i.
... supports 3D over HDMI 1.4a, check that supports 3D playback, you can watch 3D DVD content using any of the available input formats. Connect your projector. Older connections should check the resolution is set the viewing method by going to View > Viewing Method > Software pageflipping. 2 Open the 3D content in the.... Note: You need to view content at fullscreen resolution in the "Setting up a 3D environment" section on your DVD or Blu-ray player to the projector using your Acer 3D-enabled projector. English 7 1 Open the stereoscopic player and set to 480i or 576i.

User Manual
Page 2
... and place of HDMI Licensing LLC." Model number Serial number Date of purchase Place of purchase Acer and the Acer logo are trademarks or registered trademarks of purchase information in this manual or supplementary documents and publications. Acer Projector User's Guide Original Issue: 09/2017 Changes may be incorporated in any form or by...
... and place of HDMI Licensing LLC." Model number Serial number Date of purchase Place of purchase Acer and the Acer logo are trademarks or registered trademarks of purchase information in this manual or supplementary documents and publications. Acer Projector User's Guide Original Issue: 09/2017 Changes may be incorporated in any form or by...

User Manual
Page 3
... outlet before removing the power supply unit from the power supplies. The openings should never be blocked or covered. Follow all power cords from the projector. • If the system has multiple sources of the product and to protect it could result in installation unless proper ventilation is easily accessible and...
... outlet before removing the power supply unit from the power supplies. The openings should never be blocked or covered. Follow all power cords from the projector. • If the system has multiple sources of the product and to protect it could result in installation unless proper ventilation is easily accessible and...

User Manual
Page 5
...the product exhibits a distinct change in performance, indicating a need for purchase options. It might cause fire or electric shock. Warning! Consult your projector. Do not operate if smoke, strange noise or odor comes out of your reseller for service • the product does not operate normally ...covered by a qualified technician to restore the product to normal condition. Keep them out of the reach of a car with your projector. At least 50cm clearance from the wall outlet and refer servicing to dangerous voltage points or other risks. Your device and its enhancements...
...the product exhibits a distinct change in performance, indicating a need for purchase options. It might cause fire or electric shock. Warning! Consult your projector. Do not operate if smoke, strange noise or odor comes out of your reseller for service • the product does not operate normally ...covered by a qualified technician to restore the product to normal condition. Keep them out of the reach of a car with your projector. At least 50cm clearance from the wall outlet and refer servicing to dangerous voltage points or other risks. Your device and its enhancements...

User Manual
Page 6
... 6° 6° Refer servicing only to suitable qualified professional service personnel. • Do not stand the projector on . • Do not block the projector lens with any object when the projector is under operation as this could cause the object to become heated and deformed or even cause a fire. ... voltages inside which becomes hot. • Do not look into the air outlet grille when projector is to wait for inspection. • Do not face the projector lens to ensure the projector completes its tilt angles should be placed in a horizontal way by means of desktop or ceiling...
... 6° 6° Refer servicing only to suitable qualified professional service personnel. • Do not stand the projector on . • Do not block the projector lens with any object when the projector is under operation as this could cause the object to become heated and deformed or even cause a fire. ... voltages inside which becomes hot. • Do not look into the air outlet grille when projector is to wait for inspection. • Do not face the projector lens to ensure the projector completes its tilt angles should be placed in a horizontal way by means of desktop or ceiling...
User Manual
Page 8
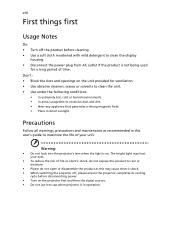
... the unit provided for a long period of your unit. viii First things first Usage Notes Do: • Turn off , please ensure the projector completes its cooling cycle before cleaning. • Use a soft cloth moistened with mild detergent to clean the display housing. • Disconnect the ...dirt. • Near any appliance that generates a strong magnetic field. • Place In direct sunlight. Warning: • Do not look into the projector's lens when the light is in this product to maximize the life of time. Don't: • Block the slots and openings on . Precautions Follow ...
... the unit provided for a long period of your unit. viii First things first Usage Notes Do: • Turn off , please ensure the projector completes its cooling cycle before cleaning. • Use a soft cloth moistened with mild detergent to clean the display housing. • Disconnect the ...dirt. • Near any appliance that generates a strong magnetic field. • Place In direct sunlight. Warning: • Do not look into the projector's lens when the light is in this product to maximize the life of time. Don't: • Block the slots and openings on . Precautions Follow ...
User Manual
Page 9
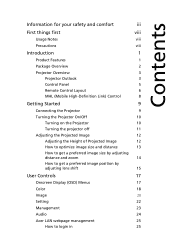
... 3 Control Panel 5 Remote Control Layout 6 MHL (Mobile High-Definition Link) Control 8 Getting Started 9 Connecting the Projector 9 Turning the Projector On/Off 10 Turning on the Projector 10 Turning the projector off 11 Adjusting the Projected Image 12 Adjusting the Height of Projected Image 12 How to optimize image size and distance 13 How to... image position by adjusting lens shift 15 User Controls 17 Onscreen Display (OSD) Menus 17 Color 18 Image 20 Setting 22 Management 23 Audio 24 Acer LAN webpage management 25 How to login in 25
... 3 Control Panel 5 Remote Control Layout 6 MHL (Mobile High-Definition Link) Control 8 Getting Started 9 Connecting the Projector 9 Turning the Projector On/Off 10 Turning on the Projector 10 Turning the projector off 11 Adjusting the Projected Image 12 Adjusting the Height of Projected Image 12 How to optimize image size and distance 13 How to... image position by adjusting lens shift 15 User Controls 17 Onscreen Display (OSD) Menus 17 Color 18 Image 20 Setting 22 Management 23 Audio 24 Acer LAN webpage management 25 How to login in 25

User Manual
Page 11
English 1 Introduction Product Features This product is a single-chip DLP® projector. Outstanding features include: • DLP® technology • Native 3840x2160 resolution Full/4:3/16:9/L.Box/Anamorphic 2.35:1 aspect ratio supported &#...; HDTV (480i/p, 576i/p, 720p, 1080i/p, 2160p) supported • Lower power consumption and economy (ECO) mode extend light source life • Acer EcoProjeciton Technology delivers Intelligent power management approach and physical efficiency improvement • Equipped with HDMI™ & MHL connection supporting HDCP • Smart detection ...
English 1 Introduction Product Features This product is a single-chip DLP® projector. Outstanding features include: • DLP® technology • Native 3840x2160 resolution Full/4:3/16:9/L.Box/Anamorphic 2.35:1 aspect ratio supported &#...; HDTV (480i/p, 576i/p, 720p, 1080i/p, 2160p) supported • Lower power consumption and economy (ECO) mode extend light source life • Acer EcoProjeciton Technology delivers Intelligent power management approach and physical efficiency improvement • Equipped with HDMI™ & MHL connection supporting HDCP • Smart detection ...

User Manual
Page 12
Trust the cable with all the items shown below. English Projector Power cord HDMI cable User's guide (option) Quick start guide Remote control AAA battery x2 (option) Carrying case (option) MHL HDMI DC 5V IN WirelessCAST (option) WirelessHD-Kit (option) Note: When projecting a 4K2K/60Hz signal, use an HDMI Premium certified 4K2K/60Hz cable supporting 18Gbps bandwidth. Contact your unit is missing. 2 Package Overview This projector comes with the label Check to make sure your dealer immediately if any thing is complete.
Trust the cable with all the items shown below. English Projector Power cord HDMI cable User's guide (option) Quick start guide Remote control AAA battery x2 (option) Carrying case (option) MHL HDMI DC 5V IN WirelessCAST (option) WirelessHD-Kit (option) Note: When projecting a 4K2K/60Hz signal, use an HDMI Premium certified 4K2K/60Hz cable supporting 18Gbps bandwidth. Contact your unit is missing. 2 Package Overview This projector comes with the label Check to make sure your dealer immediately if any thing is complete.
User Manual
Page 13
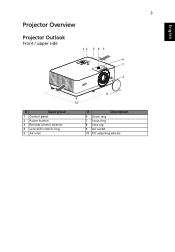
English 3 Projector Overview Projector Outlook Front / upper side 12 3 4 5 6 7 3 # Description 1 Control panel 2 Power button 3 Remote control receiver 4 Lens shift control ring 5 Air inlet 8 9 10 # Description 6 Zoom ring 7 Focus ring 8 Lens cap 9 Air outlet 10 Tilt adjusting wheels
English 3 Projector Overview Projector Outlook Front / upper side 12 3 4 5 6 7 3 # Description 1 Control panel 2 Power button 3 Remote control receiver 4 Lens shift control ring 5 Air inlet 8 9 10 # Description 6 Zoom ring 7 Focus ring 8 Lens cap 9 Air outlet 10 Tilt adjusting wheels
User Manual
Page 15
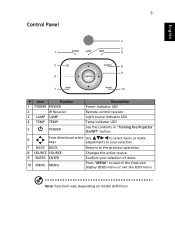
... to launch the Onscreen display (OSD) menu or exit the OSD menu. Light source Indicator LED Temp Indicator LED See the contents in "Turning the Projector On/Off" section. 6 Four directional select Use to select items or make keys adjustments to your selection of items. Press "MENU" to the previous operation...
... to launch the Onscreen display (OSD) menu or exit the OSD menu. Light source Indicator LED Temp Indicator LED See the contents in "Turning the Projector On/Off" section. 6 Four directional select Use to select items or make keys adjustments to your selection of items. Press "MENU" to the previous operation...
User Manual
Page 16
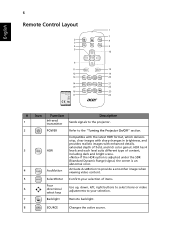
...13 20 14 21 15 22 Model No:J-25041 16 17 23 24 MC.JMV11.008 # Icon Function Description 1 Infrared transmitter Sends signals to the projector. 2 POWER Refer to provide a smoother image when viewing video content. 5 Select/Enter Confirm your selection. 7 Backlight Remote backlight. 8 SOURCE Changes ... the SDR (Standard Dynamic Range) signal, the screen is an abnormal color. 4 AcuMotion Activate AcuMotion to the "Turning the Projector On/Off" section. HDR has 4 3 HDR levels and each level suits different type of content, including dark and bright scene.
...13 20 14 21 15 22 Model No:J-25041 16 17 23 24 MC.JMV11.008 # Icon Function Description 1 Infrared transmitter Sends signals to the projector. 2 POWER Refer to provide a smoother image when viewing video content. 5 Select/Enter Confirm your selection. 7 Backlight Remote backlight. 8 SOURCE Changes ... the SDR (Standard Dynamic Range) signal, the screen is an abnormal color. 4 AcuMotion Activate AcuMotion to the "Turning the Projector On/Off" section. HDR has 4 3 HDR levels and each level suits different type of content, including dark and bright scene.

User Manual
Page 17
Display the projector information for Model Name, 13 Information Input Source, Signal Type, Display Mode, Software Version and QR Code on the screen. 14 Brightness Adjust the brightness ...
Display the projector information for Model Name, 13 Information Input Source, Signal Type, Display Mode, Software Version and QR Code on the screen. 14 Brightness Adjust the brightness ...

User Manual
Page 19
... out connector support 12V/100mA power for charging device 10 12V DC cable 11 Audio cable Jack/RCA 12 RS232 cable Note 1: To ensure the projector works well with your computer, please make sure the timing of dongle. 2 9 1 Chromecast or 1 10 RS232 D-Sub 12 7 11 1 D-.../HDTV adapter # Description 7 VGA cable 8 Audio cable Jack/Jack 9 USB cable for screen control only. English HDMI 9 Getting Started Connecting the Projector Internet DVD player, Set-top Box, HDTV receiever MHL USB RBG HDMI D-Sub 4 5 7 DVD player 2 R BG 3 3 6 HDMI HDMI HDTV adapter HDMI 8 ...
... out connector support 12V/100mA power for charging device 10 12V DC cable 11 Audio cable Jack/RCA 12 RS232 cable Note 1: To ensure the projector works well with your computer, please make sure the timing of dongle. 2 9 1 Chromecast or 1 10 RS232 D-Sub 12 7 11 1 D-.../HDTV adapter # Description 7 VGA cable 8 Audio cable Jack/Jack 9 USB cable for screen control only. English HDMI 9 Getting Started Connecting the Projector Internet DVD player, Set-top Box, HDTV receiever MHL USB RBG HDMI D-Sub 4 5 7 DVD player 2 R BG 3 3 6 HDMI HDMI HDTV adapter HDMI 8 ...


