
User Manual (3D)
Page 3
.... Acer projectors need to change the battery. Note: Require DLP Link 3D glasses and support 96Hz, 100Hz, 120Hz sync signal. English 3 The Acer projector you can view 3D content, you need 3D glasses to support 144Hz sync signal for instructions how to enhance battery life, they turn the 3D technology on page 7. If you will be projected at full brightness. Important: When you turn off , otherwise the image may...
.... Acer projectors need to change the battery. Note: Require DLP Link 3D glasses and support 96Hz, 100Hz, 120Hz sync signal. English 3 The Acer projector you can view 3D content, you need 3D glasses to support 144Hz sync signal for instructions how to enhance battery life, they turn the 3D technology on page 7. If you will be projected at full brightness. Important: When you turn off , otherwise the image may...

User Manual (3D)
Page 4
To download software and use an NVIDIA 3DTV Play ready projector with DLP glasses, refer to 100/120 Hz on the projector remote control to your graphics card supports 3D playback. Setting up the environment. 1 Set the refresh rate to the NVIDIA 3DTV Play website: www.nvidia.com/3dtv. Note: Please refer to purchase additional software. 4 Ensure you have installed the drivers, you will need...
To download software and use an NVIDIA 3DTV Play ready projector with DLP glasses, refer to 100/120 Hz on the projector remote control to your graphics card supports 3D playback. Setting up the environment. 1 Set the refresh rate to the NVIDIA 3DTV Play website: www.nvidia.com/3dtv. Note: Please refer to purchase additional software. 4 Ensure you have installed the drivers, you will need...

User Manual (3D)
Page 7
... adjust 3D function, follow the procedures in the "Setting up a 3D environment" section on your projector. Note: If your DVD or Blu-ray player supports 3D over HDMI 1.4a, check that supports 3D playback, you have a DVD or Blu-ray player that 3D options are on and the video uses 24p before turning on pages 4-6. Older connections should check the resolution is set the viewing...
... adjust 3D function, follow the procedures in the "Setting up a 3D environment" section on your projector. Note: If your DVD or Blu-ray player supports 3D over HDMI 1.4a, check that supports 3D playback, you have a DVD or Blu-ray player that 3D options are on and the video uses 24p before turning on pages 4-6. Older connections should check the resolution is set the viewing...
User Manual
Page 3
... possible. When you plug the power cord into is provided. • Never push objects of any kind onto or into this product from overheating. The openings should never be blocked or covered. Warnings! • Do not use liquid cleaners or aerosol cleaners. iii Information for cleaning. Caution for ventilation to ensure reliable operation of the product and to protect...
... possible. When you plug the power cord into is provided. • Never push objects of any kind onto or into this product from overheating. The openings should never be blocked or covered. Warnings! • Do not use liquid cleaners or aerosol cleaners. iii Information for cleaning. Caution for ventilation to ensure reliable operation of the product and to protect...

User Manual
Page 5
... product from walls and free flow of air around the projector is necessary. • Locations where temperatures may become excessively high, such as opening or removing covers may expose you to dangerous voltage points or other controls may result in following the operating instructions Note: Adjust only those controls that is poorly ventilated or confined. v Product servicing Do not attempt to service this product yourself, as...
... product from walls and free flow of air around the projector is necessary. • Locations where temperatures may become excessively high, such as opening or removing covers may expose you to dangerous voltage points or other controls may result in following the operating instructions Note: Adjust only those controls that is poorly ventilated or confined. v Product servicing Do not attempt to service this product yourself, as...

User Manual
Page 6
... keep using this product to the sun. In this case contact your eyes. • Always open the lens shutter or remove the lens cap when the projector is on end vertically. It can lead to fire. • When switching the projector off . • Do not touch air outlet grille and bottom plate which may cause the projector to suitable qualified professional service...
... keep using this product to the sun. In this case contact your eyes. • Always open the lens shutter or remove the lens cap when the projector is on end vertically. It can lead to fire. • When switching the projector off . • Do not touch air outlet grille and bottom plate which may cause the projector to suitable qualified professional service...
User Manual
Page 9
... 3 Control Panel 5 Remote Control Layout 6 MHL (Mobile High-Definition Link) Control 8 Getting Started 9 Connecting the Projector 9 Turning the Projector On/Off 10 Turning on the Projector 10 Turning the projector off 11 Adjusting the Projected Image 12 Adjusting the Height of Projected Image 12 How to optimize image size and distance 13 How to get a preferred image size by adjusting distance and zoom 14 How to get a preferred image position by adjusting lens shift 15 User Controls 17 Onscreen Display (OSD) Menus 17 Color 18 Image 20 Setting...
... 3 Control Panel 5 Remote Control Layout 6 MHL (Mobile High-Definition Link) Control 8 Getting Started 9 Connecting the Projector 9 Turning the Projector On/Off 10 Turning on the Projector 10 Turning the projector off 11 Adjusting the Projected Image 12 Adjusting the Height of Projected Image 12 How to optimize image size and distance 13 How to get a preferred image size by adjusting distance and zoom 14 How to get a preferred image position by adjusting lens shift 15 User Controls 17 Onscreen Display (OSD) Menus 17 Color 18 Image 20 Setting...

User Manual
Page 11
...; Equipped with HDMI™ & MHL connection supporting HDCP • Smart detection delivers quick, intelligent source detection • Multi-language onscreen display (OSD) menus • Manual focus projection lens zooms up to 1.6x • 1.25x digital zoom • Microsoft® Windows® 2000, XP, Vista®, Windows 7, Windows 8.1, Windows 10, Macintosh® OS compliant, ChromeOS Compliant • Support MHL V2.1 signal display • Auto image re-sizing to 4K Addressable Pixels full screen • Built...
...; Equipped with HDMI™ & MHL connection supporting HDCP • Smart detection delivers quick, intelligent source detection • Multi-language onscreen display (OSD) menus • Manual focus projection lens zooms up to 1.6x • 1.25x digital zoom • Microsoft® Windows® 2000, XP, Vista®, Windows 7, Windows 8.1, Windows 10, Macintosh® OS compliant, ChromeOS Compliant • Support MHL V2.1 signal display • Auto image re-sizing to 4K Addressable Pixels full screen • Built...

User Manual
Page 12
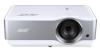
Check to make sure your dealer immediately if any thing is complete. English Projector Power cord HDMI cable User's guide (option) Quick start guide Remote control AAA battery x2 (option) Carrying case (option) MHL HDMI DC 5V IN WirelessCAST (option) WirelessHD-Kit (option) Note: When projecting a 4K2K/60Hz signal, use an HDMI Premium certified 4K2K/60Hz cable supporting 18Gbps bandwidth. Trust the cable with all the items shown below. 2 Package Overview This projector comes with the label Contact your unit is missing.
Check to make sure your dealer immediately if any thing is complete. English Projector Power cord HDMI cable User's guide (option) Quick start guide Remote control AAA battery x2 (option) Carrying case (option) MHL HDMI DC 5V IN WirelessCAST (option) WirelessHD-Kit (option) Note: When projecting a 4K2K/60Hz signal, use an HDMI Premium certified 4K2K/60Hz cable supporting 18Gbps bandwidth. Trust the cable with all the items shown below. 2 Package Overview This projector comes with the label Contact your unit is missing.
User Manual
Page 15
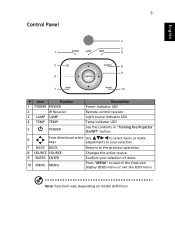
... vary depending on model definition. Confirm your selection. 7 BACK BACK 8 SOURCE SOURCE 9 ENTER ENTER 10 MENU MENU Returns to launch the Onscreen display (OSD) menu or exit the OSD menu. English 5 Control Panel 2 3 1 4 5 8 9 6 7 10 # Icon Function 1 POWER POWER 2 IR Recevier 3 LAMP LAMP 4 TEMP TEMP 5 POWER Description Power Indicator LED Remote control receiver. Light source Indicator LED Temp Indicator LED See the contents in "Turning the Projector On/Off" section. 6 Four directional select Use to select items or make keys adjustments to your selection...
... vary depending on model definition. Confirm your selection. 7 BACK BACK 8 SOURCE SOURCE 9 ENTER ENTER 10 MENU MENU Returns to launch the Onscreen display (OSD) menu or exit the OSD menu. English 5 Control Panel 2 3 1 4 5 8 9 6 7 10 # Icon Function 1 POWER POWER 2 IR Recevier 3 LAMP LAMP 4 TEMP TEMP 5 POWER Description Power Indicator LED Remote control receiver. Light source Indicator LED Temp Indicator LED See the contents in "Turning the Projector On/Off" section. 6 Four directional select Use to select items or make keys adjustments to your selection...

User Manual
Page 17
... MENU Press "MENU" to launch the Onscreen display (OSD) menu or exit the OSD menu. 19 HDMI™/MHL To change source to HDMI/MHL. 20 FREEZE To pause the screen image. 21 HIDE Momentarily turns off the video. With greater gamma value, dark scenery looks brighter. 16 Contrast Adjusting the contrast changes the amount of dark scenery. Display the projector information for Model Name, 13 Information Input Source, Signal Type, Display Mode, Software...
... MENU Press "MENU" to launch the Onscreen display (OSD) menu or exit the OSD menu. 19 HDMI™/MHL To change source to HDMI/MHL. 20 FREEZE To pause the screen image. 21 HIDE Momentarily turns off the video. With greater gamma value, dark scenery looks brighter. 16 Contrast Adjusting the contrast changes the amount of dark scenery. Display the projector information for Model Name, 13 Information Input Source, Signal Type, Display Mode, Software...

User Manual
Page 19
... component/HDTV adapter # Description 7 VGA cable 8 Audio cable Jack/Jack 9 USB cable for charging device 10 12V DC cable 11 Audio cable Jack/RCA 12 RS232 cable Note 1: To ensure the projector works well with your computer, please make sure the timing of the display mode is not detected. Note 5: USB DC 5V out connector support 5V/1.5A power output for screen control only. English HDMI 9 Getting Started Connecting the Projector Internet DVD player, Set-top...
... component/HDTV adapter # Description 7 VGA cable 8 Audio cable Jack/Jack 9 USB cable for charging device 10 12V DC cable 11 Audio cable Jack/RCA 12 RS232 cable Note 1: To ensure the projector works well with your computer, please make sure the timing of the display mode is not detected. Note 5: USB DC 5V out connector support 5V/1.5A power output for screen control only. English HDMI 9 Getting Started Connecting the Projector Internet DVD player, Set-top...
User Manual
Page 20
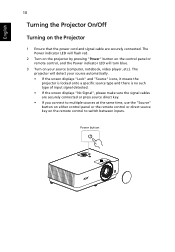
... screen displays "No Signal", please make sure the signal cables are securely connected. Power button The Power indicator LED will flash red. 2 Turn on the projector by pressing "Power" button on the Projector 1 Ensure that the power cord and signal cable are securely connected or press source direct key. • If you connect to multiple sources at the same time, use the "Source" button on either control panel or the remote control or direct source key on the remote control to switch between inputs. English 10 Turning the Projector On/Off Turning...
... screen displays "No Signal", please make sure the signal cables are securely connected. Power button The Power indicator LED will flash red. 2 Turn on the projector by pressing "Power" button on the Projector 1 Ensure that the power cord and signal cable are securely connected or press source direct key. • If you connect to multiple sources at the same time, use the "Source" button on either control panel or the remote control or direct source key on the remote control to switch between inputs. English 10 Turning the Projector On/Off Turning...
User Manual
Page 21
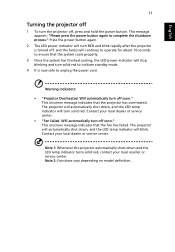
... the projector automatically shuts down , and the LED temp indicator will turn solid red. Warning indicators: • "Projector Overheated. Contact your local dealer or service center. English 11 Turning the projector off 1 To turn off soon." This onscreen message indicates that the projector has overheated. Note 2: Functions vary depending on model definition. Will automatically turn the projector off, press and hold the power button. This onscreen message indicates that the fan has failed. Will automatically turn solid red to indicate standby mode...
... the projector automatically shuts down , and the LED temp indicator will turn solid red. Warning indicators: • "Projector Overheated. Contact your local dealer or service center. English 11 Turning the projector off 1 To turn off soon." This onscreen message indicates that the projector has overheated. Note 2: Functions vary depending on model definition. Will automatically turn the projector off, press and hold the power button. This onscreen message indicates that the fan has failed. Will automatically turn solid red to indicate standby mode...

User Manual
Page 29
... is an abnormal color. English Advanced 19 RGB Gain/Bias Adjusts the red gain/green gain/blue gain/red bias/green bias/blue bias for bright, true-to your country. 3. The ISF calibration will calibrate and optimize the projection image according to -life images. Note 1: "Saturation" and "Tint" functions are not supported under the SDR (Standard Dynamic Range) signal, the screen is adjusted under computer or HDMI mode.
... is an abnormal color. English Advanced 19 RGB Gain/Bias Adjusts the red gain/green gain/blue gain/red bias/green bias/blue bias for bright, true-to your country. 3. The ISF calibration will calibrate and optimize the projection image according to -life images. Note 1: "Saturation" and "Tint" functions are not supported under the SDR (Standard Dynamic Range) signal, the screen is adjusted under computer or HDMI mode.
User Manual
Page 30
... fit the width of the screen and the height adjusted to display the image using a 16:9 ratio. • L.Box: Keep original signal aspect ratio and zoom in by 1.333 times. • Anamorphic 2.35:1: Stretches the image vertically to move the image left . • Press to to fit anamorphic lens. Keeps the image with the graphics card. If you select this function, the projector inverts the image for ceiling-mounted projection.
... fit the width of the screen and the height adjusted to display the image using a 16:9 ratio. • L.Box: Keep original signal aspect ratio and zoom in by 1.333 times. • Anamorphic 2.35:1: Stretches the image vertically to move the image left . • Press to to fit anamorphic lens. Keeps the image with the graphics card. If you select this function, the projector inverts the image for ceiling-mounted projection.

User Manual
Page 32
... the factory default settings. Reset Press the "ENTER" button and choose "Yes" to return the parameters on the screen. Warning!The DC 5V Out may happen power conflict if connecting to enable test pattern for Model Name, Input Source, Signal Type, Display Mode, Software Version and QR code on all menus to enable LAN control under standby mode. LAN IP Identify IP address. Default is "Off" to Disable DC 5V OUT connection. 5V/1.5A power output...
... the factory default settings. Reset Press the "ENTER" button and choose "Yes" to return the parameters on the screen. Warning!The DC 5V Out may happen power conflict if connecting to enable test pattern for Model Name, Input Source, Signal Type, Display Mode, Software Version and QR code on all menus to enable LAN control under standby mode. LAN IP Identify IP address. Default is "Off" to Disable DC 5V OUT connection. 5V/1.5A power output...

User Manual
Page 39
... the resolution mode you experience difficulty changing resolutions or your computer. (For notebooks) • Press the toggle output settings. Windows® 2000, • Verify that the resolution setting is switched on. 2 Partial, scrolling • For an incorrectly displayed image: or incorrectly • Open "My Computer", open the "Control displayed image Panel", and then double-click the "Display" (for item 2 (above) to adjust the displayed image resolution of the connector pins are using and...
... the resolution mode you experience difficulty changing resolutions or your computer. (For notebooks) • Press the toggle output settings. Windows® 2000, • Verify that the resolution setting is switched on. 2 Partial, scrolling • For an incorrectly displayed image: or incorrectly • Open "My Computer", open the "Control displayed image Panel", and then double-click the "Display" (for item 2 (above) to adjust the displayed image resolution of the connector pins are using and...

User Manual
Page 40
... the projector OSD. 9 Image is within the required distance of focus • Make sure the lens cap is removed. • Adjusts the focus ring on the projector lens. • Make sure the projection screen is too small • Adjust the zoom ring on the remote control. or too large • Move the projector closer to 9.2 meters) from the screen. • Press "MENU" on the projector. displaying your computer. 6 Image has vertical • Use...
... the projector OSD. 9 Image is within the required distance of focus • Make sure the lens cap is removed. • Adjusts the focus ring on the projector lens. • Make sure the projection screen is too small • Adjust the zoom ring on the remote control. or too large • Move the projector closer to 9.2 meters) from the screen. • Press "MENU" on the projector. displaying your computer. 6 Image has vertical • Use...
User Manual
Page 46
... specs, please refer to change without notice. 36 English Specifications The specifications listed below are subject to Acer's published marketing specifications. Projection system Resolution Computer compatibility Video compatibility Aspect ratio Displayable colors Optical zoom ratio Throw ratio Projection lens Projection screen size (diagonal) Projection distance Horizontal scan rate Vertical refresh scan rate Audio Weight Dimensions (W x D x H) Digital zoom Power supply Power consumption Operating temperature Standard package contents DLP® 4K UHD Native 3840x2160 resolution...
... specs, please refer to change without notice. 36 English Specifications The specifications listed below are subject to Acer's published marketing specifications. Projection system Resolution Computer compatibility Video compatibility Aspect ratio Displayable colors Optical zoom ratio Throw ratio Projection lens Projection screen size (diagonal) Projection distance Horizontal scan rate Vertical refresh scan rate Audio Weight Dimensions (W x D x H) Digital zoom Power supply Power consumption Operating temperature Standard package contents DLP® 4K UHD Native 3840x2160 resolution...


