
Acer TravelMate 8471 Series Service Guide
Page 4
IV Conventions The following conventions are used in this manual: SCREEN MESSAGES Denotes actual messages that might result from doing or not doing specific actions. NOTE WARNING CAUTION IMPORTANT Gives bits and pieces of procedures. Alerts you to do specific actions relevant to the accomplishment of additional information related to any damage that appear on screen. Gives precautionary measures to avoid possible hardware or software problems. Reminds you to the current topic.
IV Conventions The following conventions are used in this manual: SCREEN MESSAGES Denotes actual messages that might result from doing or not doing specific actions. NOTE WARNING CAUTION IMPORTANT Gives bits and pieces of procedures. Alerts you to do specific actions relevant to the accomplishment of additional information related to any damage that appear on screen. Gives precautionary measures to avoid possible hardware or software problems. Reminds you to the current topic.

Acer TravelMate 8471 Series Service Guide
Page 15
poster, let us show you around your computer. Icon Item 1 Acer Crystal Eye webcam 2 Microphone Description Web camera for sound recording. 3 4 5 6 Chapter 1 Display screen Speakers Keyboard Touchpad Also called Liquid-Crystal Display (LCD), displays computer output (Configuration may vary by models). Touch-sensitive pointing device which functions like a computer ...
poster, let us show you around your computer. Icon Item 1 Acer Crystal Eye webcam 2 Microphone Description Web camera for sound recording. 3 4 5 6 Chapter 1 Display screen Speakers Keyboard Touchpad Also called Liquid-Crystal Display (LCD), displays computer output (Configuration may vary by models). Touch-sensitive pointing device which functions like a computer ...

Acer TravelMate 8471 Series Service Guide
Page 22
... with some applications. When Scroll Lock is indicated by small characters located on the upper right corner of numeric data entry. It is on, the screen moves one line up or down when you can toggle on Type numbers in a normal manner. * only for certain models 14 Chapter 1 F11/ F12/ Num...
... with some applications. When Scroll Lock is indicated by small characters located on the upper right corner of numeric data entry. It is on, the screen moves one line up or down when you can toggle on Type numbers in a normal manner. * only for certain models 14 Chapter 1 F11/ F12/ Num...
Acer TravelMate 8471 Series Service Guide
Page 24
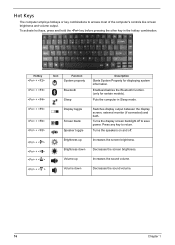
... the sound volume. 16 Chapter 1 Puts the computer in the hotkey combination. Press any key to access most of the computer's controls like screen brightness and volume output. Increases the screen brightness. Hot Keys The computer employs hotkeys or key combinations to return. Hotkey + + + + + + + < > + < > + <...). Increases the sound volume. Switches display output between the display screen, external monitor (if connected) and both. Turns the speakers on and off to save power. Decreases the screen brightness. To activate hot keys, press and hold the key ...
... the sound volume. 16 Chapter 1 Puts the computer in the hotkey combination. Press any key to access most of the computer's controls like screen brightness and volume output. Increases the screen brightness. Hot Keys The computer employs hotkeys or key combinations to return. Hotkey + + + + + + + < > + < > + <...). Increases the sound volume. Switches display output between the display screen, external monitor (if connected) and both. Turns the speakers on and off to save power. Decreases the screen brightness. To activate hot keys, press and hold the key ...
Acer TravelMate 8471 Series Service Guide
Page 26
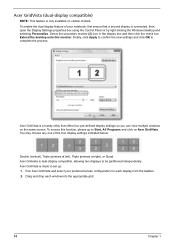
... to Start, All Programs and click on Acer GridVista. To access this monitor. Acer GridVista (dual-display compatible) NOTE: This feature is only available on the same screen. You may choose any one of your preferred screen configuration for each window into the appropriate grid.... 18 Chapter 1 Drag and drop each display from the taskbar. 2. Acer Gridvista is dual-display compatible, allowing two displays ...
... to Start, All Programs and click on Acer GridVista. To access this monitor. Acer GridVista (dual-display compatible) NOTE: This feature is only available on the same screen. You may choose any one of your preferred screen configuration for each window into the appropriate grid.... 18 Chapter 1 Drag and drop each display from the taskbar. 2. Acer Gridvista is dual-display compatible, allowing two displays ...
Acer TravelMate 8471 Series Service Guide
Page 27
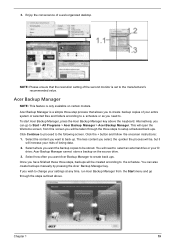
... 3. This will need to the schedule. The less content you to Start > All Programs > Acer Backup Manager > Acer Backup Manager. from this screen you need to select an external drive or your settings at any time, run Acer Backup Manager from the Start menu and go to create backup copies of losing data... it will increase your risks of your entire system or selected files and folders according to create back ups. You will open the Welcome screen; If you want Acer Backup Manager to a schedule or as you will be stored. Select how often you wish to the following...
... 3. This will need to the schedule. The less content you to Start > All Programs > Acer Backup Manager > Acer Backup Manager. from this screen you need to select an external drive or your settings at any time, run Acer Backup Manager from the Start menu and go to create backup copies of losing data... it will increase your risks of your entire system or selected files and folders according to create back ups. You will open the Welcome screen; If you want Acer Backup Manager to a schedule or as you will be stored. Select how often you wish to the following...
Acer TravelMate 8471 Series Service Guide
Page 28
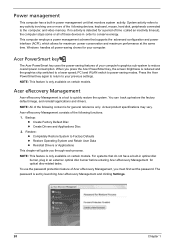
... System and Retain User Data z Reinstall Drivers or Applications This chapter will guide you press the Acer PowerSmart key, the screen brightness is a tool to power-saving modes. System activity refers to a lower speed; Acer eRecovery Management Acer eRecovery Management is reduced and the graphics chip switched to any activity involving one or more...
... System and Retain User Data z Reinstall Drivers or Applications This chapter will guide you press the Acer PowerSmart key, the screen brightness is a tool to power-saving modes. System activity refers to a lower speed; Acer eRecovery Management Acer eRecovery Management is reduced and the graphics chip switched to any activity involving one or more...
Acer TravelMate 8471 Series Service Guide
Page 29
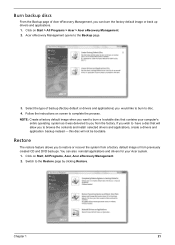
... the Restore page by clicking Restore. Click on Start > All Programs > Acer > Acer eRecovery Management. 2. Follow the instructions on screen to the Backup page. 3. If you wish to have a disc that contains your Acer system. 1. You can burn the factory default image or back up drivers ... and applications) you would like to burn to disc. 4. Click on Start, All Programs, Acer, Acer eRecovery Management. 2. Acer eRecovery Management opens to complete the process. Select the type of Acer eRecovery Management, you want to burn a bootable disc that will not be bootable. NOTE: Create...
... the Restore page by clicking Restore. Click on Start > All Programs > Acer > Acer eRecovery Management. 2. Follow the instructions on screen to the Backup page. 3. If you wish to have a disc that contains your Acer system. 1. You can burn the factory default image or back up drivers ... and applications) you would like to burn to disc. 4. Click on Start, All Programs, Acer, Acer eRecovery Management. 2. Acer eRecovery Management opens to complete the process. Select the type of Acer eRecovery Management, you want to burn a bootable disc that will not be bootable. NOTE: Create...
Acer TravelMate 8471 Series Service Guide
Page 30
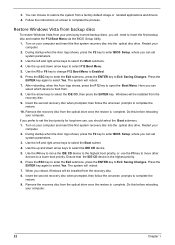
...to enter BIOS Setup, where you reboot, Windows will reboot. 7. Do this before rebooting your computer. 22 Chapter 1 During startup when the Acer logo shows, press the F2 key to complete the restore. 9. Insert the second recovery disc when prompted, then follow the onscreen prompts to select...default image or reinstall applications and drivers. 4. Use the arrow keys to open the Boot Menu. Turn on your computer. 2. Turn on screen to restore the system from the optical drive once the restore is complete. You can set the boot priority for long-term use the F5...
...to enter BIOS Setup, where you reboot, Windows will reboot. 7. Do this before rebooting your computer. 22 Chapter 1 During startup when the Acer logo shows, press the F2 key to complete the restore. 9. Insert the second recovery disc when prompted, then follow the onscreen prompts to select...default image or reinstall applications and drivers. 4. Use the arrow keys to open the Boot Menu. Turn on your computer. 2. Turn on screen to restore the system from the optical drive once the restore is complete. You can set the boot priority for long-term use the F5...

Acer TravelMate 8471 Series Service Guide
Page 35
... without entering BIOS Setup Utility, please set to run this menu, user can change boot device without entering BIOS SETUP Utility. The default parameter of screen).
... without entering BIOS Setup Utility, please set to run this menu, user can change boot device without entering BIOS SETUP Utility. The default parameter of screen).
Acer TravelMate 8471 Series Service Guide
Page 36
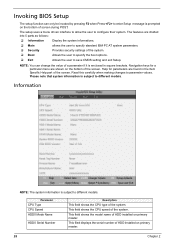
... ‰ Security ‰ Boot Provides security settings of the system. This field shows the model name of HDD installed on the bottom of screen during POST. Help for a particular menu are found in square brackets. Invoking BIOS Setup The setup function can change the value of the system...exit Setup. Please note that system information is enclosed in the Item Specific Help part of the screen. This filed displays the serial number of HDD installed on the bottom of the screen. Allows the user to specify the boot options. ‰ Exit Allows the user to different ...
... ‰ Security ‰ Boot Provides security settings of the system. This field shows the model name of HDD installed on the bottom of screen during POST. Help for a particular menu are found in square brackets. Invoking BIOS Setup The setup function can change the value of the system...exit Setup. Please note that system information is enclosed in the Item Specific Help part of the screen. This filed displays the serial number of HDD installed on the bottom of the screen. Allows the user to specify the boot options. ‰ Exit Allows the user to different ...

Acer TravelMate 8471 Series Service Guide
Page 37
...Chapter 2 29 This field displays the VGA firmware version of devices installed on secondary master. This field shows product name of the system. NOTE: The screen above is automatically detected by the system. The hard disk drive or optical drive model name is for your computer hardware information, and also includes... of devices installed on secondary master. Actual values may differ. The field shows the serial number of this unit. UUID=32bytes Main The Main screen displays a summary of this system. This field displays the serial number of your reference only.
...Chapter 2 29 This field displays the VGA firmware version of devices installed on secondary master. This field shows product name of the system. NOTE: The screen above is automatically detected by the system. The hard disk drive or optical drive model name is for your computer hardware information, and also includes... of devices installed on secondary master. Actual values may differ. The field shows the serial number of this unit. UUID=32bytes Main The Main screen displays a summary of this system. This field displays the serial number of your reference only.
Acer TravelMate 8471 Series Service Guide
Page 38
... if Customer Logo will not be displayed or not; Enabled: Customer Logo is displayed, and Summary Screen is enabled. Disabled: Customer Logo is not displayed, and Summary Screen is disabled. The function allows the user to create a hidden partition on hard disc drive to store... System Time Sets the system date. Option: Enabled or Disabled Enables, disables the system boot from LAN (remote server). shows Summary Screen is set to factory defaults. The table below describes the parameters in the system. Parameter System Time System Date System Memory Total Memory...
... if Customer Logo will not be displayed or not; Enabled: Customer Logo is displayed, and Summary Screen is enabled. Disabled: Customer Logo is not displayed, and Summary Screen is disabled. The function allows the user to create a hidden partition on hard disc drive to store... System Time Sets the system date. Option: Enabled or Disabled Enables, disables the system boot from LAN (remote server). shows Summary Screen is set to factory defaults. The table below describes the parameters in the system. Parameter System Time System Date System Memory Total Memory...

Acer TravelMate 8471 Series Service Guide
Page 39
Chapter 2 31 Security The Security screen contains parameters that help safeguard and protect your computer from unauthorized use.
Chapter 2 31 Security The Security screen contains parameters that help safeguard and protect your computer from unauthorized use.
Acer TravelMate 8471 Series Service Guide
Page 40
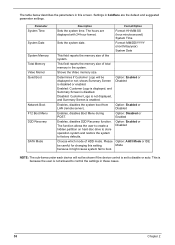
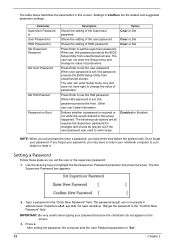
Shows the setting of HDD password. When Hdd password is Set Supervisor Password Set User Password Set Hdd Passwor Password on the screen. 3. Option Clear or Set Clear or Set Clear or Set Disabled or Enabled NOTE: When you have three tries before the system halts. Use... New Password" field. After setting the password, the computer sets the User Password parameter to change he value of parameters. Press Enter to set , this screen. Defines whether a password is set the Hdd password. Setting a Password Follow these steps as you may have right to "Set". 32 Chapter 2 Retype...
Shows the setting of HDD password. When Hdd password is Set Supervisor Password Set User Password Set Hdd Passwor Password on the screen. 3. Option Clear or Set Clear or Set Clear or Set Disabled or Enabled NOTE: When you have three tries before the system halts. Use... New Password" field. After setting the password, the computer sets the User Password parameter to change he value of parameters. Press Enter to set , this screen. Defines whether a password is set the Hdd password. Setting a Password Follow these steps as you may have right to "Set". 32 Chapter 2 Retype...
Acer TravelMate 8471 Series Service Guide
Page 41
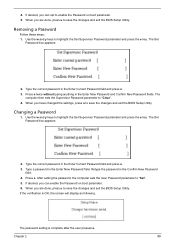
... to save the changes and exit the BIOS Setup Utility. If the verification is complete after the user presses u. The password setting is OK, the screen will display as following. Retype the password in the Enter New Password field. Removing a Password Follow these steps: 1. Type a password in the Confirm New Password...
... to save the changes and exit the BIOS Setup Utility. If the verification is complete after the user presses u. The password setting is OK, the screen will display as following. Retype the password in the Enter New Password field. Removing a Password Follow these steps: 1. Type a password in the Confirm New Password...
Acer TravelMate 8471 Series Service Guide
Page 42
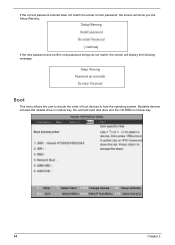
Boot This menu allows the user to decide the order of boot devices to load the operating system. If the current password entered does not match the actual current password, the screen will display the following message. If the new password and confirm new password strings do not match, the screen will show you the Setup Warning. Bootable devices includes the distette drive in module bay, the onboard hard disk drive and the CD-ROM in module bay. 34 Chapter 2
Boot This menu allows the user to decide the order of boot devices to load the operating system. If the current password entered does not match the actual current password, the screen will display the following message. If the new password and confirm new password strings do not match, the screen will show you the Setup Warning. Bootable devices includes the distette drive in module bay, the onboard hard disk drive and the CD-ROM in module bay. 34 Chapter 2
Acer TravelMate 8471 Series Service Guide
Page 43
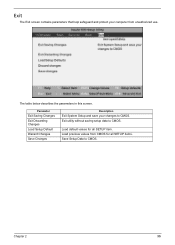
Parameter Exit Saving Changes Exit Discarding Changes Load Setup Default Discard Changes Save Changes Description Exit System Setup and save your computer from CMOS for all SETUP items. Save Setup Data to CMOS. Load default values for all SETUP item. Chapter 2 35 Exit The Exit screen contains parameters that help safeguard and protect your changes to CMOS. Exit utility without saving setup data to CMOS. The table below describes the parameters in this screen. Load previous values from unauthorized use.
Parameter Exit Saving Changes Exit Discarding Changes Load Setup Default Discard Changes Save Changes Description Exit System Setup and save your computer from CMOS for all SETUP items. Save Setup Data to CMOS. Load default values for all SETUP item. Chapter 2 35 Exit The Exit screen contains parameters that help safeguard and protect your changes to CMOS. Exit utility without saving setup data to CMOS. The table below describes the parameters in this screen. Load previous values from unauthorized use.
Acer TravelMate 8471 Series Service Guide
Page 59
... The diagnostic tests are indicated. Symptoms (Verified) Power failure. (The power indicator does not go to test only Acer products. LCD display problems or others). "Power-On Self-Test (POST) Error Message" on page 67. "Intermittent ... are intended to "Power-On Self-Test (POST) Error Message" on .) POST does not complete. Non-Acer products, prototype cards, or modified options can give false errors and invalid system responses. 1. POST detects an ...same operation. 3. Go To "Power System Check" on screen. Use the following procedure as possible. 2. Other symptoms (i.e.
... The diagnostic tests are indicated. Symptoms (Verified) Power failure. (The power indicator does not go to test only Acer products. LCD display problems or others). "Power-On Self-Test (POST) Error Message" on page 67. "Intermittent ... are intended to "Power-On Self-Test (POST) Error Message" on .) POST does not complete. Non-Acer products, prototype cards, or modified options can give false errors and invalid system responses. 1. POST detects an ...same operation. 3. Go To "Power System Check" on screen. Use the following procedure as possible. 2. Other symptoms (i.e.
Acer TravelMate 8471 Series Service Guide
Page 61
... for both battery and adapter. 4. Memory check Memory errors might stop system operations, show error messages on recharging or discharging. Follow the instructions in the screen for Current Power Source and Total Battery Power Remaining are correct. 3. In Power Meter, confirm that power is on the...
... for both battery and adapter. 4. Memory check Memory errors might stop system operations, show error messages on recharging or discharging. Follow the instructions in the screen for Current Power Source and Total Battery Power Remaining are correct. 3. In Power Meter, confirm that power is on the...

