TravelMate 2310 Service Guide
Page 34
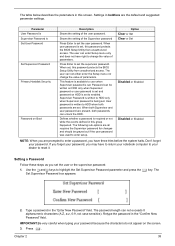
... when both passwords can not exceeds 8 alphanumeric characters (A-Z, a-z, 0-9, not case sensitive). The user can enter Setup menu only and does not have to return your notebook computer to your password. User password is set . The following sub-options are present, both passwords are the default and suggested parameter settings. The password...
... when both passwords can not exceeds 8 alphanumeric characters (A-Z, a-z, 0-9, not case sensitive). The user can enter Setup menu only and does not have to return your notebook computer to your password. User password is set . The following sub-options are present, both passwords are the default and suggested parameter settings. The password...
TravelMate 2310 Service Guide
Page 40
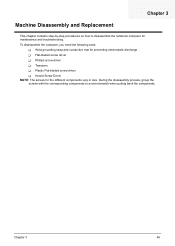
... driver T Hexed Screw Driver NOTE: The screws for maintenance and troubleshooting. During the disassembly process, group the screws with the corresponding components to disassemble the notebook computer for the different components vary in size. Chapter 3 46
... driver T Hexed Screw Driver NOTE: The screws for maintenance and troubleshooting. During the disassembly process, group the screws with the corresponding components to disassemble the notebook computer for the different components vary in size. Chapter 3 46
TravelMate 2310 Service Guide
Page 45
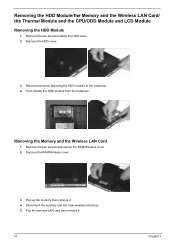
... Wireless LAN Card/ the Thermal Module and the CPU/ODD Module and LCD Module Removing the HDD Module 1. Then detach the HDD module from the notebook. Remove the two screws that secure the RAM/Wireless cover. 2. Remove the RAM/Wireless cover. 3. Pop the wireless LAN card then remove it .... 4. Remove the HDD cover. 3. Removing the Memory and the Wireless LAN Card 1. Remove the screw fastening the HDD module to the notebook. 4. Disconnect the auxiliary and the main wireless antennae. 5. Pop up the memory then remove it . 51 Chapter 3 Remove the two screws holding the HDD...
... Wireless LAN Card/ the Thermal Module and the CPU/ODD Module and LCD Module Removing the HDD Module 1. Then detach the HDD module from the notebook. Remove the two screws that secure the RAM/Wireless cover. 2. Remove the RAM/Wireless cover. 3. Pop the wireless LAN card then remove it .... 4. Remove the HDD cover. 3. Removing the Memory and the Wireless LAN Card 1. Remove the screw fastening the HDD module to the notebook. 4. Disconnect the auxiliary and the main wireless antennae. 5. Pop up the memory then remove it . 51 Chapter 3 Remove the two screws holding the HDD...

TravelMate 2310 Service Guide
Page 47
... screws fastening the keyboard. 4. Remove the screw that fastens the ODD module. 7. Disconnect the keyboard cable from the main unit. . 53 Chapter 3 Turn over the notebook computer then detach the ODD module carefully. Turn over the keyboard as the picture shown then detach the keyboard cover from the main board then...
... screws fastening the keyboard. 4. Remove the screw that fastens the ODD module. 7. Disconnect the keyboard cable from the main unit. . 53 Chapter 3 Turn over the notebook computer then detach the ODD module carefully. Turn over the keyboard as the picture shown then detach the keyboard cover from the main board then...
TravelMate 2310 Service Guide
Page 67
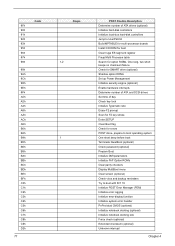
... with INT 19 Initialize POST Error Manager (PEM) Initialize error logging Initialize error display function Initialize system error handler PnPnd dual CMOS (optional) Initialize notebook docking (optional) Initialize notebook docking late Force check (optional) Extended checksum (optional) Unknown interrupt Chapter 4 8Fh 90h 91h 92h 93h 95h 96h 97h 98h 99h 9Ah 9Ch...
... with INT 19 Initialize POST Error Manager (PEM) Initialize error logging Initialize error display function Initialize system error handler PnPnd dual CMOS (optional) Initialize notebook docking (optional) Initialize notebook docking late Force check (optional) Extended checksum (optional) Unknown interrupt Chapter 4 8Fh 90h 91h 92h 93h 95h 96h 97h 98h 99h 9Ah 9Ch...
TravelMate 2310 Service Guide
Page 98
... whenever you have included an Acrobat File to facilitate the problem-free downloading of Acer's Notebook, Desktop and Server models including: T Service guides for all of our technical material. Acer Branch Offices and Regional Business Units may access our website. We are always looking...these to us. Appendix C 110 Appendix C Online Support Information This section describes online technical support services available to help you repair your Acer Systems. If you are a distributor, dealer, ASP or TPM, please refer your technical queries to your technical queries. and password....
... whenever you have included an Acrobat File to facilitate the problem-free downloading of Acer's Notebook, Desktop and Server models including: T Service guides for all of our technical material. Acer Branch Offices and Regional Business Units may access our website. We are always looking...these to us. Appendix C 110 Appendix C Online Support Information This section describes online technical support services available to help you repair your Acer Systems. If you are a distributor, dealer, ASP or TPM, please refer your technical queries to your technical queries. and password....
TravelMate 2310 User's Guide
Page 2
..., either expressed or implied, with respect to the contents hereof and specifically disclaims the implied warranties of Purchase Acer and the Acer logo are recorded on the label affixed to their respective companies. TravelMate 2310 Series Notebook Computer Model Number Serial Number Purchase Date Place of merchantability or fitness for identification purposes only and belong...
..., either expressed or implied, with respect to the contents hereof and specifically disclaims the implied warranties of Purchase Acer and the Acer logo are recorded on the label affixed to their respective companies. TravelMate 2310 Series Notebook Computer Model Number Serial Number Purchase Date Place of merchantability or fitness for identification purposes only and belong...
TravelMate 2310 User's Guide
Page 3
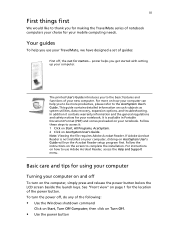
...button. Follow these steps to use your TravelMate, we have designed a set of your mobile computing needs. For instructions on AcerSystem User's Guide will run the Acrobat Reader setup program first. See "Front view" on page 1 for the location of notebook computers your choice for your computer, ...1 Click on Start, All Programs, AcerSystem. 2 Click on and off To turn the power off , the Just for using your computer Turning your notebook. For more productive, please refer to the basic features and functions of guides: First off , do any of the following: • Use the ...
...button. Follow these steps to use your TravelMate, we have designed a set of your mobile computing needs. For instructions on AcerSystem User's Guide will run the Acrobat Reader setup program first. See "Front view" on page 1 for the location of notebook computers your choice for your computer, ...1 Click on Start, All Programs, AcerSystem. 2 Click on and off To turn the power off , the Just for using your computer Turning your notebook. For more productive, please refer to the basic features and functions of guides: First off , do any of the following: • Use the ...

TravelMate 2310 User's Guide
Page 7
Taking your notebook PC with you 27 Disconnecting from the desktop 27 Moving around 27 Preparing the computer 27 What to take to short meetings 28 What to ... 38 BIOS utility 39 Boot sequence 40 Enable Disk to disk recovery 40 Password 40 Using software 40 Playing DVD movies 40 Power management 41 Acer eRecovery 42 Create backup 42 Restore from backup 43
Taking your notebook PC with you 27 Disconnecting from the desktop 27 Moving around 27 Preparing the computer 27 What to take to short meetings 28 What to ... 38 BIOS utility 39 Boot sequence 40 Enable Disk to disk recovery 40 Password 40 Using software 40 Playing DVD movies 40 Power management 41 Acer eRecovery 42 Create backup 42 Restore from backup 43

TravelMate 2310 User's Guide
Page 26
...This feature is only available on the same screen. You may choose any one of your notebook, first ensure the secondary monitor is connected, then, select Start, Control Panel, Display and click on Acer GridVista. To access this monitor. Select the secondary monitor (2) icon in the display box...monitor feature of the four display settings indicated below: Double (Vertical), Triple (Major at left), Triple (Major at right), or Quad Acer Gridvista is dual-display compatible, allowing two displays to be partitioned independently. Finally, Apply the new settings and click OK to complete the process...
...This feature is only available on the same screen. You may choose any one of your notebook, first ensure the secondary monitor is connected, then, select Start, Control Panel, Display and click on Acer GridVista. To access this monitor. Select the secondary monitor (2) icon in the display box...monitor feature of the four display settings indicated below: Double (Vertical), Triple (Major at left), Triple (Major at right), or Quad Acer Gridvista is dual-display compatible, allowing two displays to be partitioned independently. Finally, Apply the new settings and click OK to complete the process...

TravelMate 2310 User's Guide
Page 28
...recovery is enabled or not. 2 Make sure the [D2D Recovery] setting in a hidden partition on your notebook. Before performing a restore operation, please check the BIOS settings. 1 Check to see if Acer disk-to rebuild your C: drive. (Your C: drive will be reformatted and all data files before you ... 3 Exit the BIOS setup utility and save changes. Note: To activate BIOS setup utility, press during POST. 1 Restart the system. 2 While the Acer logo is showing, press + at the same time to enter the recovery process. 3 Refer to screen instructions to back up all data will reboot. ...
...recovery is enabled or not. 2 Make sure the [D2D Recovery] setting in a hidden partition on your notebook. Before performing a restore operation, please check the BIOS settings. 1 Check to see if Acer disk-to rebuild your C: drive. (Your C: drive will be reformatted and all data files before you ... 3 Exit the BIOS setup utility and save changes. Note: To activate BIOS setup utility, press during POST. 1 Restart the system. 2 While the Acer logo is showing, press + at the same time to enter the recovery process. 3 Refer to screen instructions to back up all data will reboot. ...

TravelMate 2310 User's Guide
Page 33
... your location. English 25 I want to set up your location: 1 Click on Start, Settings, Control Panel. 2 Double-click on Modems. 3 Click on first booting your notebook, that you can proceed with the Internet Connection setup.
... your location. English 25 I want to set up your location: 1 Click on Start, Settings, Control Panel. 2 Double-click on Modems. 3 Click on first booting your notebook, that you can proceed with the Internet Connection setup.

TravelMate 2310 User's Guide
Page 35
... disks, from the drive(s). 3 Shut down the computer. 4 Close the display cover. 5 Disconnect the cord from your work in Sleep mode. English 27 Taking your notebook PC with your computer. then press and release the power button. Disconnecting from the desktop Follow these steps to disconnect your computer from external accessories...
... disks, from the drive(s). 3 Shut down the computer. 4 Close the display cover. 5 Disconnect the cord from your work in Sleep mode. English 27 Taking your notebook PC with your computer. then press and release the power button. Disconnecting from the desktop Follow these steps to disconnect your computer from external accessories...

TravelMate 2310 User's Guide
Page 43
... the modem port to a telephone jack. Warning: Please make sure that the cable you would with digital phone lines. English 35 Expanding through options Your notebook PC offers you are working. Warning! Fax/Data modem Your computer has a built-in which you a complete mobile computing experience.
... the modem port to a telephone jack. Warning: Please make sure that the cable you would with digital phone lines. English 35 Expanding through options Your notebook PC offers you are working. Warning! Fax/Data modem Your computer has a built-in which you a complete mobile computing experience.

TravelMate 2310 User's Guide
Page 48
... disk recovery (hard disk recovery), activate the BIOS utility, then select Main from the categories listed at the bottom of the screen. Important! while the notebook PC logo is installed in the BIOS utility, activate the BIOS utility, then select Boot from the categories listed at the top of five times...
... disk recovery (hard disk recovery), activate the BIOS utility, then select Main from the categories listed at the bottom of the screen. Important! while the notebook PC logo is installed in the BIOS utility, activate the BIOS utility, then select Boot from the categories listed at the top of five times...

TravelMate 2310 User's Guide
Page 53
... center. See "Requesting service" on page 26. Error messages Corrective action CMOS battery bad Contact your dealer or an authorized service center. Troubleshooting tips This notebook computer incorporates an advanced design that delivers onscreen error message reports to reboot. Disk boot failure Insert a system (bootable) disk into the floppy drive (A:), then...
... center. See "Requesting service" on page 26. Error messages Corrective action CMOS battery bad Contact your dealer or an authorized service center. Troubleshooting tips This notebook computer incorporates an advanced design that delivers onscreen error message reports to reboot. Disk boot failure Insert a system (bootable) disk into the floppy drive (A:), then...

TravelMate 2310 User's Guide
Page 56
... with the essential requirements and other relevant provisions of Directive 1999/5/EC. (Please visit http://global.acer.com/products/ notebook/reg-nb/index.htm for EU countries Hereby, Acer, declares that may not cause harmful interference, and (2) this device must accept any interference received,... approved by the manufacturer could void the user's authority, which is granted by the Federal Communications Commission, to operate this notebook PC series is subject to the following two conditions: (1) this device may cause undesired operation. Operation conditions This device complies...
... with the essential requirements and other relevant provisions of Directive 1999/5/EC. (Please visit http://global.acer.com/products/ notebook/reg-nb/index.htm for EU countries Hereby, Acer, declares that may not cause harmful interference, and (2) this device must accept any interference received,... approved by the manufacturer could void the user's authority, which is granted by the Federal Communications Commission, to operate this notebook PC series is subject to the following two conditions: (1) this device may cause undesired operation. Operation conditions This device complies...

TravelMate 2310 User's Guide
Page 61
... type: UL listed/CSA certified, type SPT-2, rated 7 A 125 V minimum, VDE approved or its equivalent. Keep them in your accessories box) for service. 12 The notebook PC series uses lithium batteries. Refer all telephone lines from lightning. c If the product has been exposed to normal condition. d If the product does not...
... type: UL listed/CSA certified, type SPT-2, rated 7 A 125 V minimum, VDE approved or its equivalent. Keep them in your accessories box) for service. 12 The notebook PC series uses lithium batteries. Refer all telephone lines from lightning. c If the product has been exposed to normal condition. d If the product does not...

TravelMate 2310 User's Guide
Page 64
...; Art.3.2) EN 300 328-2 • Art.3.2) EN 301 893 *applies to 5 GHz only List of Applicable Countries EU member states as of use . Nevertheless, the notebook PC series shall be used in strict accordance with the essential requirements of the European Council Directives listed below the FCC radio frequency exposure limits...
...; Art.3.2) EN 300 328-2 • Art.3.2) EN 301 893 *applies to 5 GHz only List of Applicable Countries EU member states as of use . Nevertheless, the notebook PC series shall be used in strict accordance with the essential requirements of the European Council Directives listed below the FCC radio frequency exposure limits...

TravelMate 2310 User's Guide
Page 66
... undesired operation of 5250-5350 MHz and 5650-5850 MHz and these radars could cause interference and/or damage to RF fields (RSS-102) The notebook PC series employs low gain integral antennas that may not cause interference, and 2. c Operation in 2.4 GHz band To prevent radio interference to the licensed service...
... undesired operation of 5250-5350 MHz and 5650-5850 MHz and these radars could cause interference and/or damage to RF fields (RSS-102) The notebook PC series employs low gain integral antennas that may not cause interference, and 2. c Operation in 2.4 GHz band To prevent radio interference to the licensed service...


