
TravelMate 2310 Service Guide
Page 31
.... Main Security Boot Exit System Time: System Date: System Memory: Extended Memory: Video Memory Quiet Boot: Power on display: Network boot F12 Boot Menu D2D Recovery Item Specific Help [15:56:48] [04/01/2005] , , or 640 KB selects field.
.... Main Security Boot Exit System Time: System Date: System Memory: Extended Memory: Video Memory Quiet Boot: Power on display: Network boot F12 Boot Menu D2D Recovery Item Specific Help [15:56:48] [04/01/2005] , , or 640 KB selects field.
TravelMate 2310 Service Guide
Page 32
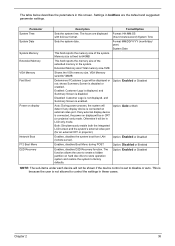
...system boot from LAN (remote server). The hours are the default and suggested parameter settings. Option: Disabled or Enabled Enables, disables D2D Recovery function. Option: Enabled or Disabled NOTE: The sub-items under each device will be displayed or not; Option: Enabled or Disabled ...on external video port. shows Summary Screen is not allowed to create a hidden partition on display Network Boot F12 Boot Menu D2D Recovery Description Format/Option Sets the system time. Both: Simultaneously enable both the integrated LCD screen and the system's external video port ...
...system boot from LAN (remote server). The hours are the default and suggested parameter settings. Option: Disabled or Enabled Enables, disables D2D Recovery function. Option: Enabled or Disabled NOTE: The sub-items under each device will be displayed or not; Option: Enabled or Disabled ...on external video port. shows Summary Screen is not allowed to create a hidden partition on display Network Boot F12 Boot Menu D2D Recovery Description Format/Option Sets the system time. Both: Simultaneously enable both the integrated LCD screen and the system's external video port ...

TravelMate 2310 Service Guide
Page 39
.... If the battery pack does not contain enough power to run the Phlash utility. NOTE: If you do not have a crisis recovery diskette at hand, then you should create a Crisis Recovery Diskette before you may not boot the system because the BIOS is required for the following conditions: T New versions of system...
.... If the battery pack does not contain enough power to run the Phlash utility. NOTE: If you do not have a crisis recovery diskette at hand, then you should create a Crisis Recovery Diskette before you may not boot the system because the BIOS is required for the following conditions: T New versions of system...
TravelMate 2310 Service Guide
Page 66
... Setup System Management Mode (SMM) area Display external L2 cache size Load custom defaults (optional) Display shadow-area message Display possible high address for UMB recovery Display error messages Check for configuration errors Check for keyboard errors Set up hardware interrupt vectors Initialize coprocessor if present Disable onboard Super I/O ports and...
... Setup System Management Mode (SMM) area Display external L2 cache size Load custom defaults (optional) Display shadow-area message Display possible high address for UMB recovery Display error messages Check for configuration errors Check for keyboard errors Set up hardware interrupt vectors Initialize coprocessor if present Disable onboard Super I/O ports and...

TravelMate 2310 Service Guide
Page 68
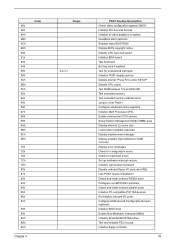
... F1h F2h F3h F4h F5h F6h F7h Beeps 1 Initialize the chipset Initialize the bridge Initialize the CPU Initialize the system timer Initialize system I/O Check force recovery boot Checksum BIOS ROM Go to BIOS Set Huge Segment Initialize Multi Processor Initialize OEM special code Initialize PIC and DMA Initialize Memory type Initialize...
... F1h F2h F3h F4h F5h F6h F7h Beeps 1 Initialize the chipset Initialize the bridge Initialize the CPU Initialize the system timer Initialize system I/O Check force recovery boot Checksum BIOS ROM Go to BIOS Set Huge Segment Initialize Multi Processor Initialize OEM special code Initialize PIC and DMA Initialize Memory type Initialize...
TravelMate 2310 User's Guide
Page 3
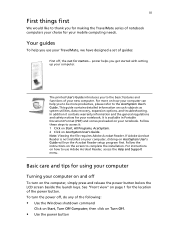
...See "Front view" on AcerSystem User's Guide. then click on how your computer can help you for making the TravelMate series of notebook computers your choice for the location of the power button. Your guides To help you to be...2 Click on page 1 for your mobile computing needs. iii First things first We would like to thank you use your TravelMate, we have designed a set of guides: First off To turn the power off, do any of the following: •...... This guide contains detailed information on such subjects as system utilities, data recovery, expansion options, and troubleshooting.
...See "Front view" on AcerSystem User's Guide. then click on how your computer can help you for making the TravelMate series of notebook computers your choice for the location of the power button. Your guides To help you to be...2 Click on page 1 for your mobile computing needs. iii First things first We would like to thank you use your TravelMate, we have designed a set of guides: First off To turn the power off, do any of the following: •...... This guide contains detailed information on such subjects as system utilities, data recovery, expansion options, and troubleshooting.

TravelMate 2310 User's Guide
Page 6
... iii Taking care of your computer iv Taking care of your AC adaptor iv Taking care of your battery pack v Cleaning and servicing v A TravelMate tour 1 Front view 1 Closed front view 2 Left view 3 Right view 3 Rear view 4 Base view 4 Specifications 5 Indicators 7 Launch ... lock 15 Audio 16 Adjusting the volume 16 Using the system utilities 17 Acer eManager 17 Acer GridVista (dual-display compatible) 18 Acer disk-to-disk recovery 19 Restore without a Recovery CD 20 Launch Manager 21 Frequently-asked questions 23 Requesting service 26 International ...
... iii Taking care of your computer iv Taking care of your AC adaptor iv Taking care of your battery pack v Cleaning and servicing v A TravelMate tour 1 Front view 1 Closed front view 2 Left view 3 Right view 3 Rear view 4 Base view 4 Specifications 5 Indicators 7 Launch ... lock 15 Audio 16 Adjusting the volume 16 Using the system utilities 17 Acer eManager 17 Acer GridVista (dual-display compatible) 18 Acer disk-to-disk recovery 19 Restore without a Recovery CD 20 Launch Manager 21 Frequently-asked questions 23 Requesting service 26 International ...

TravelMate 2310 User's Guide
Page 7
... network feature 36 Universal Serial Bus 37 IEEE 1394 port 37 PC Card slot 38 BIOS utility 39 Boot sequence 40 Enable Disk to disk recovery 40 Password 40 Using software 40 Playing DVD movies 40 Power management 41 Acer eRecovery 42 Create backup 42 Restore from backup 43
... network feature 36 Universal Serial Bus 37 IEEE 1394 port 37 PC Card slot 38 BIOS utility 39 Boot sequence 40 Enable Disk to disk recovery 40 Password 40 Using software 40 Playing DVD movies 40 Power management 41 Acer eRecovery 42 Create backup 42 Restore from backup 43

TravelMate 2310 User's Guide
Page 14
... exact configuration of your PC depends on -LAN ready Wireless LAN (optional): integrated Mini PCI 802.11b/g Wi-Fi CERTIFIED™ solution Acer SignalUp wireless technology support Wireless PAN (optional): integrated Bluetooth® Three USB 2.0 ports Ethernet (RJ-45) port Modem (RJ-11) ... II PC Card slot DC-in jack for AC adaptor Kensington lock slot BIOS user and supervisor passwords Acer Launch Manager Acer eManager (eSetting/ePresentation/eRecovery) Acer GridVista Acer System Recovery CD Norton AntiVirus™ Adobe® Reader® CyberLink® PowerDVD™ NTI CD-Maker™...
... exact configuration of your PC depends on -LAN ready Wireless LAN (optional): integrated Mini PCI 802.11b/g Wi-Fi CERTIFIED™ solution Acer SignalUp wireless technology support Wireless PAN (optional): integrated Bluetooth® Three USB 2.0 ports Ethernet (RJ-45) port Modem (RJ-11) ... II PC Card slot DC-in jack for AC adaptor Kensington lock slot BIOS user and supervisor passwords Acer Launch Manager Acer eManager (eSetting/ePresentation/eRecovery) Acer GridVista Acer System Recovery CD Norton AntiVirus™ Adobe® Reader® CyberLink® PowerDVD™ NTI CD-Maker™...
TravelMate 2310 User's Guide
Page 27
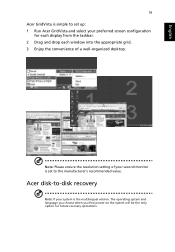
English 19 Acer GridVista is simple to set to -disk recovery Note: If your second monitor is the multilingual version. The operating system and language you choose when you first power-on the system will be ... each display from the taskbar. 2 Drag and drop each window into the appropriate grid. 3 Enjoy the convenience of your system is set up: 1 Run Acer GridVista and select your preferred screen configuration for future recovery operations. Acer disk-to the manufacturer's recommended value. Note: Please ensure the resolution setting of a well-organized desktop.
English 19 Acer GridVista is simple to set to -disk recovery Note: If your second monitor is the multilingual version. The operating system and language you choose when you first power-on the system will be ... each display from the taskbar. 2 Drag and drop each window into the appropriate grid. 3 Enjoy the convenience of your system is set up: 1 Run Acer GridVista and select your preferred screen configuration for future recovery operations. Acer disk-to the manufacturer's recommended value. Note: Please ensure the resolution setting of a well-organized desktop.

TravelMate 2310 User's Guide
Page 28
...save changes. Note: To activate BIOS setup utility, press during POST. 1 Restart the system. 2 While the Acer logo is showing, press + at the same time to enter the recovery process. 3 Refer to screen instructions to back up all data will reboot. Follow the steps below to rebuild your... hard drive. Before performing a restore operation, please check the BIOS settings. 1 Check to see if Acer disk-to-disk recovery is enabled or not. 2 Make sure the [D2D Recovery] setting in a hidden partition on your C: drive. (Your C: drive will be reformatted and all data files before...
...save changes. Note: To activate BIOS setup utility, press during POST. 1 Restart the system. 2 While the Acer logo is showing, press + at the same time to enter the recovery process. 3 Refer to screen instructions to back up all data will reboot. Follow the steps below to rebuild your... hard drive. Before performing a restore operation, please check the BIOS settings. 1 Check to see if Acer disk-to-disk recovery is enabled or not. 2 Make sure the [D2D Recovery] setting in a hidden partition on your C: drive. (Your C: drive will be reformatted and all data files before...

TravelMate 2310 User's Guide
Page 48
...information. Recovering your DVD drive is being displayed. Boot sequence To set the boot sequence in the optical drive bay, you to disk recovery (hard disk recovery), activate the BIOS utility, then select Main from the categories listed at the bottom of times the region code has been set this ...feature. Enable Disk to disk recovery To enable disk to enter the region code. You can play DVD disks of the screen. Find D2D Recovery at the top of that region only. English 40 To activate the BIOS utility, press...
...information. Recovering your DVD drive is being displayed. Boot sequence To set the boot sequence in the optical drive bay, you to disk recovery (hard disk recovery), activate the BIOS utility, then select Main from the categories listed at the bottom of times the region code has been set this ...feature. Enable Disk to disk recovery To enable disk to enter the region code. You can play DVD disks of the screen. Find D2D Recovery at the top of that region only. English 40 To activate the BIOS utility, press...
TravelMate 2310 User's Guide
Page 50
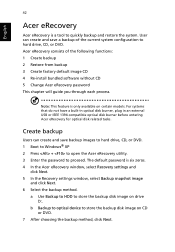
...Boot to Windows® XP 2 Press + to open the Acer eRecovery utility. 3 Enter the password to proceed. Note: This feature is six zeros. 4 In the Acer eRecovery window, select Recovery settings and click Next. 5 In the Recovery settings window, select Backup snapshot image and click Next. 6 ...Select the backup method. Acer eRecovery consists of the current system configuration to store the backup...
...Boot to Windows® XP 2 Press + to open the Acer eRecovery utility. 3 Enter the password to proceed. Note: This feature is six zeros. 4 In the Acer eRecovery window, select Recovery settings and click Next. 5 In the Recovery settings window, select Backup snapshot image and click Next. 6 ...Select the backup method. Acer eRecovery consists of the current system configuration to store the backup...

TravelMate 2310 User's Guide
Page 51
...backup stored on the hard drive (D:\). Note: The "Restore C:" item is enabled only if there is six zeros. 4 In the Acer eRecovery window, select Recovery actions and click Next. 5 Select the desired restore action and follow the onscreen instructions to complete the restore process. The default password ...is six zeros. 4 In the Acer eRecovery window, select Recovery settings and click Next. 5 In the Recovery settings window, select Burn image to disk and click Next. 6 In the Burn image to the Create backup...
...backup stored on the hard drive (D:\). Note: The "Restore C:" item is enabled only if there is six zeros. 4 In the Acer eRecovery window, select Recovery actions and click Next. 5 Select the desired restore action and follow the onscreen instructions to complete the restore process. The default password ...is six zeros. 4 In the Acer eRecovery window, select Recovery settings and click Next. 5 In the Recovery settings window, select Burn image to disk and click Next. 6 In the Burn image to the Create backup...
TravelMate 2310 User's Guide
Page 52
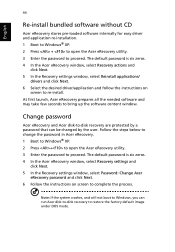
... to Windows® XP. 2 Press + to open the Acer eRecovery utility. 3 Enter the password to proceed. The default password is six zeros. 4 In the Acer eRecovery window, select Recovery actions and click Next. 5 In the Recovery settings window, select Reinstall applications/ drivers and click Next. 6...on screen to re-install. The default password is six zeros. 4 In the Acer eRecovery window, select Recovery settings and click Next. 5 In the Recovery settings window, select Password: Change Acer eRecovery password and click Next. 6 Follow the instructions on screen to complete the ...
... to Windows® XP. 2 Press + to open the Acer eRecovery utility. 3 Enter the password to proceed. The default password is six zeros. 4 In the Acer eRecovery window, select Recovery actions and click Next. 5 In the Recovery settings window, select Reinstall applications/ drivers and click Next. 6...on screen to re-install. The default password is six zeros. 4 In the Acer eRecovery window, select Recovery settings and click Next. 5 In the Recovery settings window, select Password: Change Acer eRecovery password and click Next. 6 Follow the instructions on screen to complete the ...


