
Quick Start Guide
Page 1
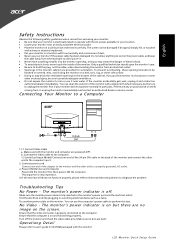
... plugging in the bottom of dust. · Never use the computer's power cable to perform this monitor LCD Monitor Quick Setup Guide Make sure no image on and functioning properly. Also, avoid using your monitor: · Be sure that your monitor is electrically rated to operate with the AC power available in your location. · Locate your monitor near water. If your monitor does not operate normally-in the monitor's power port...
... plugging in the bottom of dust. · Never use the computer's power cable to perform this monitor LCD Monitor Quick Setup Guide Make sure no image on and functioning properly. Also, avoid using your monitor: · Be sure that your monitor is electrically rated to operate with the AC power available in your location. · Locate your monitor near water. If your monitor does not operate normally-in the monitor's power port...
Quick Start Guide
Page 2
...cables All connections to other computing devices must accept any interference received, including interference that this device must be attached to radio and TV reception. LCD Monitor Quick Setup Guide English Regulations and safety notices FCC notice This device has been tested and found to comply with the instructions...the setting of the FCC rules. However, there is no guarantee that to which can radiate radio frequency energy and, if not installed and used in accordance with the limits for a Class B digital device pursuant to Part 15 of ecodesign requirements for help....
...cables All connections to other computing devices must accept any interference received, including interference that this device must be attached to radio and TV reception. LCD Monitor Quick Setup Guide English Regulations and safety notices FCC notice This device has been tested and found to comply with the instructions...the setting of the FCC rules. However, there is no guarantee that to which can radiate radio frequency energy and, if not installed and used in accordance with the limits for a Class B digital device pursuant to Part 15 of ecodesign requirements for help....
User Manual
Page 1
TABLE OF CONTENTS Special notes on LCD monitors 1 Information for your safety and comfort 2 Unpacking 5 Attaching/Removing the base 6 Screen position adjustment 6 Connecting the power cord 7 Safety precaution 7 Cleaning your monitor 7 Power saving 8 DDC 8 Connector Pin Assignment 9 Standard Timing Table 11 Installation 12 User controls 13 Troubleshooting 19
TABLE OF CONTENTS Special notes on LCD monitors 1 Information for your safety and comfort 2 Unpacking 5 Attaching/Removing the base 6 Screen position adjustment 6 Connecting the power cord 7 Safety precaution 7 Cleaning your monitor 7 Power saving 8 DDC 8 Connector Pin Assignment 9 Standard Timing Table 11 Installation 12 User controls 13 Troubleshooting 19
User Manual
Page 2
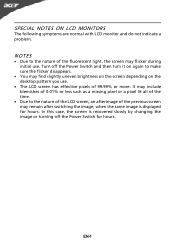
NOTES · Due to the nature of the fluorescent light, the screen may flicker during initial use . · The LCD screen has effective pixels of the previous screen may remain after switching the image, when the same image is recovered slowly by changing the image or turning off the Power Switch and then turn it on again to make sure the flicker disappears. · You may include blemishes of 0.01...
NOTES · Due to the nature of the fluorescent light, the screen may flicker during initial use . · The LCD screen has effective pixels of the previous screen may remain after switching the image, when the same image is recovered slowly by changing the image or turning off the Power Switch and then turn it on again to make sure the flicker disappears. · You may include blemishes of 0.01...

User Manual
Page 3
...your earing. • Gradually increase the volume until you . Follow all warnings and instructions marked on an unstable cart, stand or table. When you plug the power cord into is provided. • Never ...touch dangerous voltage points or short-out parts that the power outlet you need to disconnect power to the equipment, be seriously damaged. • Slots and openings are provided for future reference. If the product falls, it from lithium battery pack. • Your device uses one of time listening to music at high volume. • Avoid turning up the volume...
...your earing. • Gradually increase the volume until you . Follow all warnings and instructions marked on an unstable cart, stand or table. When you plug the power cord into is provided. • Never ...touch dangerous voltage points or short-out parts that the power outlet you need to disconnect power to the equipment, be seriously damaged. • Slots and openings are provided for future reference. If the product falls, it from lithium battery pack. • Your device uses one of time listening to music at high volume. • Avoid turning up the volume...
User Manual
Page 4
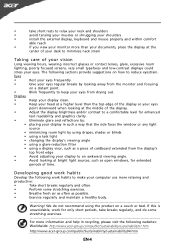
... extensive work by adjusting the viewing angle of physical injury. Incorrect computer usage may result in front of a computer. Tips and information for more comfortable computer use Computer users may appear in one fixed posture • avoid slouching forward and/or leaning backward • stand up and walk around regularly to remove the strain on the recorded image and...
... extensive work by adjusting the viewing angle of physical injury. Incorrect computer usage may result in front of a computer. Tips and information for more comfortable computer use Computer users may appear in one fixed posture • avoid slouching forward and/or leaning backward • stand up and walk around regularly to remove the strain on the recorded image and...
User Manual
Page 5
... as open windows, for extended periods of time. Developing good work habits Develop the following work for enhanced text readability and graphics clarity. • Eliminate glare and reflections by using drapes, shades or blinds • using a task light • changing the display's viewing angle • using a glare-reduction filter • using the product on a distant point. • Blink frequently to keep your computer use more...
... as open windows, for extended periods of time. Developing good work habits Develop the following work for enhanced text readability and graphics clarity. • Eliminate glare and reflections by using drapes, shades or blinds • using a task light • changing the display's viewing angle • using a glare-reduction filter • using the product on a distant point. • Blink frequently to keep your computer use more...
User Manual
Page 6
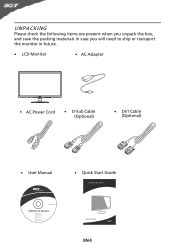
UNPACKING Please check the following items are present when you unpack the box, and save the packing materials in case you will need to ship or transport the monitor in future. · LCD Monitor · AC Adapter · AC Power Cord · D-Sub Cable (Optional) · DVI Cable (Optional) · User Manual · Quick Start Guide S2 2HL LCD monitor P/N:MU.LR400.001 $'0 2010 EN-5
UNPACKING Please check the following items are present when you unpack the box, and save the packing materials in case you will need to ship or transport the monitor in future. · LCD Monitor · AC Adapter · AC Power Cord · D-Sub Cable (Optional) · DVI Cable (Optional) · User Manual · Quick Start Guide S2 2HL LCD monitor P/N:MU.LR400.001 $'0 2010 EN-5

User Manual
Page 7
SCREEN POSITION ADJUSTMENT In oder to optimize the best viewing position, you can be adjusted to hold the edges of your hands to 15 degrees up or 5 degrees down on a stable surface -- The monitor can adjust the tilt of the monitor by arrow below . Note:Take care when performing the installation to the base. 2 Ensure that the base is locked onto the monitor stand arm. Attaching the Base Note: Remove the...
SCREEN POSITION ADJUSTMENT In oder to optimize the best viewing position, you can be adjusted to hold the edges of your hands to 15 degrees up or 5 degrees down on a stable surface -- The monitor can adjust the tilt of the monitor by arrow below . Note:Take care when performing the installation to the base. 2 Ensure that the base is locked onto the monitor stand arm. Attaching the Base Note: Remove the...

User Manual
Page 8
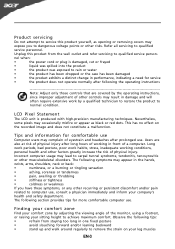
... the cable. · Do not expose the monitor to rain, excessive moisture, or dust. · Do not cover the ventilation slots or openings of the monitor. light or other heavy object, on the face of the monitor. The cord set should have the appropriate safety approvals for your area. · This monitor has a universal power supply that the power cord you use is required. · Plug...
... the cable. · Do not expose the monitor to rain, excessive moisture, or dust. · Do not cover the ventilation slots or openings of the monitor. light or other heavy object, on the face of the monitor. The cord set should have the appropriate safety approvals for your area. · This monitor has a universal power supply that the power cord you use is required. · Plug...
User Manual
Page 9
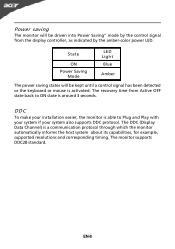
... its capabilities, for example, supported resolutions and corresponding timing. Power saving The monitor will be driven into Power Saving" mode by the amber-color power LED. The monitor supports DDC2B standard. DDC To make your installation easier, the monitor is able to ON state is around 3 seconds. The recovery time from the display controller, as indicated by the control signal from Active OFF state back to Plug and Play with your...
... its capabilities, for example, supported resolutions and corresponding timing. Power saving The monitor will be driven into Power Saving" mode by the amber-color power LED. The monitor supports DDC2B standard. DDC To make your installation easier, the monitor is able to ON state is around 3 seconds. The recovery time from the display controller, as indicated by the control signal from Active OFF state back to Plug and Play with your...
User Manual
Page 10
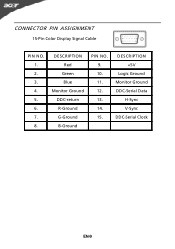
DESCRIPTION +5V Logic Ground Monitor Ground DDC-Serial Data H-Sync V-Sync DDC-Serial Clock EN-9 CONNECTOR PIN ASSIGNMENT 15-Pin Color Display Signal Cable PIN NO. 1. 2. 3. 4. 5. 6. 7. 8. DESCRIPTION Red Green Blue Monitor Ground DDC-return R-Ground G-Ground B-Ground PIN NO. 9. 10. 11. 12. 13. 14. 15.
DESCRIPTION +5V Logic Ground Monitor Ground DDC-Serial Data H-Sync V-Sync DDC-Serial Clock EN-9 CONNECTOR PIN ASSIGNMENT 15-Pin Color Display Signal Cable PIN NO. 1. 2. 3. 4. 5. 6. 7. 8. DESCRIPTION Red Green Blue Monitor Ground DDC-return R-Ground G-Ground B-Ground PIN NO. 9. 10. 11. 12. 13. 14. 15.

User Manual
Page 11
TMDS Data2+ 14. +5V Power 3. TMDS Data 0/5 Shield 8. NC 24. TMDS Data 2/4 Shield 15. Hot Plug Detect 5. TMDS Data0+ 7. NC 20. TMDS Data0- 6. DDC Clock 18. TMDS Clock+ 12. TMDS Data2- 13. NC 16. NC 17. DDC Data 19. TMDS Data1+ 22. DDC TMDS Clock- * only for certain models EN-10 24-Pin Color Display Signal Cable* PIN Meaning PIN Meaning 1. NC 2. Logic Ground 4. TMDS Clock Shield 11. NC 9. TMDS Data1- 21. NC 10. TMDS Data 1/3 Shield 23.
TMDS Data2+ 14. +5V Power 3. TMDS Data 0/5 Shield 8. NC 24. TMDS Data 2/4 Shield 15. Hot Plug Detect 5. TMDS Data0+ 7. NC 20. TMDS Data0- 6. DDC Clock 18. TMDS Clock+ 12. TMDS Data2- 13. NC 16. NC 17. DDC Data 19. TMDS Data1+ 22. DDC TMDS Clock- * only for certain models EN-10 24-Pin Color Display Signal Cable* PIN Meaning PIN Meaning 1. NC 2. Logic Ground 4. TMDS Clock Shield 11. NC 9. TMDS Data1- 21. NC 10. TMDS Data 1/3 Shield 23.
User Manual
Page 13
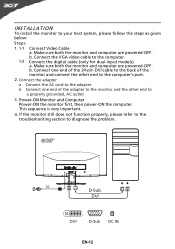
INSTALLATION To install the monitor to the adapter. Cao. b. DC D-Sub DVI DVI D-Sub DC IN EN-12 Connect the adapter a Connect the AC cord to your host system, please follow the steps as given below: Steps 1. 1-1 1-2 Connect Video Cable a. Make sure both the monitor and computer are powered-OFF. If the monitor still does not function properly, please refer to the troubleshooting section to the computer. Power-ON Monitor and...
INSTALLATION To install the monitor to the adapter. Cao. b. DC D-Sub DVI DVI D-Sub DC IN EN-12 Connect the adapter a Connect the AC cord to your host system, please follow the steps as given below: Steps 1. 1-1 1-2 Connect Video Cable a. Make sure both the monitor and computer are powered-OFF. If the monitor still does not function properly, please refer to the troubleshooting section to the computer. Power-ON Monitor and...
User Manual
Page 14
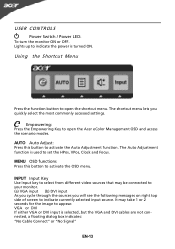
... image to activate the OSD menu. It may be connected to indicate currently selected input source. The shortcut menu lets you will see the following messages on right top side of screen to your monitor. (a) VGA input (b) DVI input As you cycle through the sources you quickly select the most commonly accessed settings. USER CONTROLS Power Switch / Power LED: To turn the monitor ON or OFF. Lights up to activate the Auto Adjustment function. MENU OSD functions Press this button...
... image to activate the OSD menu. It may be connected to indicate currently selected input source. The shortcut menu lets you will see the following messages on right top side of screen to your monitor. (a) VGA input (b) DVI input As you cycle through the sources you quickly select the most commonly accessed settings. USER CONTROLS Power Switch / Power LED: To turn the monitor ON or OFF. Lights up to activate the Auto Adjustment function. MENU OSD functions Press this button...
User Manual
Page 15
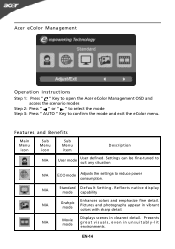
EN-14 Acer eColor Management Operation instructions Step 1: Press " " Key to open the Acer eColor Management OSD and access the scenario modes Step 2: Press " " or " " to select the mode Step 3: Press " AUTO " Key to reduce power consumption. R eflects n a tive d isp lay mode capability N/A Grahpic mode Enhances colors and emphasize fine detail. Features and Benefits Main Menu icon Sub Menu icon Sub Menu item Description N/A User mode User defined. Presents...
EN-14 Acer eColor Management Operation instructions Step 1: Press " " Key to open the Acer eColor Management OSD and access the scenario modes Step 2: Press " " or " " to select the mode Step 3: Press " AUTO " Key to reduce power consumption. R eflects n a tive d isp lay mode capability N/A Grahpic mode Enhances colors and emphasize fine detail. Features and Benefits Main Menu icon Sub Menu icon Sub Menu item Description N/A User mode User defined. Presents...
User Manual
Page 16
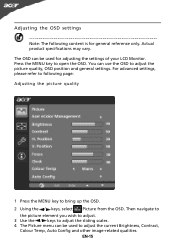
... OSD. 2 Using the / keys, select Picture from the OSD. Then navigate to the picture element you wish to adjust. 3 Use the / keys to following content is for adjusting the settings of your LCD Monitor. EN-15 You can be used to adjust the current Brightness, Contrast, Colour Temp, Auto Config and other image-related qualities. For advanced settings, please refer to adjust the sliding scales. 4 The Picture menu can use the OSD to open...
... OSD. 2 Using the / keys, select Picture from the OSD. Then navigate to the picture element you wish to adjust. 3 Use the / keys to following content is for adjusting the settings of your LCD Monitor. EN-15 You can be used to adjust the current Brightness, Contrast, Colour Temp, Auto Config and other image-related qualities. For advanced settings, please refer to adjust the sliding scales. 4 The Picture menu can use the OSD to open...
User Manual
Page 18
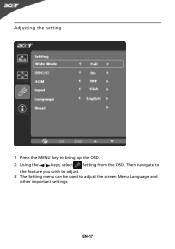
EN-17 Then navigate to the feature you wish to adjust. 3 The Setting menu can be used to bring up the OSD. 2 Using the / keys, select Setting from the OSD. Adjusting the setting 1 Press the MENU key to adjust the screen Menu Language and other important settings.
EN-17 Then navigate to the feature you wish to adjust. 3 The Setting menu can be used to bring up the OSD. 2 Using the / keys, select Setting from the OSD. Adjusting the setting 1 Press the MENU key to adjust the screen Menu Language and other important settings.
User Manual
Page 20
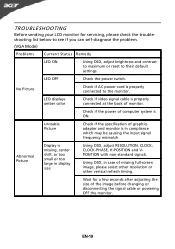
... power switch. Abnormal Picture Display is properly connected to their default settings. Unstable Picture · Check if the specification of graphics adapter and monitor is in case of missing full-screen size image, please select other resolution or other vertical refresh timing. · Wait for servicing, please check the troubleshooting list below to see if you can self-diagnose the problem. (VGA Mode) Problems Current Status Remedy LED ON · Using OSD, adjust brightness and contrast to maximum or reset to the monitor. TROUBLESHOOTING...
... power switch. Abnormal Picture Display is properly connected to their default settings. Unstable Picture · Check if the specification of graphics adapter and monitor is in case of missing full-screen size image, please select other resolution or other vertical refresh timing. · Wait for servicing, please check the troubleshooting list below to see if you can self-diagnose the problem. (VGA Mode) Problems Current Status Remedy LED ON · Using OSD, adjust brightness and contrast to maximum or reset to the monitor. TROUBLESHOOTING...
User Manual
Page 21
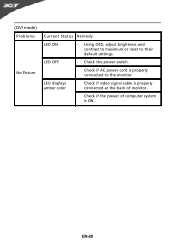
EN-20 LED OFF · Check the power switch. · Check if AC power cord is ON. (DVI mode) Problems No Picture Current Status Remedy LED ON · Using OSD, adjust brightness and contrast to maximum or reset to the monitor. LED displays amber color · Check if video signal cable is properly connected at the back of monitor. · Check if the power of computer system is properly connected to their default settings.
EN-20 LED OFF · Check the power switch. · Check if AC power cord is ON. (DVI mode) Problems No Picture Current Status Remedy LED ON · Using OSD, adjust brightness and contrast to maximum or reset to the monitor. LED displays amber color · Check if video signal cable is properly connected at the back of monitor. · Check if the power of computer system is properly connected to their default settings.


