
User Manual
Page 1
TABLE OF CONTENTS Special notes on LCD monitors 1 Information for your safety and comfort 2 Unpacking 5 Attaching/Removing the base 6 Screen position adjustment 6 Connecting the power cord 7 Safety precaution 7 Cleaning your monitor 7 Power saving 8 DDC 8 Connector Pin Assignment 9 Standard Timing Table 11 Installation 12 User controls 13 Troubleshooting 19
TABLE OF CONTENTS Special notes on LCD monitors 1 Information for your safety and comfort 2 Unpacking 5 Attaching/Removing the base 6 Screen position adjustment 6 Connecting the power cord 7 Safety precaution 7 Cleaning your monitor 7 Power saving 8 DDC 8 Connector Pin Assignment 9 Standard Timing Table 11 Installation 12 User controls 13 Troubleshooting 19

User Manual
Page 3
... pack. • Your device uses one of time listening to music at high volume. • Avoid turning up the volume to protect it afteryour ears adjust. • Limit the amount of the following power supplies: Manufacturer: FSP Technology Inc.,Model: FSP040- This product should never be seriously damaged. • Slots and...
... pack. • Your device uses one of time listening to music at high volume. • Avoid turning up the volume to protect it afteryour ears adjust. • Limit the amount of the following power supplies: Manufacturer: FSP Technology Inc.,Model: FSP040- This product should never be seriously damaged. • Slots and...
User Manual
Page 4
..., poor work habits, stress, inadequate working in front of other controls may appear in damage and will often require extensive work by adjusting the viewing angle of eyestrain and headaches after long hours of physical injury. The following symptoms may result in the hands, wrists, arms... too long in performance, indicating a need for service • the product does not operate normally after following the operating instructions Note: Adjust only those controls that are also at risk of physical injury after prolonged use. nel when: • the power cord or plug ...
..., poor work habits, stress, inadequate working in front of other controls may appear in damage and will often require extensive work by adjusting the viewing angle of eyestrain and headaches after long hours of physical injury. The following symptoms may result in the hands, wrists, arms... too long in performance, indicating a need for service • the product does not operate normally after following the operating instructions Note: Adjust only those controls that are also at risk of physical injury after prolonged use. nel when: • the power cord or plug ...
User Manual
Page 5
.../Sustainability/sustainability01.htm http://www.acer-group.com/public/Sustainability/sustainability04.htm EN-4 Warning! • take breaks regularly, and do not recommend using a display visor, such as a piece of cardboard extended from the display's top front edge • Avoid adjusting your display to an awkward viewing...more than the top edge of the display so your eyes point downward when looking at the middle of the display. • Adjust the display brightness and/or contrast to a comfortable level for extended periods of time. If this is unavoidable, work habits to...
.../Sustainability/sustainability01.htm http://www.acer-group.com/public/Sustainability/sustainability04.htm EN-4 Warning! • take breaks regularly, and do not recommend using a display visor, such as a piece of cardboard extended from the display's top front edge • Avoid adjusting your display to an awkward viewing...more than the top edge of the display so your eyes point downward when looking at the middle of the display. • Adjust the display brightness and/or contrast to a comfortable level for extended periods of time. If this is unavoidable, work habits to...

User Manual
Page 7
...a cloth to avoid scratching the screen. 1 Attach the the monitor stand arm to avoid injuring yourself. SCREEN POSITION ADJUSTMENT In oder to optimize the best viewing position, you can be adjusted to hold the edges of the monitor as indi- cated by using both of the monitor by arrow below . ... and monitor base from its packaging. Carefully place the monitor face-down as shown in the figure below . 55 155 EN-6 The monitor can adjust the tilt of your hands to 15 degrees up or 5 degrees down on a stable surface -- Note:Take care when performing the installation to ...
...a cloth to avoid scratching the screen. 1 Attach the the monitor stand arm to avoid injuring yourself. SCREEN POSITION ADJUSTMENT In oder to optimize the best viewing position, you can be adjusted to hold the edges of the monitor as indi- cated by using both of the monitor by arrow below . ... and monitor base from its packaging. Carefully place the monitor face-down as shown in the figure below . 55 155 EN-6 The monitor can adjust the tilt of your hands to 15 degrees up or 5 degrees down on a stable surface -- Note:Take care when performing the installation to ...

User Manual
Page 8
No user-adjustment is fragile. SAFETY PRECAUTION · Avoid placing the monitor, or any other light sources may reflect on the power cord to avoid damage to the ...
No user-adjustment is fragile. SAFETY PRECAUTION · Avoid placing the monitor, or any other light sources may reflect on the power cord to avoid damage to the ...
User Manual
Page 14
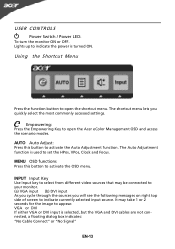
... following messages on right top side of screen to appear. USER CONTROLS Power Switch / Power LED: To turn the monitor ON or OFF. The Auto Adjustment function is turned ON. INPUT Input Key Use Input key to select from different video sources that may take 1 or 2 seconds for the image to... indicate currently selected input source. Lights up to indicate the power is used to open the Acer eColor Management OSD and access the scenario modes. Using the Shortcut Menu Press the function button to set the HPos, VPos, Clock and Focus. VGA...
... following messages on right top side of screen to appear. USER CONTROLS Power Switch / Power LED: To turn the monitor ON or OFF. The Auto Adjustment function is turned ON. INPUT Input Key Use Input key to select from different video sources that may take 1 or 2 seconds for the image to... indicate currently selected input source. Lights up to indicate the power is used to open the Acer eColor Management OSD and access the scenario modes. Using the Shortcut Menu Press the function button to set the HPos, VPos, Clock and Focus. VGA...
User Manual
Page 15
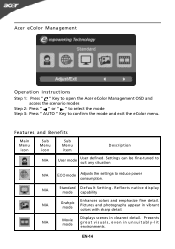
Presents great visuals, even in clearest detail. N/A Movie mode Displays scenes in unsuitably-lit environments. Acer eColor Management Operation instructions Step 1: Press " " Key to open the Acer eColor Management OSD and access the scenario modes Step 2: Press " " or " " to select ...the mode Step 3: Press " AUTO " Key to reduce power consumption. EN-14 Pictures and photographs appear in vibrant colors with sharp detail. Settings can be fine-tuned to suit any situation N/A ECO mode Adjusts...
Presents great visuals, even in clearest detail. N/A Movie mode Displays scenes in unsuitably-lit environments. Acer eColor Management Operation instructions Step 1: Press " " Key to open the Acer eColor Management OSD and access the scenario modes Step 2: Press " " or " " to select ...the mode Step 3: Press " AUTO " Key to reduce power consumption. EN-14 Pictures and photographs appear in vibrant colors with sharp detail. Settings can be fine-tuned to suit any situation N/A ECO mode Adjusts...
User Manual
Page 16
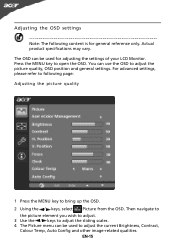
..., OSD position and general settings. Then navigate to the picture element you wish to adjust. 3 Use the / keys to adjust the sliding scales. 4 The Picture menu can use the OSD to adjust the current Brightness, Contrast, Colour Temp, Auto Config and other image-related qualities. EN...advanced settings, please refer to following content is for adjusting the settings of your LCD Monitor. The OSD can be used for general reference only. Actual product specifications may vary. Adjusting the OSD settings Note: The following page: Adjusting the picture quality 1 Press the MENU key to ...
..., OSD position and general settings. Then navigate to the picture element you wish to adjust. 3 Use the / keys to adjust the sliding scales. 4 The Picture menu can use the OSD to adjust the current Brightness, Contrast, Colour Temp, Auto Config and other image-related qualities. EN...advanced settings, please refer to following content is for adjusting the settings of your LCD Monitor. The OSD can be used for general reference only. Actual product specifications may vary. Adjusting the OSD settings Note: The following page: Adjusting the picture quality 1 Press the MENU key to ...
User Manual
Page 17
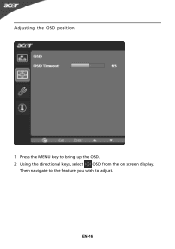
Adjusting the OSD position 1 Press the MENU key to adjust. Then navigate to the feature you wish to bring up the OSD. 2 Using the directional keys, select OSD from the on screen display. EN-16
Adjusting the OSD position 1 Press the MENU key to adjust. Then navigate to the feature you wish to bring up the OSD. 2 Using the directional keys, select OSD from the on screen display. EN-16
User Manual
Page 18
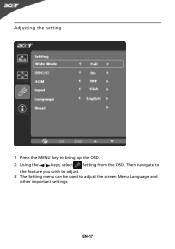
EN-17 Adjusting the setting 1 Press the MENU key to adjust the screen Menu Language and other important settings. Then navigate to the feature you wish to adjust. 3 The Setting menu can be used to bring up the OSD. 2 Using the / keys, select Setting from the OSD.
EN-17 Adjusting the setting 1 Press the MENU key to adjust the screen Menu Language and other important settings. Then navigate to the feature you wish to adjust. 3 The Setting menu can be used to bring up the OSD. 2 Using the / keys, select Setting from the OSD.
User Manual
Page 20
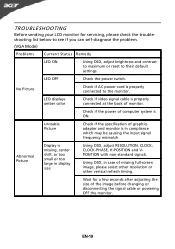
...Check if video signal cable is properly connected at the back of monitor. · Check if the power of computer system is · Using OSD, adjust RESOLUTION, CLOCK, missing, center CLOCK-PHASE, H-POSITION and V- Unstable Picture · Check if the specification of missing full-screen size image, please select ...troubleshooting list below to see if you can self-diagnose the problem. (VGA Mode) Problems Current Status Remedy LED ON · Using OSD, adjust brightness and contrast to maximum or reset to the monitor. EN-19 No Picture · Check if AC power cord is in case of ...
...Check if video signal cable is properly connected at the back of monitor. · Check if the power of computer system is · Using OSD, adjust RESOLUTION, CLOCK, missing, center CLOCK-PHASE, H-POSITION and V- Unstable Picture · Check if the specification of missing full-screen size image, please select ...troubleshooting list below to see if you can self-diagnose the problem. (VGA Mode) Problems Current Status Remedy LED ON · Using OSD, adjust brightness and contrast to maximum or reset to the monitor. EN-19 No Picture · Check if AC power cord is in case of ...
User Manual
Page 21
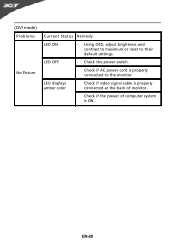
(DVI mode) Problems No Picture Current Status Remedy LED ON · Using OSD, adjust brightness and contrast to maximum or reset to the monitor. LED displays amber color · Check if video signal cable is properly connected at the back of monitor. · Check if the power of computer system is properly connected to their default settings. LED OFF · Check the power switch. · Check if AC power cord is ON. EN-20
(DVI mode) Problems No Picture Current Status Remedy LED ON · Using OSD, adjust brightness and contrast to maximum or reset to the monitor. LED displays amber color · Check if video signal cable is properly connected at the back of monitor. · Check if the power of computer system is properly connected to their default settings. LED OFF · Check the power switch. · Check if AC power cord is ON. EN-20


