
Quick Start Guide
Page 1
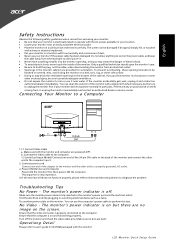
... that the computer is fully inserted in a working electrical device such as a lamp. If your monitor does not operate normally-in the bottom of the adapter to a properly grounded, AC outlet. 3. Test the electrical oulet by plugging in the monitor's power port and the electrical outlet. Make sure the monitor power...
... that the computer is fully inserted in a working electrical device such as a lamp. If your monitor does not operate normally-in the bottom of the adapter to a properly grounded, AC outlet. 3. Test the electrical oulet by plugging in the monitor's power port and the electrical outlet. Make sure the monitor power...
User Manual
Page 6
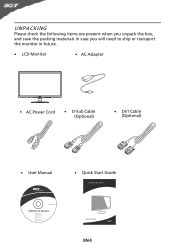
UNPACKING Please check the following items are present when you unpack the box, and save the packing materials in case you will need to ship or transport the monitor in future. · LCD Monitor · AC Adapter · AC Power Cord · D-Sub Cable (Optional) · DVI Cable (Optional) · User Manual · Quick Start Guide S2 2HL LCD monitor P/N:MU.LR400.001 $'0 2010 EN-5
UNPACKING Please check the following items are present when you unpack the box, and save the packing materials in case you will need to ship or transport the monitor in future. · LCD Monitor · AC Adapter · AC Power Cord · D-Sub Cable (Optional) · DVI Cable (Optional) · User Manual · Quick Start Guide S2 2HL LCD monitor P/N:MU.LR400.001 $'0 2010 EN-5
User Manual
Page 13
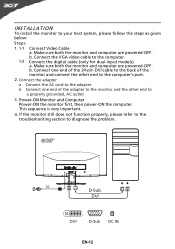
Cao. b Connect one end of the 24-pin DVI cable to the back of the adapter to the monitor and the other end to a properly grounded, AC outlet . 3. b. INSTALLATION To install the monitor to the computer. ...given below: Steps 1. 1-1 1-2 Connect Video Cable a. This sequence is very important. 4. Mnnaekcet stuhreedbiogtithatlhceabmleo(noitnolyr afonrddcuoaml-pinupteurt amreodpeolws).ered-OFF. Connect the adapter a Connect the AC cord to diagnose the problem. Make sure both the monitor and computer are powered-OFF. b. If the monitor still does not function...
Cao. b Connect one end of the 24-pin DVI cable to the back of the adapter to the monitor and the other end to a properly grounded, AC outlet . 3. b. INSTALLATION To install the monitor to the computer. ...given below: Steps 1. 1-1 1-2 Connect Video Cable a. This sequence is very important. 4. Mnnaekcet stuhreedbiogtithatlhceabmleo(noitnolyr afonrddcuoaml-pinupteurt amreodpeolws).ered-OFF. Connect the adapter a Connect the AC cord to diagnose the problem. Make sure both the monitor and computer are powered-OFF. b. If the monitor still does not function...
User Manual
Page 20
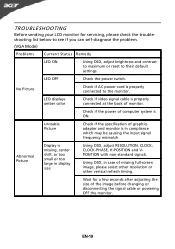
... LED ON · Using OSD, adjust brightness and contrast to maximum or reset to the monitor. Unstable Picture · Check if the specification of graphics adapter and monitor is · Using OSD, adjust RESOLUTION, CLOCK, missing, center CLOCK-PHASE, H-POSITION and V- TROUBLESHOOTING Before sending your LCD monitor for a few seconds after...
... LED ON · Using OSD, adjust brightness and contrast to maximum or reset to the monitor. Unstable Picture · Check if the specification of graphics adapter and monitor is · Using OSD, adjust RESOLUTION, CLOCK, missing, center CLOCK-PHASE, H-POSITION and V- TROUBLESHOOTING Before sending your LCD monitor for a few seconds after...

