
User Manual
Page 4
...and without distortion. • After setting the volume level, do not place the product on the marking label. If you plug the power cord into the product. • To avoid damage of internal components and to the equipment operator as close to prevent battery leakage, do not... Warnings • Do not use it could result in a fire or electric shock. Model:HP-A0301R3 (S200HL Model) Manufacture : Delta Electronics Inc., Model: ADP-30MH B (S200HL Model) Using electrical power • This product should never be blocked by placing the product on an unstable cart, stand or table...
...and without distortion. • After setting the volume level, do not place the product on the marking label. If you plug the power cord into the product. • To avoid damage of internal components and to the equipment operator as close to prevent battery leakage, do not... Warnings • Do not use it could result in a fire or electric shock. Model:HP-A0301R3 (S200HL Model) Manufacture : Delta Electronics Inc., Model: ADP-30MH B (S200HL Model) Using electrical power • This product should never be blocked by placing the product on an unstable cart, stand or table...
User Manual
Page 5
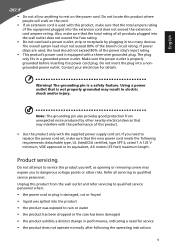
...product from unexpected noise produced by plugging in performance, indicating a need to replace the power cord set, make sure that the total rating of this product, make sure that the new power cord meets the following the operating instructions v English • Do not allow anything to...this product yourself, as opening or removing covers may result in a grounded power outlet. Make sure the power outlet is a safety feature. The grounding pin is properly grounded before inserting the power cord plug. Note: The grounding pin also provides good protection from the wall outlet...
...product from unexpected noise produced by plugging in performance, indicating a need to replace the power cord set, make sure that the total rating of this product, make sure that the new power cord meets the following the operating instructions v English • Do not allow anything to...this product yourself, as opening or removing covers may result in a grounded power outlet. Make sure the power outlet is a safety feature. The grounding pin is properly grounded before inserting the power cord plug. Note: The grounding pin also provides good protection from the wall outlet...
User Manual
Page 11
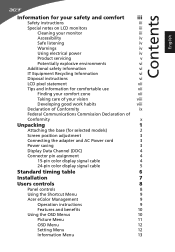
...Commission Declaration of Conformity x Unpacking 1 Attaching the base (for selected models) 2 Screen position adjustment 3 Connecting the adapter and AC Power cord 3 Power saving 3 Display Data Channel (DDC) 4 Connector pin assignment 4 15-pin color display signal cable 4 24-pin color display ...signal cable 5 Standard timing table 6 Installation 7 Users controls 8 Panel controls 8 Using the Shortcut Menu 9 Acer eColor Management 9 Operation instructions 9 Features and benefits 10 Using the OSD Menus 10 Picture Menu 11 OSD Menu 12 Setting...
...Commission Declaration of Conformity x Unpacking 1 Attaching the base (for selected models) 2 Screen position adjustment 3 Connecting the adapter and AC Power cord 3 Power saving 3 Display Data Channel (DDC) 4 Connector pin assignment 4 15-pin color display signal cable 4 24-pin color display ...signal cable 5 Standard timing table 6 Installation 7 Users controls 8 Panel controls 8 Using the Shortcut Menu 9 Acer eColor Management 9 Operation instructions 9 Features and benefits 10 Using the OSD Menus 10 Picture Menu 11 OSD Menu 12 Setting...

User Manual
Page 13
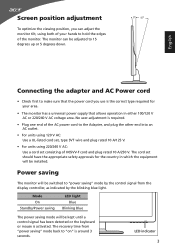
LCD monitor User guide Quick start guide D-sub cable DVI cable (Optional) AC Power cord AC Adapter 1 English Unpacking Please check that the following items are present when you unpack the box, and save the packing materials in case you need to ship or transport the monitor in the future.
LCD monitor User guide Quick start guide D-sub cable DVI cable (Optional) AC Power cord AC Adapter 1 English Unpacking Please check that the following items are present when you unpack the box, and save the packing materials in case you need to ship or transport the monitor in the future.
User Manual
Page 15
...To optimize the viewing position, you can be adjusted to 15 degrees up or 5 degrees down. 5 15 English Connecting the adapter and AC Power cord • Check first to make sure that allows operation in which the equipment will be installed. The monitor can adjust the monitor tilt, using... for your hands to "on" is around 3 seconds. No user-adjustment is activated. The recovery time from "power saving" mode back to hold the edges of the AC power cord to "power saving" mode by the control signal from the display controller, as indicated by the blinking blue light. The...
...To optimize the viewing position, you can be adjusted to 15 degrees up or 5 degrees down. 5 15 English Connecting the adapter and AC Power cord • Check first to make sure that allows operation in which the equipment will be installed. The monitor can adjust the monitor tilt, using... for your hands to "on" is around 3 seconds. No user-adjustment is activated. The recovery time from "power saving" mode back to hold the edges of the AC power cord to "power saving" mode by the control signal from the display controller, as indicated by the blinking blue light. The...

User Manual
Page 19
... off . DVI D-SUB DC-IN DVI D-SUB DVI DC D-SUB DC-IN 7 Connect the DVI cable to the computer. 2 Connect the adapter a Connect the AC cord to diagnose the problem. c Connect the digital cable (1) Make sure both the monitor and computer are switched off . (2) DVI Cable (Optional, only Dual-Input Model... and computer Turn on your host system, please follow the steps below: Steps 1 Connect the video cable a Make sure both the monitor and computer are powered-OFF.
... off . DVI D-SUB DC-IN DVI D-SUB DVI DC D-SUB DC-IN 7 Connect the DVI cable to the computer. 2 Connect the adapter a Connect the AC cord to diagnose the problem. c Connect the digital cable (1) Make sure both the monitor and computer are switched off . (2) DVI Cable (Optional, only Dual-Input Model... and computer Turn on your host system, please follow the steps below: Steps 1 Connect the video cable a Make sure both the monitor and computer are powered-OFF.
User Manual
Page 26
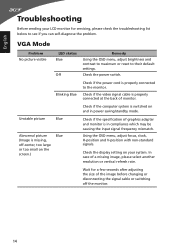
...-center, too large or too small on and in compliance which may be causing the input signal frequency mismatch. Check if the power cord is in power saving/standby mode. Using the OSD menu, adjust focus, clock, H-position and V-position with non-standard signals. Wait for servicing..., please check the troubleshooting list below to the monitor. Check if the specification of monitor. Check the power switch. VGA Mode Problem No picture visible LED status Blue Off Blinking Blue Unstable picture Blue Abnormal picture (Image is switched on ...
...-center, too large or too small on and in compliance which may be causing the input signal frequency mismatch. Check if the power cord is in power saving/standby mode. Using the OSD menu, adjust focus, clock, H-position and V-position with non-standard signals. Wait for servicing..., please check the troubleshooting list below to the monitor. Check if the specification of monitor. Check the power switch. VGA Mode Problem No picture visible LED status Blue Off Blinking Blue Unstable picture Blue Abnormal picture (Image is switched on ...
User Manual
Page 27
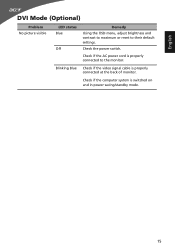
Check the power switch. Check if the AC power cord is properly connected to their default settings. English DVI Mode (Optional) Problem No picture visible LED status Blue Off Remedy Using the OSD menu, adjust brightness and contrast to maximum or reset to the monitor. Check if the computer system is properly connected at the back of monitor. Blinking Blue Check if the video signal cable is switched on and in power saving/standby mode. 15
Check the power switch. Check if the AC power cord is properly connected to their default settings. English DVI Mode (Optional) Problem No picture visible LED status Blue Off Remedy Using the OSD menu, adjust brightness and contrast to maximum or reset to the monitor. Check if the computer system is properly connected at the back of monitor. Blinking Blue Check if the video signal cable is switched on and in power saving/standby mode. 15


