User Manual
Page 11
...Federal Communications Commission Declaration of Conformity x Unpacking 1 Attaching the base (for selected models) 2 Screen position adjustment 3 Connecting the adapter and AC Power cord 3 Power saving 3 Display Data Channel (DDC) 4 Connector pin assignment 4 15-pin color display signal cable ...4 24-pin color display signal cable 5 Standard timing table 6 Installation 7 Users controls 8 Panel controls 8 Using the Shortcut Menu 9 Acer ...
...Federal Communications Commission Declaration of Conformity x Unpacking 1 Attaching the base (for selected models) 2 Screen position adjustment 3 Connecting the adapter and AC Power cord 3 Power saving 3 Display Data Channel (DDC) 4 Connector pin assignment 4 15-pin color display signal cable ...4 24-pin color display signal cable 5 Standard timing table 6 Installation 7 Users controls 8 Panel controls 8 Using the Shortcut Menu 9 Acer ...

User Manual
Page 13
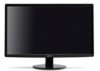
English Unpacking Please check that the following items are present when you unpack the box, and save the packing materials in case you need to ship or transport the monitor in the future. LCD monitor User guide Quick start guide D-sub cable DVI cable (Optional) AC Power cord AC Adapter 1
English Unpacking Please check that the following items are present when you unpack the box, and save the packing materials in case you need to ship or transport the monitor in the future. LCD monitor User guide Quick start guide D-sub cable DVI cable (Optional) AC Power cord AC Adapter 1
User Manual
Page 15
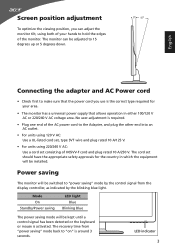
..." mode by the blinking blue light. No user-adjustment is required. • Plug one end of the AC power cord to the Adapter, and plug the other end into an AC outlet. • For units using 120 V AC: Use a UL-listed cord set, type SVT wire and plug rated 10 A/125 V. • For units... is activated. Screen position adjustment To optimize the viewing position, you can be adjusted to 15 degrees up or 5 degrees down. 5 15 English Connecting the adapter and AC Power cord • Check first to make sure that allows operation in which the equipment will be installed.
..." mode by the blinking blue light. No user-adjustment is required. • Plug one end of the AC power cord to the Adapter, and plug the other end into an AC outlet. • For units using 120 V AC: Use a UL-listed cord set, type SVT wire and plug rated 10 A/125 V. • For units... is activated. Screen position adjustment To optimize the viewing position, you can be adjusted to 15 degrees up or 5 degrees down. 5 15 English Connecting the adapter and AC Power cord • Check first to make sure that allows operation in which the equipment will be installed.

User Manual
Page 19
... DVI Cable (Optional, only Dual-Input Model) a. Connect the DVI cable to the computer. 2 Connect the adapter a Connect the AC cord to diagnose the problem. b Connect one end of the adapter to the monitor and the other end to the computer. This sequence is very important. 4 If the monitor does... refer to the troubleshooting section to the adapter. DVI D-SUB DC-IN DVI D-SUB DVI DC D-SUB DC-IN 7 English Installation To install the monitor on the monitor first, then the computer. b. b Connect the VGA video cable to a properly grounded, AC outlet. 3 Turn on the monitor and...
... DVI Cable (Optional, only Dual-Input Model) a. Connect the DVI cable to the computer. 2 Connect the adapter a Connect the AC cord to diagnose the problem. b Connect one end of the adapter to the monitor and the other end to the computer. This sequence is very important. 4 If the monitor does... refer to the troubleshooting section to the adapter. DVI D-SUB DC-IN DVI D-SUB DVI DC D-SUB DC-IN 7 English Installation To install the monitor on the monitor first, then the computer. b. b Connect the VGA video cable to a properly grounded, AC outlet. 3 Turn on the monitor and...


